この記事で取り扱うSW360のバージョンはとても古いです。以下を参照に最新のバージョンの導入をお勧めします。(2023年追記)
https://www.eclipse.org/sw360/docs/deployment/nativeinstall/
この記事はSW360のVersion 11以降のインストール方法を記載したものである.主にこのページを参照して書いている.
過去のバージョンについてはQiitaで別記事を書いているの以下を参考にしてほしい.
OSS管理ツール SW360 - オープンソースをオープンソースで管理しよう (1.1 新バージョンインストール編): 主にVersion 4 - 10
https://qiita.com/K-Hama/items/cd1c7f6e9e812bb8faf8
OSS管理ツール SW360 - オープンソースをオープンソースで管理しよう (1.インストール編): 主にVersion 3
https://qiita.com/K-Hama/items/90a6105a16400ce3e718
またこの記事では,Nativeインストールの他に,Vagrantを利用したインストール,Dockerを利用したインストールについても紹介する.
今回用いた実行環境はUbuntu18.04である.
なお、Version10系からのアップデート方法については公式のこのページに記載されたものを元にして後日別記事で紹介予定.
SW360 Native Install
まずは,コードからビルド/インストールする方法を紹介する.VagrantやDockerでのインストールは現在コミュニティにより作業中であり,しっかりと構築するのであればこの方法でインストールするのがおすすめである.
Native Install 事前準備
proxy環境下ではproxy設定を行っておく.
$ export http_proxy="http://proxy.example:port"
$ export https_proxy="http://proxy.example:port"
$ export no_proxy="localhost,127.0.0.1,noproxy_example"
$ sudo apt install -y git wget
$ git config --global http.proxy http://proxy.example:port
$ git config --global https.proxy http://proxy.example :port
このバージョンからJavaのバージョンが11へ変更される.
$ sudo apt install openjdk-11-jdk
$ sudo apt install openjdk-11-jre-headless
$ sudo update-alternatives --config java
$ export JAVA_OPTS='-Dhttp.proxyHost=example.proxy -Dhttp.proxyPort=8080 -Dhttps.proxyHost=example.proxy -Dhttps.proxyPort=8080'
・(参考):[Apache Maven のインストール] (https://linuxize.com/post/how-to-install-apache-maven-on-ubuntu-18-04/)とProxyの設定
$ sudo apt install maven
$ mkdir ~/.m2
$ vi ~/.m2/settings.xml
Maven Proxy設定
 <settings>
  <proxies>
    <proxy>
      <id>httpproxy</id>
      <active>true</active>
      <protocol>http</protocol>
      <host>proxy.example</host>
      <port>8080</port>
     <nonProxyHosts>localhost|127.0.0.1</nonProxyHosts>
  </proxy>
    <proxy>
      <id>httpsproxy</id>
      <active>true</active>
      <protocol>https</protocol>
      <host>proxy.example</host>
      <port>8080</port>
      <nonProxyHosts>localhost|127.0.0.1</nonProxyHosts>
    </proxy>
  </proxies>
 </settings>
Apache Thriftも0.13に変更されている.SW360以外にThriftを使う場合は適宜オプションを変更.
# Thrift
$ sudo apt-get update
$ sudo apt-get install -y build-essential
$ sudo apt-get install -y libboost-dev libboost-test-dev libboost-program-options-dev libevent-dev automake libtool flex bison pkg-config g++ libssl-dev
$  wget  https://dist.apache.org/repos/dist/release/thrift/0.13.0/thrift-0.13.0.tar.gz
$  tar -xzf thrift-0.13.0.tar.gz -C /tmp/
$  cd /tmp/thrift-0.13.0/
$  ./configure --without-test --without-erlang --without-python --without-cpp --without-java --without-php
$  make
$  sudo make install

$  thrift --version
また,CouchDBも2系に代わり,今までとインストール方法が異なるので注意が必要.
(注意:2021年現在 最新のCouchDBのインストール方法は以下)
$sudo apt update && sudo apt install -y curl apt-transport-https gnupg
$curl https://couchdb.apache.org/repo/keys.asc | gpg --dearmor | sudo tee /usr/share/keyrings/couchdb-archive-keyring.gpg >/dev/null 2>&1
$source /etc/os-release
$echo "deb [signed-by=/usr/share/keyrings/couchdb-archive-keyring.gpg] https://apache.jfrog.io/artifactory/couchdb-deb/ ${VERSION_CODENAME} main" \
    | sudo tee /etc/apt/sources.list.d/couchdb.list >/dev/null
$sudo apt update ; sudo apt install couchdb=2.1.2~focal
(注意:2021年現在以下は失敗する)
# CouchDB
#Cf. https://docs.couchdb.org/en/stable/install/unix.html
$ sudo apt-get install -y apt-transport-https gnupg ca-certificates
$ curl -L https://couchdb.apache.org/repo/bintray-pubkey.asc | sudo apt-key add -
$ echo "deb https://apache.bintray.com/couchdb-deb bionic main" \
    | sudo tee -a /etc/apt/sources.list.d/couchdb.list
$ sudo apt update
$ sudo DEBIAN_FRONTEND=noninteractive apt-get install -y couchdb=2.1.2~bionic
同様にLiferayも7.2 -> 7.3 に変更されている.
$ wget https://sourceforge.net/projects/lportal/files/Liferay%20Portal/7.3.3%20GA4/liferay-ce-portal-tomcat-7.3.3-ga4-20200701015330959.tar.gz
$ tar -xvzf  liferay-ce-portal-tomcat-7.3.3-ga4-20200701015330959.tar.gz
#PATHの設定
$ export LIFERAY_PATH=/PATH/TO/liferay-ce-portal-7.3.3-ga4
$ export LIFERAY_INSTALL=/PATH/TO/liferay-ce-portal-7.3.3-ga4
Version11 では以下のファイルを利用する.
#PostgreSQLのドライバダウンロード
$ cd /PATH/TO/liferay-ce-portal-7.3.3-ga4
$ cd /tomcat-9.0.33/lib/ext
$ wget https://jdbc.postgresql.org/download/postgresql-42.2.9.jar

#Liferayのdeployフォルダに関連ファイルをダウンロード
$ cd /PATH/TO/liferay-ce-portal-7.3.3-ga4/deploy
$  wget -O commons-codec-1.12.jar https://search.maven.org/remotecontent?filepath=commons-codec/commons-codec/1.12/commons-codec-1.12.jar
$  wget -O commons-collections4-4.1.jar https://search.maven.org/remotecontent?filepath=org/apache/commons/commons-collections4/4.1/commons-collections4-4.1.jar
$  wget -O commons-csv-1.4.jar https://search.maven.org/remotecontent?filepath=org/apache/commons/commons-csv/1.4/commons-csv-1.4.jar
$  wget -O commons-io-2.6.jar https://search.maven.org/remotecontent?filepath=commons-io/commons-io/2.6/commons-io-2.6.jar
$  wget -O commons-lang-2.4.jar https://search.maven.org/remotecontent?filepath=commons-lang/commons-lang/2.4/commons-lang-2.4.jar
$  wget -O commons-logging-1.2.jar https://search.maven.org/remotecontent?filepath=commons-logging/commons-logging/1.2/commons-logging-1.2.jar
$  wget -O gson-2.8.5.jar https://search.maven.org/remotecontent?filepath=com/google/code/gson/gson/2.8.5/gson-2.8.5.jar
$  wget -O guava-21.0.jar https://search.maven.org/remotecontent?filepath=com/google/guava/guava/21.0/guava-21.0.jar
$  wget -O jackson-annotations-2.9.8.jar  https://search.maven.org/remotecontent?filepath=com/fasterxml/jackson/core/jackson-annotations/2.9.8/jackson-annotations-2.9.8.jar
$  wget -O jackson-core-2.9.8.jar https://search.maven.org/remotecontent?filepath=com/fasterxml/jackson/core/jackson-core/2.9.8/jackson-core-2.9.8.jar
$  wget -O jackson-databind-2.9.8.jar https://search.maven.org/remotecontent?filepath=com/fasterxml/jackson/core/jackson-databind/2.9.8/jackson-databind-2.9.8.jar
$  wget -O libthrift-0.13.0.jar https://repo1.maven.org/maven2/org/apache/thrift/libthrift/0.13.0/libthrift-0.13.0.jar
Version12 以降では以下のファイルを利用する.
#PostgreSQLのドライバダウンロード
$ cd /PATH/TO/liferay-ce-portal-7.3.3-ga4
$ cd /tomcat-9.0.33/lib/ext
$ wget https://jdbc.postgresql.org/download/postgresql-42.2.9.jar

#Liferayのdeployフォルダに関連ファイルをダウンロード
$ cd /PATH/TO/liferay-ce-portal-7.3.3-ga4/deploy
$  wget -O commons-codec-1.12.jar https://search.maven.org/remotecontent?filepath=commons-codec/commons-codec/1.12/commons-codec-1.12.jar
$  wget -O commons-collections4-4.4.jar https://search.maven.org/remotecontent?filepath=org/apache/commons/commons-collections4/4.4/commons-collections4-4.4.jar
$  wget -O commons-csv-1.4.jar https://search.maven.org/remotecontent?filepath=org/apache/commons/commons-csv/1.4/commons-csv-1.4.jar
$  wget -O commons-io-2.6.jar https://search.maven.org/remotecontent?filepath=commons-io/commons-io/2.6/commons-io-2.6.jar
$  wget -O commons-lang-2.4.jar https://search.maven.org/remotecontent?filepath=commons-lang/commons-lang/2.4/commons-lang-2.4.jar
$  wget -O commons-logging-1.2.jar https://search.maven.org/remotecontent?filepath=commons-logging/commons-logging/1.2/commons-logging-1.2.jar
$  wget -O gson-2.8.5.jar https://search.maven.org/remotecontent?filepath=com/google/code/gson/gson/2.8.5/gson-2.8.5.jar
$  wget -O guava-21.0.jar https://search.maven.org/remotecontent?filepath=com/google/guava/guava/21.0/guava-21.0.jar
$  wget -O jackson-annotations-2.11.3.jar  https://search.maven.org/remotecontent?filepath=com/fasterxml/jackson/core/jackson-annotations/2.11.3/jackson-annotations-2.11.3.jar
$  wget -O jackson-core-2.11.3.jar https://search.maven.org/remotecontent?filepath=com/fasterxml/jackson/core/jackson-core/2.11.3/jackson-core-2.11.3.jar
$  wget -O jackson-databind-2.11.3.jar https://search.maven.org/remotecontent?filepath=com/fasterxml/jackson/core/jackson-databind/2.11.3/jackson-databind-2.11.3.jar
$  wget -O libthrift-0.13.0.jar https://repo1.maven.org/maven2/org/apache/thrift/libthrift/0.13.0/libthrift-0.13.0.jar
##https://github.com/eclipse/sw360/pull/1061で追加
$  wget -O commons-compress-1.20.jar https://repo1.maven.org/maven2/org/apache/commons/commons-compress/1.20/commons-compress-1.20.jar
CouchDB-lucene をビルド/インストール
#ダウンロード
$ wget -O couchdb-lucene.tar.gz https://github.com/rnewson/couchdb-lucene/archive/v2.1.0.tar.gz
$ tar xvzf couchdb-lucene.tar.gz -C /tmp
$ cd /tmp

#設定ファイル置き換え
$ cd /tmp/couchdb-lucene-2.1.0/src/main/resources/
$ rm couchdb-lucene.ini
$ wget https://raw.githubusercontent.com/sw360/sw360vagrant/master/shared/couchdb-lucene.ini

#パッチのインストールと適用
$ cd /tmp
$ wget https://raw.githubusercontent.com/sw360/sw360vagrant/master/shared/couchdb-lucene.patch
$ cd /tmp/couchdb-lucene-2.1.0/
$ patch -p1 </tmp/couchdb-lucene.patch

#Warファイルの作成
$ mvn clean install war:war

#Liferay内のTomcat/webappにwarファイルをコピー
$ cp --remove-destination /tmp/couchdb-lucene-2.1.0/target/couchdb-lucene-*.war /PATH/TO/liferay-ce-portal-7.3.3-ga4/tomcat-9.0.33/webapps/couchdb-lucene.war

#設定ファイル書き換え(下記参照)
$ sudo vim /opt/couchdb/etc/local.ini

#設定ファイル書き換え反映
$ sudo systemctl restart couchdb
local.iniは[httpd_global_handlers] の項目に以下を追記して保存.
_fti = {couch_httpd_proxy, handle_proxy_req, <<"http://127.0.0.1:8080/couchdb-lucene">>}
Liferay はデータベースとしてPostgreSQLを利用するので、それをインストールする.
$ sudo apt install zlib1g-dev -y
$ sudo apt install libreadline-dev -y
$ wget https://download.postgresql.org/pub/source/v10.14/postgresql-10.14.tar.gz
$ tar -xvf postgresql-10.14.tar.gz
$ cd postgresql-10.14/
$ mkdir -p  /PATH/TO/sw360postgres
$ ./configure -prefix=/PATH/TO/sw360postgres
$ make
$ sudo make install
PostgreSQLのPATH設定
$ export PATH=$HOME/sw360postgres/bin:$PATH
$ export PGDATA=$HOME/sw360postgres/data
$ export LD_LIBRARY_PATH=$HOME/sw360postgres/lib
$ export PGPORT=5432
PostgreSQL初期化&起動
$  cd /PATH/TO/sw360postgres/bin
$ ./initdb --encoding=UTF8 --no-locale
$ pg_ctl start
$ createuser postgres
次に sw360をクローンしてくる.
$ git clone https://github.com/eclipse/sw360.git
$ cd sw360
# リリースされたバージョンを使う場合以下を実行
$ # git checkout  182f456  #sw360-11.0.0-M1
$ # git checkout  06f8bce  #sw360-12.0.0-M1
portal-ext.properties をliferay直下に配置し,適宜編集を行う.
$ cp  /PATH/TO/sw360/frontend/configuration/portal-ext.properties  /PATH/TO/liferay-ce-portal-7.3.3-ga4/
$ vim  /PATH/TO/liferay-ce-portal-7.3.3-ga4/portal-ext.properties
以下のように setup.wizard.enabled=true にしておく.
# Copyright Siemens AG, 2019. Part of the SW360 Portal Project.
#
# This program and the accompanying materials are made
# available under the terms of the Eclipse Public License 2.0
# which is available at https://www.eclipse.org/legal/epl-2.0/
#
# SPDX-License-Identifier: EPL-2.0
#

# ***********************************
# Needed properties for SW360
# ***********************************

# Company (Actually the name of the site that is generated by liferay)
# (https://github.com/liferay/liferay-portal/blob/7.2.0-ga1/portal-impl/src/portal.properties#L1968)
company.default.name=SW360
company.default.web.id=sw360.org

# Needed SW360 roles
# (https://github.com/liferay/liferay-portal/blob/7.2.0-ga1/portal-impl/src/portal.properties#L2502)
# Keep this inline with sw360-portlet/**/PortalConstants#Role names
system.site.roles=Clearing Admin, Clearing Expert, ECC Admin, Security Admin, SW360 Admin


# Jump to SW360 Homepage (Dashboard) after login
# (https://github.com/liferay/liferay-portal/blob/7.2.0-ga1/portal-impl/src/portal.properties#L4333)
default.landing.page.path=/group/guest/home


# ***********************************
# Useful Liferay properties
# ***********************************

# Prevent from starting a browser at startup
# (https://github.com/liferay/liferay-portal/blob/7.2.0-ga1/portal-impl/src/portal.properties#L5581)
#browser.launcher.url=

# Set this property to true if the Setup Wizard should be displayed the
# first the portal is started.
# (https://github.com/liferay/liferay-portal/blob/7.2.0-ga1/portal-impl/src/portal.properties#L5927)
setup.wizard.enabled=true

# Disable asking for the security question
# (https://github.com/liferay/liferay-portal/blob/7.2.0-ga1/portal-impl/src/portal.properties#L2327)
#users.reminder.queries.enabled=false

# To turn off the terms and conditions
# (https://github.com/liferay/liferay-portal/blob/7.2.0-ga1/portal-impl/src/portal.properties#L2552)
#terms.of.use.required=false

# Disable user portlet CSS
# (https://github.com/liferay/liferay-portal/blob/7.2.0-ga1/portal-impl/src/portal.properties#L10960)
#portlet.css.enabled=false

# Do not track user clicks
# (https://github.com/liferay/liferay-portal/blob/7.2.0-ga1/portal-impl/src/portal.properties#L3232)
#session.tracker.memory.enabled=false


# ***********************************
# Optional properties for SW360
# ***********************************

## Default Admin
## (https://github.com/liferay/liferay-portal/blob/7.2.0-ga1/portal-impl/src/portal.properties#L4590)

# Set the default admin password.
#default.admin.password=sw360fossy
# Set the default admin screen name prefix.
#default.admin.screen.name=setup
# Set the default admin email address prefix.
#default.admin.email.address.prefix=setup
# Set the default admin first name.
#default.admin.first.name=Setup
# Set the default admin last name.
#default.admin.last.name=Administrator

# ***********************************
# Custom properties and overrides
# ***********************************
include-and-override=/etc/sw360/portal-ext.properties
次に先ほどインストールしたPostgreSQLにデータベースを作成しパスワードを設定する.(以下はテスト用)
$ psql postgres
postgres=# create database lportal;
postgres=# ALTER USER postgres WITH PASSWORD 'sw360fossy';
postgres=# ALTER ROLE postgres with superuser;
postgres=# \q
/data/postgresql.conf と /data/pg_hba.conf を適切に設定(以下はテスト用の例)
listen_addresses = '*' # what IP address(es) to listen on;
IPv4アドレス
host all all 0.0.0.0/0 trust
PostgreSQL再起動
$ pg_ctl restart
SW360 native インストール/ビルド
先ほどcloneしたsw360フォルダに移動し、build 行う
$ cd /PATH/TO/sw360
$ mvn clean
$ mvn package -P deploy -Dbase.deploy.dir=. -Dliferay.deploy.dir=${LIFERAY_INSTALL}/deploy -Dbackend.deploy.dir=${LIFERAY_INSTALL}/tomcat-9.0.33/webapps -Drest.deploy.dir=${LIFERAY_INSTALL}/tomcat-9.0.33/webapps -Duser.timezone=GMT -DskipTests
Liferayを起動する.
$ cd /PATH/TO/liferay-portal-7.2.1-ga2/tomcat-9.0.33/bin
$ startup.sh
http://127.0.0.1:8080 を開くと以下が表示されるので,adminユーザー名とデータベースの情報を入力.

完了後以下が表示されれば成功
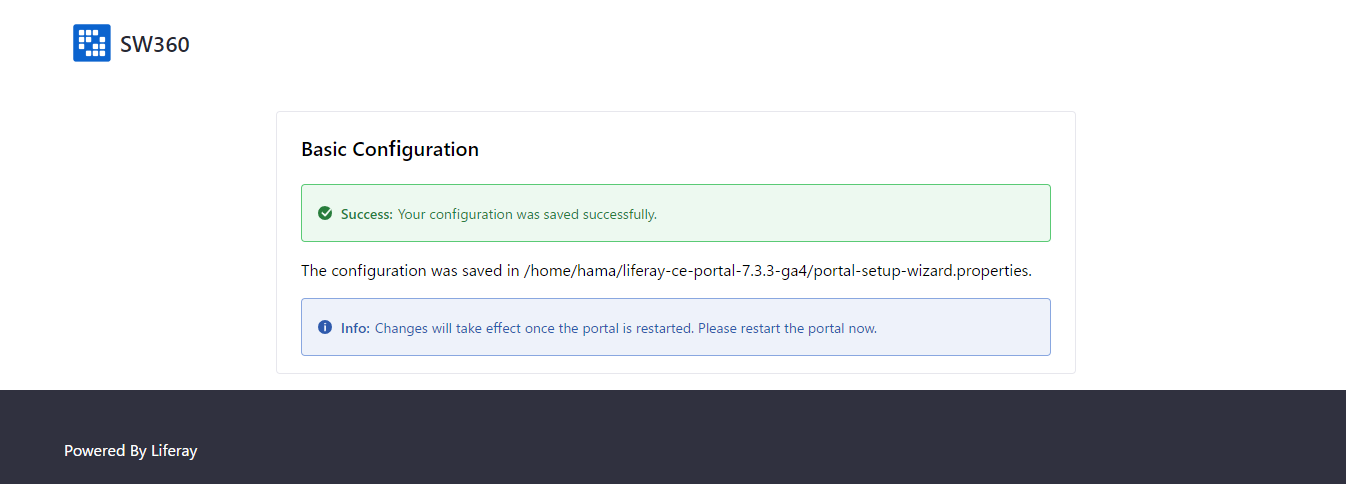
ここまでくると一度 tomcatを終了させる.
$ cd /PATH/TO/liferay-portal-7.2.1-ga2/tomcat-9.0.33/bin
$ shutdown.sh
liferayフォルダの中に、以下のようなファイルができている
(ここではemail=setup@sw360.org,fist_name=setup last_name=admin として登録するものとする.)
/PATH/TO/Liferay/portal-setup-wizard.properties
admin.email.from.address=setup@sw360.org
admin.email.from.name=setup admin
company.default.locale=en_US
company.default.time.zone=UTC
company.default.web.id=sw360.org
default.admin.email.address.prefix=setup
default.admin.first.name=setup
default.admin.last.name=admin
jdbc.default.driverClassName=org.postgresql.Driver
jdbc.default.password=sw360fossy
jdbc.default.url=jdbc:postgresql://localhost:5432/lportal
jdbc.default.username=postgres
liferay.home=/home/hama/liferay-ce-portal-7.3.3-ga4
setup.wizard.enabled=false
Liferayを再起動後にDBを確認すると以下のようになっている
$ /PATH/TO/liferay-ce-portal-7.3.3-ga4/tomcat-9.0.33/bin/shutdown.sh
$ /PATH/TO/liferay-ce-portal-7.3.3-ga4/tomcat-9.0.33/bin/startup.sh
$ psql -d lportal

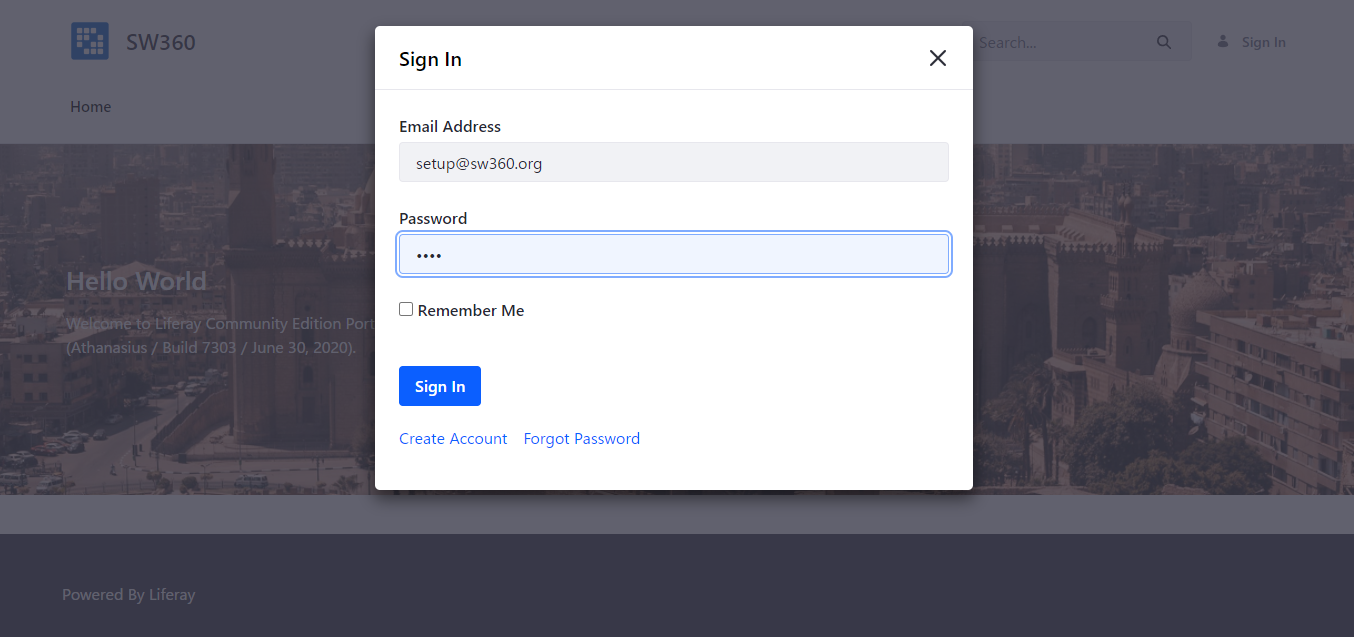
この後はLiferayの設定に続く.Liferayにログインするときは以下でまた起動し
$ cd /PATH/TO/liferay-portal-7.2.1-ga2/tomcat-9.0.33/bin
$ startup.sh
トップ画面のログインではuser:setup@sw360.org, pass:test を使えばいい.
Vagrant利用インストール
現在,Naitiveインストールより簡単で,Dockerより安定してインストールできるのがこの方法.sw360vagrantからコードをクローンして使う.Vagrant バージョン2.29以降, VirtualBoxの最新バージョンを事前にインストールしてある必要がある.
Vagrantインストール事前準備
proxy環境下ではproxy設定を行っておく.
$ export http_proxy="http://proxy.example:port"
$ export https_proxy="http://proxy.example:port"
$ export no_proxy="localhost,127.0.0.1,noproxy_example"
git,wgetのインストール,proxy設定も必要
$ sudo apt install -y git wget
$ git config --global http.proxy http://proxy:port
$ git config --global https.proxy http://proxy:port
VirtualBoxインストール参考ページよりVirtualBoxをインストールする.
$ sudo apt autoremove virtualbox virtualboc-* #旧バージョン削除
$ wget -q https://www.virtualbox.org/download/oracle_vbox_2016.asc -O- | sudo apt-key add -
$ sudo add-apt-repository "deb [arch=amd64] http://download.virtualbox.org/virtualbox/debian $(lsb_release -cs) contrib"

$ sudo apt update
$ sudo apt install virtualbox-6.1
Vagrantインストール
$ curl -O https://releases.hashicorp.com/vagrant/2.2.9/vagrant_2.2.9_x86_64.deb
$ sudo apt install ./vagrant_2.2.9_x86_64.deb
$ vagrant --version
Vagrantプラグインをインストール
$ vagrant plugin install vagrant-aws
$ vagrant plugin install vagrant-disksize
$ vagrant plugin install vagrant-proxyconf

#それぞれ以下のバージョンを利用した
$ vagrant plugin list     fog-ovirt (1.0.1, global)
  - Version Constraint: 1.0.1
vagrant-aws (0.7.2, global)
vagrant-disksize (0.1.3, global)
vagrant-proxyconf (2.0.10, global)
SW360 Vagrantインストール
$ git clone  https://github.com/sw360/sw360vagrant.git
$ cd sw360vagrant
$ vi shared/configuration.rb #proxy設定
$ ./download-packages.sh #実行時間長め
$ cd generate-box
$  ./generate_box.sh #実行時間長め
$ cd ../sw360-single
$ vagrant up
完了後,ブラウザで https://127.0.0.1:8443 からLiferayを開き ユーザー:admin@sw360.org, pass:sw360fossy でログインできるようになる.このあとのGUI設定は他のインストール方法と共通.
SW360 Docker利用インストール
2020年12月から正式にDockerビルドがサポートされたので、
https://github.com/eclipse/sw360/blob/master/README_DOCKER.md
上記を参照するとよい。
SW360 Dockerインストール 事前準備
git,curl, DockerとDocker-composeをインストールする.
$ sudo apt install -y git curl
$ git config --global http.proxy http://proxy:port
$ git config --global https.proxy http://proxy:port
Dockerインストール
$ sudo apt install -y apt-transport-https ca-certificates curl software-properties-common
$ curl -fsSL https://download.docker.com/linux/ubuntu/gpg | sudo apt-key add -
$ sudo add-apt-repository    "deb [arch=amd64] https://download.docker.com/linux/ubuntu \
        $(lsb_release -cs) \
        stable"
$ sudo apt-get update
$ sudo apt-get install docker-ce

# Option sudoなしでDocker利用
$ sudo groupadd docker
$ sudo adduser $(whoami) docker
$ sudo chmod 666 /var/run/docker.sock
$ docker images # 確認
Docker-composerを使えるように設定.
$ sudo curl -L https://github.com/docker/compose/releases/download/1.27.4/docker-compose-`uname -s`-`uname -m` -o /usr/local/bin/docker-compose
$ sudo chmod +x /usr/local/bin/docker-compose
$ docker-compose --version
SW360Dockerイメージを構築&起動
$ git clone https://github.com/eclipse/sw360.git
$ cd sw360

#ビルドに数時間がかかる
$ docker build -t sw360 .

#(参考)バックグラウンドでビルドするなら
$ nohup docker build -t sw360 . &

#起動
$docker run -it -p 8090:8080 -p 5985:5984 -p 5435:5432 sw360

#(参考)バックグラウンドで起動
$docker run -it -d -p 8090:8080 -p 5985:5984 -p 5435:5432 sw360
上記より http://127.0.0.1:8090 でGUI設定を開始
(user: setup@sw360.org, password: sw360fossy)
有志が作成したDocker構築プログラムについても一応以下に残しておく.
簡単にインストールできるが,2020年11月の時点で最新のSW360をインストールする方法は公式のsw360choresからは提供されていない.ただしコミュニティのメンバーが公開している開発コードを利用することでDockerインストール自体は可能である.ここではそれを利用したインストール方法を紹介する.なお公式の情報が更新され次第追記する予定.
$ git clone https://github.com/bosch-io/sw360chores.git
$ cd sw360chores/
$ git checkout 4305276
$ cd v2/

# Build は1時間程度かかる場合がある
$ docker-compose build  --build-arg http_proxy=http://proxy.example:8080  --build-arg https_proxy=http://proxy.example:8080

# スタートは専用スクリプト利用
$ ./startUp.sh

# 終了する場合は他ターミナルから
$ docker-compose down
完了後,ブラウザで https://127.0.0.1:8443 からLiferayを開き ユーザー:setup@sw360.org, pass:sw360fossy でログインできるようになる.このあとのGUI設定は他のインストール方法と共通.
Liferay(GUI)設定
以下からはDeploy Liferay7.3を参考にしてどのインストール方法でも共通となるGUI上での設定の紹介を行う.
まずはログインを行う.特別な設定をしてなければ,mail:setup@sw360.org / pass:test(native), pass:sw360fossy(chore,vagrant)でログインできる.
ログイン後右上のメニューを開く

ログイン後ユーザとパスワード設定を行う
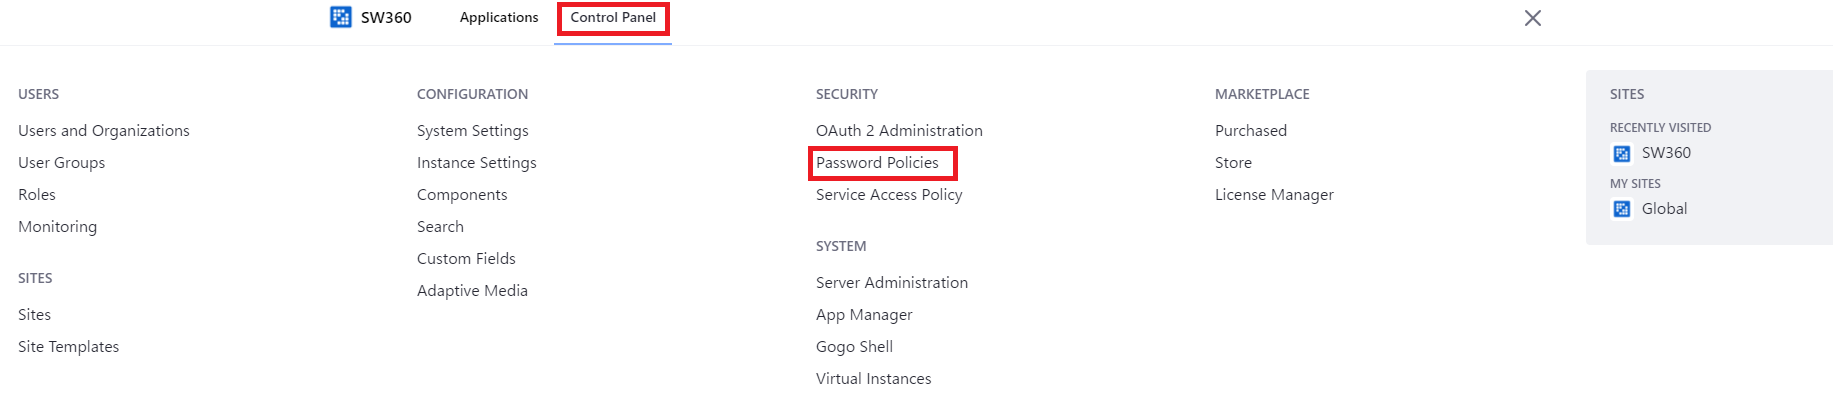
Security > Password Policies と進める
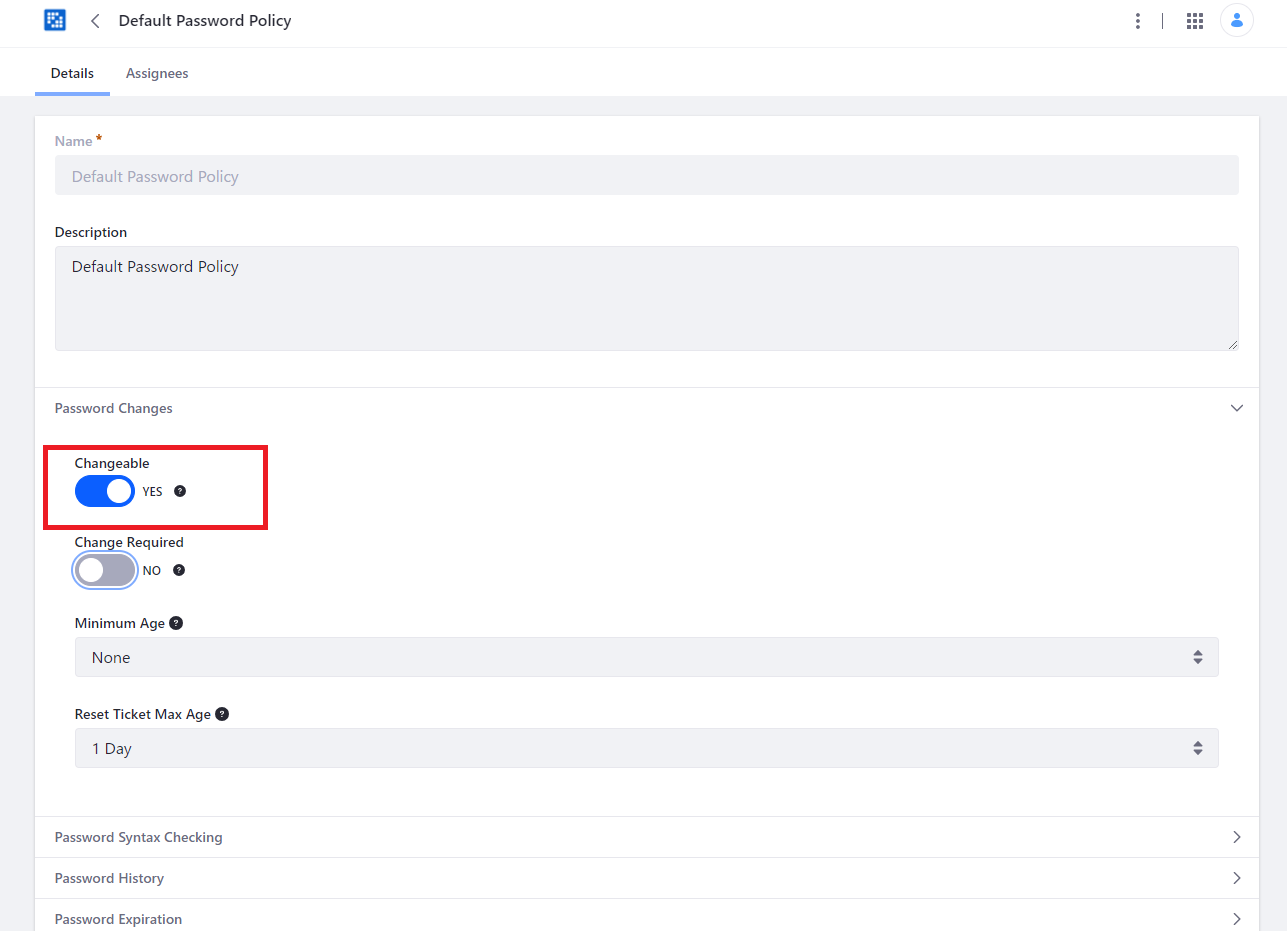
Editを開き,

changeable をオンに, change Requiredをオフにして,save する,
Configuration > Instance Settings とすすみ
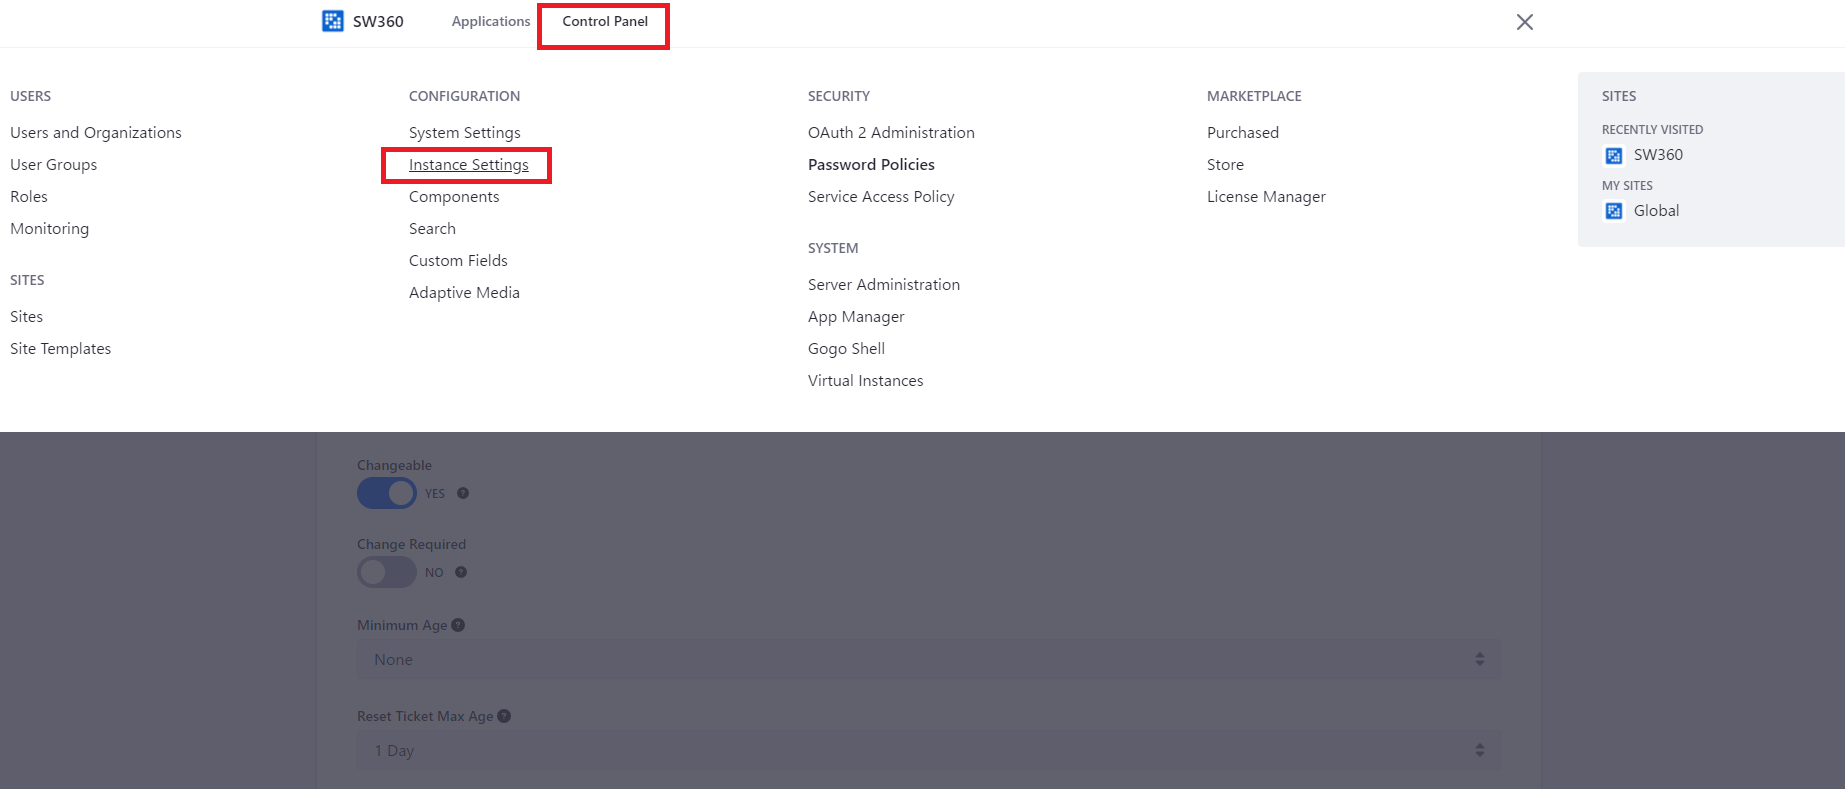
Usersを選ぶ

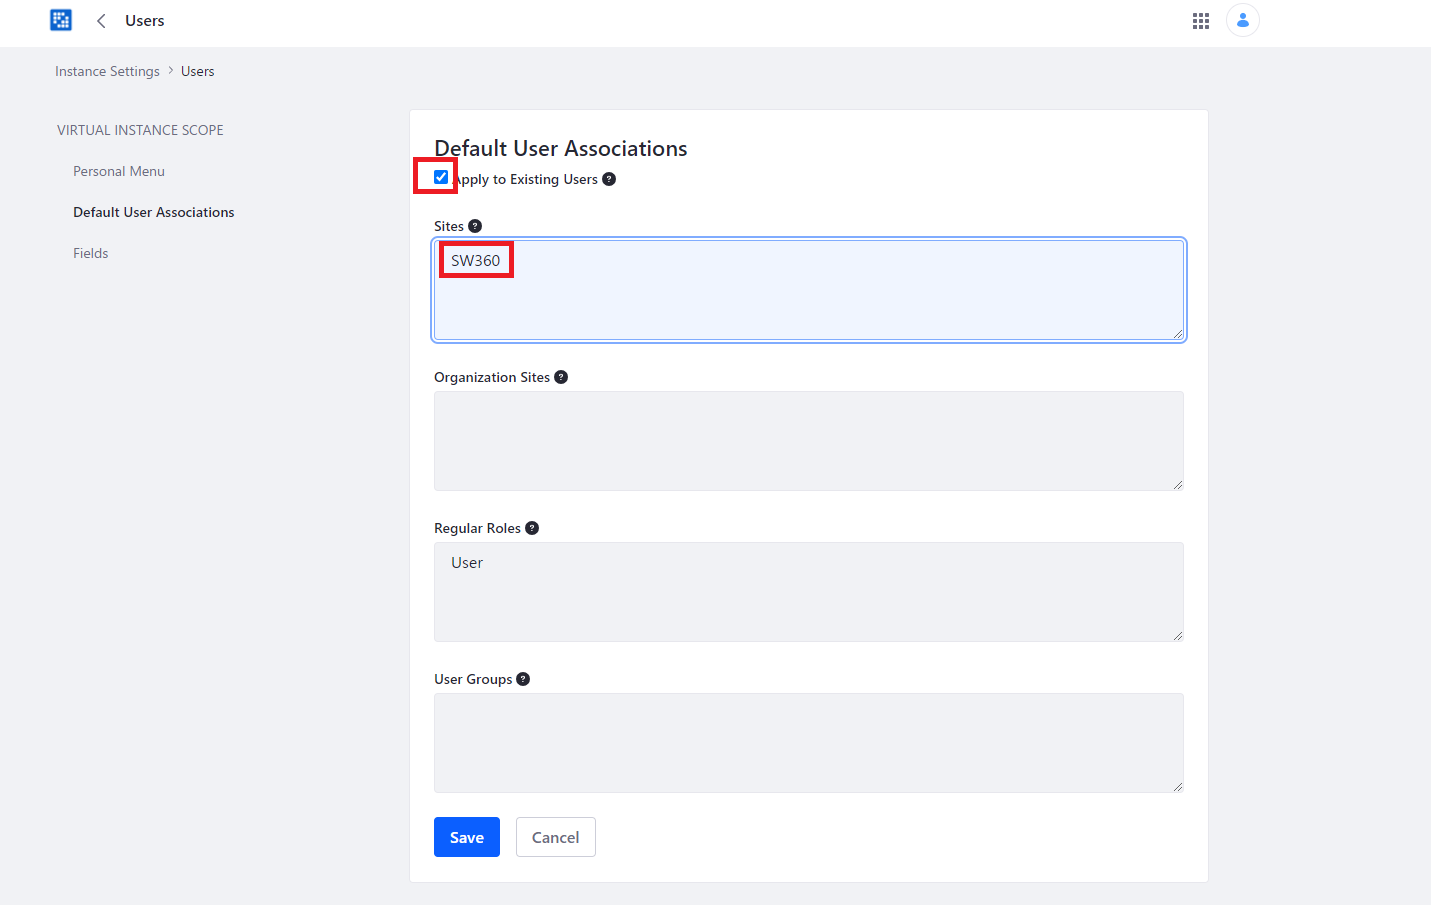
Default User Associations にSW360と入力し,”apply it also to existing users” にチェックを付ける
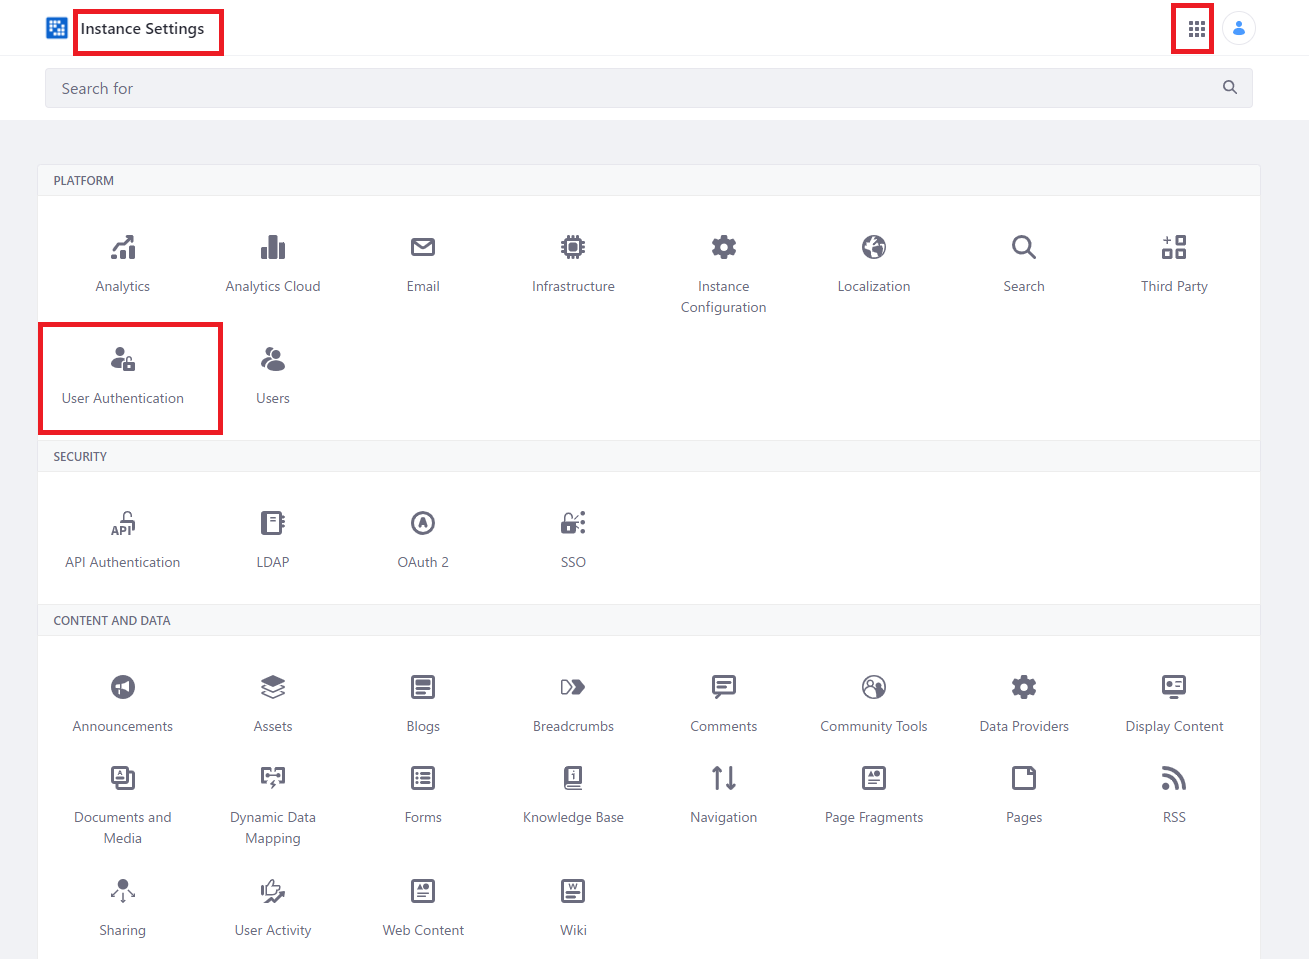
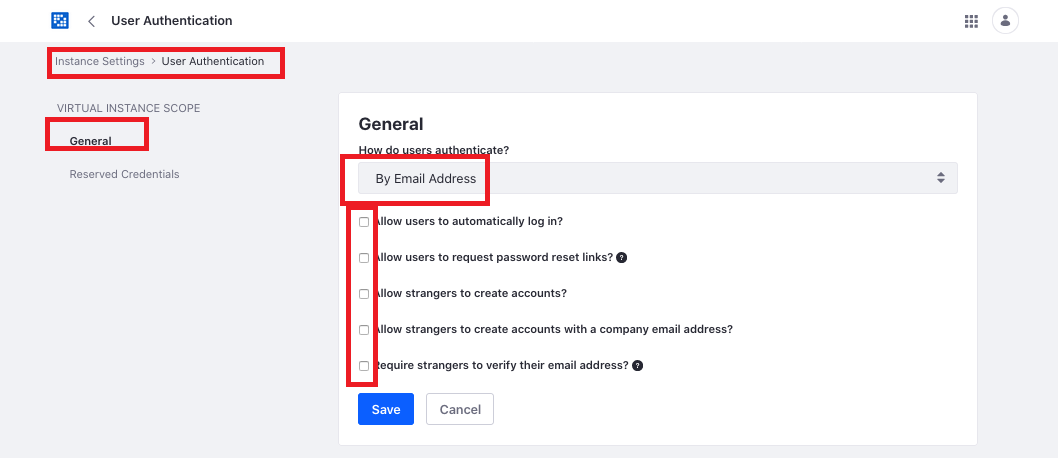
次にInstance Settings > User Authentication > Generalとすすみ
Authentication を以下のように行う
次にSystem setting に移動する.

(Configuration > System Settings > Third Party) よりjqueryをenableにしsaveする.
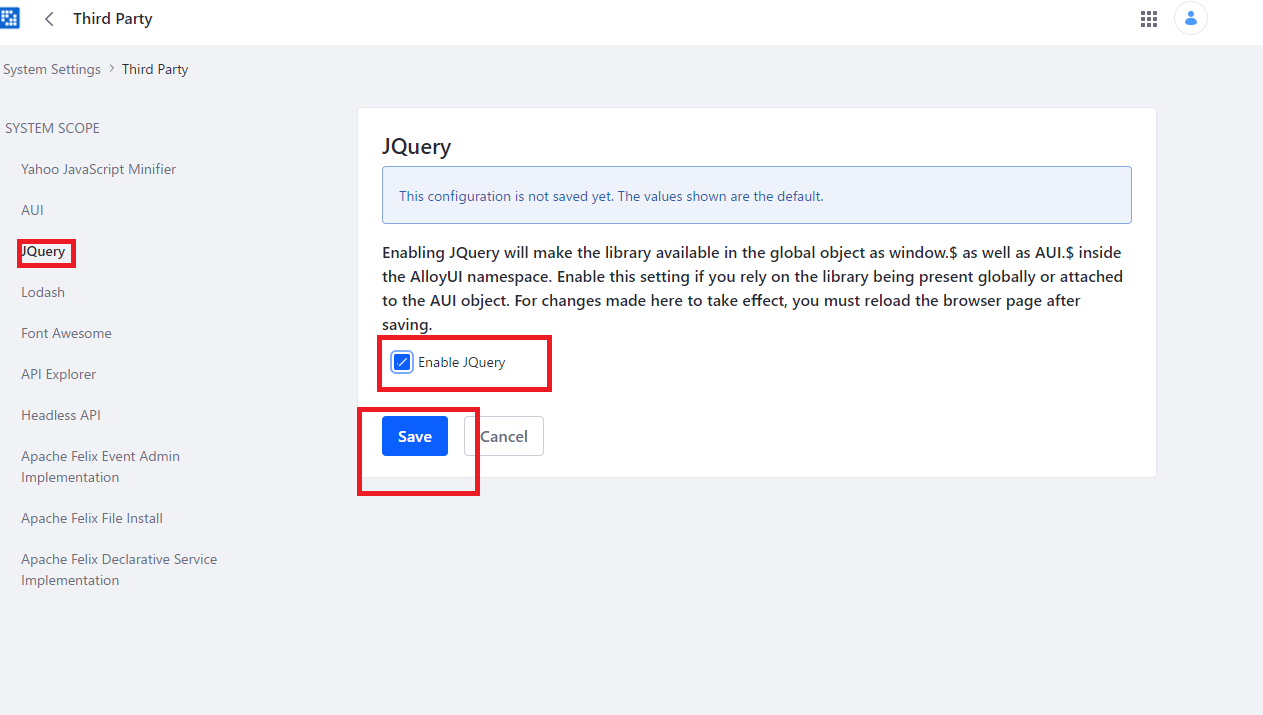
同様にfont awesomeもenableにする.

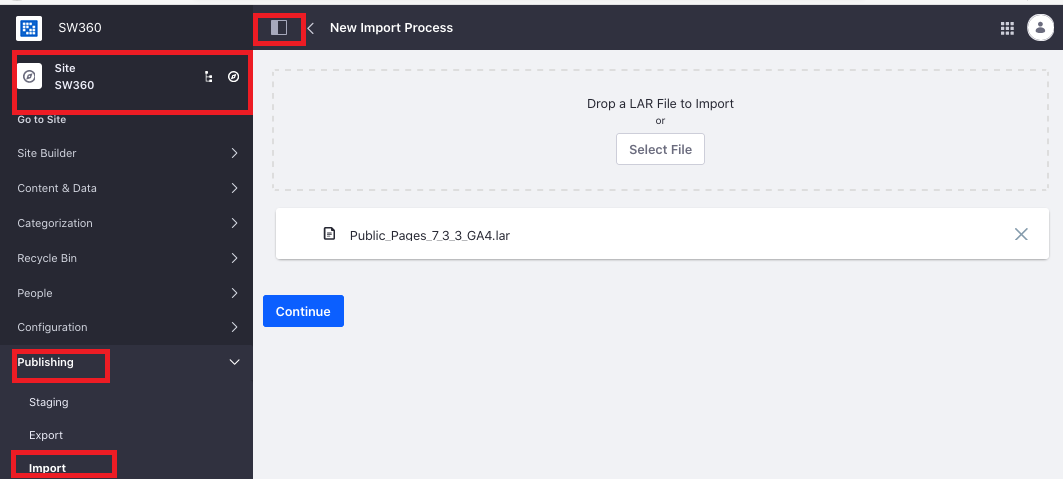
ここからLiferayにlarファイルをインポートする.
Lar file は sw360のconfigurationから持ってくる.Private_Pages_7_3_3_GA4.larとPublic_Pages_7_3_3_GA4.larをダウンロードしてくる.
まずはPublic_Pages_7_3_3_GA4.larを選択しインポートする.その後Continueを選ぶ.
以下のように選択する.(下にある,permissions ... mirror with overwriting, use the current author ... を忘れないように注意)
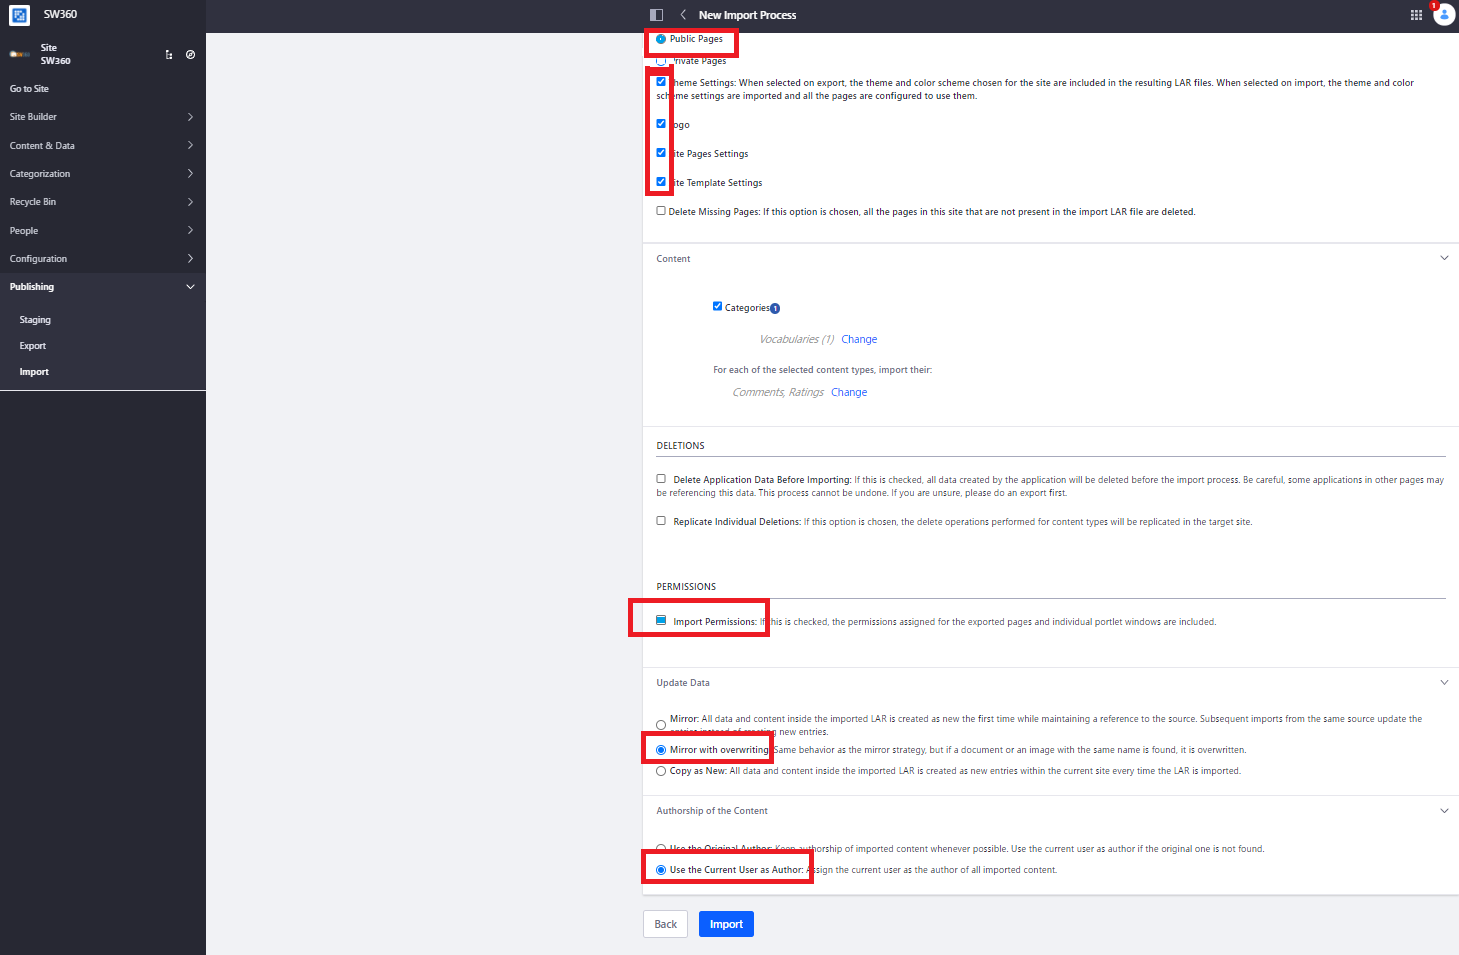
Private_Pages_7_3_3_GA4.larファイルを同様にインポートし同様の設定を行う.(ただしPagesはprivateを選ぶ.)

完了後画面左上のSW360のロゴからSW360のトップページに行ける.
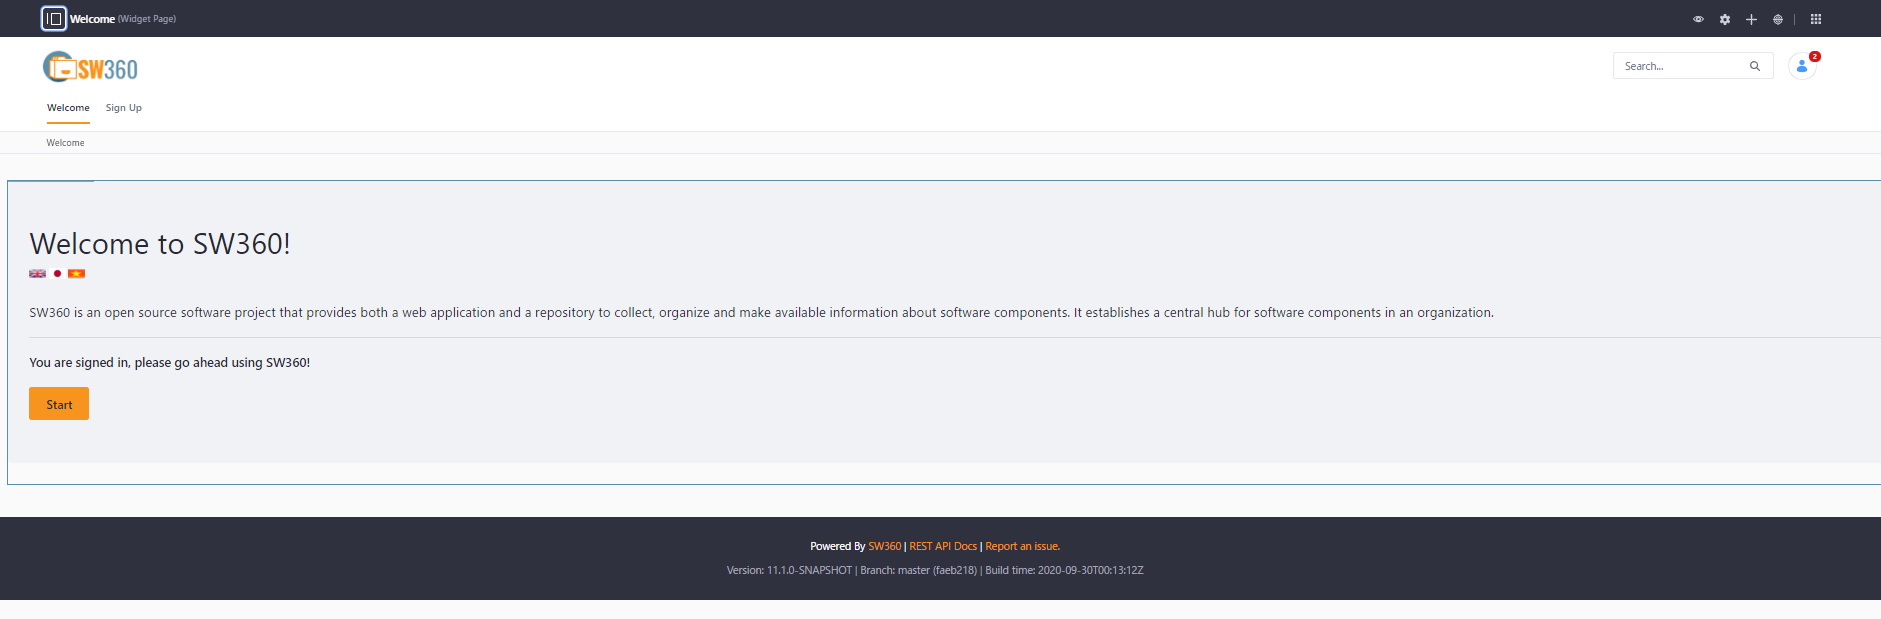
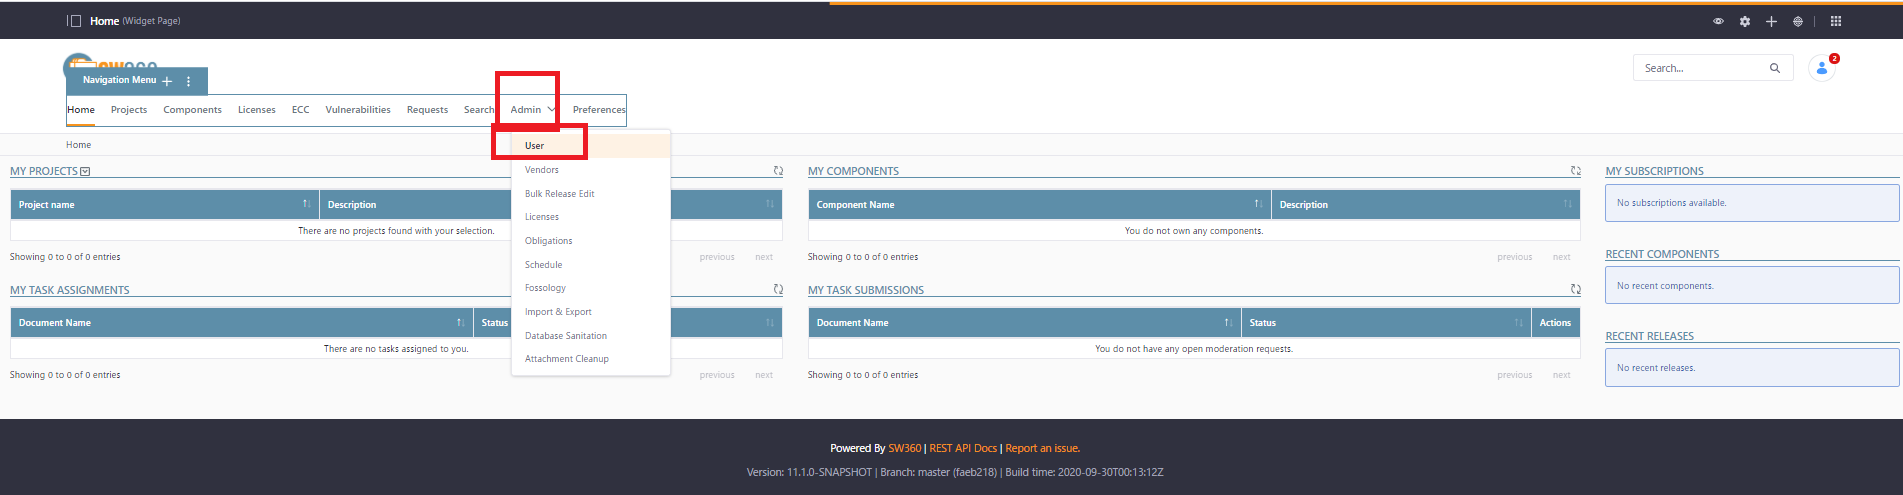
Startボタンを押すとログインできるので,そのままAdmin => User と進んでいく.
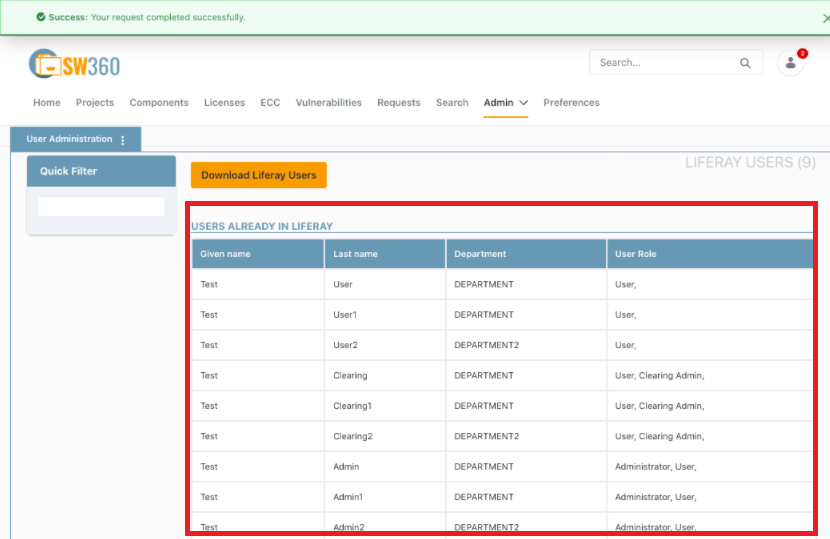
このCSVをダウンロードしUpload Userに反映させる.

成功したら以下のようにいくつかのテストユーザーが登録される.これ以降,このテストユーザのメールアドレスでログインできるようになる.(なお初期パスワードは全員12345)
これでインストールは完了である.
#SW360日本語設定
Version11から日本語が利用できるようになった.日本語の利用の仕方も紹介しておく.
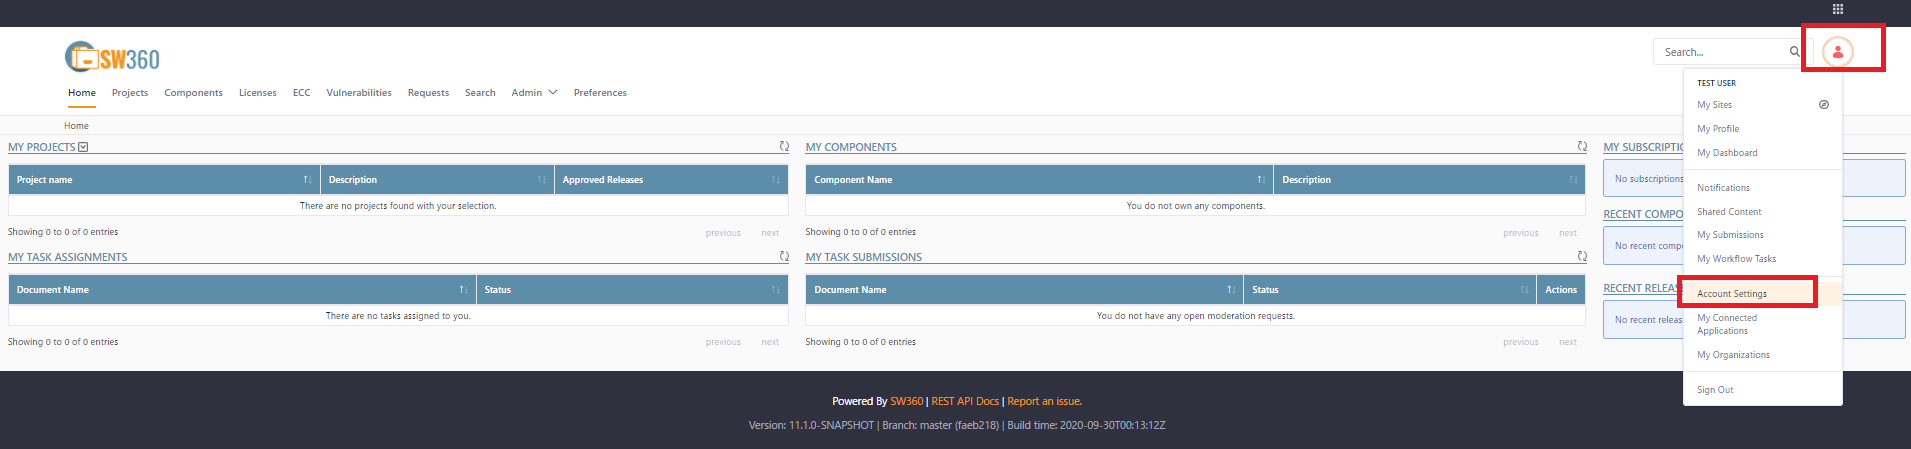
まずはログインを行う.そして右上の人型アイコンを選択.そしてAccountSettingに移動する.
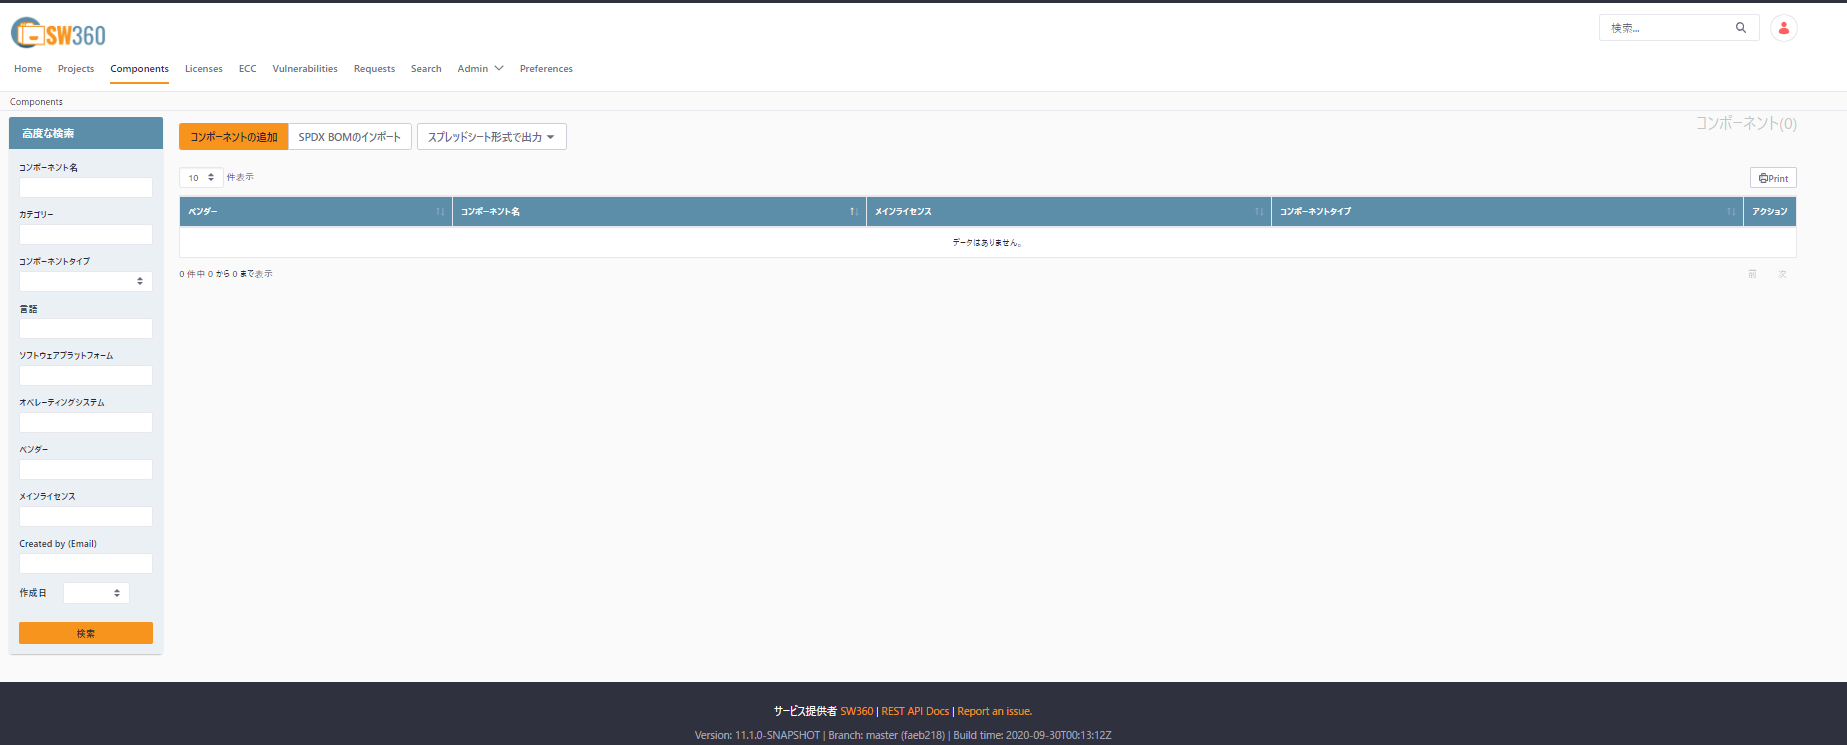
その後,Langauageから日本語を選択し,設定を保存する.

再度SW360の画面に戻ると日本語になっている.
なお Version11~13.1 では一部のページ表示にバグがあるので以下を参考に手動設定が必要
https://github.com/eclipse/sw360/issues/635#issuecomment-533791604
おまけ:ここにサンプルデータあり
https://github.com/sw360/sw360vagrant/pull/38#issue-581604836
さいごに
この記事のフィードバックやコメント等はいつでもお待ちしております。気軽にお申し付けください。