こんにちはコバトンです!Life is Tech! アドベントカレンダー二日目頑張って行きましょう!
今回はp5.jsというjavascriptのライブラリを使います。
ダニエルシフマンの動画を参考に作って見たって感じです!
index.htmlに記述する
index.html
<!DOCTYPE html>
<html lang="en">
<head>
  <meta charset="UTF-8">
  <meta name="viewport" content="width=device-width, initial-scale=1.0">
  <meta http-equiv="X-UA-Compatible" content="ie=edge">
  <title>fireworks</title>
</head>
<body>

  <!-- p5.jsの呼び出し -->
  <script src="https://cdnjs.cloudflare.com/ajax/libs/p5.js/0.5.16/p5.min.js"></script>
  <script src="particle.js"></script>
  <script src="firework.js"></script>
  <script src="sketch.js"></script>
</body>
</html>
以上のコード書くとp5.jsを使う環境が整いました!それでは花火を作って行きましょう!
p5.jsの説明
花火を作っていこうと思ったのですが、慣れていない人もいると思うので、p5.jsの説明だけしときたいと思います!

写真に書いてある通りで、setupという関数は最初に一回だけ、drawという関数は何回も呼ばれる関数です!これを書いて図形を組み合わせることで、メディアアートなどが作られているんですね!!!
すごいですね!
sketch.jsに記述する
今回のjavascriptファイルは次の三つのファイルを作って行きます
- sketch.js
- firework.js
- particle.js
sketch.js
var fireworks = [];
var gravity;

function setup(){
  createCanvas(1700, 1100); // canvasを作成
  colorMode(HSB); //花火を出す色の指定の仕方
  gravity = createVector(0,0.4);
  stroke(255);// 線の色を設定
  strokeWeight(4);// 線の太さ
  background(0);// 背景を黒く指定
}

function draw(){
  colorMode(RGB); // 花火を出す色の指定の仕方
  background(0, 0, 0,25);// 背景に少し透明なのを重ねてだんだん消えて行くように
  if (random(1) < 0.15){
    fireworks.push(new Firework());// fireworksという配列にfirewokという関数の中身を追加する。
  }
  // 花火の見せ方
  for (var i = fireworks.length-1; i >= 0; i--){
    fireworks[i].update();
    fireworks[i].show();
    if(fireworks[i].done()){
      fireworks.splice(i, 1);
    }
  }
}
一つ目のif文のところでrandomを呼び出しているのはなぜかというと、この、drawという関数は一秒間い60回呼ばれるので、全部の関数で花火が打ち上がると大変なことになるので、それを制御することでだいたい全体の15%くらいに設定しています!
new Firework();
って何やねんって感じですよね。これこのあと書いて行きます。
firework.jsに記述する
firework.js
function Firework(){
  this.hu = random(255); // 花火の色相
  this.firework = new Particle(random(width), height, this.hu, true);
  this.exploded = false;
  this.particles = [];

// 花火が打ち上がったのかをチェックする関数
  this.done = function(){
    if (this.exploded && this.particles.length === 0){
      return true;
    }else{
      return false;
    }
  }

// 花火が打ち上がったらどのように落ちて行くのかを設定
  this.update = function(){
    if (!this.exploded){
      this.firework.applyForce(gravity);// gravity分だけ下に下げる関数(particle.jsで定義)
      this.firework.update();
      if (this.firework.vel.y >= 0) {
        this.exploded = true;
        this.explode();
      }
    }
    for (var i = this.particles.length-1; i >= 0; i--){
      this.particles[i].applyForce(gravity);
      this.particles[i].update();
      if(this.particles[i].done()){
        this.particles.splice(i, 1);
      }
    }
  }

// 花火がどのように爆発して開くのかをチェックする関数
  this.explode = function(){
    for (var i = 0; i < 100; i++){
      var p = new Particle(this.firework.pos.x, this.firework.pos.y, this.hu, false);
      this.particles.push(p);
    }
  }

// 花火を見せるための関数
  this.show = function(){
    if (!this.exploded){
      this.firework.show();
    }
    for (var i = 0; i < this.particles.length; i++){
      this.particles[i].show();
    }
  }
}
はい、また、Particleとかいうわけのわからんものが出てきました。これもこのあと書きます!
particle.jsに記述する
particle.js
function Particle(x, y, hu, firework){
  this.pos = createVector(x,y);
  this.firework = firework; // 基本的にtrue
  this.lifespan = 255;
  this.hu = hu; //friework.jsで定義した色相をここでも代入

  //ランダムにベクトルを定義
  if (this.firework){
    this.vel = createVector(0,random(-29, -15));
  }else{
    this.vel = p5.Vector.random2D(); // ランダムにベクトルを定義
    this.vel.mult(random(5, 35));
  }
  this.acc = createVector(0,0);

  this.applyForce = function(force) {
    this.acc.add(force);
  }

  this.update = function(){
    if (!this.firework){
      this.vel.mult(0.85);
      this.lifespan -= 6;
    }
    this.vel.add(this.acc);
    this.pos.add(this.vel);
    this.acc.mult(0);
  }

  this.done = function(){
    if(this.lifespan < 0){
      return true;
    }else {
      return false;
    }
  }

  this.show = function(){
    colorMode(HSB);
    if(!this.firework){
      strokeWeight(3);
      stroke(hu, 255, 255, this.lifespan);// hsbの定義で線を描画
    }else{
      strokeWeight(6);
      stroke(hu, 255,255)// hsbの定義で線を描画
    }
    point(this.pos.x, this.pos.y);//点を描画
  }

}
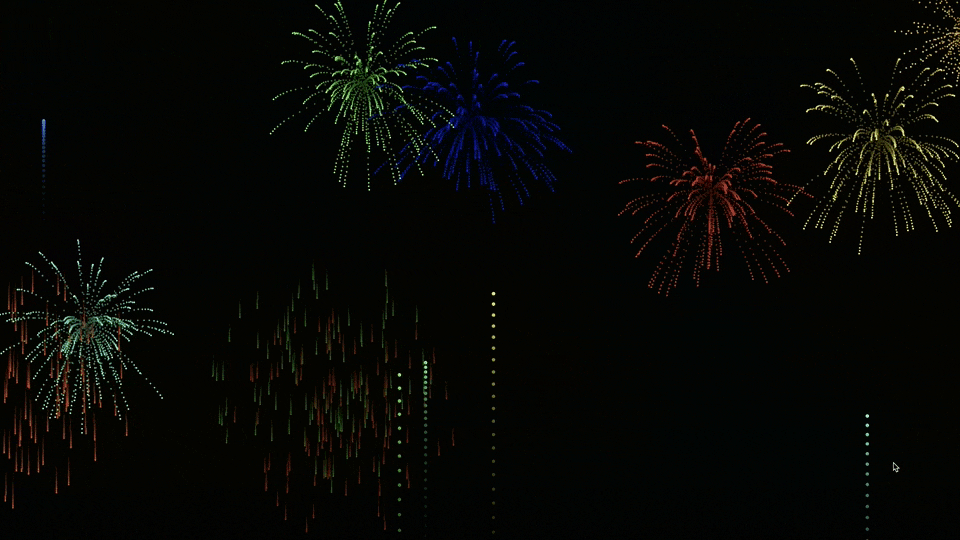
まとめ
出来上がるとこんな感じです!
どうだったでしょうか!
webでもこんなことできるんですね!!!
明日はあのデザインもできてプログラミングもできて黒ポロメンターのふなみんさんがjQueryで為になることをやってくれるみたいです!
期待しましょう!