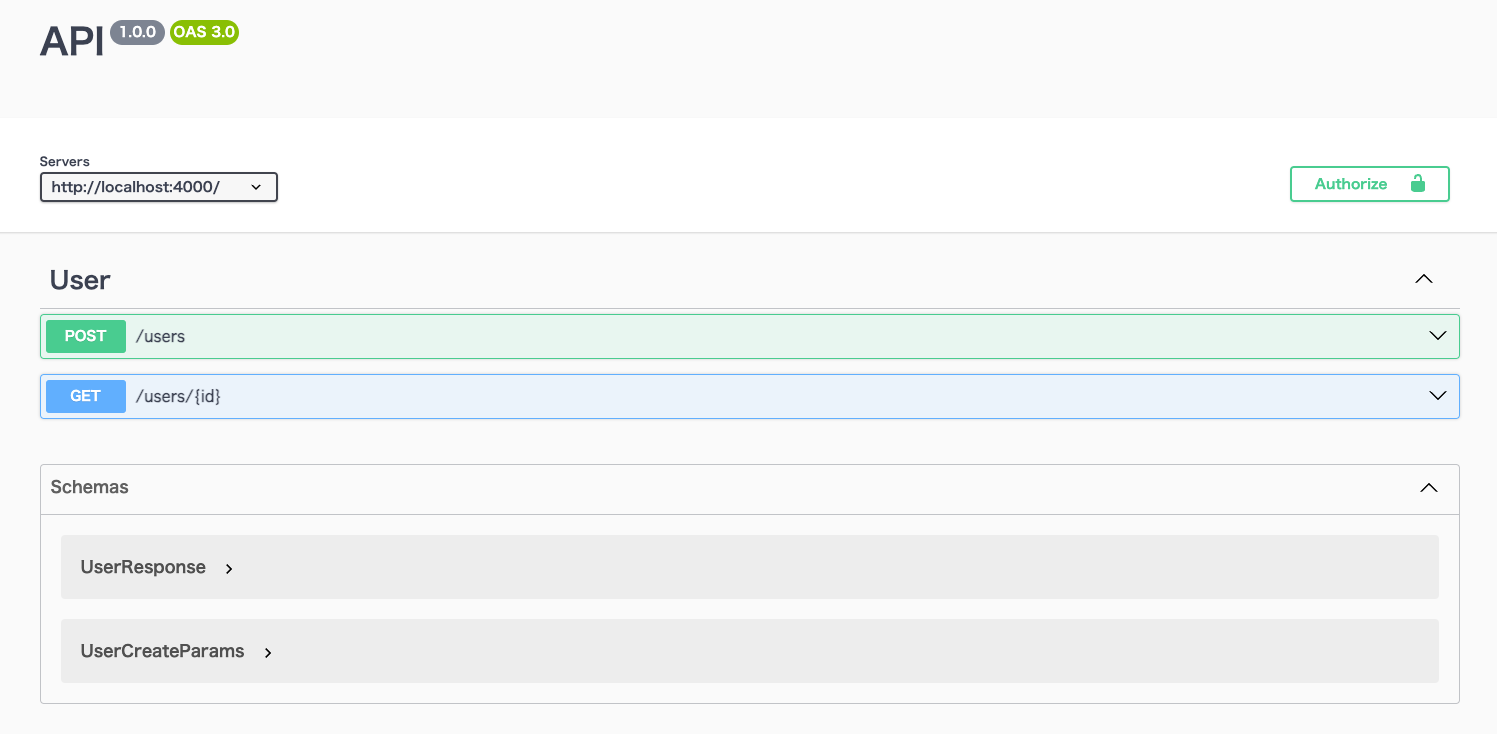
はじめに
tsoaとOpenAPIを使って、(yamlを書かずに)TypeScriptだけで完結するスキーマ駆動開発を試してみました。
OpenAPIと言えば、yamlファイルを書いてGeneratorでコードを生成するフローがよくあるパターンかと思いますが、フロントエンドもバックエンドもTypeScriptで書いている場合、yamlファイルを書かずに、TypeScriptだけで完結できると効率が良いのではないかと思い、実装してみました。
環境
- Node.js
- TypeScript
- Express
- tsoa
- OpenAPI(openapi-generator-cli)
全体の流れ(ざっくり)
- TypeScriptでリクエスト・レスポンスのモデルを定義
- TypeScriptでコントローラーを定義
- 上記1,2の定義を元に、tsoaでルーターとswagger.jsonを生成
- swagger.jsonはAPIスキーマであり、(通常の)yamlファイルに相当するもの
- swagger.jsonを元に、openapi-generator-cliでAPIクライアントを生成
セットアップ
インストール周りは省略しますが、最終的には以下の構成になります。
(バージョンの指定は任意です)
{
  "scripts": {
    "tsoa": "ts-node-dev tsoaconfig.ts"
  },
  "dependencies": {
    "express": "^4.18.2",
    "tsoa": "^5.1.1"
  },
  "devDependencies": {
    "@types/express": "^4.17.17",
    "@types/node": "^20.6.2",
    "@types/swagger-ui-express": "^4.1.3",
    "swagger-ui-express": "^5.0.0",
    "ts-node-dev": "^2.0.0",
    "typescript": "^5.2.2"
  }
}
tsoaのコンフィグファイルを作成。
生成するAPIスキーマやルーターの仕様、出力先などを設定します。
import {
  generateRoutes,
  generateSpec,
  ExtendedRoutesConfig,
  ExtendedSpecConfig,
} from "tsoa";

(async () => {
  const specOptions: ExtendedSpecConfig = {
    entryFile: "src/index.ts",
    noImplicitAdditionalProperties: "throw-on-extras",
    outputDirectory: "src/infrastructure/express",
    specVersion: 3,
    version: "1.0.0",
    controllerPathGlobs: ["src/controllers/**/*.ts"],
    name: "API",
    host: "localhost:4000",
    schemes: ["http"],
    basePath: "/",
    specFileBaseName: "swagger",
  };

  const routeOptions: ExtendedRoutesConfig = {
    entryFile: "src/index.ts",
    noImplicitAdditionalProperties: "throw-on-extras",
    routesDir: "src/infrastructure/express",
    controllerPathGlobs: ["src/controllers/**/*.ts"],
  };

  await Promise.all([generateSpec(specOptions), generateRoutes(routeOptions)]);
})();
specOptionsがAPIスキーマの設定、routeOptionsがルーターの設定です。
specOptionsによりswagger.json、routeOptionsによりルーターが生成されます。
モデルとコントローラーの定義
今回はUserの作成・取得を例に、モデルとコントローラーを定義します。
(サンプルのため、コントローラーより上位レイヤーの実装は省略しています)
モデル
User作成時のリクエストパラメーターとUser取得時のレスポンスのモデルを定義します。
export class UserCreateParams {
  name: string;
  status: string;

  constructor({ name, status }: { name: string; status: string }) {
    this.name = name;
    this.status = status;
  }
}

export class UserResponse {
  id: string;
  name: string;
  status: string;

  constructor({
    id,
    name,
    status,
  }: {
    id: string;
    name: string;
    status: string;
  }) {
    this.id = id;
    this.name = name;
    this.status = status;
  }
}
※ モデルはtypeやinterfaceでも良いです。
コントローラー
tsoaのコントローラーは、@Routeデコレーターをつけたクラスとして定義します。
@Routeデコレーターの引数には、ルーティングのベースパスを指定します。
import { Request as EXRequest } from "express";
import {
  Body,
  Controller,
  Get,
  Path,
  Post,
  Route,
  SuccessResponse,
  Tags,
  Request,
} from "tsoa";
import { UserCreateParams, UserResponse } from "./user-model";

@Route("users")
@Tags("User")
export class UserController extends Controller {
  @Post()
  @SuccessResponse("200", "Return a user")
  public async createUser(
    @Request() _: EXRequest,
    @Body() params: UserCreateParams
  ): Promise<UserResponse> {
    return new UserResponse({
      id: "1",
      name: params.name,
      status: params.status,
    });
  }

  @Get("{id}")
  @SuccessResponse("200", "Return a user")
  public async findUser(
    @Request() _: EXRequest,
    @Path() id: string
  ): Promise<UserResponse> {
    return new UserResponse({
      id,
      name: "test user",
      status: "active",
    });
  }
}
以上で、ルーターとswagger.jsonの生成準備が出来ました。
ルーターとswagger.jsonの生成
以下のコマンドで実行します。
yarn tsoa
tsoaconfig.tsで設定した場所に、routes.tsとswagger.jsonが生成されます。
routes.ts(ルーター)はExpressのルーターとして設定します。
import { RegisterRoutes } from "./routes";
import swaggerUi from "swagger-ui-express";
import swaggerDocument from "./swagger.json";

const app = express();

app.use("/api/docs", swaggerUi.serve, swaggerUi.setup(swaggerDocument));

RegisterRoutes(app);

export default app;
APIクライアントの生成
openapi-generator-cliを使って、APIクライアントを生成します。
cliを使用するためには、Javaの実行環境が必要になりますが、私の場合、普段、Javaを使うことがほとんどなく、このためにJavaの環境構築するのも億劫なので、Dockerを使って実行することにしました。
docker run \
  --rm \
  -v ${PWD}/src/infrastructure/express:/input \
  -v ${PWD}/client/openapi/gen:/output \
  openapitools/openapi-generator-cli \
  generate \
  -g typescript-axios \
  -i /input/swagger.json \
  -o /output/v1.0 \
  --additional-properties enumPropertyNaming=UPPERCASE
-iオプションでAPIスキーマとなるswagger.jsonを指定し、-oオプションでAPIクライアントの出力先を指定します。
実行すると、以下のディレクトリ・ファイルが生成されます。
client
└── openapi
    └── gen
        └── v1.0
            ├── api.ts
            ├── base.ts
            ├── common.ts
            ├── configuration.ts
            ├── git_push.sh
            └── index.ts
生成されたapi.tsの一部を抜粋すると、以下のようにAPIクライアントの型が定義されています。これらの型を使ってクライアント側を実装します。
/**
 * UserApi - object-oriented interface
 * @export
 * @class UserApi
 * @extends {BaseAPI}
 */
export class UserApi extends BaseAPI {
    /**
     *
     * @param {UserCreateParams} userCreateParams
     * @param {*} [options] Override http request option.
     * @throws {RequiredError}
     * @memberof UserApi
     */
    public createUser(userCreateParams: UserCreateParams, options?: AxiosRequestConfig) {
        return UserApiFp(this.configuration).createUser(userCreateParams, options).then((request) => request(this.axios, this.basePath));
    }

    /**
     *
     * @param {string} id
     * @param {*} [options] Override http request option.
     * @throws {RequiredError}
     * @memberof UserApi
     */
    public findUser(id: string, options?: AxiosRequestConfig) {
        return UserApiFp(this.configuration).findUser(id, options).then((request) => request(this.axios, this.basePath));
    }
}
クライアント側の実装例。
const baseConfig = new Configuration({
  basePath: API_BASE_URL,
});

const userApi = new UserApi(baseConfig);
const user = userApi.findUser(id)
以上で、APIクライアントの実装は完了です。
最後に、Expressサーバを起動し、クライアントからAPIを叩ければ成功です。
import app from "./infrastructure/express/app";

const port = process.env.API_PORT;
app.listen(port, () => {
  console.log(`Running server at http://localhost:${port}`);
});
