2024/07/05 別々のユーザーで作業する方法を追記
2024/07/25 ARM テンプレートを使った Enterprise Policy の作成と Power Platform 管理センターからの設定方法を追記
2024/08/01 ライセンス要件を削除
2024/08/30 シングルVNet の記載を削除
2024/09/19 GA の記載を追記
Power Platform の Azure Virtual Network サポート (サブネット委任) がパブリックプレビュー GA となっています。この機能を使うことで Power Platform から Azure の仮想ネットワークに閉じた環境へ接続できるようになります。
以前からオンプレミスデータゲートウェイを利用することで Azure 上の仮想ネットワーク上のリソースへの接続も実現できていましたが、Azure VM で構成する必要があり、扱えるデータサイズに制限があったり、Azure 用のマネージドコネクタが使えない等の制限がありました。
この機能を利用することで Power Platform に仮想ネットワークのサブネットを委任できるようになり、オンプレミスデータゲートウェイを利用せずに、Azure の仮想ネットワーク上のリソース (仮想マシン、プライベートエンドポイント、ロードバランサー等) にアクセスできます。
設定手順や留意点等をまとめてみましたのでご利用の際はご一読いただければ幸いです。
Power Platform からの Azure へのアクセス経路
Power Platform から Azure へ接続するシナリオは様々なので、要件に応じて接続方法と利用するサービスを選ぶ必要があります。
以下によくある接続シナリオをまとめてみました。
| 接続サービス | ネットワーク | サポートされる主な Power Platform のサービス |
|---|---|---|
| なし | パブリック | すべて |
| API Management | パブリック | Power Automate, Power Apps |
| オンプレミスデータゲートウェイ | プライベート (Azure からのアウトバウンド通信のみ) | Power Automate, Power Apps, Power BI |
| 仮想ネットワークデータゲートウェイ | プライベート (Azure からのアウトバウンド通信のみ) | Microsoft Fabric |
| Azure VNet サポート (サブネット委任) | プライベート | Dataverse, Power Automate, Power Apps |
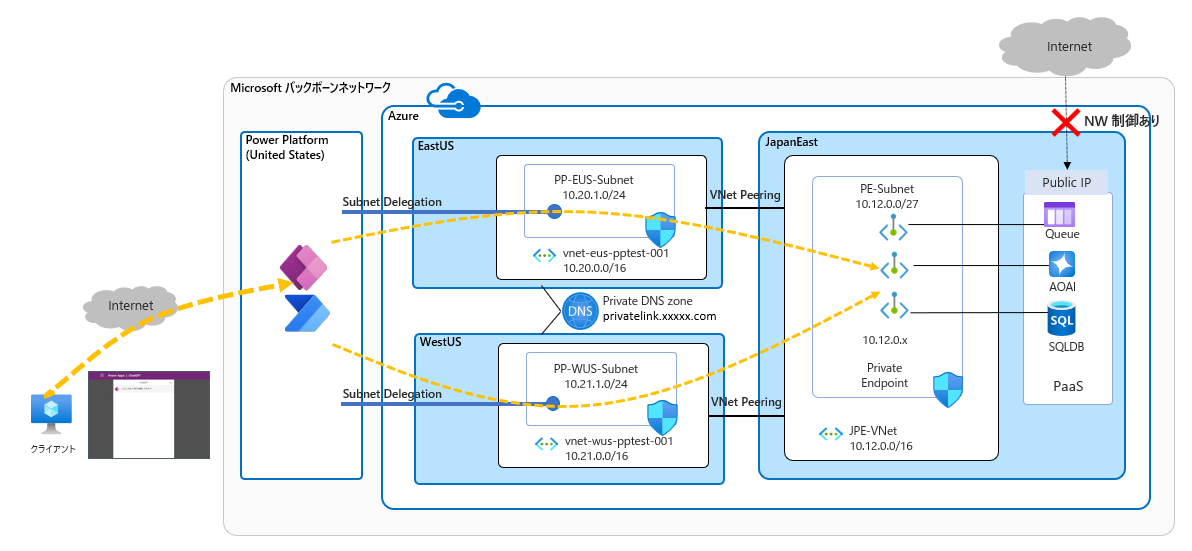
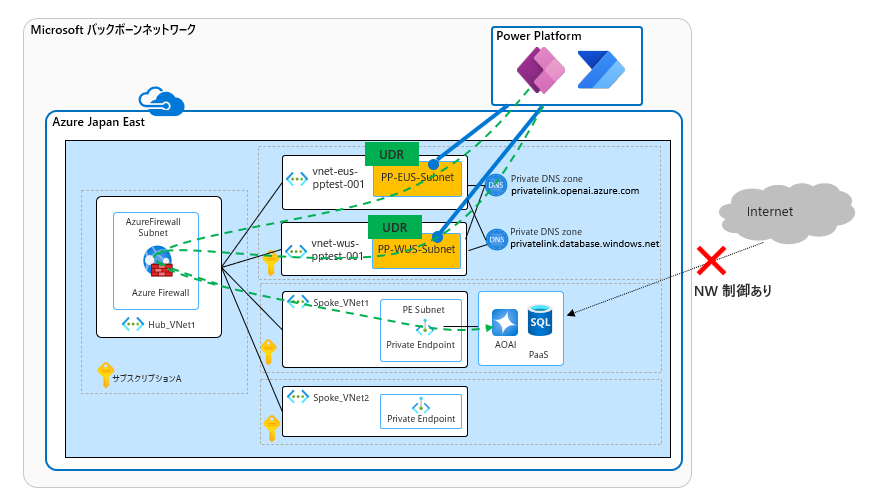
Virtual Network サポートの構成図
以下のような構成で動作確認を行っています。20240412 時点ではなぜか私の環境では、日本で作成した環境がうまく動かなかったため、US の仮想ネットワークと Power Platform の環境を利用しています。(20240521 時点で日本のマネージド環境でも動作することを確認。)
考慮事項
- Azure の仮想ネットワークはペアリージョンも必要になる。日本であれば JapanEast, JapanWest、米国であれば EastUS, WestUS の両方のリージョンで作った仮想ネットワークが必要になる。
- パブリックのエンドポイントに接続する場合は、Azure Firewall や Nat Gateway を使いアウトバウンド接続をできるようにしておく必要あり。
- 一部のコネクタのみのサポート。サポートされているコネクタの一覧はこちら。
- サポートされていないコネクタを利用した場合はサブネットを経由せず、通常のネットワーク経路になる模様。
- Power Platfrom の環境単位でサブネット委任が反映されるため、既存の環境への適用は注意が必要。
ライセンス体系はこちら。- マネージド環境が必要。
Virtual Network サポートの設定手順
事前準備
- 構成図のように仮想ネットワーク、サブネットをそれぞれ作成しておく ※サブネット委任用のサブネットサイズはこちらを確認
- 接続確認用に Azure OpenAI Service, Azure Storage, Azure SQL Database を作成しておく
- それぞれの PaaS でプライベートエンドポイントと Private DNS Zone を作成し、サブネット委任用の仮想ネットワークに Private DNS ゾーンをリンクしておく
1. 権限の付与
- 作業するユーザーに Azure, Power Platfrom 用の権限を付与します。スクリプト内で両方の環境を参照するため同一ユーザーでの作業が望ましいです。
- Azure / Power Platform で別々のユーザーで作業する場合はこちら。
| サービス | 必要な権限 | スコープ | 備考 |
|---|---|---|---|
| Azure リソースプロバイダーの登録 | 管理者権限 (所有者、共同作成者等) | サブスクリプション | 事前準備で実施 |
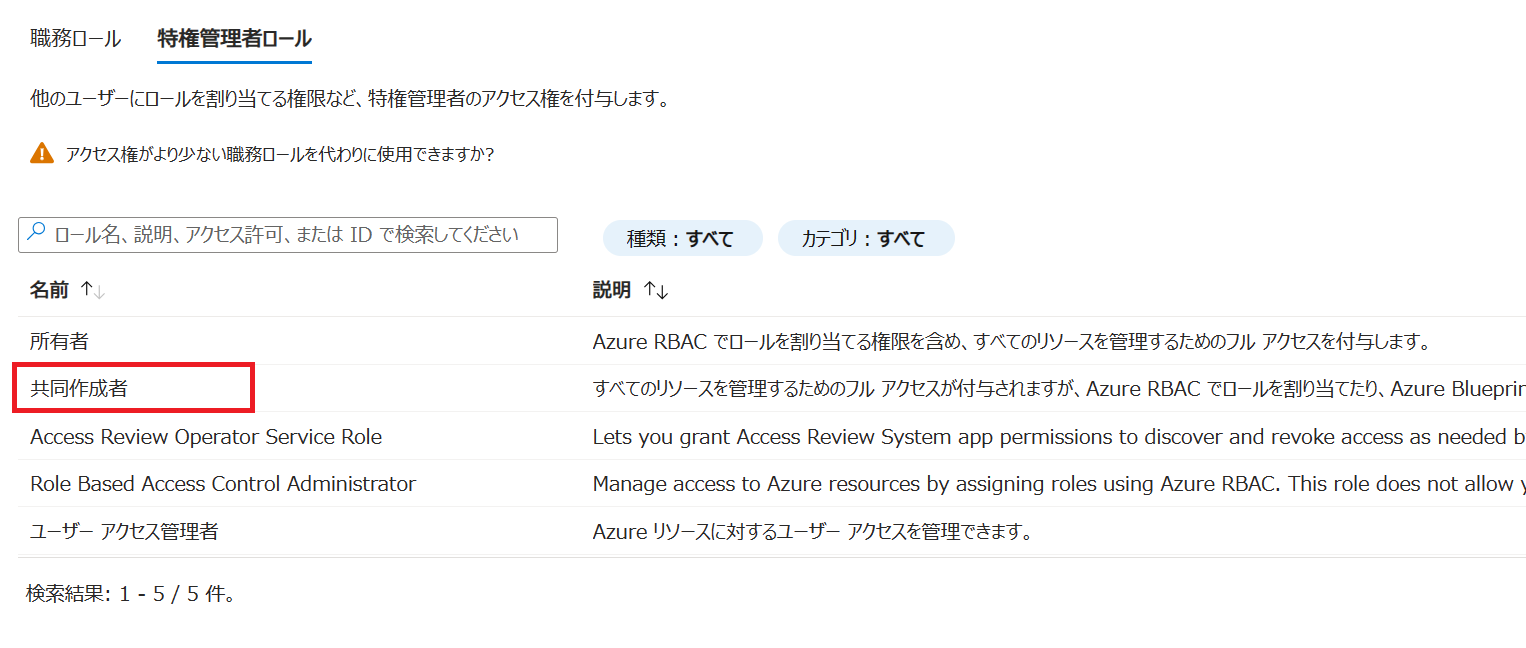
| Azure サブネットの設定、ポリシーの作成 | ネットワーク共同作成者, "Microsoft.Resources/deployments/validate/action", "Microsoft.PowerPlatform/enterprisePolicies/write", "Microsoft.PowerPlatform/enterprisePolicies/read" | リソースグループ | カスタムロールを使わない場合、"共同作成者" でも可 |
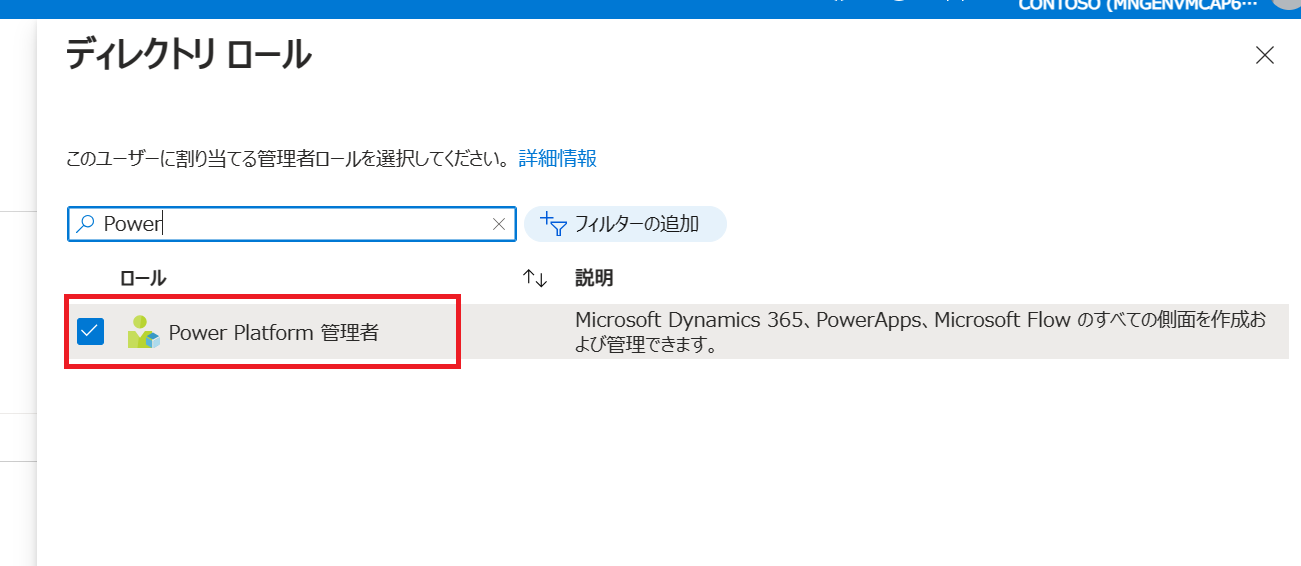
| Power Platfrom | Power Plaftform 管理者 | Entra ロール |
Azure 側の権限 (Azure Portal から設定) ※カスタムロールを使用しない場合の例
Power Platform 側の権限 (Azure Portal の Entra ID から設定)
2. Azure 側の設定
2-1. クライアント端末の準備
Windows 端末で Azure Powershell と Power Platform の Powershell を使えるようにしておきます。
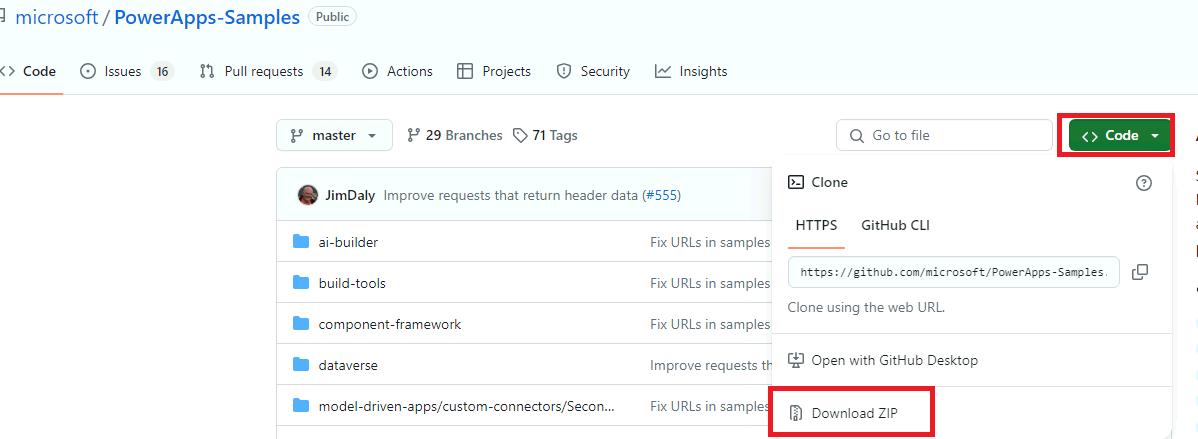
以下の Git のファイル群を Git Clone または Zip でダウンロードして端末に保存します。
https://github.com/microsoft/PowerApps-Samples
ダウンロードした Zip を任意の場所に解凍します。
2-2. リソースプロバイダーの登録
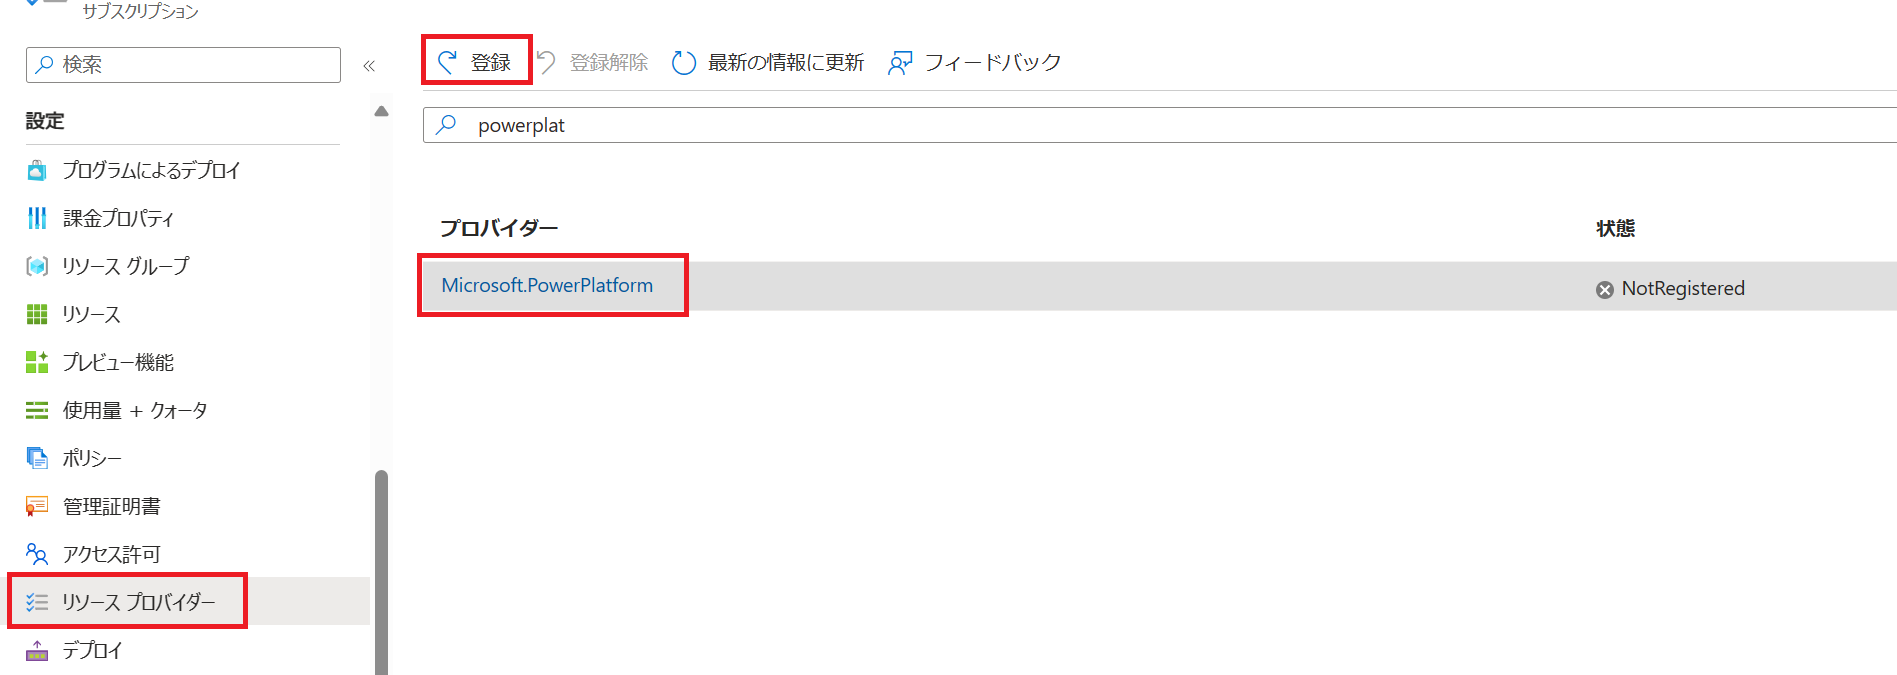
サブスクリプションの管理者権限があるユーザーで Azure Portal にログインし、サブスクリプションのリソースプロバイダーの画面で "Microsoft.PowerPlatform" を選択し、登録をクリックします。
2-3. サブネットの委任設定
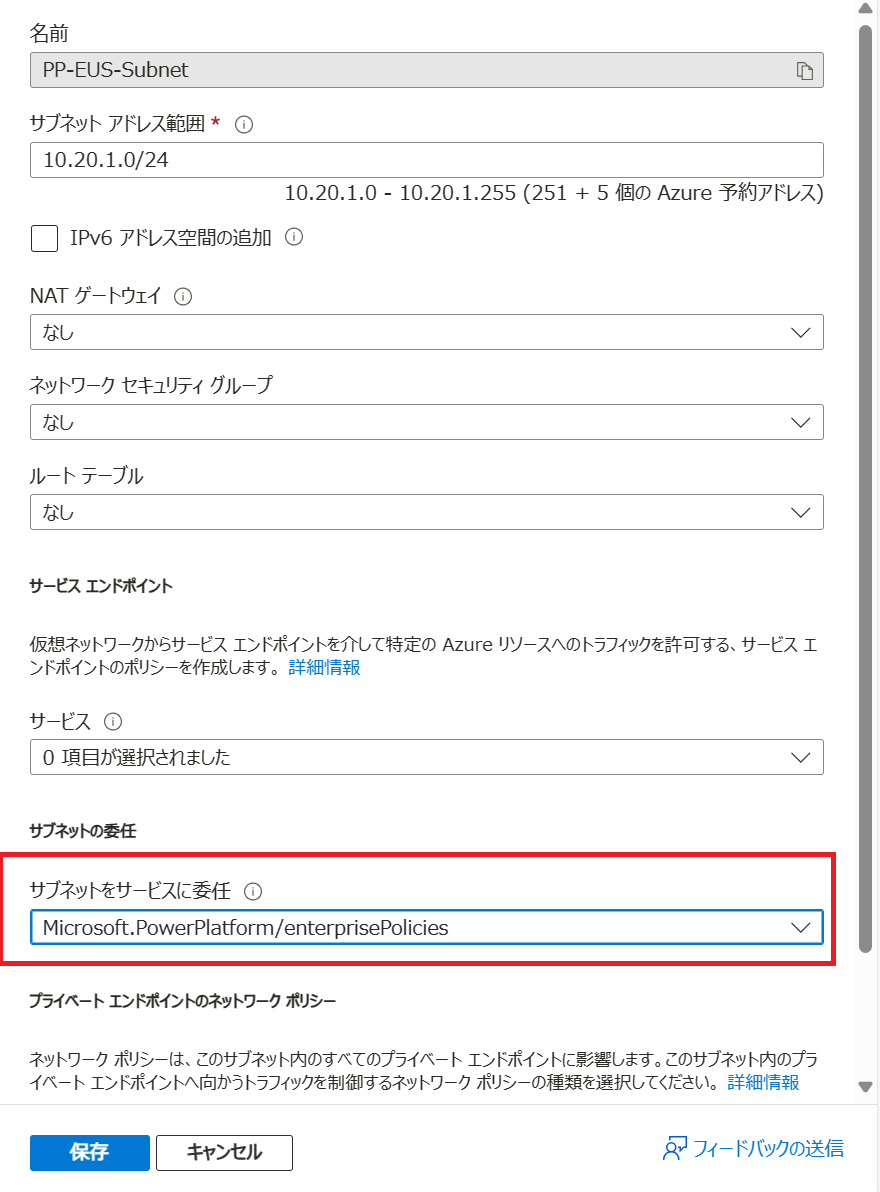
ネットワーク共同作成者があるユーザーで Azure Portal にログインし、EastUS に作成した仮想ネットワークのサブネット設定を開き、"サブネットをサービスに委任" で "Microsoft.PowerPlatform/enterprisePolicies" を選択し保存します。同様の設定を、WestUS に作成した作成した仮想ネットワークでも実施します。
以下の公開情報ではスクリプトを使ってますが、上記手順でも設定可能です。
2-4. Enterprise Policy の作成
Powershell または ARM テンプレートを使って Policy を作成します。
Powershell からの作成
Powershell でダウロードしたフォルダ内の "powershell\enterprisePolicies\SubnetInjection" のフォルダに移動します。
cd C:\xxxx\xxxx\PowerApps-Samples-master\powershell\enterprisePolicies\SubnetInjection
仮想ネットワークがあるサブスクリプションを指定します。
Update-AzConfig -DefaultSubscriptionForLogin cdf800d0-xxxx-xxxx-xxxx-2d72a5e63630
Enterprise Policy を作成するためのスクリプト (CreateSubnetInjectionEnterprisePolicy.ps1) を実行します。
| 項目 | 設定値 | 備考 |
|---|---|---|
| subscriptionId | ポリシーを配置するサブスクリプション ID | |
| resourceGroup | ポリシーを配置するリソースグループ | |
| enterprisePolicyName | ポリシー名 | |
| enterprisePolicylocation | ポリシーを配置する国 | 例: japan,unitedstates |
| primaryVnetId | VNet の ID (プライマリ) | 例 : EastUS の VNet |
| primarySubnetName | サブネット委任用のサブネット名 (プライマリ) | |
| secondaryVnetId | VNet の ID (セカンダリ) | 例 : WestUS の VNet |
| secondarySubnetName | サブネット委任用のサブネット名 (セカンダリ) |
.\CreateSubnetInjectionEnterprisePolicy.ps1

cmdlet CreateSubnetInjectionEnterprisePolicy at command pipeline position 1
Supply values for the following parameters:
(Type !? for Help.)
subscriptionId: cdf800d0-xxxx-xxxx-xxxx-2d72a5e63630
resourceGroup: rg-spoke-ppsubnet-1
enterprisePolicyName: vnet-pptest-entpolicy-001
enterprisePolicylocation: unitedstates
primaryVnetId: /subscriptions/cdf800d0-xxxx-xxxx-xxxx-2d72a5e63630/resourceGroups/rg-spoke-ppsubnet-1/providers/Microsoft.Network/virtualNetworks/vnet-eus-pptest-001
primarySubnetName: PP-EUS-Subnet
secondaryVnetId: /subscriptions/cdf800d0-xxxx-xxxx-xxxx-2d72a5e63630/resourceGroups/rg-spoke-ppsubnet-1/providers/Microsoft.Network/virtualNetworks/vnet-wus-pptest-001
secondarySubnetName: PP-WUS-Subnet
[オプション] Powershell 実行時に以下のようなエラーが出た場合、Powershell の実行ポリシーを変更する必要があります。
xxx is not digitally signed. You cannot run this script on the current system.
上記のエラーが出た場合、以下のコマンドにて Powershell の実行ポリシーを変更します。
Set-ExecutionPolicy -Scope Process -ExecutionPolicy Bypass
スクリプトが成功すると以下のように出力されます。
出力結果の "ResourceId" を後ほど使うためメモしておきます。
Logging In...
Logged In...
Creating Enterprise policy...
Subnet Injection Enterprise policy created
Policy created
{
    "ResourceId":  "/subscriptions/cdf800d0-xxxx-xxxx-xxxx-2d72a5e63630/resourceGroups/rg-spoke-ppsubnet-1/providers/Microsoft.PowerPlatform/enterprisePolicies/vnet-pptest-entpolicy-001",
    "Id":  "/subscriptions/cdf800d0-xxxx-xxxx-xxxx-2d72a5e63630/resourceGroups/rg-spoke-ppsubnet-1/providers/Microsoft.PowerPlatform/enterprisePolicies/vnet-pptest-entpolicy-001",
    "Identity":  null,
    "Kind":  "NetworkInjection",
    "Location":  "unitedstates",
    "ManagedBy":  null,
    "ResourceName":  "vnet-pptest-entpolicy-001",
    "Name":  "vnet-pptest-entpolicy-001",
~~省略~~
    "CreatedTime":  null,
    "ChangedTime":  null,
    "ETag":  null
}
ARM テンプレートでデプロイ
事前準備として利用する仮想ネットワークの "プロパティ" からリソース ID をコピーし、メモ帳に書いておきます。
サブネット名も書いておきます。
Azure Portal で "テンプレート" で検索し、"テンプレートのデプロイ" をクリック

以下のテンプレートを貼り付けます。2VNet の構成に合わせてコピーします。
{
    "$schema": "https://schema.management.azure.com/schemas/2019-04-01/deploymentTemplate.json#",
    "contentVersion": "1.0.0.0",
    "parameters": {
        "enterprisePolicies_policy_name": {
            "defaultValue": "subnetpolicy",
            "type": "String"
        },
        "virtualNetworks_vnet1_externalid": {
            "defaultValue": "/subscriptions/xxxxx/resourceGroups/rg-ppvnetsup-001/providers/Microsoft.Network/virtualNetworks/vnet-pptest-jpe-001",
            "type": "String"
        },
        "virtualNetworks_vnet2_externalid": {
            "defaultValue": "/subscriptions/xxxxx/resourceGroups/rg-ppvnetsup-001/providers/Microsoft.Network/virtualNetworks/vnet-ppfjpw-001",
            "type": "String"
        }
    },
    "variables": {},
    "resources": [
        {
            "type": "Microsoft.PowerPlatform/enterprisePolicies",
            "apiVersion": "2020-10-30-preview",
            "name": "[parameters('enterprisePolicies_policy_name')]",
            "location": "japan",
            "kind": "NetworkInjection",
            "properties": {
                "healthStatus": "Undetermined",
                "networkInjection": {
                    "virtualNetworks": [
                        {
                            "id": "[parameters('virtualNetworks_vnet1_externalid')]",
                            "subnet": {
                                "name": "subnet1"
                            }
                        },
                        {
                            "id": "[parameters('virtualNetworks_vnet2_externalid')]",
                            "subnet": {
                                "name": "subnet2"
                            }
                        }
                    ]
                }
            }
        }
    ]
}
仮想ネットワークの "ポリシー名", "リソース ID", "Location", "サブネット名" を変更して "保存" します。
サブスクリプションとリソースグループ(ポリシーが配置されるリソースグループ)を指定して、作成を押します。

サブネットの設定が完了しており、テンプレートに問題なければデプロイが成功するはずです。
成功したらリソースに移動して、リソース ID をコピーします。(次の手順でも GUI 使う場合は不要)

3.Power Platform 側の設定
3-1. 環境の作成
サブネット委任の設定は Power Platform の "環境" 単位で行われますので、検証用に新しく環境を作成します。
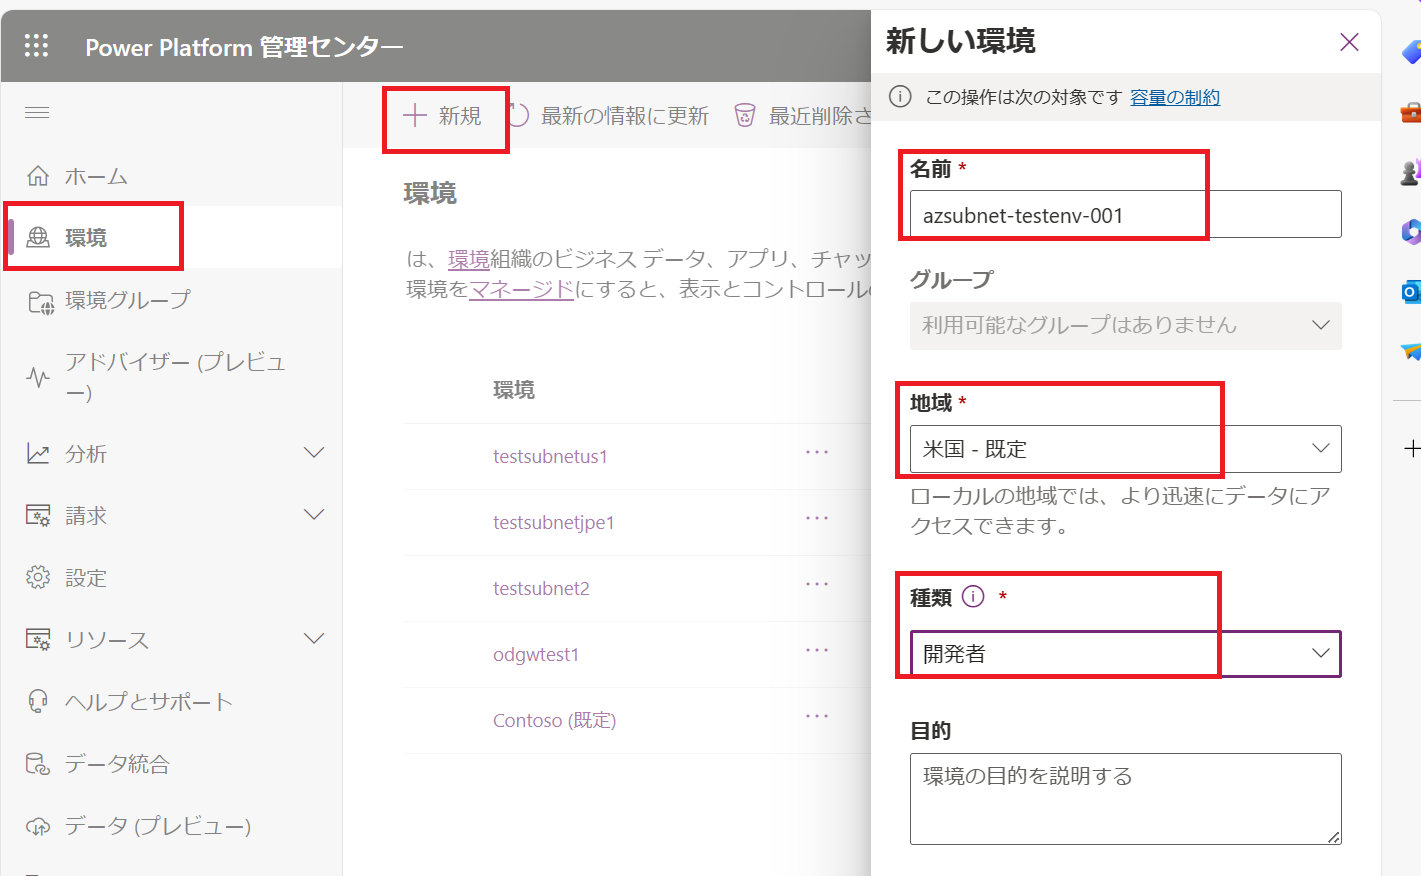
Power Platform 管理センターに同じユーザーでログインし、[環境] -> [新規] をクリックし、[名前]、[地域]、[種類] 等を適宜設定し、保存します。
3-2. サブネット委任の設定実施
サブネット委任の設定は Powershell または Power Platform 管理センターのどちらからでも実施可能です。
Powershell での実施
サブネット委任を設定するための (NewSubnetInjection.ps1) を実行します。
environmentId は先ほどメモした、"環境ID"、policyArmId は先ほどメモした "ResourceId" です。
.\NewSubnetInjection.ps1

cmdlet NewSubnetInjection at command pipeline position 1
Supply values for the following parameters:
environmentId: 825cb1e0-xxxx-xxxx-b407-7a99fbd6e21a
policyArmId: /subscriptions/cdf800d0-xxxx-xxxx-xxxx-2d72a5e63630/resourceGroups/rg-spoke-ppsubnet-1/providers/Microsoft.PowerPlatform/enterprisePolicies/vnet-pptest-entpolicy-001
Logging In...
WARNING: The names of some imported commands from the module 'Microsoft.PowerApps.AuthModule' include unapproved verbs
that might make them less discoverable. To find the commands with unapproved verbs, run the Import-Module command again
 with the Verbose parameter. For a list of approved verbs, type Get-Verb.
Logged In...
Environment reterieved

Enterprise Policy reterieved

Linking of vnet policy started for environement 825cb1e0-7787-ee40-b407-7a99fbd6e21a
Do you want to poll the linking operation (y/n)

Polling the link operation every 5 seconds.
Operation finished with state Succeeded
Power Platform 管理センターから該当の環境を開き、最近の操作にて "New Network Injection Policy" の状態が "成功" となっていることを確認します。

Power Platform 管理センターからの実施
Power Platform 管理センターに Power Platform 管理者でログインし、Security -> Network Security -> Azure Virtual Network をクリックして、対象の環境を選択し、Next をクリックします。
Assign をクリックします。(※割り当てを元に戻す場合、Powershell を使う必要があります)

Power Platform 管理センターから該当の環境を開き、最近の操作にて "New Network Injection Policy" の状態が "成功" となっていることを確認します。

Azure / Power Platform で別々のユーザーで作業する場合
以下のステップで進めれば設定できました。
- Azure の共同作成者にて "2. Azure 側の設定" をすべて実施
- RBAC の操作が可能なユーザー (所有者相当) にて Azure Portal にログインし、Enterprise policy の読み取り権限を付与
"種類" の値に "enterprisepolicies" を入力し、適用します。

作成したポリシーが表示されるので、アクセス制御にて閲覧権限を Power Platform 管理者に付与します。

3 "3.Power Platform 側の設定" を実施
動作確認
Private Endpoint 経由で接続
Azure SQL Database
SQL Database 用の接続を Microsoft Entra 認証にて作成します。(事前に SQL Server 側で認証設定済み)
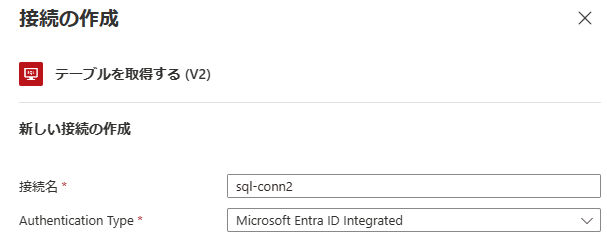
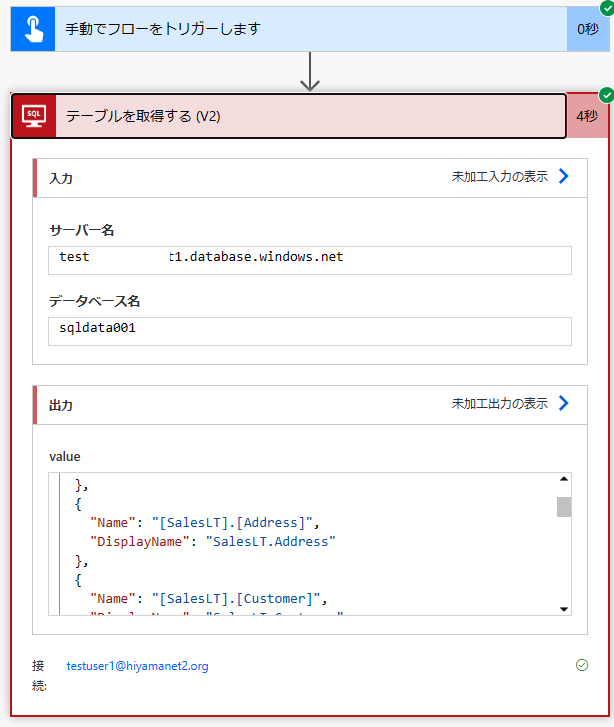
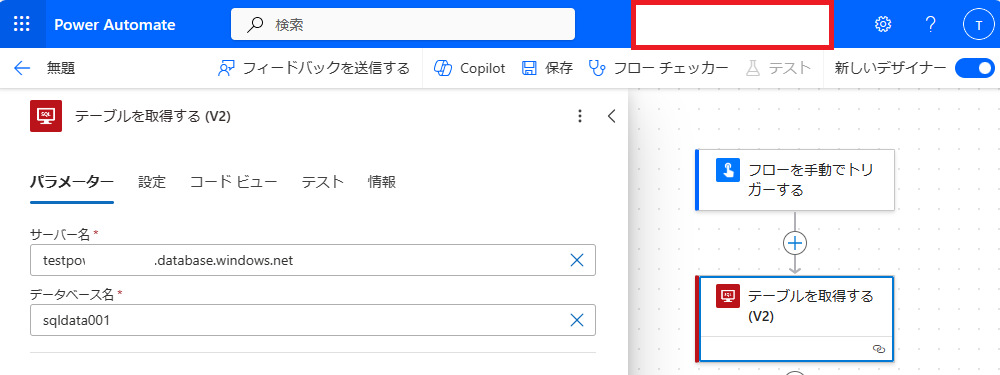
以下のような簡易なフローを作り、パブリックアクセスが無効となっている SQL Database からテーブルを取得します。
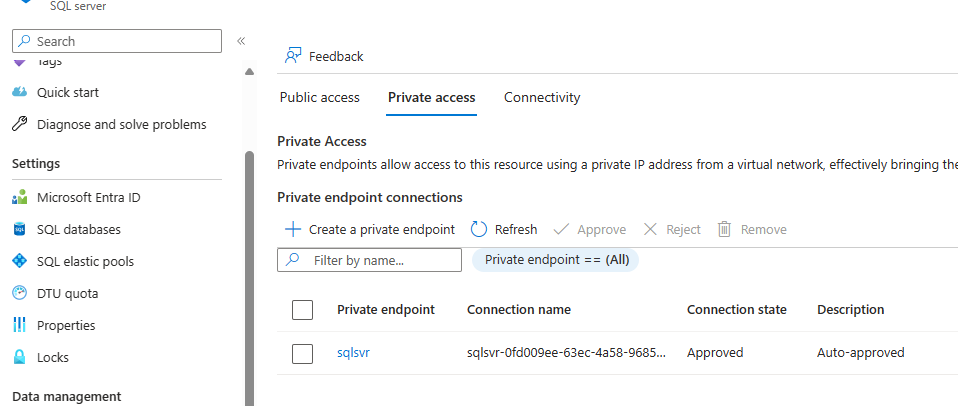
参考:SQL Server 側のネットワーク設定
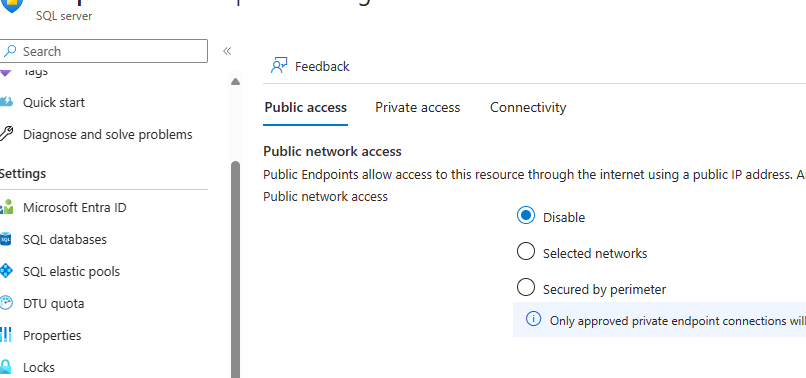
プライベートエンドポイントは設定済み
カスタムコネクタ + Azure OpenAI Service
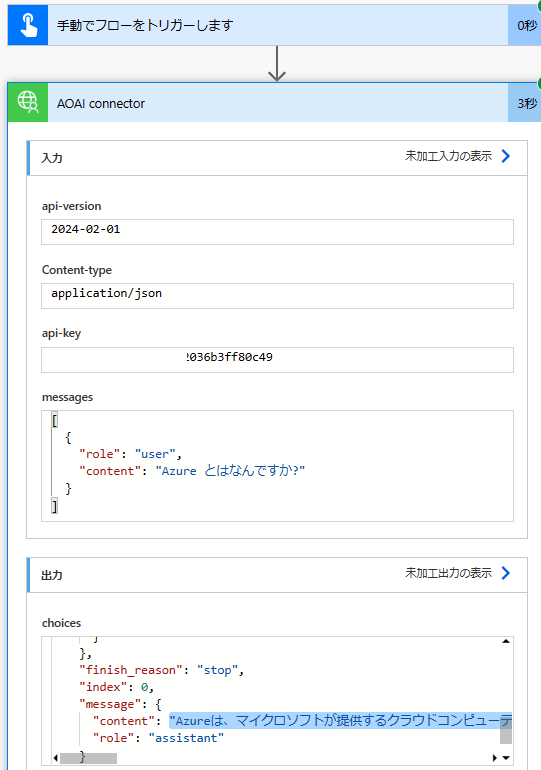
Power Automate, Power Apps と組わせて利用するシナリオが多い OpenAI Service への接続をカスタムコネクタで実施してみます。
以下のようなシンプルなカスタムコネクタを作成し、Azure OpenAI Service に接続します。
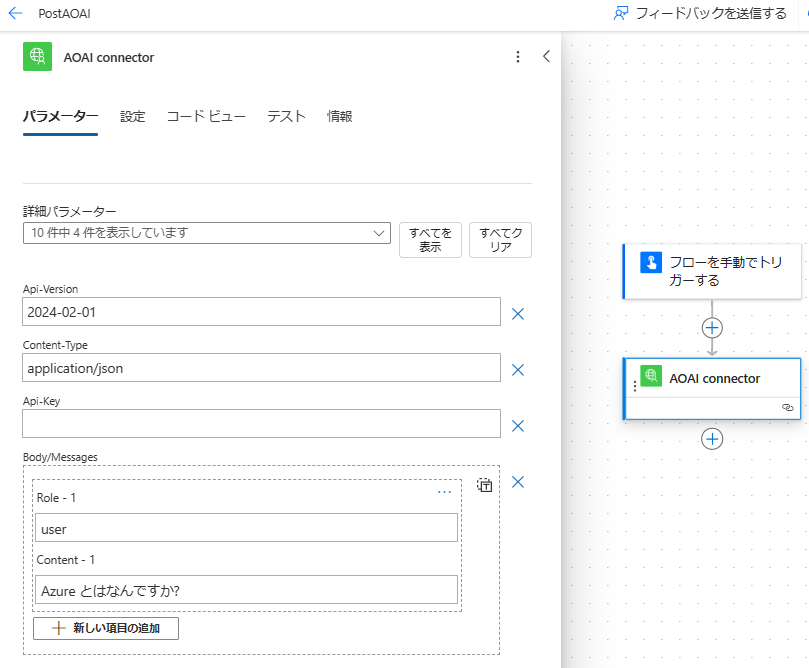
パブリックアクセスは無効にされている環境ですが、OpenAI Service から応答が正しく返ってきました。
サービスエンドポイント経由で接続
Azure Queue Storage
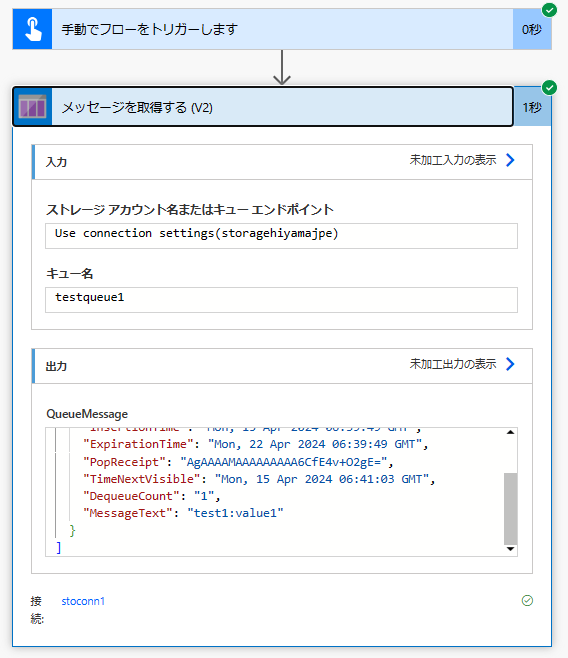
Azure Storage はグローバルのサービスエンドポイントの利用がサポートされているので Azure Storage へのサービスエンドポイントでのアクセスも試してみます。
Storage アカウントを作成し、サブネット委任が設定されている二つのサブネットをストレージのファイアウォールで許可します。
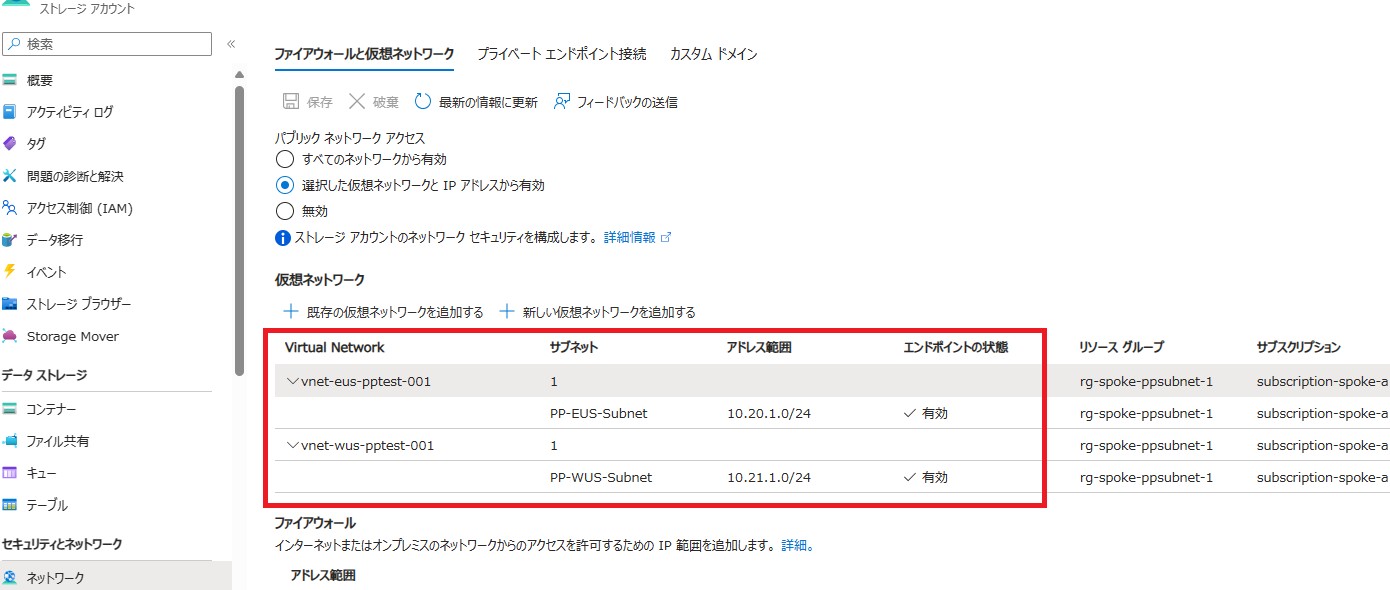
サービスエンドポイント経由でデータを取得することができました。
NSG
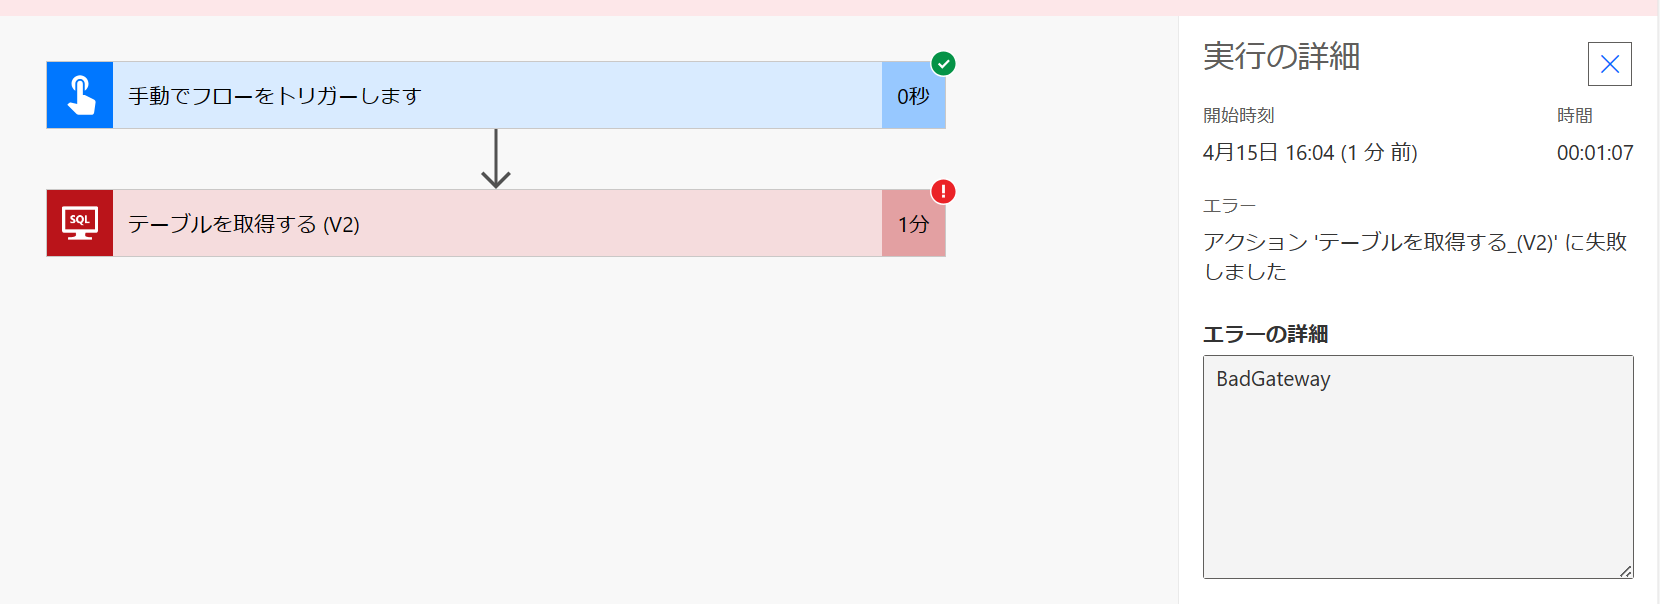
対象のサブネットに NSG を設定し、通信制御を試してみます。試しにアウトバウンド通信をすべて拒否します。

SQL Server に接続できなくなりましたので NSG の設定は効いているようです。
複数環境から同じサブネットを共有
以下のような文言が公開情報に記載があることから、複数の Power Platform の環境から同じサブネットを共有して利用することはサポートされていそうです。
試しに動作確認もしてみましたが、問題なく利用できました。
同じサブネットを複数の環境に委任するには、そのサブネット内でさらに多くの IP アドレスが必要です。
シングル VNet 構成
ドキュメントが更新されたため削除
(20240521 追記)
公開ドキュメントに開発、テスト環境では単一 VNet の利用が推奨である旨の記載があります。
ネットワーク構成
英語ですが、アーキテクチャの例を以下にいくつか記載しています。
Private Endpoint をそれぞれの仮想ネットワークに作成
こちらで説明しているように 1 つの Private DNS ゾーンでは管理できないため、Private DNS ゾーンを 2 つ作成 (リソースグループも分ける) する必要があります。リージョン障害を想定する場合は推奨される構成です。
グローバル VNet ピアリングを利用
アドレス空間が重複しているとピアリングできないため注意が必要です。また、常に片方のリージョンのネットワーク経由となるためリージョン冗長の要件がないかは事前に確認が必要です。
サービスエンドポイントを利用
ストレージのようにリージョンをまたいでサービスエンドポイントを使うことができるサービスもあるため、サービスエンドポイントを利用します。サポートされるサービスであるかは要確認です。
Hub & Spoke + Azure Firewall
Hub VNet にサブネットを追加する構成も可能だと思いますが、既存環境の場合、Hub VNet の拡張が難しかったり、共有基盤である Hub に手を入れたくないといった要件もあると思いましたので、以下のような構成で Spoke VNet としてサブネット委任用の VNet を追加して接続を試してみましたが、問題なく利用可能でした。UDR も問題なく動作しているようです。
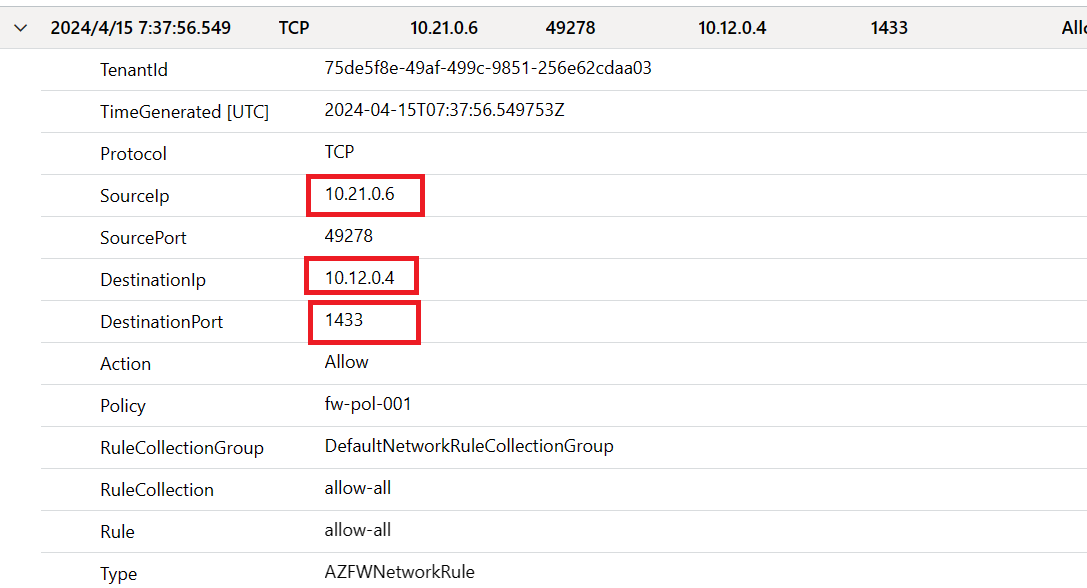
サブネット委任が設定されたアドバイス空間から SQL Server のプライベートエンドポイントへの通信が Azure Firewall のログとしても記録されていました。
環境の削除
利用後に環境を削除したい場合、以下の順序でやる必要があります。
1). RevertSubnetInjection.ps1 のスクリプトを流して Enterprise Policy の割り当てを解除する
環境 ID とポリシーのリソース ID が必要になります。
> .\RevertSubnetInjection.ps1

cmdlet RevertSubnetInjection at command pipeline position 1
Supply values for the following parameters:
environmentId: d8cad0fb-0c05-e108-83db-4929a5f0cbb3
policyArmId: /subscriptions/xxxxxx-xxxxx-4093-b19c-94eba5afa598/resourceGroups/rg-ppfsubnet-001/providers/Microsoft.PowerPlatform/enterprisePolicies/jpe-jpw-2vnet-001
Logging In...
WARNING: The names of some imported commands from the module 'Microsoft.PowerApps.AuthModule' include unapproved verbs that might make them less discoverable. To find the commands with unapproved verbs, run the Import-Module
command again with the Verbose parameter. For a list of approved verbs, type Get-Verb.
Please select the account you want to login with.

Retrieving subscriptions for the selection...
[Announcements]
With the new Azure PowerShell login experience, you can select the subscription you want to use more easily. Learn more about it and its configuration at https://go.microsoft.com/fwlink/?linkid=2271909.

If you encounter any problem, please open an issue at: https://aka.ms/azpsissue

Logged In...
Environment reterieved

Enterprise Policy reterieved

Unlinking of vnet policy started for environement d8cad0fb-0c05-e108-83db-4929a5f0cbb3
Do you want to poll the unlink operation (y/n)
y
Polling the unlink operation every 5 seconds.
Operation finished with state Succeeded
2). Power Platform 側の環境を削除
3). Azure ポータルからポリシーを削除する (非表示の種類なので注意)
ポリシーの割り当て解除の前に Power Platform 側の環境を削除してしまうとポリシー削除時に接続先の環境 ID がないためエラーで削除できなくなります。
ポリシー適用後、うまく動作しないとき
ポリシーの適用直後は反映まで時間がかかる場合があります。
1 時間程度経過後、カスタムコネクタをアップデートすると改善する場合があります。
