TL;DR
- Keras(Tensorflow)のCallback機能を利用して、epochごとに作成されるモデルの画像評価ができる
- 意外にも日本語でまとめらている記事がなかった?ので備忘録がわりに
やり方
基本的には以下の記事をそのままパクって参考にしています。
ご丁寧にgifまでつけてくれているので、もはや英語コード読める人はこちらを見たら良いのでは。
まずはcallbackに使うクラスを定義します。
class TensorBoardImage(Callback):
    def __init__(self, model, tag, now):
        super().__init__()
        self._model = model
        self._tag = tag

    def tf_summary_image(self, img):
        import io
        from PIL import Image
        img = img.astype(np.uint8)

        height, width, channel = img.shape if len(img.shape) == 3 else (img.shape[0], img.shape[1], 1)
        image = Image.fromarray(img)
        with io.BytesIO() as output:

            image.save(output, format="PNG")
            image_string = output.getvalue()
        return tf.Summary.Image(height=height,
                               width=width,
                               colorspace=channel,
                               encoded_image_string=image_string)

    def make_image()
        # ここでモデルを使ってpredictしたり、画像処理したりする
        return figure

    def on_epoch_end(self, epoch, logs={}):
        # Do something to the image
        pose_dist = self.decode_image()
        image = self.tf_summary_image(pose_dist)
        summary = tf.Summary(value=[tf.Summary.Value(tag=self._tag, image=image)])
        with tf.summary.FileWriter('/home/username/hoge/piyo') as writer:
            writer.add_summary(summary, epoch)

        return
解説
tf_summary_image関数
def tf_summary_image(self, img):
        import io
        from PIL import Image
        img = img.astype(np.uint8)

        height, width, channel = img.shape if len(img.shape) == 3 else (img.shape[0], img.shape[1], 1)
        image = Image.fromarray(img)
        with io.BytesIO() as output:
            image.save(output, format="PNG")
            image_string = output.getvalue()
        return tf.Summary.Image(height=height,
                               width=width,
                               colorspace=channel,
                               encoded_image_string=image_string)
- 画像をバイト型に変換して、文字列をtensorboardに送る関数になっています。
- 画像は
np.uint8型にしないとうまく出力してくれないので、もしfloat型で画像処理している場合は255をかけてからint型に変換することを忘れずに。 -
height, width, channelはRGBとGrayの2つに対応するように少しコードをいじっています。 - 変換した画像を
tf.Summary.Imageとして返しています。
make_image関数
def make_image()
        # ここでモデルを使ってpredictしたり、画像処理したりする
        return figure
- ここにはオリジナルな画像処理を入れます。おそらくほとんどがmodelを利用した形で使うと思うので、initした
self._modelとか使ってpredictするとと良いんじゃないでしょうか。 - 複雑な画像処理とかもこのへんでやると良さげ?
参考例
def decode_image(self):
        n = 15 # figure with 15x15 digits
        digit_size = 32
        figure = np.zeros((digit_size * n, digit_size * n))

        grid_x = norm.ppf(np.linspace(0.05, 0.95, n))
        grid_y = norm.ppf(np.linspace(0.05, 0.95, n))

        for i, yi in enumerate(grid_x):
            for j, xi in enumerate(grid_y):
                z_sample = np.array([[xi, yi]])
                x_decoded = self._model.predict(z_sample)
                digit = x_decoded[0].reshape(digit_size, digit_size)
                figure[i * digit_size: (i + 1) * digit_size,
                       j * digit_size: (j + 1) * digit_size] = digit

        figure *= 255
        return figure
- 上記のコードはVAEを実装した際に潜在変数zのパラメータ($\mu$と$\sigma^2$)を入力として、Decoderを通した画像の結果を返すコードになっています。
- 潜在変数をずらしながらパラメータに応じた画像をモデルを通して作成するものです。
on_epoch_end関数
def on_epoch_end(self, epoch, logs={}):
        # Do something to the image
        pose_dist = self.make_image()
        image = self.tf_summary_image(pose_dist)
        summary = tf.Summary(value=[tf.Summary.Value(tag=self._tag, image=image)])
        with tf.summary.FileWriter('/home/username/hoge/piyo') as writer:
            writer.add_summary(summary, epoch)
- この関数がcallbackと直接関係を持っている関数になっており、作成したっ結果を元にtensorboardに記録を残すものになっています。
- 参考にしたサイトではFileWriterに相対パスを入れていたのですが、pcやosなどの環境によっては絶対パスを入れてあげないと正しくtensorboardに画像を送ってくれない事があるので、絶対パス推奨です。
このエラーが見つけきれなくて3h潰しました
- Summary関数内にvalueを設定し、そこでtag名と出力する画像を設定しましょう。
結果
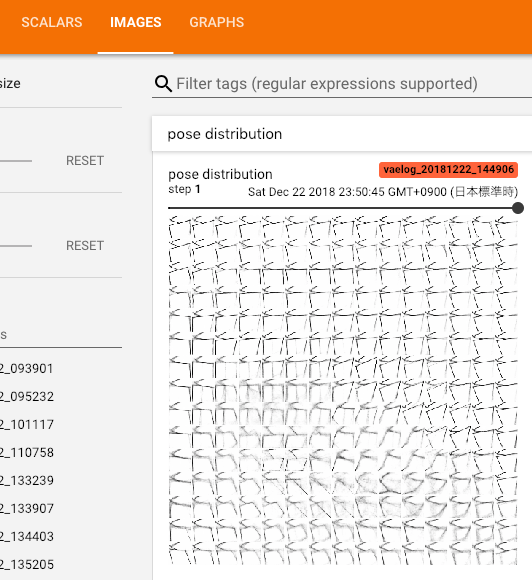
こんな感じで出力できます。やったね。みなさん良いTensorboardライフを!
