概要
CourseraのTensorFlow Advanced Techniques Specialization を開始した。
有用な情報が多そうなので備忘録がてら数回に分けて残すこととした。
- 実施時期: 2021年7月
- OS: CourseraのCloud
- Python: Python3.7.6
- Tensorflow 2.5
モチベーション
画像データや離散値データ、連続値データ、時系列データなど、カテゴリの異なるデータを同時にNeural Network(以下NN)に入力したいと思うことは誰しもあり、いままでなんとなく見様見真似で済ませてきてたけど、しっかりやり直そうとこの4ヶ月コースを開始した。
本コースは下記のコースを修了しておくことが推奨されている。
どちらとも講師はTensorflow開発チームのローレンスさん。StanfordのAndrew先生よりも英語は聞き取りやすいので助かる。
修了したら、Deep Mutual Learningを組んでみたいと思う。
PyTorchならいくつかGithubに落ちていたがTF版はTF v1しか見つからなかったので自分で組むしかない。
Functional APIの基礎
Couseraで使用されるコードのためキモの部分だけ紹介し、すべての掲載は控えることとする。
Functional APIの基礎
レイヤの流れに沿って各レイヤの出力を次のレイヤに入力するようにレイヤを並べる。Inputレイヤの前にはレイヤがないので渡せるものはない。
モデルの定義は入力レイヤと出力レイヤをリスト型で指定する。
import tensorflow as tf
from tensorflow.keras.models import Model
from tensorflow.keras.layers import Dense, Input
from tensorflow.keras.metrics import RootMeanSquaredError

In = Input(...)
x1 = Dense(...)(In)
x2 = Dense(...)(x1)
Out = Dense(...)(x2)

model = Model(inputs=[In], outputs=[Out])
Dense ( )( ) に違和感があるかもしれないが、これは下記から来ている。
# Denseクラスのインスタンスを作成して(1行目)、それに前のレイヤの出力を入力する(2行目)
x1 = Dense(...)
x1 = x1(In)

# これを1行で書くと、
x1 = Dense(...)(In)
NNの分岐
サンプルコードはY1, Y2とも連続値のRegression problemとする。
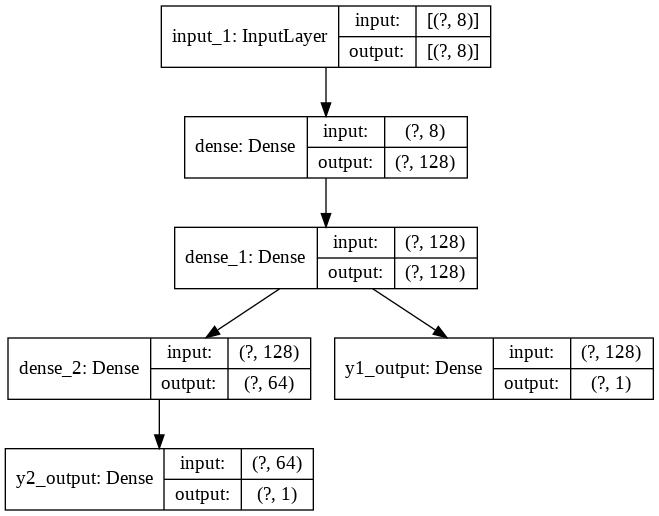
入力のデータセットXに対し、出力がY1, Y2の2つあるとき、NNを途中で分岐させるモデル
name = 'y1_output', 'y2_output'のように出力レイヤ名を任意につけておくこと。
# Define model layers.
input_layer = Input(shape=(len(train.columns),))
first_dense = Dense(units='128', activation='relu')(input_layer)
second_dense = Dense(units='128', activation='relu')(first_dense)

# Y1 output will be fed directly from the second dense
y1_output = Dense(units='1', name='y1_output')(second_dense)
third_dense = Dense(units='64', activation='relu')(second_dense)

# Y2 output will come via the third dense
y2_output = Dense(units='1', name='y2_output')(third_dense)

# Define the model with the input layer and a list of output layers
model = Model(inputs=input_layer, outputs=[y1_output, y2_output])

print(model.summary())
KerasのドキュメントにはX, Y1で1モデル、X, Y2で1モデルの計2モデルを作成することも考慮せよと書かれてあり、それももちろん良い。
感覚的には2モデルの方がそれぞれの精度は良くなりそうな気はするけど、Xに何も工夫を凝らさなければ精度は悪くなることもあり答えはない。
それぞれの出力についてoptimizerとloss, metricsを定義する。loss, metricsはそれぞれの端点で計算されるので個別に設定する。optimizerはNN全体のパラメータ調整に使うので出力の数は関係ない。
# Specify the optimizer, and compile the model with loss functions for both outputs
model.compile(optimizer='Adam',
              loss={'y1_output': 'mse', 'y2_output': 'mse'},
              metrics={'y1_output': RootMeanSquaredError(),
                       'y2_output': RootMeanSquaredError()})
fit()とevaluate()とpredict()を実行する。
test_Yはtest_Y[0]がy1_outputの出力、test_Y[1]がy2_outputの出力となっている。Y_predも同じ。
# Train the model for 500 epochs
history = model.fit(norm_train_X, train_Y,
                    epochs=500, batch_size=10, validation_data=(norm_test_X, test_Y))

# Test the model and print loss and mse for both outputs
loss, Y1_loss, Y2_loss, Y1_rmse, Y2_rmse = model.evaluate(x=norm_test_X, y=test_Y)
print("Loss = {}, Y1_loss = {}, Y1_mse = {}, Y2_loss = {}, Y2_mse = {}".format(loss, Y1_loss, Y1_rmse, Y2_loss, Y2_rmse))

Y_pred = model.predict(norm_test_X)
NNの結合
サンプルコードはsiamese networkとする。入力した2つの画像が似ているか否かを判定するネットワークで、NLPでも活用される。
fashion MNISTとその10個の元ラベルを使用し、画像のペア、及び元ラベルが同じなら1, 異なれば0という新しいラベルを作成しデータセットとしている。
上図の通り両入力NNの出力ベクトルのユークリッド距離と、同種(1)・異種(0)ラベルとともにTrainingしている。ユークリッド距離を計算するレイヤはLambdaレイヤで組んでいる。Lambdaレイヤについては次回投稿する。
左右の入力ネットワークは同じでなければならないので予め定義する。ここはただ画像のfeatureを求めるレイヤで画像サイズが大きければCNNなどに置き換えられる。
def initialize_base_network():
    input = Input(shape=(28,28,), name="base_input")
    x = Flatten(name="flatten_input")(input)
    x = Dense(128, activation='relu', name="first_base_dense")(x)
    x = Dropout(0.1, name="first_dropout")(x)
    x = Dense(128, activation='relu', name="second_base_dense")(x)
    x = Dropout(0.1, name="second_dropout")(x)
    x = Dense(128, activation='relu', name="third_base_dense")(x)

    return Model(inputs=input, outputs=x)

base_network = initialize_base_network()

def euclidean_distance(vects):
    x, y = vects
    sum_square = K.sum(K.square(x - y), axis=1, keepdims=True)
    return K.sqrt(K.maximum(sum_square, K.epsilon()))

def eucl_dist_output_shape(shapes):
    shape1, shape2 = shapes
    return (shape1[0], 1)
このベースモデルをそれぞれ入力レイヤとすると、全体は下記となる。
# create the left input and point to the base network
input_a = Input(shape=(28,28,), name="left_input")
vect_output_a = base_network(input_a)

# create the right input and point to the base network
input_b = Input(shape=(28,28,), name="right_input")
vect_output_b = base_network(input_b)

# measure the similarity of the two vector outputs
output = Lambda(euclidean_distance, name="output_layer", output_shape=eucl_dist_output_shape)([vect_output_a, vect_output_b])

# specify the inputs and output of the model
model = Model([input_a, input_b], output)
fit()を実行する。lossはカスタムlossとなっている。カスタムlossの作成も次回投稿する。
def contrastive_loss_with_margin(margin):
    def contrastive_loss(y_true, y_pred):
        square_pred = K.square(y_pred)
        margin_square = K.square(K.maximum(margin - y_pred, 0))
        return K.mean(y_true * square_pred + (1 - y_true) * margin_square)
    return contrastive_loss

rms = RMSprop()
model.compile(loss=contrastive_loss_with_margin(margin=1), optimizer=rms)
model.fit([tr_pairs[:,0], tr_pairs[:,1]], tr_y, epochs=20, batch_size=128, validation_data=([ts_pairs[:,0], ts_pairs[:,1]], ts_y))
少しCourseraについて
注意:すべてのサービスがそうではないと思うが、以下ML関連コースに関する主観による。
4〜6個のコースで構成されたSpecializationと呼ばれるセットがあり、この全コースを1月/コースのペースで受講する。
すべてのコースを修了するとコードを含む全教材へのアクセス期限は永久解除される。途中キャンセルしてしまうとアクセスはできなくなる。
また特定のコースを単体で受講することもできるが、この場合もSpecializationを終わらせたわけではないためアクセスはできなくなる。
【講師】
これが一番の魅力
TF開発チームの方や、MLの神様のひとりのAndrew先生や、Stanfordの先生たちが丁寧に解説されている。
【修了の条件】
各コースに用意されたクイズや最後に提出するコーディング課題をパスすること。期限はないが終わらなければ受講料は払い続けなければならない。
難易度はピンキリで、1月/コースも必要なかったり、課題が難しすぎてフォーラムやSlackでわかんないところを投稿したり、過去ログを調べまくらないと先に進めないものもある。
(5月に修了したNLP Specializationは半べそかきながら何度途中キャンセルしようかと思うほど難解で、後半はほぼフォーラムだより。)
【コーディング課題】
CourseraのCloud環境に用意されたJupyter labで、すでに書かれたコード中の指定箇所を穴埋めするような感覚。
セルとセルの間にアルゴリズムの解説や、どんなAPIを使うべきかなど解説があり、しっかり読めばやらなきゃならんことは必ず理解できる。コードが書けるかは別だが…
自由にセルを追加して変数の確認など行ってもOK。
IPython.core.debuggerでブレイクを張っても確認可能。
提出ボタンを押すと、Grader(グレードを付けるやつ)というシステムがコードの合否を自動判定する。不合格の場合、どこが良くなかったかとっても貧相なアドバイスが現れる。合格するまで何度再提出してもよい。
なお、IPython.core.debuggerはGraderに引っかかるので、提出するときは消去するようにしている。
【料金】
受講中は毎月クレジットカードから引き落とされる。大学の単位にならない今回のようなコースはおおよそ$50/月
大学の単位になるコースも用意されているがかなり高額。
途中キャンセルすると翌月から引き落とされなくなるが、前述の通り教材へアクセスできなくなる。同じSpecializationを再開すると、進んだところから始まるらしい。
Specializationを修了すると自動的に翌月から引き落とされなくなる。以降、教材へは引き続きアクセスできるがコーディング課題がUpdateされることがあり、その場合受講中に合格判定受けたコードはなくなってしまうので、オイラは合格判定後Google Driveなどに保存しておくようにしている。
【修了証明】
コースごとにCertificateが発行される。
効力は何もなくLinkedInに貼り付けて少し自慢できる程度。
【言葉】
何万人も受講している人気コースの解説にはボランティアによる日本語字幕がついていることが稀にある。英語字幕は必ずONできる。
この字幕以外は英語だけ。フォーラムやSlackのやり取りを見る限り日本人人口は残念ながら限りなくゼロに近い。
やはり日本人にとって言葉が一番の障壁か。
以上


