概要
警告
Intel製IPEX-LLM Ollamaのアップデートは行われないため、インストールはお勧めしません。
年末に注文したモバイルラップトップがやっと配送されたのでOllama含め環境構築した。
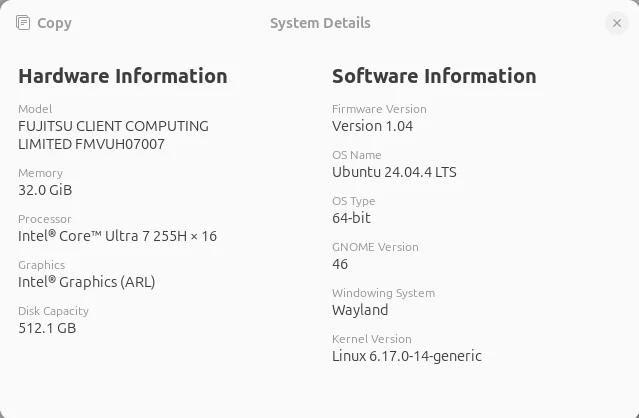
850gの軽さで、非力なNPUとIntel Arc 140T GPUが搭載されている。スペックは下図の通り。
MicroSlopのWin11 Homeが遺憾ながらプリインストールされていたので、簡単にセットアップしリカバリUSBを念のため作成後、Ubuntu24.04で躊躇なく上書きした。いい加減コンシューマ向けPCにもUbuntuプリインストール版をラインナップに上げて欲しい。
ここではOllama(Intel製 IPEX-LLM Ollama)をIntel Arcにoff loadする手順を残す。また通常版のOllamaも使用したいので住み分けられるようする。
こんな流れで進める。
- 標準のOllamaがインストール済みならそれを一旦アンインストール
途中衝突するかもしれないので、念のためアンインストールしておく - Intel Arc用のドライバをインストールして土台作り
PyTorchも将来的にIntel Arcが使えるように下準備も含む - Intel Arc専用のIPEX-LLM Ollamaをインストール
インストール後ポートを変更する
Vulkan backendは選択しない - 標準のOllamaをインストール
- 動作速度比較
- まとめ
1. 標準Ollamaのアンインストール
IPEX-LLM Ollamaは標準OllamaをForkしたもので共通点が多すぎるため、標準Ollama(curl -fsSL https://ollama.com/install.sh | shでインストールしたやつ)は一旦アンインストールしておく。結果的には残したままでもいいような気もするが…
service停止と削除
sudo systemctl stop ollama
sudo systemctl disable ollama
serviceファイルとbinaryを削除
sudo rm -f /etc/systemd/system/ollama.service
sudo systemctl daemon-reload
sudo rm -f /usr/local/bin/ollama
~/.ollama内のpull済みモデルは削除されない
2. Intel Arc GPUドライバのインストール
Intel GPU unified repoではなく、PPAへ追加する方法で進める。
2.1 kernelの確認
6.17以上(Ubuntu24.04LTS)であることを確認する。
uname -r
それ以前のkernelの場合は公式手順を参照のこと。
2.2 Intel GPU PPA 追加
sudo apt install software-properties-common
sudo add-apt-repository ppa:kobuk-team/intel-graphics
sudo apt update
2.3 Arc computing driverのインストール
sudo apt install \
libze-intel-gpu1 libze1 intel-opencl-icd intel-gsc clinfo
2.4 Arcが見えるか確認
clinfo | grep Intel
見えているので正常
  Platform Name                                   Intel(R) OpenCL Graphics
  Platform Vendor                                 Intel(R) Corporation
  Platform Name                                   Intel(R) OpenCL Graphics
  Device Name                                     Intel(R) Arc(TM) Graphics
  Device Vendor                                   Intel(R) Corporation
  Device IP (Intel)                               0x3128004 (12.296.4)
  Device ID (Intel)                               32081
  Slices (Intel)                                  1
  Sub-slices per slice (Intel)                    8
  EUs per sub-slice (Intel)                       16
  Threads per EU (Intel)                          8
  Feature capabilities (Intel)                    DP4A, DPAS
  Sub-group sizes (Intel)                         8, 16, 32
  Host USM capabilities (Intel)                   USM access, USM atomic access
  Device USM capabilities (Intel)                 USM access, USM atomic access
  Single-Device USM caps (Intel)                  USM access, USM atomic access
  Cross-Device USM caps (Intel)                   USM access, USM atomic access
  Shared System USM caps (Intel)                  (n/a)
  clGetPlatformInfo(NULL, CL_PLATFORM_NAME, ...)  Intel(R) OpenCL Graphics
    Platform Name                                 Intel(R) OpenCL Graphics
    Device Name                                   Intel(R) Arc(TM) Graphics
    Platform Name                                 Intel(R) OpenCL Graphics
    Device Name                                   Intel(R) Arc(TM) Graphics
    Platform Name                                 Intel(R) OpenCL Graphics
    Device Name                                   Intel(R) Arc(TM) Graphics
2.5 PyTorch開発用ランタイムをインストール
PyTorchではGPUではなくXPUで指定すること。
sudo apt install libze-dev intel-ocloc
pip install torch torchvision torchaudio --index-url https://download.pytorch.org/whl/xpu
pythonで動作確認
python - << 'EOF'
import torch
print("torch:", torch.__version__)
print("xpu available:", torch.xpu.is_available())
print("device count:", torch.xpu.device_count())
EOF
torch: 2.10.0+xpu
xpu available: True
device count: 1
xpuが有効になっているので成功
3. IPEX-LLM Ollamaのインストール
3.1 renderグループ追加
OllamaがIPEX-LLM 経由で/dev/dri/render* にアクセスできる状態とする
sudo gpasswd -a ${USER} render
一度log outしてlog inし直す。
3.2 IPEX-LLM Ollamaインストール準備
インストール先を作成
mkdir -p ~/ollama-ipex
cd ~/ollama-ipex
3.3 Ollama Portable Zip
いま時点でlatestのIPEX-LLM release 2.2.0からollama-ipex-llm-2.2.0-ubuntu.tgzをダウンロードし、上記フォルダへ置き、解凍する。
tar -xzf ollama-ipex-llm-2.2.0-ubuntu.tgz
cd ~/ollama-ipex/ollama-ipex-llm-2.2.0-ubuntu
chmod +x start-ollama.sh
IPEX-LLM Ollamaサーバは単体のbynaryで起動せず、専用のstart-ollama.shで起動させる。
3.4 start-ollama.shの編集
下記のためshを編集する。
- 標準Ollamaとポートで切り分け、標準版:11434、IPEX-LLM版:11435、とする。
- conda環境を切り離す。(condaを入れてなければ不要)
#!/bin/bash
# conda由来のランタイム汚染を切る
unset LD_LIBRARY_PATH
unset DYLD_LIBRARY_PATH
unset CONDA_PREFIX CONDA_DEFAULT_ENV CONDA_SHLVL
unset PYTHONHOME PYTHONPATH
# 念のためPATHもOS寄りに
export PATH="/usr/local/sbin:/usr/local/bin:/usr/sbin:/usr/bin:/sbin:/bin"

export OLLAMA_NUM_GPU=999
export no_proxy=localhost,127.0.0.1
export ZES_ENABLE_SYSMAN=1
export SYCL_CACHE_PERSISTENT=1
export OLLAMA_KEEP_ALIVE=10m

# 標準Ollamaとポートを別にする
export OLLAMA_HOST=http://127.0.0.1:11435

# [optional] under most circumstances, the following environment variable may improve performance, but sometimes this may also cause performance degradation
export SYCL_PI_LEVEL_ZERO_USE_IMMEDIATE_COMMANDLISTS=1
# [optional] if you want to run on single GPU, use below command to limit GPU may improve performance
# export ONEAPI_DEVICE_SELECTOR=level_zero:0
# If you have more than one dGPUs, according to your configuration you can use configuration like below, it will use the first and second card.
# export ONEAPI_DEVICE_SELECTOR="level_zero:0;level_zero:1"

./ollama serve
ターミナルでcondaの(base)が起動する場合、このollamaがcondaのパスを見に行ってエラーが出るので、できれば下記で無効化しておく。
conda config --set auto_activate false
conda config --show auto_activate    # falseに変わっていることを確認
3.4 IPEX-LLM Ollama起動確認
systemd化することもできるみたいなので別途調べる。ここではshで起動する。
cd ~/ollama-ipex/ollama-ipex-llm-2.2.0-ubuntu
./start-ollama.sh
ollama serverが起動して大量のログが出力されollamaでチャットする都度ログが出力される。ログ中、ArcもGPUとして認識している。搭載メモリを30Gbと認識していることがわかる。
Found 1 SYCL devices:
|  |                   |                                       |       |Max    |        |Max  |Global |                     |
|  |                   |                                       |       |compute|Max work|sub  |mem    |                     |
|ID|        Device Type|                                   Name|Version|units  |group   |group|size   |       Driver version|
|--|-------------------|---------------------------------------|-------|-------|--------|-----|-------|---------------------|
| 0| [level_zero:gpu:0]|                     Intel Arc Graphics|  12.74|    128|    1024|   32| 30640M|         1.14.37020+3|
Intel Arcにもnvidia-smiに相当するコマンドがある。スナップショットではなくモニタリングタイプなので別ターミナルで起動する。
# インストール
sudo apt install intel-gpu-tools
# 起動
sudo intel_gpu_top
4. 標準Ollamaのインストール
IPEX-LLM Ollamaとぶつからないように設定してあるのでオフィシャルサイトの通り、下記でインストールするだけ。
curl -fsSL https://ollama.com/install.sh | sh
pullするモデルは~/.ollama/modelsを共有するのでどちらのollamaからも同じモデルがrunできる。ただし、残念ながらIPEX-LLM Ollamaはollama version is 0.5.4-ipexllm-20250402で止まってしまっているので最新モデルをrunするとエラーが出る。Intelは経営状態が悪くOSSへの貢献を控えているので、今後もUpdateされない可能性が高い。
5. 動作速度比較
事前に./start-ollama.shでサーバを起動しておく。
5.1 評価用関数
次のコードで速度比較を行った。
import os
import re
import pandas as pd
import numpy as np
import datetime
from ollama import Client

# --- Configuration ---
MODEL = "qwen2.5-coder:7b"
client = Client(host='http://localhost:11434')     # 標準Ollama
# client = Client(host='http://localhost:11435')   # IPEX-LLM Ollama

def execute_pandas_logic_from_llm(user_prompt, df=None, history=None, max_retries=1):
    """
    history: 過去のやり取り (list of dict) を受け取り、文脈を維持したコード生成を行う。
    """
    now = datetime.datetime.now().strftime("%Y%m%d_%H%M%S")
    if history is None:
        history = []

    working_df = df.copy() if df is not None else None

    if working_df is not None:
        # 毎回最新の型情報を伝える(加工で列が増減している可能性があるため)
        context_data = f"Target: Modify existing DataFrame 'df'.\nColumns: {working_df.dtypes.to_string()}\nSample:\n{working_df.head(2).to_string()}"
        mode_instruction = "Modify the existing variable 'df'."
    else:
        context_data = "Target: Create a new DataFrame 'df' from scratch."
        mode_instruction = "You must define 'df'."

    system_prompt = f"""
You are a Pandas expert. {mode_instruction}
[Context]
{context_data}
[Rules]
1. Use ENGLISH for all code.
2. Respond ONLY with executable Python code.
3. The final result of the user's request MUST be stored back into the variable 'df'.
   (e.g., If asked for mean, do `df = df.mean().to_frame().T`)
4. Do not include markdown code blocks.
5. If the result is a Series or a single value, convert it back to a DataFrame and assign it to 'df'.
"""

    # 送信用のメッセージリストを構築
    messages = [{'role': 'system', 'content': system_prompt}]
    messages.extend(history) # 過去の履歴を追加
    messages.append({'role': 'user', 'content': user_prompt}) # 今回の依頼を追加

    current_attempt_prompt = user_prompt

    for attempt in range(max_retries + 1):
        # 修正版の呼び出し(messagesを渡す)
        response = client.chat(model="qwen2.5-coder:7b", messages=messages)

        full_content = response['message']['content']
        match = re.search(r"```python\n?(.*?)\n?```", full_content, re.DOTALL | re.IGNORECASE)
        clean_code = match.group(1).strip() if match else full_content.strip()

        # 実行
        local_vars = {"pd": pd, "np": np, "df": working_df, "datetime": datetime}
        try:
            exec(clean_code, local_vars)
            new_df = local_vars.get('df')

            # 成功時:今回のやり取りを履歴に追加して、DFと一緒に返す
            history.append({'role': 'user', 'content': user_prompt})
            history.append({'role': 'assistant', 'content': f"```python\n{clean_code}\n```"})

            return new_df, history

        except Exception as e:
            error_msg = str(e)
            if attempt < max_retries:
                # 自己修正用メッセージをmessagesに追加してリトライ
                messages.append({'role': 'assistant', 'content': clean_code})
                messages.append({'role': 'user', 'content': f"Error: {error_msg}\nPlease fix the code."})
            else:
                print("Maximum retries reached.")
                return df, history
Ollama環境を切り替えて下記コードで計測した。
最初にガウス分布に沿った乱数を要素に持つ3列のDataFrameを作成させ、次に各列の平均を計算させる。これを11回繰り返すが、初回はモデルロードで時間がかかる可能性があるため、omitして10回の平均処理時間を計測した。
time_hist = []
for i in range(11):
    timer_start = time.time()
    user_input = "10行3列(列名はcol1, col2, col3)のDataFrameを作成してください。各要素は平均1.0、標準偏差1.0の正規分布から乱数生成してください。乱数のseedは42にしてください。"
    current_df, pandas_history = execute_pandas_logic_from_llm(user_input)
    # display(current_df)
    # print(pandas_history)

    user_input = "current_dfの各行ではなく、各列の平均値を計算してください。"
    current_df, pandas_history = execute_pandas_logic_from_llm(
                user_input, df=current_df, history=pandas_history
            )
    # display(current_df)
    # print(pandas_history)

    timer_end = time.time()
    timer_elapsed = timer_end - timer_start
    print(f"経過時間: {timer_elapsed:.2f}秒")
    time_hist.append(timer_elapsed)

print(f"平均経過時間: {sum(time_hist[1:])/len(time_hist[1:]):.2f}秒")
5.2 実測
それぞれOllamaのポートを切り替えて計測する。
| 平均処理時間 | 使用したOllama | |
|---|---|---|
| Core Ultra7 255H CPU | 45.62 秒 | 標準Ollama |
| 内蔵Intel Arc 140T | 11.27 秒 | IPEX-LLM Ollama |
計測中、CPU使用時は16コアすべてが100%に張り付き、Intel Arc時では1coreだけが100%に張り付いていた。
参考までに自作PCのGPUだと下記となる。
| 平均処理時間 | 使用したOllama | |
|---|---|---|
| RTX-3090Ti | 1.37 秒 | 標準Ollama |
6. まとめ
内蔵GPUで4倍早いのは魅力だけど、Ollamaが古くて新しいLLMが使用できないのは致命的。これでは使い物にならない。llama.cppであれば最新LLMが使用できるし、Arcにも対応しているので気が向けばllama.cppで試したい。
AI対応が遅れたせいで経営難になっているはずなのに、石だけ売ってソフトはそっちのけって、何も学習していないのかな?Intelさんよ。
以上