この記事はAndroid Advent Calendar 2016の16日目の投稿になります。
概要
社内QAを行う場合などにFabric BetaでAPKを配布しているのですが、その作業をSlack + Hubot + Werckerで自動化してみます。
APKが配布されるまでの流れ
流れとしては以下のようになります。
- Slackでコマンドを打つ
- Hubotが反応
- WerckerのAPIを叩きビルドを開始
- APKをFabric Betaで配布
Slackでコマンドを打つ
まず、APKの配布を実行するコマンドを決めます。QAのためにAPKを配布する場合を想定し、コマンドをandroid qaとします。任意のメッセージをリリースノートとして指定したいですが、一旦脇に置いておきます。
実際にAPK配布を実行したい場合、以下のようにSlackに入力します。
Hubotが反応
Slackにandroid qaと入力されたのをHubotで検知します。まずHubotを準備し、Slackと連携させてみましょう。
SlackでHubotを使う方法についてはこちらの記事が参考になります。
また、公式のドキュメントはこちらになります。
なお、今回Herokuのコンテナ上で動かすNode.jsのバージョンは6.9.1を指定しています。したがって、コードをES2015で書くことができ、Slackでandroid qaと入力された場合qa startとログに表示させるコードは以下のようになります。
module.exports = (robot) => {
  robot.hear(/^android\s+qa$/, (msg) => {
    console.log("qa start");
  });
}
Hubotのディレクトリ構成は以下のようになっています。scripts以下にコードを配置しましょう。
.
├── Procfile
├── README.md
├── bin
│   ├── hubot
│   └── hubot.cmd
├── external-scripts.json
├── hubot-scripts.json
├── package.json
└── scripts
    └── qa.js
bin/hubotを実行するとローカルでHubotの挙動を確認でき、android qaと入力するとqa startと表示されます。
Wercker APIを叩きビルドを開始
Wercker APIのTrigger a new run使用することで任意のタイミングでビルドを開始させることが可能です。CircleCIであればTrigger a new Buildを使うと同じことができます。
cURLでAPIを叩く場合以下のようになります。TOKENはhttps://app.wercker.com/profile/tokensから取得できます。
curl -X POST -H "Content-Type: application/json; charset=utf-8"
-H "Authorization: Bearer YOUR_TOKEN"
-d '{
	"pipelineId": "PIPELINE_ID"
}' https://app.wercker.com/api/v3/runs
ここで、PIPELINE_IDはWerckerのWorkflowsを構成するPipelineのIDとなります。WorkflowsはPipelineを繋げることで作成されます。Workflowsについての詳細はこちらをご覧ください。
Wercker APIクライントの利用
HubotからWercker APIを叩く場合、Node.js向けのAPIクライントがあると便利です。今回の用途に丁度いいクライントが無かったので自作してみました。
wercker-clientを使用して先程のcURLでのリクエストを以下のように置き換えます。
const Wercker = require("wercker-client").default;
const wercker = new Wercker({token: "YOUR_TOKEN"});

wercker.Runs.triggerNewRun({
  pipelineId: "PIPELINE_ID",
}).then((res) => {
  console.log(res);
});
これを先程のHubotスクリプトと組み合わせると以下のようになり、これでandroid qaとSlackで入力するとWerckerでビルドが開始されるようになります。
const Wercker = require("wercker-client").default;
const wercker = new Wercker({token: "YOUR_TOKEN"});

module.exports = (robot) => {
  robot.hear(/^android\s+qa$/, (msg) => {
    wercker.Runs.triggerNewRun({
      pipelineId: "PIPELINE_ID"
    }).then((res) => {
      console.log(res);
    });
  });
}
APKをFabric Betaで配布
Fabric Betaの設定方法やオプションについては以下の記事でまとめています。
WerckerではWorkflowと呼ばれるビルドパイプラインに沿ってビルドが実行されます。Workflowを設定するのは、まずユニットテストとAPK配布が実行されるPipelineを以下のようにwercker.ymlに定義します。
build:
  steps:
    - script:
        name: Unit test
        code: |
          ./gradlew testDebug

distribute-apk:
  steps:
    - script:
        name: Distribute APK
        code: |
         - ./gradlew assembleDebug crashlyticsUploadDistributionDebug
Pipelineの追加とWorkflowsの作成
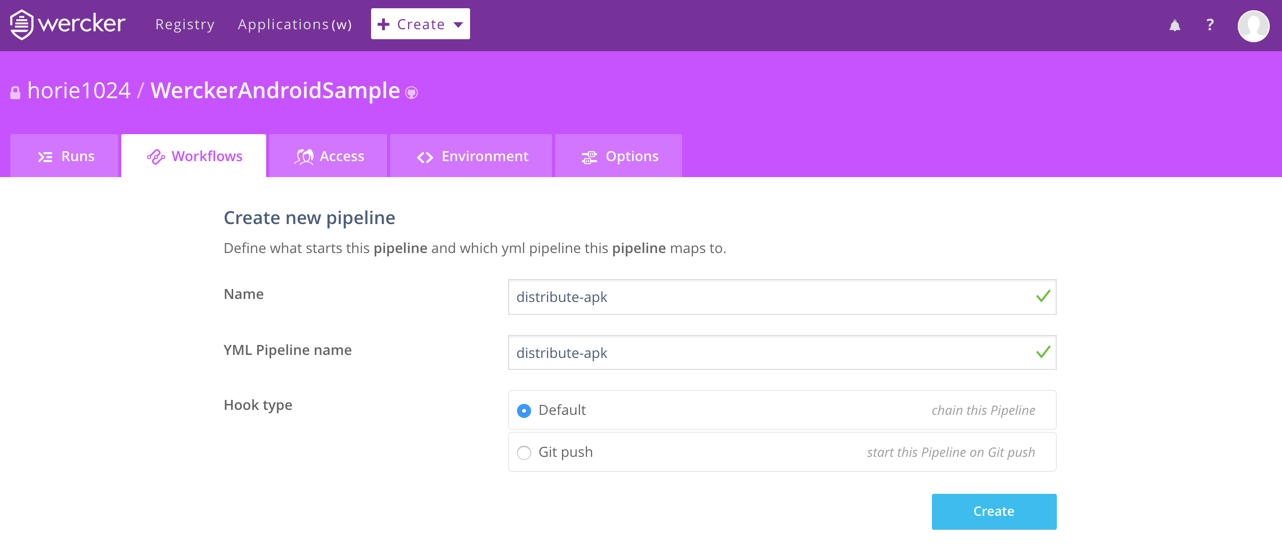
wercker.ymlに定義しただけではPipelineとして使用できないのでWeb UIから「Add new pipeline」で追加します。
Nameには任意の識別しやすい名前、YML Pipeline nameにはwercker.ymlに定義したPipelineの名前を指定します。
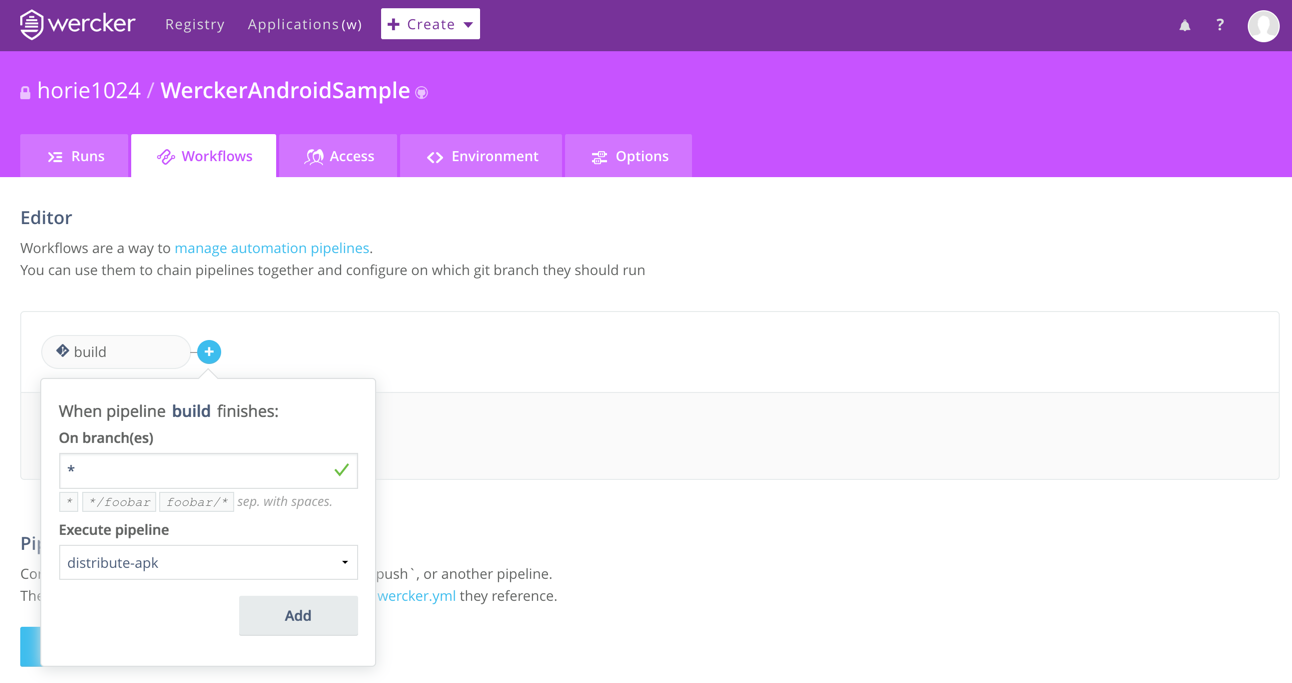
追加したPipelineをEditorでつなぐことでWorkflowsを作成します。On branch(es)には*を指定し全てのブランチで実行されるようにします。
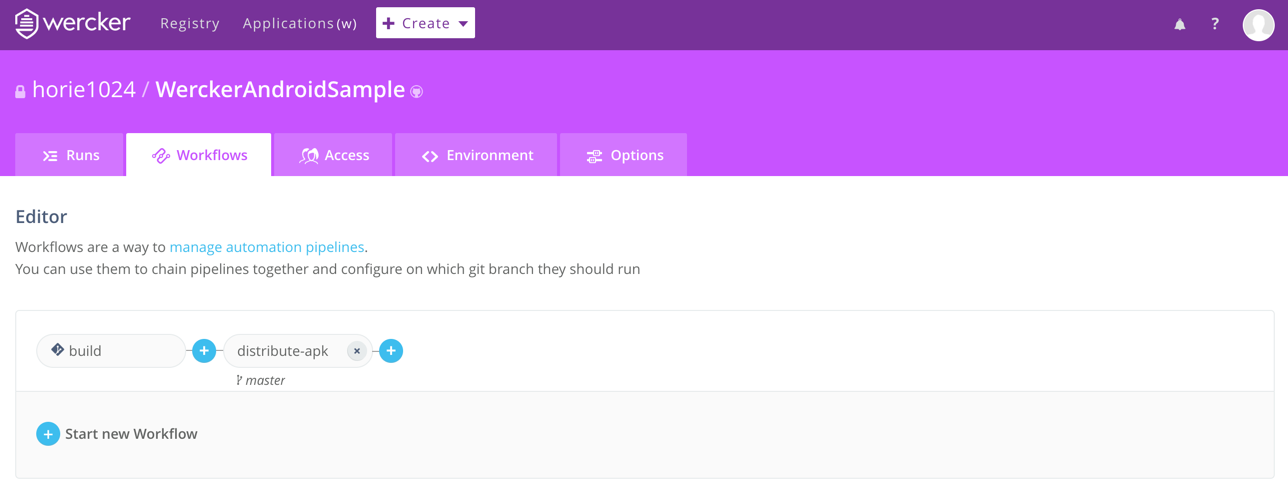
最終的なWorkflowは以下のようになり、build Pipelineの実行が完了後直列にdistribute-apk Pipelineが実行されます。
Workflowの実行の流れ
ここで、WerckerがWorkflowを実行する条件は以下の通りです。
- VCS(GitHub、Bitbucket)へのPush
- Hubotからのトリガ
したがって、このままではVCSにプッシュする都度APKの配布が行われてしまいます。
環境変数による配布の制御
APKの配布制御するために環境変数DISTをWerckerのEnvironmentで定義し、DISTがtrueの場合のみAPKを配布するようにします。Werckerで定義するDISTのValueはfalseにしておきます。
build:
  steps:
    - script:
        name: Unit test
        code: |
          ./gradlew testDebug

distribute-apk:
  steps:
    - script:
        name: Distribute APK
        code: |
          if [ "$DIST" = "true" ]; then
            ./gradlew assembleDebug crashlyticsUploadDistributionDebug
          fi
Trigger a new runは、envVarsパラメータでビルド実行時の環境変数を上書きすることができます。wercker-clientでenvVarsを指定する場合以下のようにします。
const Wercker = require("wercker-client").default;
const wercker = new Wercker({token: "YOUR_TOKEN"});

module.exports = (robot) => {
  robot.hear(/^android\s+qa$/, (msg) => {
    wercker.Runs.triggerNewRun({
      pipelineId: "PIPELINE_ID",
      envVars: [{key: "DIST", value: "true"}]
    }).then((res) => {
      console.log(res);
    });
  });
}
これでHubotからdistribute-apk Pipelineをトリガした場合にのみAPKが配布されるようになります。distribute-apk Pipelineをトリガの対象にするため、Pipeline IDはdistribute-apk Pipelineのものを使用します。
Pipeline IDは、Pipeline詳細ページのURLから確認できます。
https://app.wercker.com/{user_name}/{application_name}/workflows/pipelines/{pipeline_id}
まとめ
SlackからAPKを配布できるようにしてみました。
Werckerのビルドをトリガする部分はHubotに依存していないので他の用途にも使えます。Amazon Dashボタンを押すとAPKを配布することも簡単にできると思うので試してみようと思います。


