この記事は私の今まで調べましたのことを共有したいです。
vue-test-utilsとJestの基本的な使い方です。
もし、他の方法・他の基本的なこと・質問・ご意見があったら、是非下にコメントしてください。
そして、間違えた日本語がある場合は、申し訳ございませんでした。
バックグラウンド
この記事は、vue-test-utilsを使って、ユニットテストを書きたいのためです。
ユニットテストを書くがあまり人気じゃないですから、インターネットにチュートリアルもあまりないと思います。
普通の開発ことよりユニットテストは少ないと思います。
特にvue-test-utilsのチュートリアルには、探すことが本当に難しいと思います。
そして、半開発システムに、ユニットテストを書くは難しいです「これは私の経験からです」。だって、たくさんプラグインもう統合されています。例えば:Vue.jsのプロジェクトの場合なら、Vuex、vue-router、Vuetify、axios、などを使って、Vue.jsのsingle-page システムアプリケーションを作成する。
だから、この記事は書きたいです。
特に最初のステップからを始めての人に手伝いたいです。
これは今までvue-test-utilsについて、知っているのことが記事を書くです。
必要なもの
- Node.js v8.11.0+ (NPM v5.6.0+)
- vue-cli v3.0.0+
- vue.js v2.5.0+
- vue-router v3.0.0+
- vuex v3.0.0+
- vuetify v1.3.8
最初のこと
まずには、あなたはvue-cliを使って作成されたvueプロジェクトを持っていなければなりません。
じゃあ、簡単なVue.jsプロジェクトを作ろう!
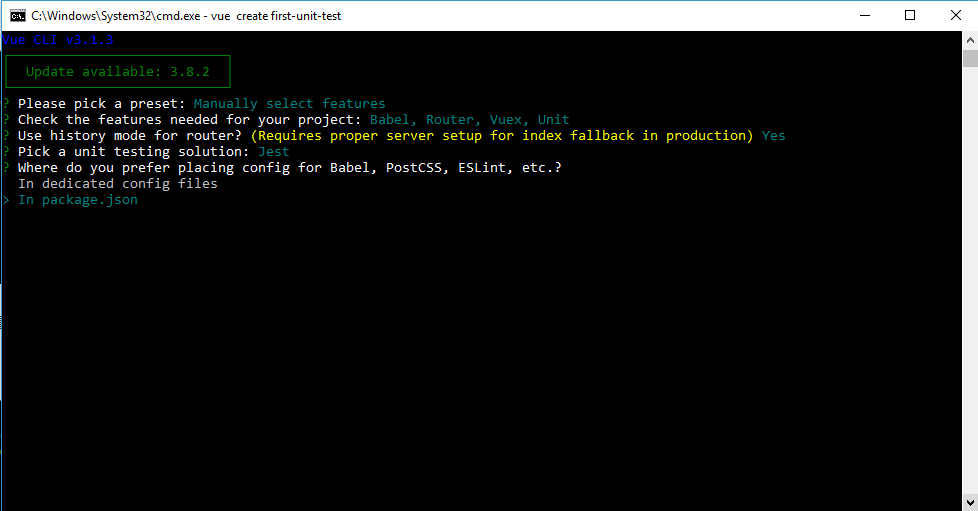
ターミナルに書きます vue create {PROJECT_NAME}。
私の例ではvue create first-test-unit
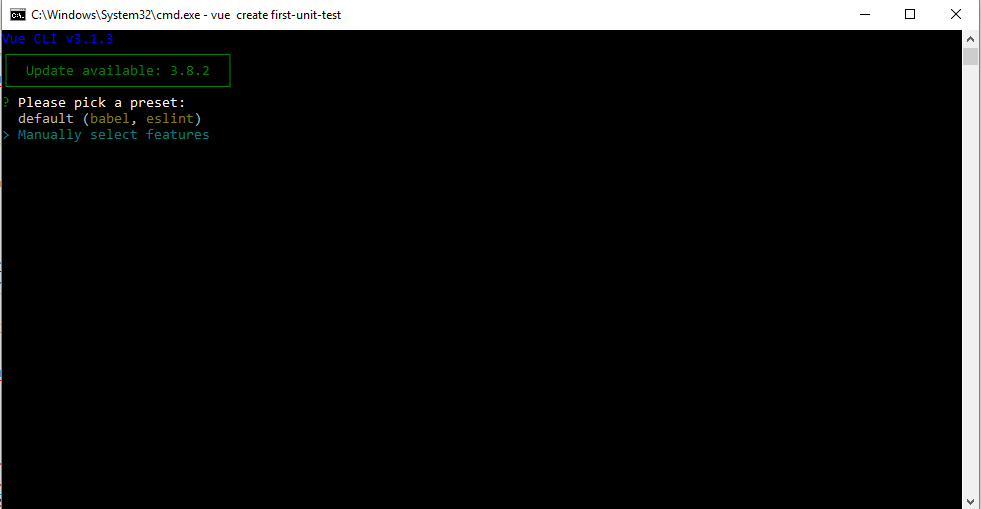
そのコマンドの後は、この絵のようなものを見えます。
Manually select featureを選びます
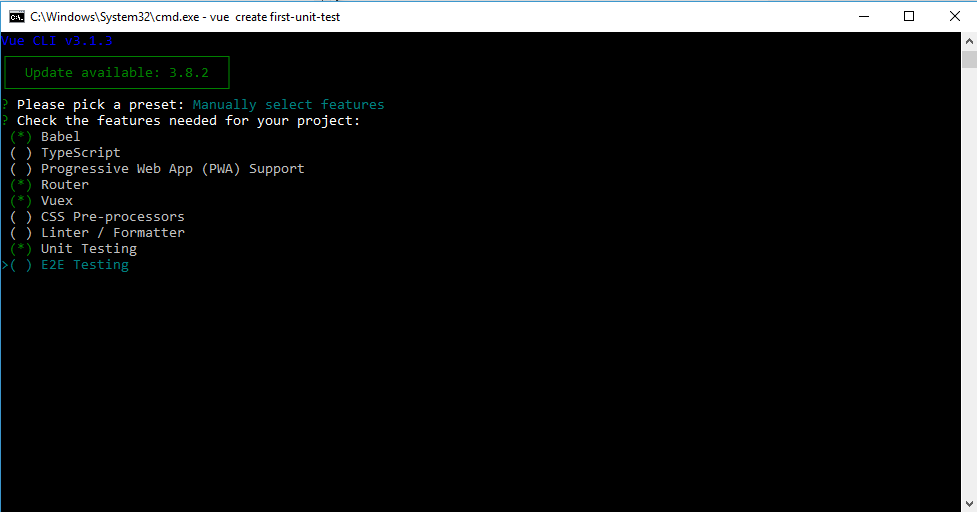
次に画像と同じものを選択してください。
選ぶ方法は上下の矢印と選択するはスペースです。
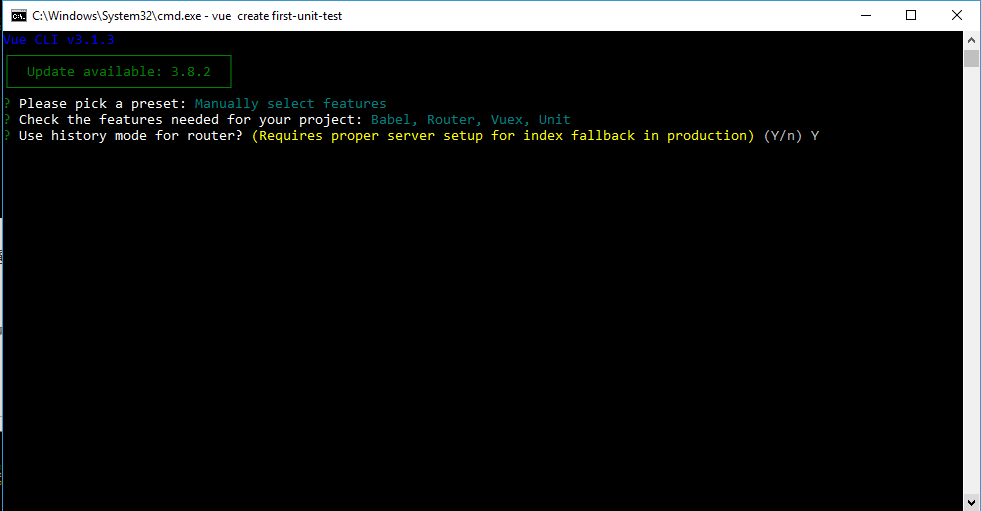
次に画像と同じものを書くしてください。
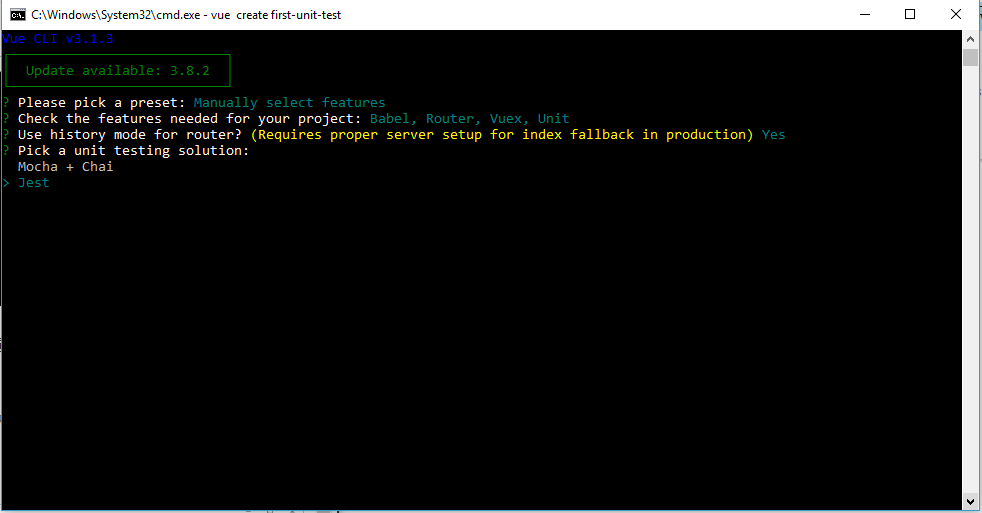
次にJestを選択してください
次に画像と同じものを選択してください。
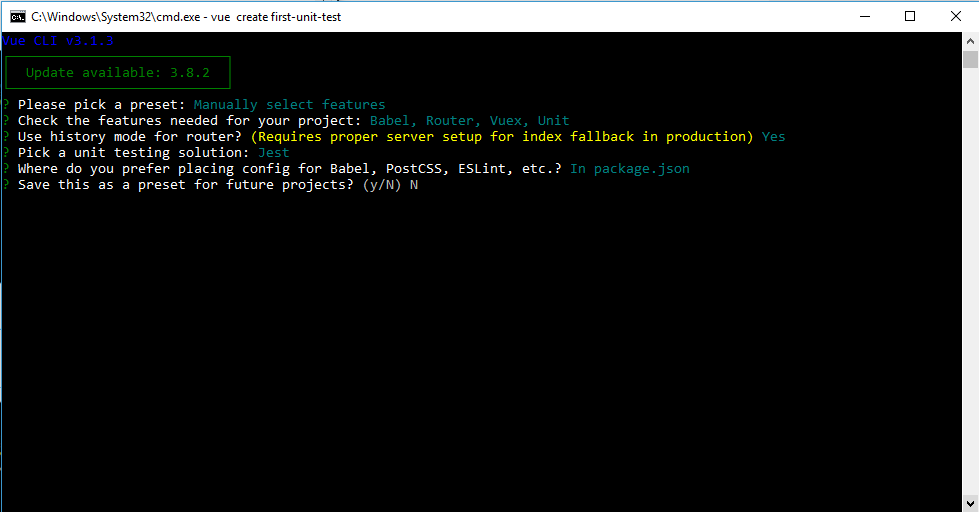
次に画像と同じものを選択してください。
その後、インストールが完了するまで待ってください。
インストールする別の方法はvue guiを使うことです。
vue guiを使うのことはこちらです:https://qiita.com/Hendiche/items/6ddec49e03ea9c7c17b8
基本的なこと
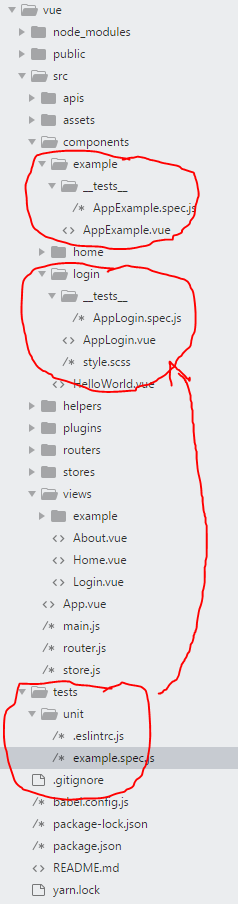
vue.jsプロジェクトをインストールした後、IDEでプロジェクトを開いて、そして "tests"フォルダーに行ってください。
1) ファイル構造
推奨されるファイル構造はtests -> unitの中ではなく、コンポーネントの中に__tests__という名前のフォルダを作ることです。
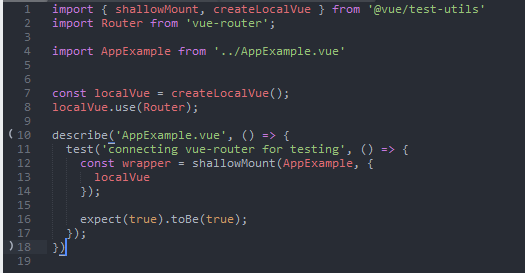
2) vue-router
ドキュメントから、global vue-routerを使用するのではなく、@vue/test-utilsのlocalVueを使用するように指示してください。
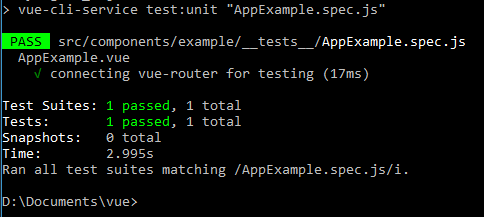
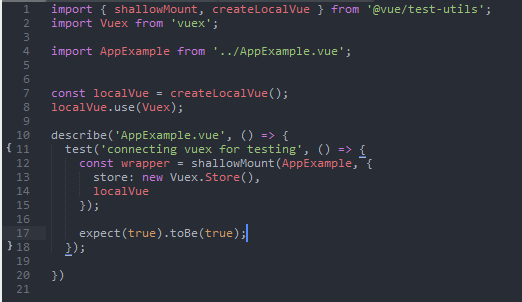
3) vuex
ドキュメントから、global vuexを使用するのではなく、@vue/test-utilsのlocalVueを使用するように指示してください。
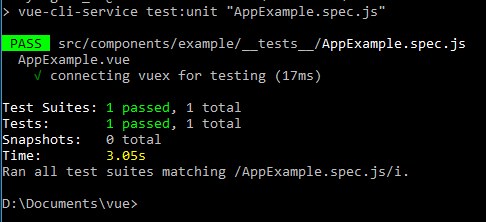
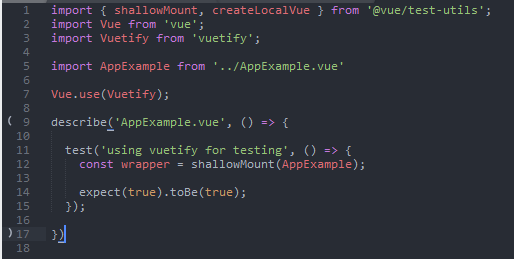
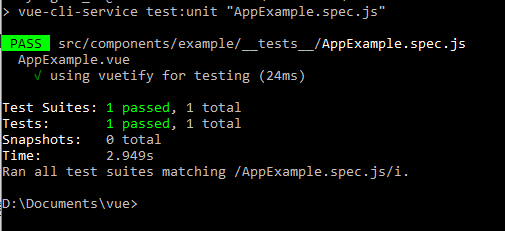
4) vuetify
UIの設計に "vuetify"を使用する場合、テストのために "unknown custom element: ... - did you register the component correctly?"というエラーを防ぐためにvue-test-utilsに接続する必要があります。
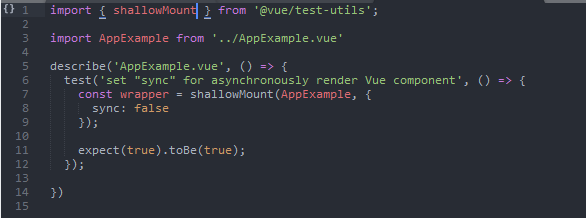
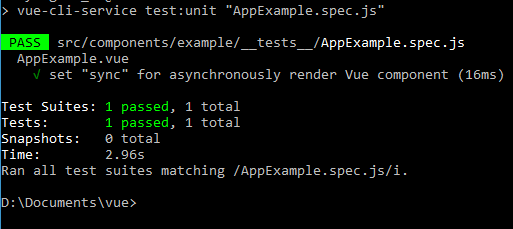
5) asynchronous Vue コンポーネント
asynchronouslyレンダリングコンポーネントのときに設定を設定するために使用します。
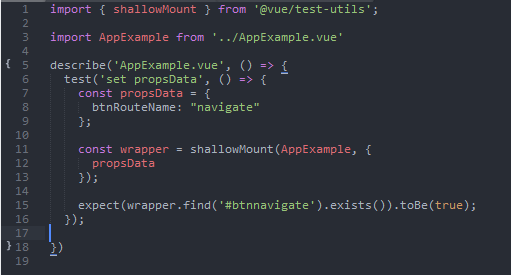
6) PropsData
コンポーネントのpropsデータをmockするために使用される「propsData」。
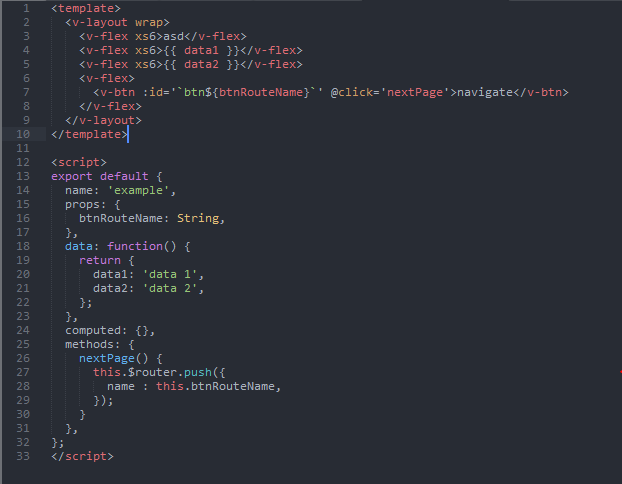
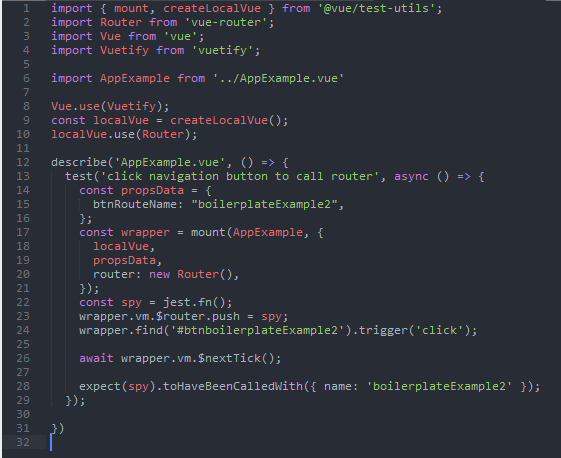
7) ナビゲートルータ
このナビゲートルータではもっと複雑です。
ユニットテストのコードで、セットアップのために「vue-router②」と「vuetify④」を組み合わせ、router mocksを追加して、 mountでwrapperの方法を変更しなければいけません。
8) beforeAll() or beforeEach()
テストケースがたくさんある場合は、このコードを見てください。
長いコードたくさん二重化のコードがありますよね~
import { shallowMount, mount, createLocalVue } from '@vue/test-utils';
import Router from 'vue-router';
import Vuex from 'vuex';
import Vue from 'vue';
import Vuetify from 'vuetify';
import AppExample from '../AppExample.vue'
Vue.use(Vuetify);
const localVue = createLocalVue();
localVue.use(Router);
localVue.use(Vuex);
describe('AppExample.vue', () => {
test('connecting vue-router for testing', () => {
const wrapper = shallowMount(AppExample, {
localVue
});
expect(true).toBe(true);
});
test('connecting vuex for testing', () => {
const wrapper = shallowMount(AppExample, {
store: new Vuex.Store(),
localVue
});
expect(true).toBe(true);
});
test('using vuetify for testing', () => {
const wrapper = shallowMount(AppExample);
expect(true).toBe(true);
});
test('set "sync" for asynchronously render Vue component', () => {
const wrapper = shallowMount(AppExample, {
sync: false
});
expect(true).toBe(true);
});
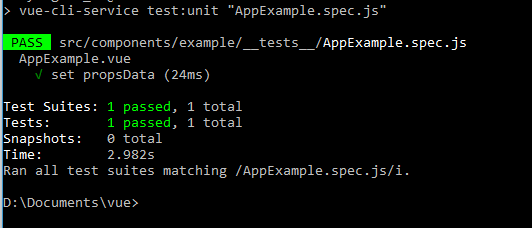
test('set propsData', () => {
const propsData = {
btnRouteName: "navigate"
};
const wrapper = shallowMount(AppExample, {
propsData
});
expect(wrapper.find('#btnnavigate').exists()).toBe(true);
});
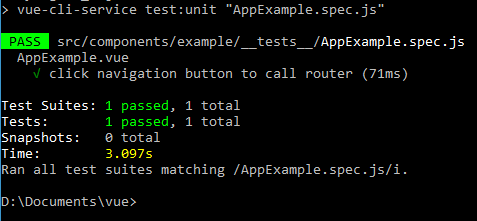
test('click navigation button to call router', async () => {
const propsData = {
btnRouteName: "boilerplateExample2",
};
const wrapper = mount(AppExample, {
localVue,
propsData,
router: new Router(),
sync: false,
});
const spy = jest.fn();
wrapper.vm.$router.push = spy;
wrapper.find('#btnboilerplateExample2').trigger('click');
await wrapper.vm.$nextTick();
expect(spy).toHaveBeenCalledWith({ name: 'boilerplateExample2' });
});
})
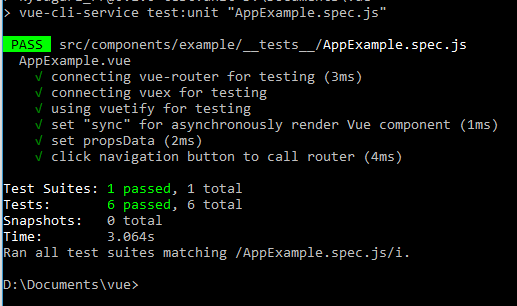
と魔法を使って、、、、、、![]()
pooooffffff........![]()
import { shallowMount, mount, createLocalVue } from '@vue/test-utils';
import Router from 'vue-router';
import Vuex from 'vuex';
import Vue from 'vue';
import Vuetify from 'vuetify';

import AppExample from '../AppExample.vue'

Vue.use(Vuetify);
const localVue = createLocalVue();
localVue.use(Router);
localVue.use(Vuex);

describe('AppExample.vue', () => {
	let wrapper;

	beforeAll(() => {
		const propsData = {
			btnRouteName: "boilerplateExample2",
		};

		wrapper = mount(AppExample, {
			store: new Vuex.Store(),
			localVue,
			sync: false,
			router: new Router(),
			propsData,
		});
	});

  test('connecting vue-router for testing', () => {
  	expect(true).toBe(true);
  });

  test('connecting vuex for testing', () => {
  	expect(true).toBe(true);
  });

  test('using vuetify for testing', () => {
  	expect(true).toBe(true);
  });

  test('set "sync" for asynchronously render Vue component', () => {
  	expect(true).toBe(true);
  });

  test('set propsData', () => {
  	expect(wrapper.find('#btnboilerplateExample2').exists()).toBe(true);
  });

  test('click navigation button to call router', async () => {
  	const spy = jest.fn();
  	wrapper.vm.$router.push = spy;
  	wrapper.find('#btnboilerplateExample2').trigger('click');

  	await wrapper.vm.$nextTick();

  	expect(spy).toHaveBeenCalledWith({ name: 'boilerplateExample2' });
  });

})
エンディング
では、これはvue-test-utilsで単体テストを作成する基本的な使い方のいくつかです。
このいくつかの点では、すでにvue-test-utilsの基本的な使い方テストを作成することができます。