はじめに
本記事ではSelenideとAppiumを使ってiOS実機でWebアプリ(Safari),および,iOSアプリ(Native App)の自動テストを動かすことを目標とします.
そのため,テストの内容は画面を開いて何か操作する程度です.
SelenideはSeleniumのラッパーですので,Seleniumでも同様のことが可能です.
目次
- Selenideのインストール
- Appiumのインストール
- 自動テスト〜Simulator + Safari〜編
- テスト対象自作アプリの作成
- 自動テスト〜Simulator + 自作アプリ〜編
- 実機テストの準備
- 自動テスト〜実機 + Safari〜編
- 自動テスト〜実機 + 自作アプリ〜編
- WDAの手動インストール
- 最後に
環境や使うもの
- Mac macOS Mojave 10.14.6
- Eclipse 2019-06
- Java 12
- Maven
- Selenide v5.4.1
- Appium v1.15.1
- Xcode 11.2
- iOS実機 iOS13.2
使わないもの(持ってないもの)
- Windows
- Android
変更履歴
| 日時 | 内容 |
|---|---|
| 2019/11/3 | 新規作成 |
| 2019/11/4 | 不要なライブラリのインストールを削除 capabilitiesにupdatedWDABundleIdを追加 SafariのWebインスペクタの説明を追加 |
1. Selenideのインストール
Eclipse & Mavenがインストールされていることを前提とします.
まだインストールしてない方はGoogle先生にインストール方法を聞いてください.(丸投げ)
まずはAppiumとか関係なく,ChromeでWebブラウザでの自動テストが動くことを確認していきます.
詳細な手順は以下が参考になります.
Selenide~Javaで超簡単・簡潔にUIテストを書く~
Seleniumラッパー Selenideのセットアップから使い方まで
プロジェクトの作成
EclipseでMavenプロジェクトを作成します.

ライブラリインストール
pom.xmlに以下を追記しします.JunitとSelenideが含まれています.
※ 記事作成時(2019/11/3)の最新版ですが,より新しいバージョンはMVN Repositoryから検索してください.
	<dependencies>
		<!-- https://mvnrepository.com/artifact/org.junit.jupiter/junit-jupiter-api -->
		<dependency>
			<groupId>org.junit.jupiter</groupId>
			<artifactId>junit-jupiter-api</artifactId>
			<version>5.5.2</version>
			<scope>test</scope>
		</dependency>

		<!-- https://mvnrepository.com/artifact/org.junit.jupiter/junit-jupiter-engine -->
		<dependency>
			<groupId>org.junit.jupiter</groupId>
			<artifactId>junit-jupiter-engine</artifactId>
			<version>5.5.2</version>
			<scope>test</scope>
		</dependency>

		<!-- https://mvnrepository.com/artifact/org.junit.platform/junit-platform-launcher -->
		<dependency>
			<groupId>org.junit.platform</groupId>
			<artifactId>junit-platform-launcher</artifactId>
			<version>1.5.2</version>
			<scope>test</scope>
		</dependency>

		<!-- https://mvnrepository.com/artifact/com.codeborne/selenide -->
		<dependency>
			<groupId>com.codeborne</groupId>
			<artifactId>selenide</artifactId>
			<version>5.4.1</version>
		</dependency>

		<!-- https://mvnrepository.com/artifact/com.codeborne/selenide-appium -->
		<dependency>
			<groupId>com.codeborne</groupId>
			<artifactId>selenide-appium</artifactId>
			<version>1.4.2</version>
		</dependency>
	</dependencies>
記載したらpom.xmlを右クリック→実行→Maven installでダウンロードしてきます.

リポジトリからのダウンロードでhost unresolvedとか出てきた場合はproxyに阻まれている可能性があるので以下の記事を参考にプロキシを設定してあげてください.
Mavenが会社のプロキシに阻まれて動かないとき
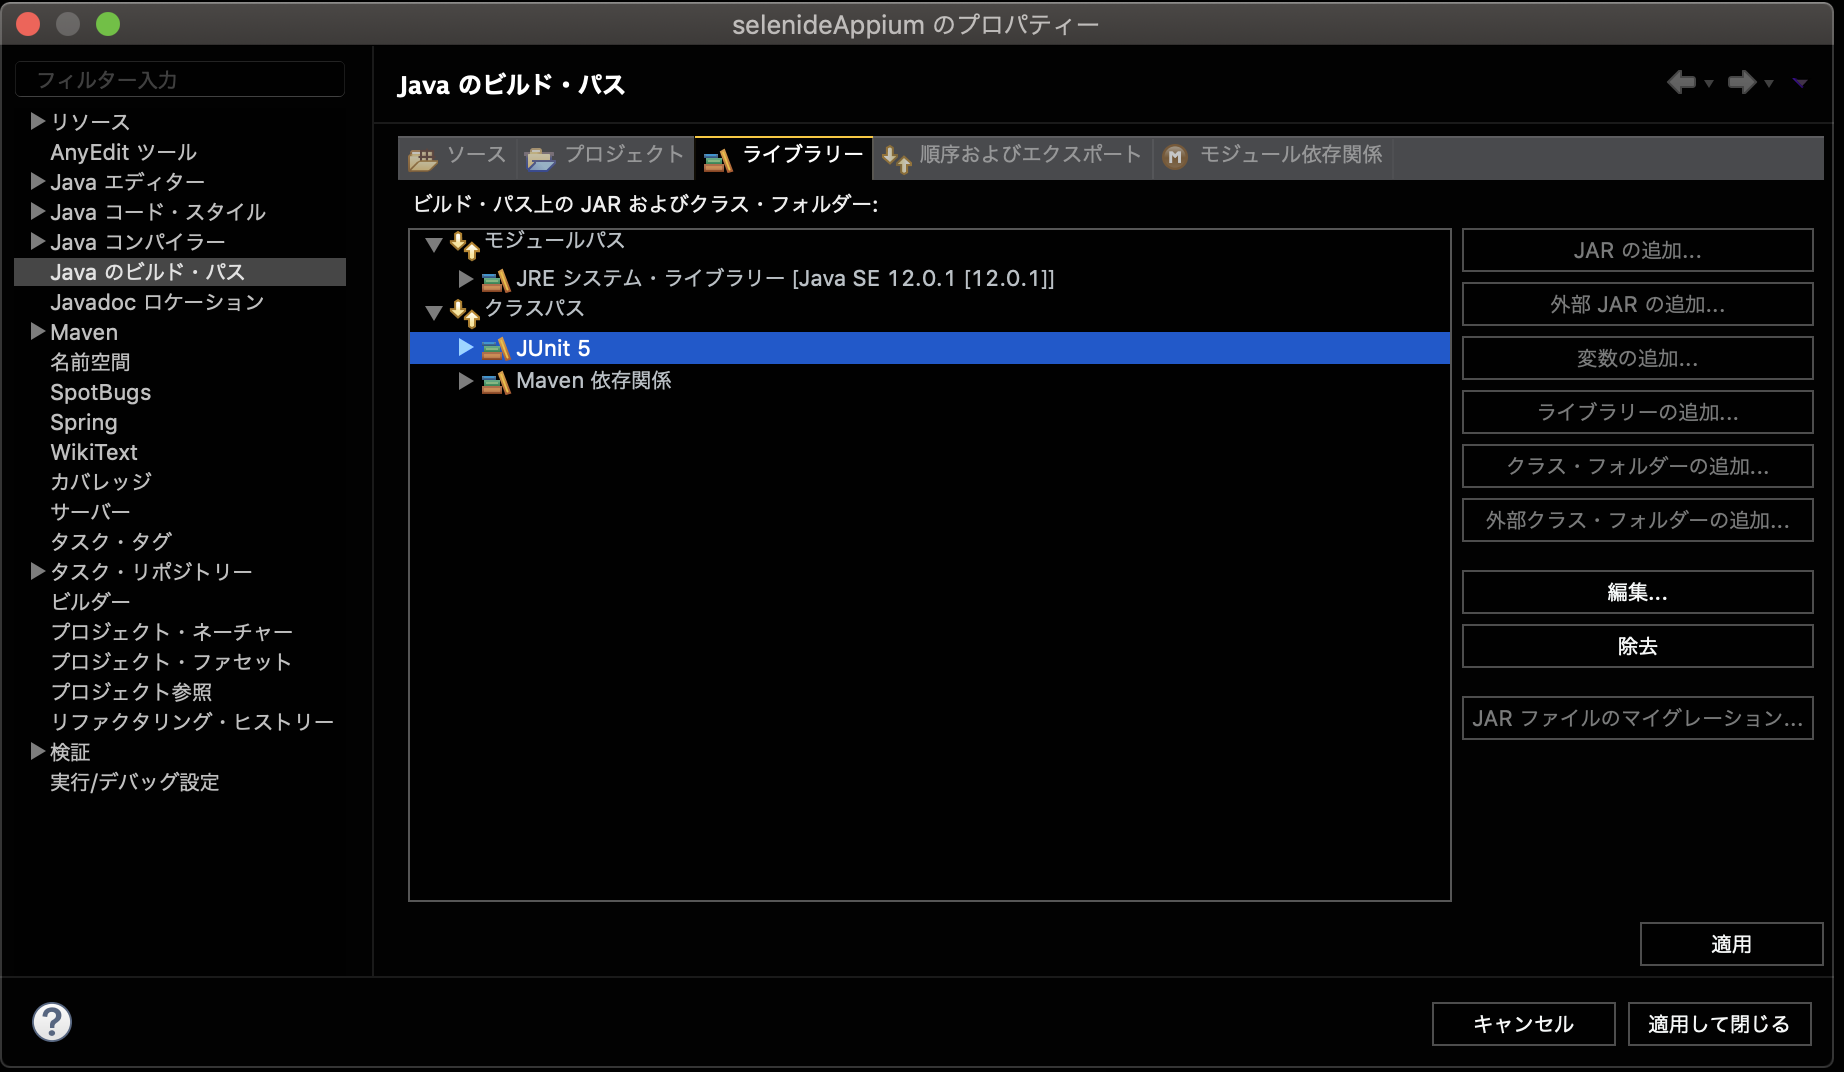
Junit5の追加
Eclipse上でJunitを実行するためにクラスパスにJunit5を追加します.
Chrome Driverのインストール
https://chromedriver.chromium.org/downloads
から利用しているChromeDriverをダウンロードしてプロジェクトの直下などに保存します.
現在のフォルダ構成は以下のようになります.

Eclipseからでもターミナルからでも良いので,ChromeDriverに実行権限を付与します.
サボると実行時に以下のエラーが表示されます.
java.lang.IllegalStateException: The driver is not executable: /Applications/Eclipse_2019-06.app/Contents/workspace/selenideAppium/chromedriver
Selenideのサンプルテストの作成
動作確認用のサンプルを作成します.
Qiitaで「Selenide」と検索するだけです.
package selenide.selenideAppium;

import static com.codeborne.selenide.Selenide.*;

import org.junit.BeforeClass;
import org.junit.Test;

import com.codeborne.selenide.Configuration;
import com.codeborne.selenide.SelenideElement;
import com.codeborne.selenide.WebDriverRunner;

public class SelenideTest {

	/**
	 * テストの前に1度だけ実施
	 */
	@BeforeClass
	public static void beforeClass() {
		// Chrome Driverのパスを指定
		System.setProperty("webdriver.chrome.driver", "./chromedriver");
		// Chromeを指定
		Configuration.browser = WebDriverRunner.CHROME;
	}

	@Test
	public void qiitaOpenTest() {
		// Qiitaを表示
		open("https://qiita.com");

		// Selenideで検索
		SelenideElement searchInput = $(".st-Header_searchInput");
		searchInput.sendKeys("Selenide");
		searchInput.pressEnter();
	}
}
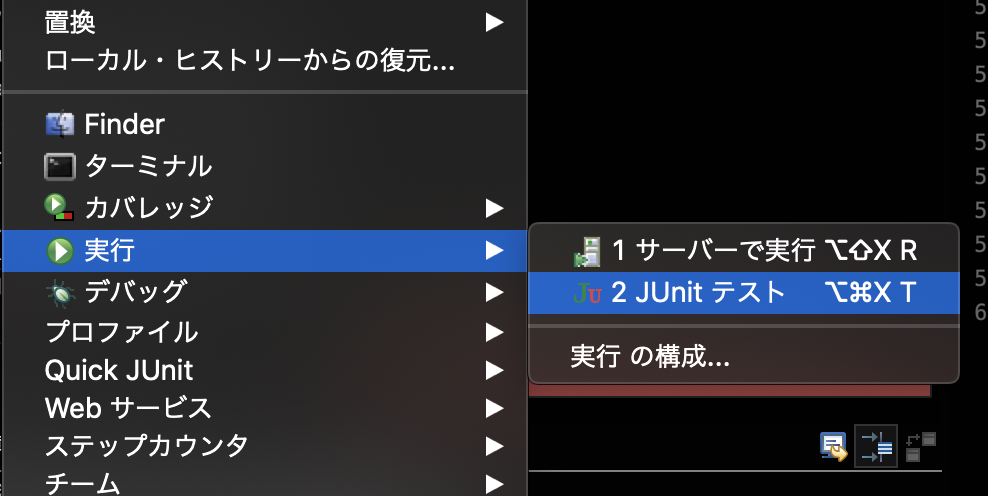
ファイルを右クリック→実行→Junit テストで実行します.
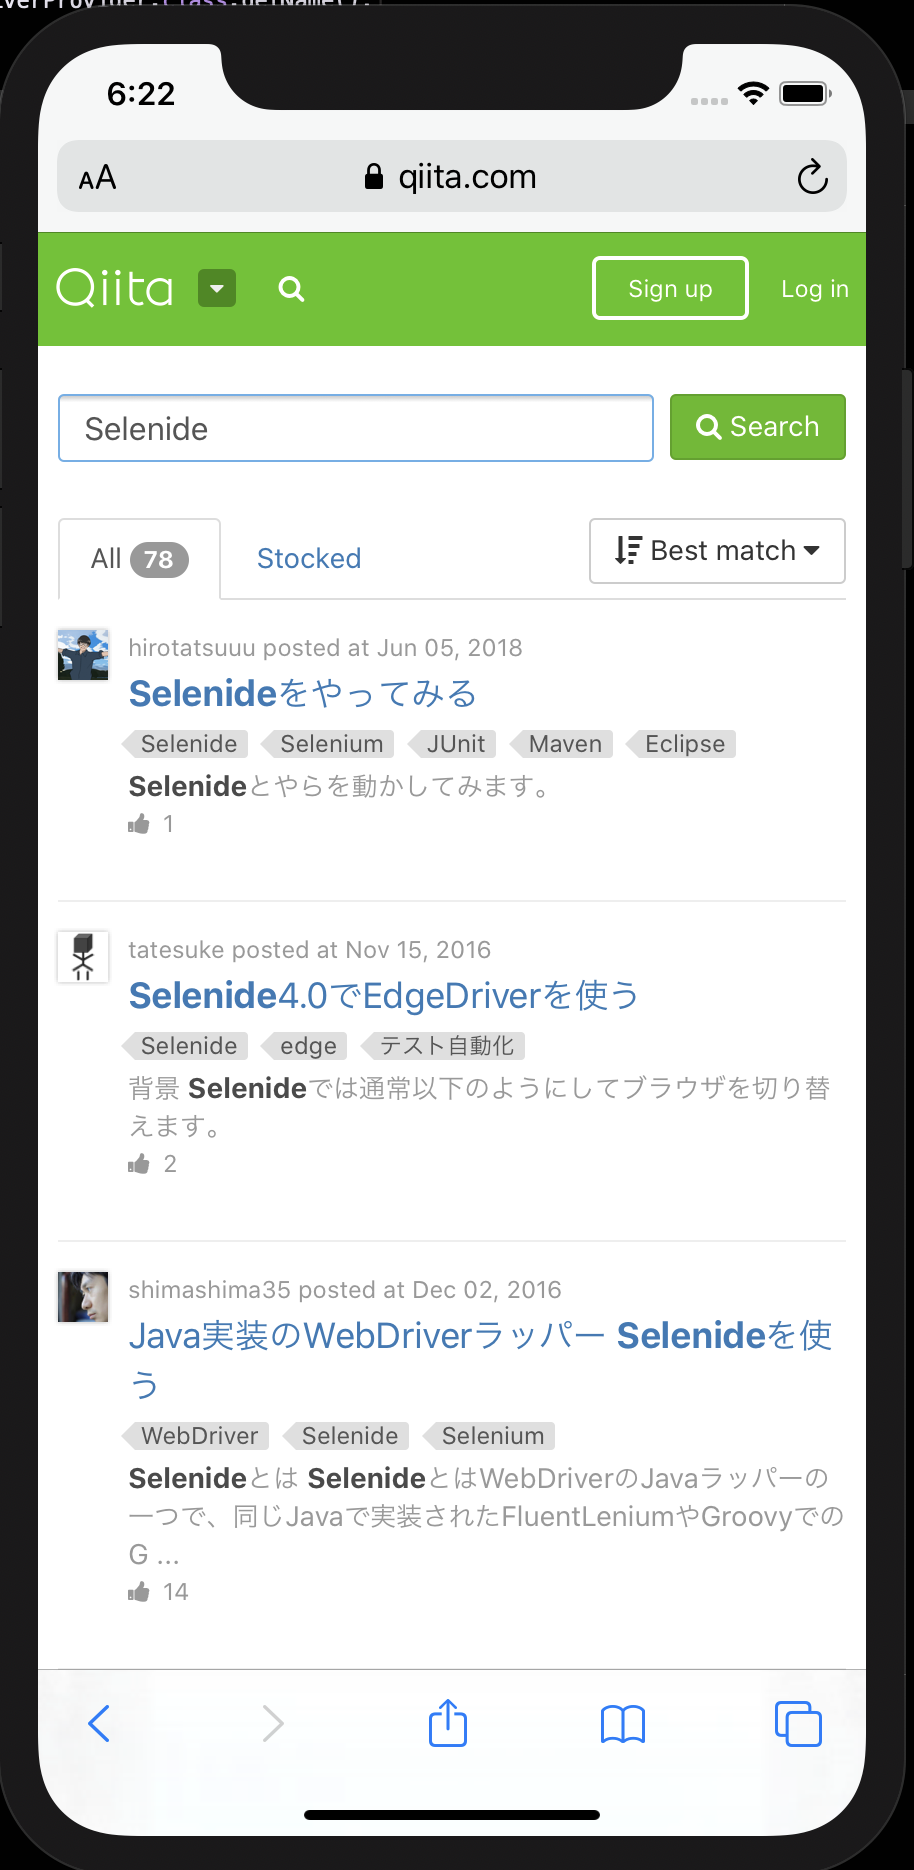
Qiitaのページで検索できれば動作確認完了です.
2.Appiumのインストール
インストール
Homebrewがインストールされていることを前提とします.
インストールしてない方はGoogle先生に聞いてください.(また丸投げ)
兎にも角にもAppiumをインストールします.
# npmのインストール
$ brew install npm
$ npm init

# nodeバージョン確認
$ node -v
v12.12.0

# appiumとAppium-doctorのインストール
$ npm install -g appium appium-doctor

# appiumのバージョン確認
$ appium -v
1.15.1

# appium-doctorのバージョン確認
$ appium-doctor --version
1.12.1
実行環境の整備
続いて,appium-doctorを実行して実行環境に不足しているものをインストールしていきます.
# appium-doctorの実行
$ appium-doctor --ios
info AppiumDoctor Appium Doctor v.1.12.1
info AppiumDoctor ### Diagnostic for necessary dependencies starting ###
info AppiumDoctor  ✅ The Node.js binary was found at: /usr/local/bin/node
info AppiumDoctor  ✅ Node version is 12.12.0
info AppiumDoctor  ✅ Xcode is installed at: /Applications/Xcode.app/Contents/Developer
info AppiumDoctor  ✅ Xcode Command Line Tools are installed in: /Applications/Xcode.app/Contents/Developer
info AppiumDoctor  ✅ DevToolsSecurity is enabled.
info AppiumDoctor  ✅ The Authorization DB is set up properly.
WARN AppiumDoctor  ❌ Carthage was NOT found!
info AppiumDoctor  ✅ HOME is set to: /Users/XXXXX
info AppiumDoctor ### Diagnostic for necessary dependencies completed, one fix needed. ###
info AppiumDoctor
info AppiumDoctor ### Diagnostic for optional dependencies starting ###
WARN AppiumDoctor  ❌ opencv4nodejs cannot be found.
WARN AppiumDoctor  ❌ ffmpeg cannot be found
WARN AppiumDoctor  ❌ mjpeg-consumer cannot be found.
WARN AppiumDoctor  ❌ idb and idb_companion are not installed
WARN AppiumDoctor  ❌ applesimutils cannot be found
info AppiumDoctor ### Diagnostic for optional dependencies completed, 5 fixes possible. ###
info AppiumDoctor
info AppiumDoctor ### Manual Fixes Needed ###
info AppiumDoctor The configuration cannot be automatically fixed, please do the following first:
WARN AppiumDoctor  ➜ Please install Carthage. Visit https://github.com/Carthage/Carthage#installing-carthage for more information.
info AppiumDoctor
info AppiumDoctor ### Optional Manual Fixes ###
info AppiumDoctor The configuration can install optionally. Please do the following manually:
WARN AppiumDoctor  ➜ Why opencv4nodejs is needed and how to install it: https://github.com/appium/appium/blob/master/docs/en/writing-running-appium/image-comparison.md
WARN AppiumDoctor  ➜ ffmpeg is needed to record screen features. Please read https://www.ffmpeg.org/ to install it
WARN AppiumDoctor  ➜ mjpeg-consumer module is required to use MJPEG-over-HTTP features. Please install it with 'npm i -g mjpeg-consumer'.
WARN AppiumDoctor  ➜ Why idb is needed and how to install it: https://github.com/appium/appium-idb
WARN AppiumDoctor  ➜ Why applesimutils is needed and how to install it: http://appium.io/docs/en/drivers/ios-xcuitest/
info AppiumDoctor
info AppiumDoctor ###
info AppiumDoctor
info AppiumDoctor Bye! Run appium-doctor again when all manual fixes have been applied!
info AppiumDoctor
❌が複数出たので解消していきます.
# chartage
$ brew install carthage

# opencv4nodejs
$ brew install cmake
$ npm install -g opencv4nodejs

# ffmpeg
$ sudo mkdir /usr/local/Frameworks
$ sudo chown $(whoami):admin /usr/local/Frameworks
$ brew install ffmpeg

# mjpeg-consumer
$ npm install -g mjpeg-consumer

# applesimutils
$ brew tap wix/brew
$ brew install applesimutils

# idb idb-companion
$ tap facebook/fb
$ install idb-companion
$ install fb-idb
もう一度Appium-doctor --iosを実行して❌が出なければ完了です.
Appiumの起動
最後にAppiumを起動します.
$ appium --port 4723 --address localhost
3.自動テスト〜Simulator + Safari〜編
一番ハードルの低いシミュレータとSafariでSelenideを動作させます.
コードは以下のようになります.
package selenide.selenideAppium;

import static com.codeborne.selenide.Selenide.*;

import org.junit.BeforeClass;
import org.junit.Test;
import org.openqa.selenium.WebDriver;
import org.openqa.selenium.remote.DesiredCapabilities;

import com.codeborne.selenide.Configuration;
import com.codeborne.selenide.SelenideElement;
import com.codeborne.selenide.WebDriverProvider;
import java.net.MalformedURLException;
import java.net.URL;

import io.appium.java_client.ios.IOSDriver;

public class SelenideIOSSimuSafari {
	@BeforeClass
	public static void beforeClass() {
		Configuration.startMaximized = false;
		Configuration.browserSize = null;
		Configuration.timeout = 3000;
		Configuration.browser = SimulatorSafariDriverProvider.class.getName();
	}

	@Test
	public void qiitaOpenTest() {
		// Qiitaを表示
		open("https://qiita.com");
		// Selenideで検索
		SelenideElement searchButton = $(".st-Header_searchButton");
		SelenideElement searchInput = $(".st-Header_searchModalInput");
		searchButton.click();
		searchInput.sendKeys("Selenide");
		searchInput.pressEnter();
		sleep(3000);
	}
}

class SimulatorSafariDriverProvider implements WebDriverProvider {
	@SuppressWarnings("rawtypes")
	@Override
	public WebDriver createDriver(DesiredCapabilities capabilities) {
		capabilities.setCapability("automationName", "XCUITest");
		capabilities.setCapability("deviceName", "iPhone 11");
		capabilities.setCapability("platformName", "iOS");
		capabilities.setCapability("platformVersion", "13.2");
		capabilities.setCapability("browserName", "Safari");
		try {
			return new IOSDriver(new URL("http://localhost:4723/wd/hub"), capabilities);
		} catch (MalformedURLException e) {
			throw new RuntimeException(e);
		}
	}
}
ブラウザ名をSimulatorSafariDriverProvider.class.getName()とするところがポイントです.
setCapabilityに記載の値はシミュレータの一覧で確認してください.

今回の場合はiOS13.2のiPhone 11のシミュレータを使用します.
Chromeの時と同様にJunitを実行するとシミュレータが起動して自動でテストしてくれます.
Chromeと同じようにQiitaで検索できれば完了です.
4.テスト対象自作アプリの作成
Safari以外のアプリのテストといきたいところですが,テスト対象のアプリは自分で作成しないといけないので,ただTextFieldが置いてあるだけのアプリをパッと作成します.

せっかくなのでSwiftUIで作成してみます.
記載することはこれだけです.(初めてSwiftUIを触った初心者の書いたコピペコードなので参考にはしないでください.)
import SwiftUI

struct ContentView: View {
    @State private var username: String = ""
    var body: some View {
      Form {
        Section {
            Text("Name")
            TextField("Username", text: $username)
        }
      }
    }
}

struct ContentView_Previews: PreviewProvider {
    static var previews: some View {
        ContentView()
    }
}
テストしたいシミュレータにインストールして実行できることを確認してください.
5.自動テスト〜Simulator + 自作アプリ〜編
以下のコードでJunitを実行します.
package selenide.selenideAppium;

import static com.codeborne.selenide.Selenide.*;

import org.junit.BeforeClass;
import org.junit.Test;
import org.openqa.selenium.By;
import org.openqa.selenium.WebDriver;
import org.openqa.selenium.remote.DesiredCapabilities;

import com.codeborne.selenide.Configuration;
import com.codeborne.selenide.SelenideElement;
import com.codeborne.selenide.WebDriverProvider;
import java.net.MalformedURLException;
import java.net.URL;

import io.appium.java_client.ios.IOSDriver;

public class SelenideIOSSimuApp {
	@BeforeClass
	public static void beforeClass() {
		Configuration.startMaximized = false;
		Configuration.browserSize = null;
		Configuration.timeout = 3000;
		Configuration.browser = SimulatorAppDriverProvider.class.getName();
	}

	@Test
	public void inputTest() {
		// アプリを起動
		open();
		// Selenideと入力
		SelenideElement userNameInput = $(By.className("XCUIElementTypeTextField"));
		userNameInput.click();
		userNameInput.sendKeys("Selenide");
		sleep(3000);
	}
}

class SimulatorAppDriverProvider implements WebDriverProvider {
	@SuppressWarnings("rawtypes")
	@Override
	public WebDriver createDriver(DesiredCapabilities capabilities) {
		capabilities.setCapability("automationName", "XCUITest");
		capabilities.setCapability("deviceName", "iPhone 11");
		capabilities.setCapability("platformName", "iOS");
		capabilities.setCapability("platformVersion", "13.2");
		capabilities.setCapability("bundleId", "XXXXX.textInputSample");
		try {
			return new IOSDriver(new URL("http://localhost:4723/wd/hub"), capabilities);
		} catch (MalformedURLException e) {
			throw new RuntimeException(e);
		}
	}
}
bundleIdは自分でアプリを作成した時のIDを入力してください.
IDの付与をサボっているのでXCUIElementTypeTextFieldというclassのテキストフィールドを探して,そこにSelenideと入力しています.
シミュレータが起動してテキストフィールドにSelenideと入力できれば完了です.
6.実機テストの準備
UDIDの取得
テストを実行する端末を特定するためにUDIDがが必要になりますので事前に取得しておきます.
以下のコマンドで取得します.
今回の場合,UDIDは00008020-001638XXXXXXXXXXです.
$ brew install ios-deploy
$ ios-deploy -c
[....] Waiting up to 5 seconds for iOS device to be connected
[....] Found 00008020-001638XXXXXXXXXX (D321AP, D321AP, uknownos, unkarch) a.k.a. 'あいぽんXS' connected through USB.
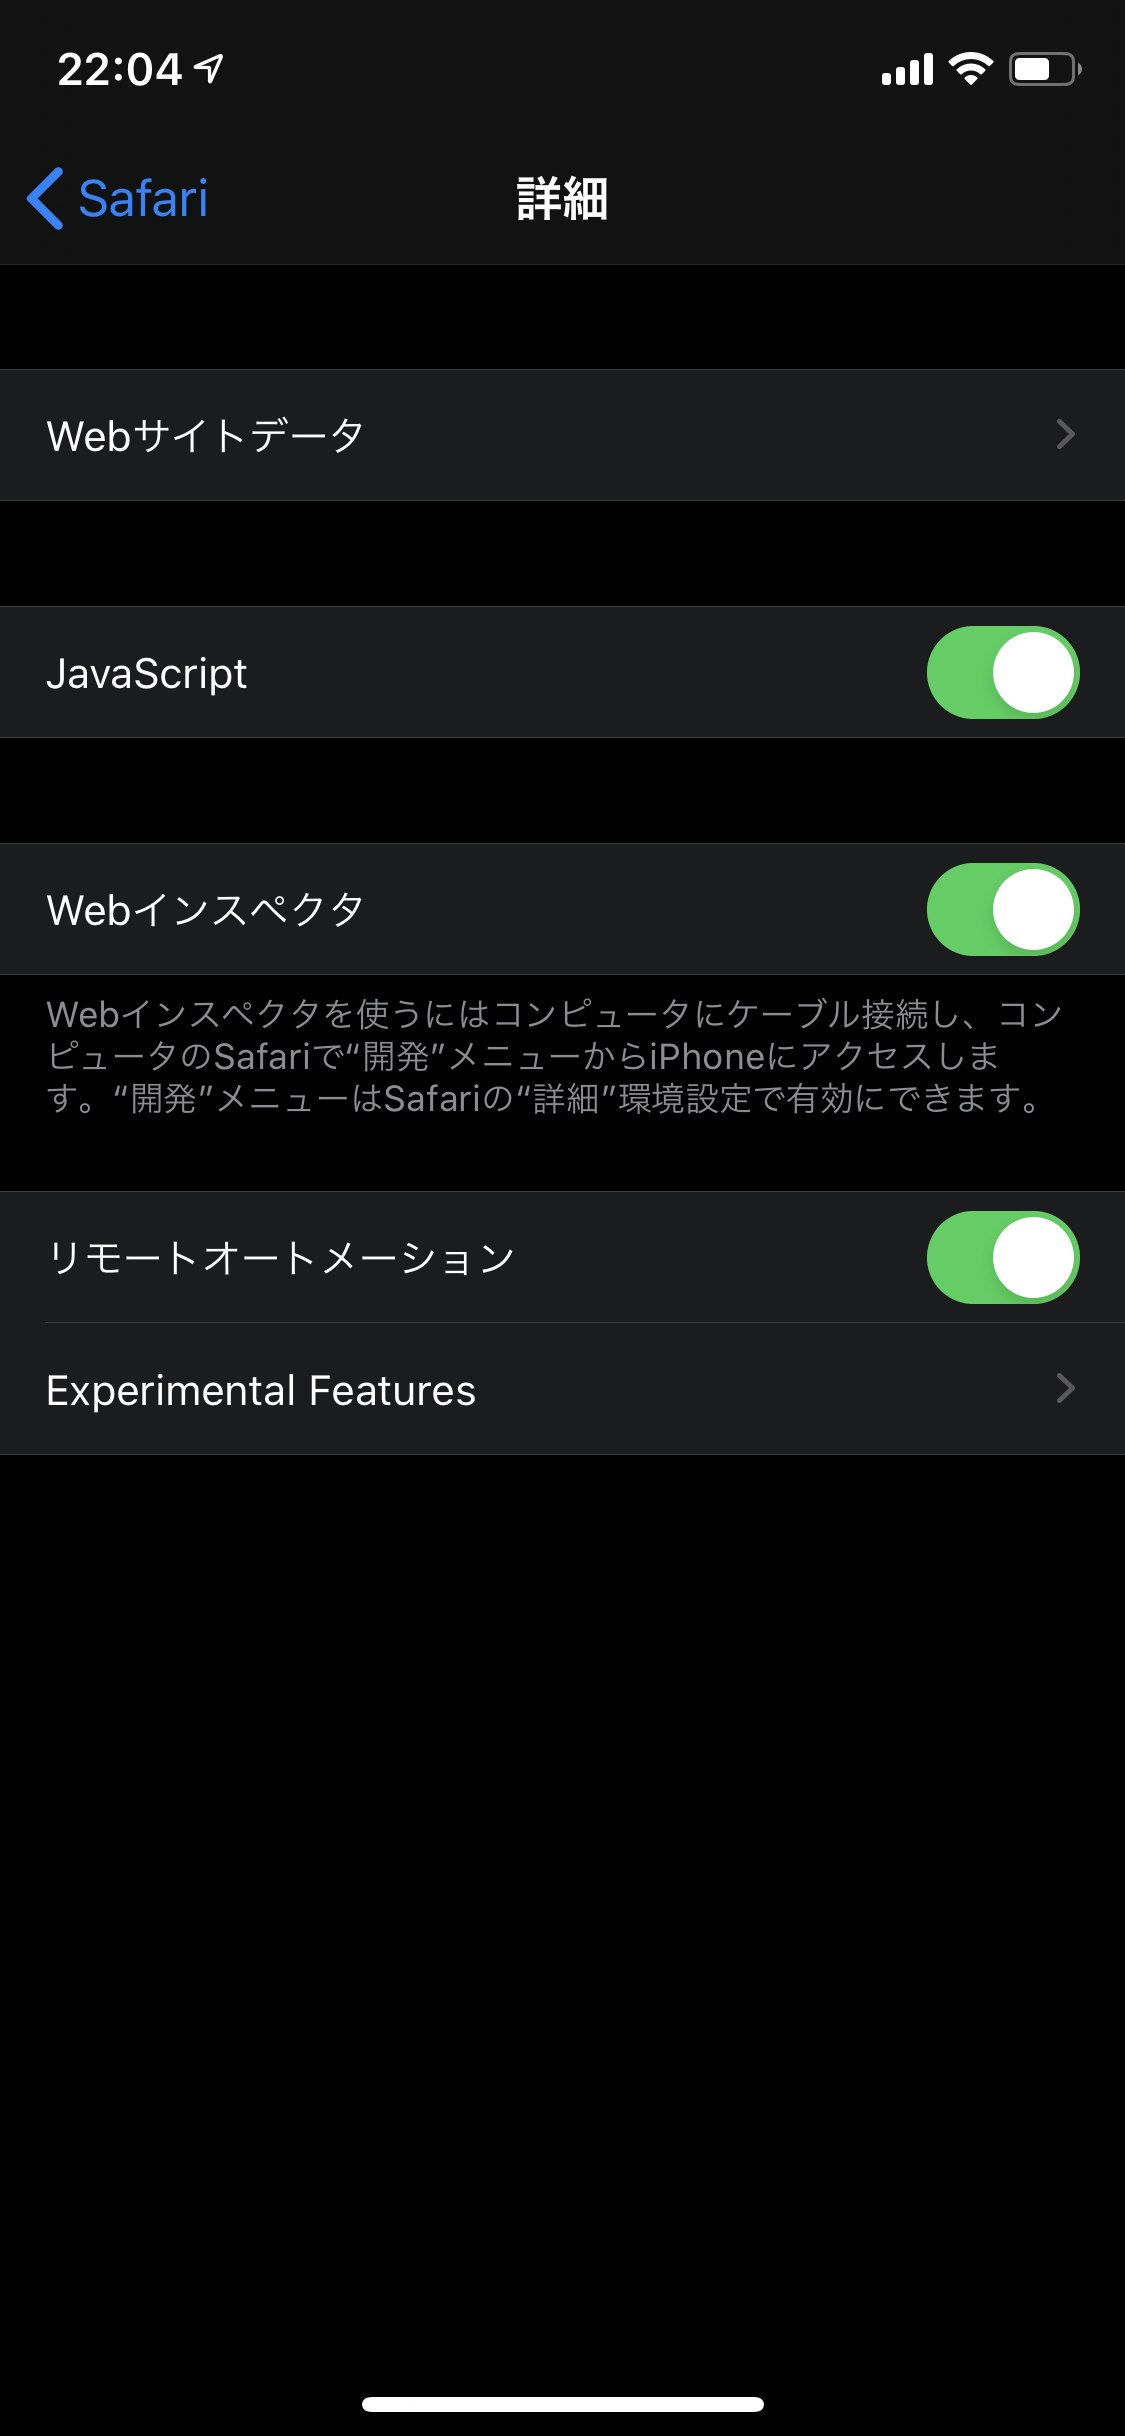
Safariの自動テストの有効化
SafariをAppiumから操作するために,「設定」→「Safari」→「詳細」の中にある「Webインスペクタ」「リモートオートメーション」をONに変更します.
7.自動テスト〜実機 + Safari〜編
実機で動作させる場合は,WebDriverAgent(WDA)をいうアプリを端末にインストールする必要があります.このインストールもAppiumが自動でやってくれるのですが,私の環境ではうまく動作しませんでした.
動作しない場合は「9. WDAの手動インストール」をご覧ください.
⚠️ 2019/11/3 ページは開けるのですが,なぜか要素の取得に30分かかったりします.(Seleniumを使っても同じでした.iOS12では発生しませんでした.)
バージョンに依存する現象かもしれませんが,ご存知の方がいらっしゃれば教えてください.
→$ npm install -g appium@beta でベータ版をインストールすることで改善しました.
Kazu_cocoaさんありがとうございます.
以下のコードでJunitを実行します.
package selenide.selenideAppium;

import static com.codeborne.selenide.Selenide.*;

import org.junit.BeforeClass;
import org.junit.Test;
import org.openqa.selenium.WebDriver;
import org.openqa.selenium.remote.DesiredCapabilities;

import com.codeborne.selenide.Configuration;
import com.codeborne.selenide.SelenideElement;
import com.codeborne.selenide.WebDriverProvider;
import java.net.MalformedURLException;
import java.net.URL;

import io.appium.java_client.ios.IOSDriver;

public class SelenideIOSRealDeviceSafari {
	@BeforeClass
	public static void beforeClass() {
		Configuration.startMaximized = false;
		Configuration.browserSize = null;
		Configuration.timeout = 3000;
		Configuration.browser = RealDeviceSafariDriverProvider.class.getName();
	}

	@Test
	public void qiitaOpenTest() {
		// Qiitaを表示
		open("https://qiita.com");
		// Selenideで検索
		SelenideElement searchButton = $(".st-Header_searchButton");
		SelenideElement searchInput = $(".st-Header_searchModalInput");
		searchButton.click();
		searchInput.sendKeys("Selenide");
		searchInput.pressEnter();
		sleep(3000);
	}

}

class RealDeviceSafariDriverProvider implements WebDriverProvider {
	@SuppressWarnings("rawtypes")
	@Override
	public WebDriver createDriver(DesiredCapabilities capabilities) {
		capabilities.setCapability("automationName", "XCUITest");
		capabilities.setCapability("deviceName", "iPhone XS");
		capabilities.setCapability("platformName", "iOS");
		capabilities.setCapability("platformVersion", "13.2");
		capabilities.setCapability("udid", "00008020-001638XXXXXXXXXX");
		capabilities.setCapability("browserName", "Safari");
		capabilities.setCapability("startIWDP", true);
		capabilities.setCapability("xcodeOrgId", "XXXXXXXXXX");
		capabilities.setCapability("xcodeSigningId", "iPhone Developer");
		capabilities.setCapability("updatedWDABundleId", "com.facebook.WebDriverAgentRunner");
		try {
			return new IOSDriver(new URL("http://localhost:4723/wd/hub"), capabilities);
		} catch (MalformedURLException e) {
			throw new RuntimeException(e);
		}
	}
}
シミュレータの時とコードはほぼ同じですが,capabilitiesに色々と追加しています.
| capabilities | 説明 |
|---|---|
| udid | テストを実行する端末のUDIDを指定 |
| startIWDP | ios_webkit_debug_proxyを自動実行する.trueを指定. |
| xcodeOrgId | 自身の開発者チームのIDを指定(10桁の英数字). |
| xcodeSigningId | iPhone Developerを指定. |
| updatedWDABundleId | WebDriverAgentのBundleIdを入力.他のアプリと区別する必要があるので,他の人と被らない値を指定してください. |
実機のSafariが起動され,Qiitaで検索できれば完了です.
8.自動テスト〜実機 + 自作アプリ〜編
自動テスト〜実機 + Safari〜編と同じく,WebDriverAgent(WDA)が必要となります.
自動でインストールできない場合は,「9. WDAの手動インストール」をご覧ください.
iOS実機にテストしたいアプリをインストールしてから,以下のコードでJunitを実行します.
package selenide.selenideAppium;

import static com.codeborne.selenide.Selenide.*;

import org.junit.BeforeClass;
import org.junit.Test;
import org.openqa.selenium.By;
import org.openqa.selenium.WebDriver;
import org.openqa.selenium.remote.DesiredCapabilities;

import com.codeborne.selenide.Configuration;
import com.codeborne.selenide.SelenideElement;
import com.codeborne.selenide.WebDriverProvider;
import java.net.MalformedURLException;
import java.net.URL;

import io.appium.java_client.ios.IOSDriver;

public class SelenideIOSRealDeviceApp {
	@BeforeClass
	public static void beforeClass() {
		Configuration.startMaximized = false;
		Configuration.browserSize = null;
		Configuration.timeout = 3000;
		Configuration.browser = RealDeviceAppDriverProvider.class.getName();
	}

	@Test
	public void inputTest() {
		// アプリを起動
		open();
		// Selenideと入力
		SelenideElement userNameInput = $(By.className("XCUIElementTypeTextField"));
		userNameInput.click();
		userNameInput.sendKeys("Selenide");
		sleep(3000);
	}
}

class RealDeviceAppDriverProvider implements WebDriverProvider {
	@SuppressWarnings("rawtypes")
	@Override
	public WebDriver createDriver(DesiredCapabilities capabilities) {
		capabilities.setCapability("automationName", "XCUITest");
		capabilities.setCapability("deviceName", "iPhone XS");
		capabilities.setCapability("platformVersion", "13.2");
		capabilities.setCapability("udid", "00008020-001638XXXXXXXXXX");
		capabilities.setCapability("bundleId", "XXXXX.textInputSample");
		capabilities.setCapability("startIWDP", true);
		capabilities.setCapability("xcodeOrgId", "XXXXXXXXXX");
		capabilities.setCapability("xcodeSigningId", "iPhone Developer");
		capabilities.setCapability("updatedWDABundleId", "com.facebook.WebDriverAgentRunner");

		try {
			return new IOSDriver(new URL("http://localhost:4723/wd/hub"), capabilities);
		} catch (MalformedURLException e) {
			throw new RuntimeException(e);
		}
	}
}
今まで出てきたcapabilitiesだけで,新しいものはありません.
実行してSelenideと入力できればOKです.
9.WDAの手動インストール
Appiumに以下のようのエラーが表示された場合など,自動でインストールできなかった場合は,手動でWDAをインストールする必要があります.
[debug] [W3C] Testing failed:
[debug] [W3C] 	No profiles for 'XXXXX.WebDriverAgentRunner.xctrunner' were found: Xcode couldn't find any iOS App Development provisioning profiles matching 'XXXXX.WebDriverAgentRunner.xctrunner'. Automatic signing is disabled and unable to generate a profile. To enable automatic signing, pass -allowProvisioningUpdates to xcodebuild.
[debug] [W3C] 	No signing certificate "iOS Development" found: No "iOS Development" signing certificate matching team ID "XXXXXXXXXX" with a private key was found.
以下の手順は
http://appium.io/docs/en/drivers/ios-xcuitest-real-devices/
のFull manual configurationに該当します.
アプリのインストールのため,指定のスクリプトを実行してから,Xcodeのプロジェクトを開きます.
# Script実行
$ cd /usr/local/lib/node_modules/appium/node_modules/appium-webdriveragent/
$  mkdir -p Resources/WebDriverAgent.bundle
$  ./Scripts/bootstrap.sh -d
# Xcodeを起動
$  open WebDriverAgent.xcodeproj
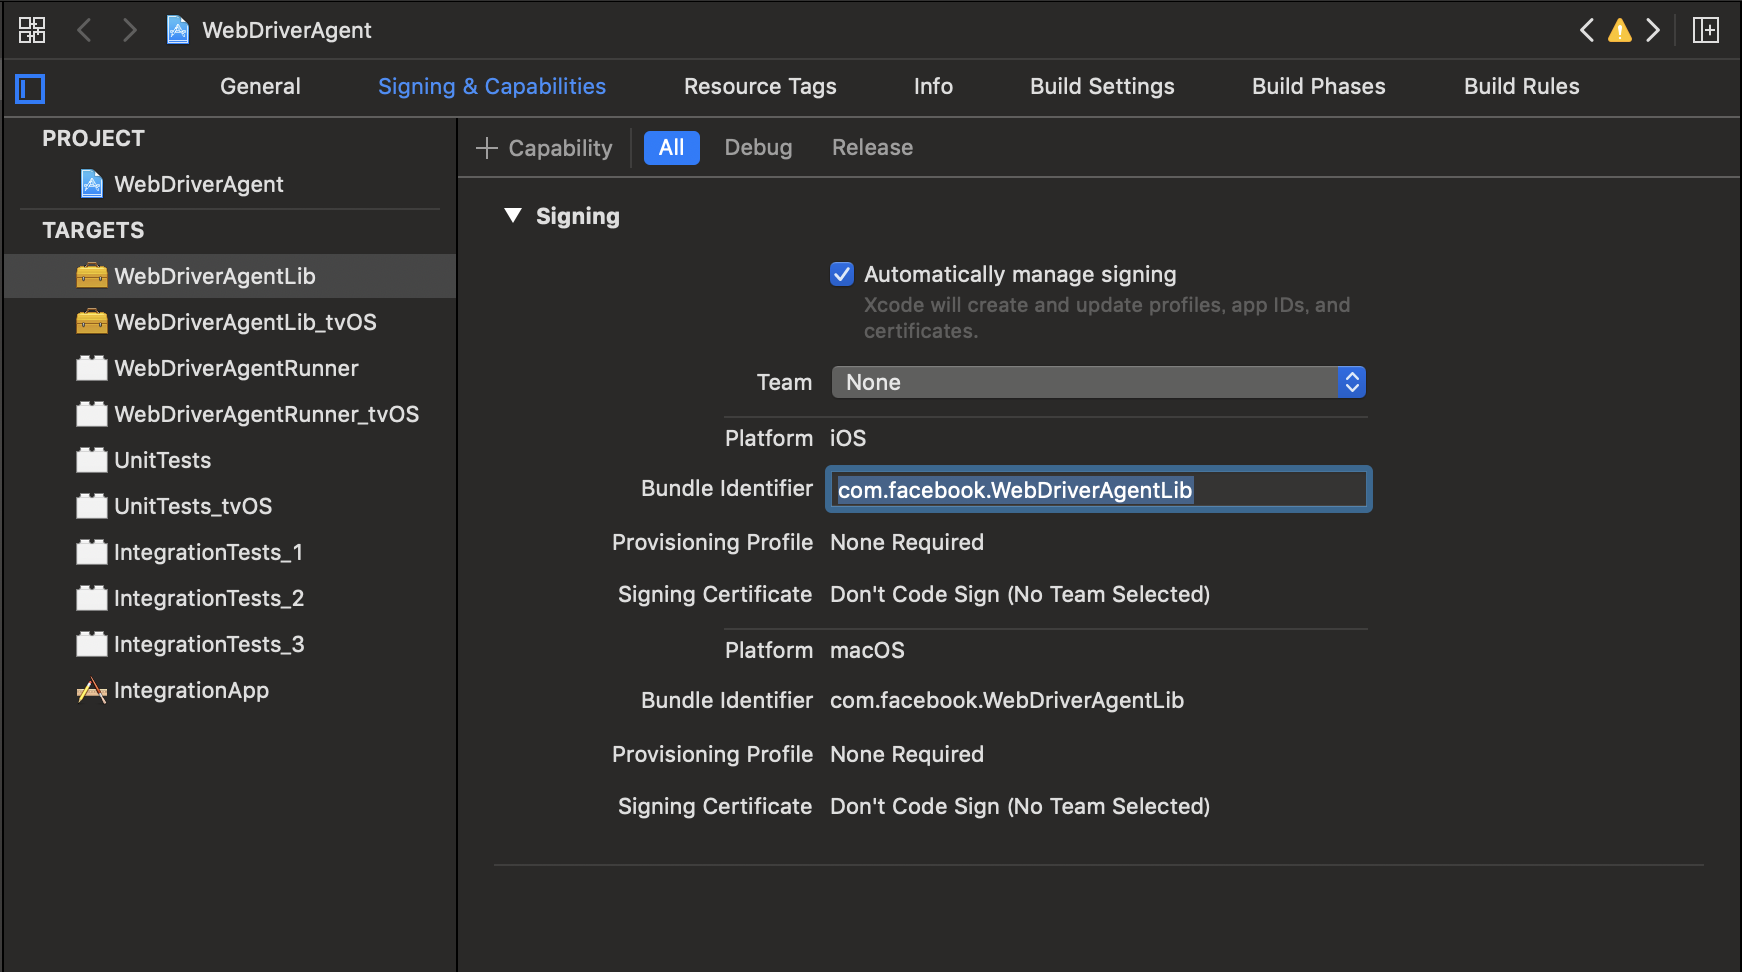
WebDriverAgentLibの設定画面を開き,TeamとBundle identifierをそれぞれ以下に変更します.
Team:自分の開発者アカウント
Bundle identifier:他の人と被らない文字列
※画像編集が面倒だったので変更前の値のキャプチャです.
今度はWebDriverAgentRunnerのTeamを変更します.

さらに,WebDriverAgentRunnerのBuild SettingsのProduct Bundle Identifierを変更します.

Xcodeを終了してビルド&テストを実行します.
idには実機のUDIDを入力してください.
$ cd /usr/local/lib/node_modules/appium/node_modules/appium-webdriveragent/
$ xcodebuild -project WebDriverAgent.xcodeproj -scheme WebDriverAgentRunner -destination 'id=00008020-001638XXXXXXXXXX' test
実機にアプリを1度も入れたことがない場合は,以下のエラーが表示される場合があります.
Testing failed:
	WebDriverAgentRunner:
		WebDriverAgentRunner-Runner.app encountered an error (Failed to install or launch the test runner.
(中略)
Unable to launch XXXXX.WebDriverAgentRunner.xctrunner because it has an invalid code signature, inadequate entitlements or its profile has not been explicitly trusted by the user.)
インストールされたアプリを信頼する必要があるので,「設定」→「一般」→「プロファイルとデバイス管理」→「Apple Development: メールアドレス」を選択して信頼をタップします.
もう一度ビルドとテストを実行します.
以下のような出力が出れば準備完了です.
手動インストールした場合は,capabilitiesからupdatedWDABundleIdを削除してください.
Test Case '-[UITestingUITests testRunner]' started.
    t =     0.00s Start Test at 2019-11-03 08:42:20.781
    t =     0.00s Set Up
2019-11-03 08:42:20.830548+0900 WebDriverAgentRunner-Runner[397:13013] Built at Nov  3 2019 08:28:07
2019-11-03 08:42:20.853824+0900 WebDriverAgentRunner-Runner[397:13013] ServerURLHere->http://192.168.0.7:8100<-ServerURLHere
2019-11-03 08:42:20.855402+0900 WebDriverAgentRunner-Runner[397:13029] Using singleton test manager
10.最後に
Appium+Selenideの記事は見当たらなかったので作成しました.(需要がない?)
今回の記事ではSelenideを使う必要は全くないのですが,いざWebのテストを書こうとするとSelenideが便利ですので検索してみてください.
Androidについては端末を持ってないので試せていませんが,iOSより制限が緩いと思いますのでもっと楽だと思います.
自動テストの環境構築のお役に立てれば幸いです.
参考
http://appium.io
https://github.com/selenide/selenide
https://github.com/selenide/selenide-appium