はじめに
Seleniumの使いやすそうなラッパー Selenide を知ったのでセットアップからサンプル作成までをまとめました。
実際に動くサンプルまでが書かれているので動作させてみたい人は試してみてください。
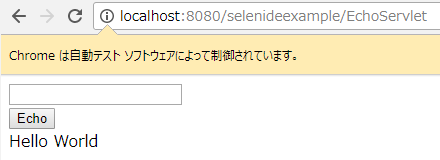
サンプルはテキストボックスに入れたテキストを表示するだけの簡単なサーブレットで、自動テストのイメージは以下のようになります。
サーブレットの実装は、この記事の末尾の付録の2に書いています。
参考URL
参考にしたURLは、以下の通りです。どこも大変良い参考になりました。
Selenideのバージョンが更新されていたり、リンク切れがあったので、2018/01時点での情報でこの記事は作成しました。
-
- Selenium WebDriverのセットアップについて
Selenium WebDriverのインストール~動かしてみる
https://www.htmlhifive.com/conts/web/view/library/webdriver-howtouse
- Selenium WebDriverのセットアップについて
Selenideとは
Selenideとは、UIテストフレームワークである Selenium のラッパーです。
使ってみた感想としては、手っ取り早くて学習コストも低そうでした。
公式ページ http://selenide.org/の説明を抜粋を注釈すると、
Selenide is a framework for test automation powered by Selenium WebDriver
that brings the following advantages:

- Concise fluent API for tests
- Ajax support for stable tests
- Powerful selectors
- Simple configuration

(Selenideは、Selenium WebDriver ベースの自動テストフレームワークです。
 次のような利点があります。
 - 簡潔で流れるようなテストAPI
 - 安定したテストのために、Ajaxをサポート
 - 強力なセレクタ機能※
  ※ ID、CSS、クエリなどのセレクタが使用可能
 - 簡単な設定 )
のようになります。
Selenideを使うための設定
mavenを使用している場合は、pom.xmlに次の内容を追記します。
<project xmlns="http://maven.apache.org/POM/4.0.0" xmlns:xsi="http://www.w3.org/2001/XMLSchema-instance"
  xsi:schemaLocation="http://maven.apache.org/POM/4.0.0 http://maven.apache.org/xsd/maven-4.0.0.xsd">
  <modelVersion>4.0.0</modelVersion>

  <groupId>com.example</groupId>
  <artifactId>selenideexample</artifactId>
  <version>0.0.1-SNAPSHOT</version>
  <packaging>jar</packaging>

  <name>selenideexample</name>
  <url>http://maven.apache.org</url>

  <properties>
    <project.build.sourceEncoding>UTF-8</project.build.sourceEncoding>
  </properties>

  <dependencies>
<!-- ここからが Selenide の設定 -->
	<dependency>
	    <groupId>com.codeborne</groupId>
	    <artifactId>selenide</artifactId>
	    <version>4.9.1</version>
	</dependency>
<!-- ここまでが Selenide の設定 -->
	<dependency>
	    <groupId>junit</groupId>
	    <artifactId>junit</artifactId>
	    <version>4.12</version>
	</dependency>
  </dependencies>
</project>
それ以外のgradle, ivyなど設定は、参考URLの1)に詳しく書かれています。
ちなみに、Selenideの最新バージョンは、Googleで、maven Selenideで検索で出る、
https://mvnrepository.com/artifact/com.codeborne/selenide で確認できます。
maven, gradleのdipendencyの記述などもここでコピーできます。
テストコード
その前の事前準備
事前に準備としてSeleniumのWebDriverとChromeDriver.exeを配置しておく必要があります。
この記事の最後の付録の3とコードのコメントを参照してください。
参考URLの3)にも書かれています。(ただしダウンロードのリンク切れがありました。)
JUnitのコード
Javaのテストコードは以下の通りです。
package com.example;

import org.junit.BeforeClass;
import org.junit.Test;

import com.codeborne.selenide.Configuration;
import com.codeborne.selenide.Condition;
//import static com.codeborne.selenide.Condition.*;//static importしても良い。
import com.codeborne.selenide.Selenide;
//import static com.codeborne.selenide.Selenide.*;//static importしても良い。
import com.codeborne.selenide.WebDriverRunner;

public class EchoJspTest {

	@BeforeClass
	public static void beforeClass() {
		// デフォルトではFireFoxを使うので、Chromeを使うよう設定している。
		Configuration.browser = WebDriverRunner.CHROME;

		// 事前準備
		// 1) <project>/lib/を作る。(libは任意の名前、場所で良い)
		// 2) JavaのWebDriver client-combined-3.8.1.jar と libs を <project>/lib/ に配置する。
		//    Javaのドライバ(jar)は、http://docs.seleniumhq.org/download/ から以下のようにダウンロードできる。
		//    "Selenium Client & WebDriver Language Bindings"のLanguage Java のDownloadリンクをクリック。
		// 3) 2)のjarをすべてライブラリのパスに追加する。
		// 4) <project>/lib/chromedirver.exeを入れておく。
		//    exeは、https://sites.google.com/a/chromium.org/chromedriver/downloads からダウンロードできる。

		//以下のように、chromedirver.exe のパスをシステムプロパティで指定する。
		System.setProperty("webdriver.chrome.driver", "./lib/chromedriver.exe");
	}

	@Test
	public void echoButtonTest() {
		// static importした場合は、Selenide. と Condition. を消す。
		// そちらのほうが可読性は高くなるが、学習のため敢えて普通のimportを使っている。
		Selenide.open("http://localhost:8080/selenideexample/EchoServlet");
		Selenide.$("#input_text").val("Hello World");
		Selenide.$("#echo_button").click();
		Selenide.$("#output_text").shouldHave(Condition.text("Hello World"));
	}

}
echoButtonTestメソッドでは、
input_textというIDでテキストボックスをセレクトして値を入力、
その後、echo_buttonというIDのボタンをクリック、
そして、output_textというIDのフィールドの値のチェック
をしています。
上の画像と付録にあるJSPも併せて見ると分かりやすいかと思います。
ポイント
- beforeClass()では、以下のことを行っています。
- デフォルトでは、FireFoxを使用するので、Chromeを使うようにしています。
- ChromeDriver.exeのパスをシステムプロパティで設定しています。
- テストのコードは、以下のような流れで実装します。
- open("<url>")でURLを開き、
- エレメントの選択(jQueryライクに"$"を使用)と、
- イベント実行(click(), pressEnter()など)を実行し、
- Condition(.value("<期待値>"), .text("<期待値>"))で評価します。
まとめ
公式ページにもあるように、APIも分かりやすくテストを簡単に書くことと、ブラウザの開閉、タイムアウトなどを気にすることなくテストの実装ができました。
付録
1. プロジェクト全体のファイル構成
上のコードとサーブレットのコード、JSP、Web.xml、pom.xmlの場所は以下のようになります。
|   pom.xml   ........... ★pom.xmlファイル
|
+---lib   ............... ★WebDriverとchoromedriver.exeを入れた場所
|   |   chromedriver.exe
|   |   client-combined-3.8.1.jar
|   |
|   `---libs
|           byte-buddy-1.7.5.jar
|           commons-codec-1.10.jar
|           commons-exec-1.3.jar
|           commons-logging-1.2.jar
|           gson-2.8.2.jar
|           guava-23.0.jar
|           httpclient-4.5.3.jar
|           httpcore-4.4.6.jar
|
+---src
|   +---main
|   |   `---java
|   |       `---com
|   |           `---example
|   |                   EchoServlet.java   ..... ★サーブレット
|   |
|   `---test
|       `---java
|           `---com
|               `---example
|                       EchoJspTest.java   ..... ★テストケース
|
`---WebContent
    +---META-INF
    |       MANIFEST.MF
    |
    `---WEB-INF
        |   echo.jsp   ......................... ★JSP
        |   web.xml   .......................... ★web.xml
        |
        `---lib
web.xmlは以下の通りです。
<?xml version="1.0" encoding="UTF-8"?>
<web-app id="WebApp_ID" version="3.0"
 xmlns="http://java.sun.com/xml/ns/javaee"
 xmlns:xsi="http://www.w3.org/2001/XMLSchema-instance"
 xsi:schemaLocation="http://java.sun.com/xml/ns/javaee http://java.sun.com/xml/ns/javaee/web-app_3_0.xsd">
	<servlet>
		<servlet-name>selenide-example</servlet-name>
		<servlet-class>com.example.EchoServlet</servlet-class>
	</servlet>
	<servlet-mapping>
		<servlet-name>selenide-example</servlet-name>
		<url-pattern>/EchoServlet</url-pattern>
	</servlet-mapping>
	<welcome-file-list>
		<welcome-file>echo.jsp</welcome-file>
	</welcome-file-list>
</web-app>
2. テスト用サーブレットとJSPのコード
サーブレットは、Getで表示して、POSTで値を詰めてdoGetを呼ぶだけです。
package com.example;

import java.io.IOException;

import javax.servlet.RequestDispatcher;
import javax.servlet.ServletException;
import javax.servlet.http.HttpServlet;
import javax.servlet.http.HttpServletRequest;
import javax.servlet.http.HttpServletResponse;

public class EchoServlet extends HttpServlet {
	private static final long serialVersionUID = 1L;

	@Override
	protected void doGet(HttpServletRequest req, HttpServletResponse resp) throws ServletException, IOException {
		RequestDispatcher dispatcher = req.getRequestDispatcher("WEB-INF/echo.jsp");
		dispatcher.forward(req, resp);
	}

	@Override
	protected void doPost(HttpServletRequest req, HttpServletResponse resp) throws ServletException, IOException {
		String val = req.getParameter("echo");
		System.out.println(val);
		req.setAttribute("echo", val);
		doGet(req, resp);
	}
}
JSPは、一番上の画像の通りです。テキストを取るために、<div id="output_text">
と記述しています。
<%@ page language="java" contentType="text/html; charset=ISO-8859-1"
    pageEncoding="ISO-8859-1"%>
<%@ taglib prefix="c" uri="http://java.sun.com/jsp/jstl/core" %>
<!DOCTYPE html PUBLIC "-//W3C//DTD HTML 4.01 Transitional//EN" "http://www.w3.org/TR/html4/loose.dtd">
<html>
<head>
<meta http-equiv="Content-Type" content="text/html; charset=ISO-8859-1">
<title>Echo</title>
</head>
<body>
	<form method="post" action="./EchoServlet">
		<input id="input_text" type="text" name="echo"/>
		<br/>
		<button id="echo_button" type="submit">Echo</button>
		<br/>
		<div id="output_text"><c:out value="${echo}" /></div>
	</form>
</body>
</html>
3. Selenium WebDriverとChromeDriver.exeのセットアップ
テストコードの事前準備にある通り、Chromeで起動したい場合は以下のセットアップをします。
- Seleniumのjarをダウンロード
http://docs.seleniumhq.org/download/ から
Selenium Client & WebDriver Language Bindingsのところにある
JavaのDownloadをクリック(一番上ではありません)

- ダウンロードしたjarをライブラリパスに追加
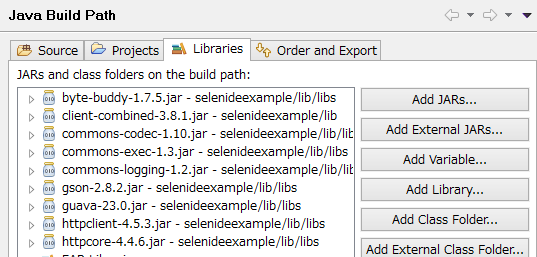
(EclipseならBuild PathからLibrariesタブのAdd Jarで追加します。)

- ChromeDirver.exeをダウンロードしてプロジェクトの下の任意の場所に配置
https://sites.google.com/a/chromium.org/chromedriver/downloads からダウンロード
以上です。
