やりたいこと
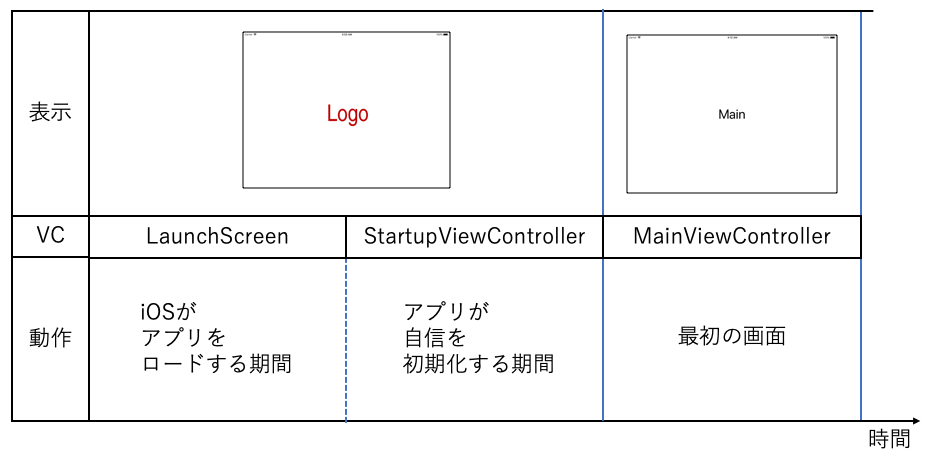
LaunchScreenを表示した後、画面はそのままで初期化用のStartupViewControllerを起動します。
初期化終了後にMainViewControllerを起動します。
StartupViewControllerを起動する
SceneDelegateのscene(_: willConnectTo:options)でStartupViewControllerをrootViewControllerにセットします。
// root view controller
let viewController = StartupViewController()
window.rootViewController = viewController
window.makeKeyAndVisible()
LaunchScreenのStoryboard名をInfo.plistから取得する
ハードコードで"LaunchScreen"でもいいんですけど。![]()
struct InfoPlistUtil {

    private init() {} // prevent instantiation.

    static func objectForKey<T>(_ key: String) -> T? {
        Bundle.main.object(forInfoDictionaryKey: key) as? T
    }

    static func stringForKey(_ key: String) -> String? {
        objectForKey(key)
    }

    static var launchStoryboardName: String? {
        stringForKey("UILaunchStoryboardName")
    }
}
LaunchScreenを取得する
LaunchScreenをViewControllerごとインスタンス化してそのviewを取得します。
struct ViewUtil {

    private init() {} // prevent instantiation.

    static var launchScreen: UIView? {
        guard let name = InfoPlistUtil.launchStoryboardName else {
            return nil
        }
        let storyboard = UIStoryboard(name: name, bundle: nil)
        let viewController = storyboard.instantiateInitialViewController()
        let retainedView = viewController?.view // retain Launch Screen
        viewController?.view = nil // Cut reference from viewController to Launch Screen
        return retainedView
    }
}
肝なところなので解説もご覧ください。
StartupViewControllerにLaunchScreenをセットする
StartupViewControllerのviewにLaunchScreenをセットします。
override func loadView() {
    super.loadView()

    if let launchScreen = ViewUtil.launchScreen {
        view = launchScreen
    }
}
MainViewControllerを起動する
初期化終了後にMainViewControllerをインスタンス化してrootViewControllerにセットします。
このまま実行できませんが雰囲気はわかりますよね?ベタで書くの面倒だったので。![]()
// 初期化終了後
let viewController = ViewUtil.retrieveViewController(MainViewController.self)
RootViewControllerSegue(source: self, destination: viewController)
    .perform()
解説
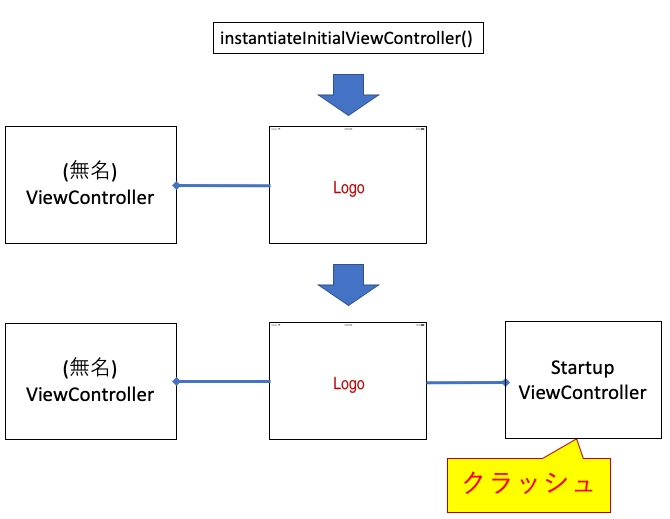
ダメパターン(1)

instantiateInitialViewController()を実行した直後はLaunchScreenが無名ViewControllerに割り当てられています。
この状態でLaunchScreenをStartupViewControllerに割り当てるとクラッシュします。
(1つのUIViewを複数のUIViewControllerに割り当てできないため)
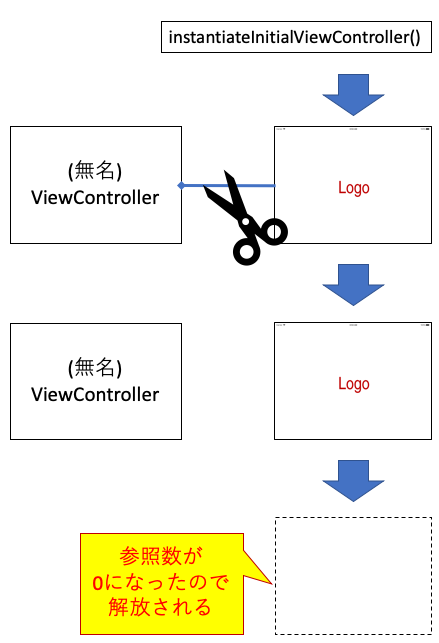
ダメパターン(2)

無名ViewControllerからLaunchScreenへの参照を切ってみたらどうでしょうか?
LaunchScreenの参照数が0になってしまうので、LaunchScreenがメモリから解放されてしまいます。
(詳細はARCの仕組みを調べてみてください)
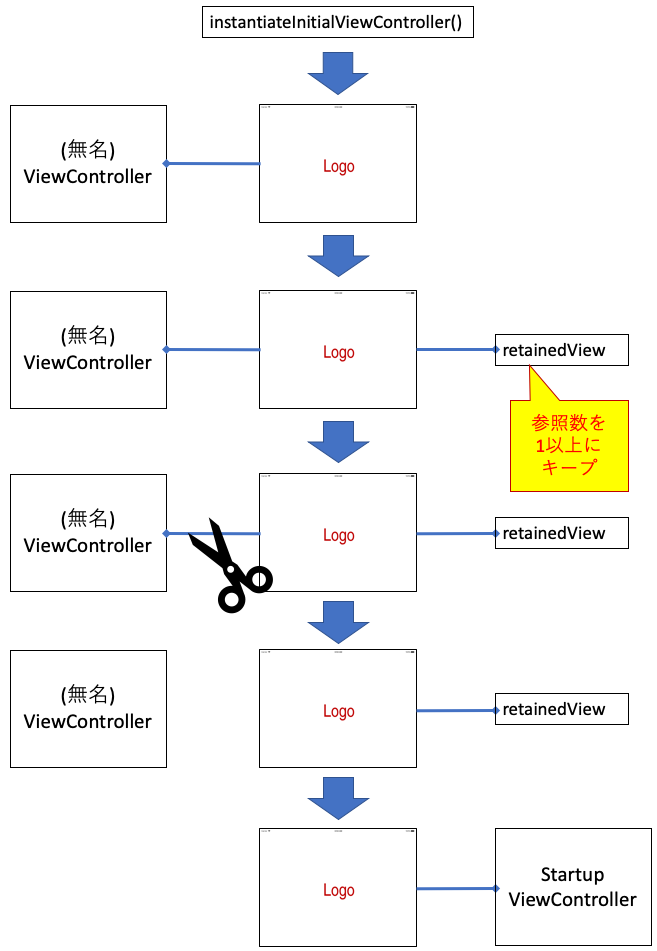
成功パターン
- 変数retainedViewを用意してLaunchScreenを参照することで参照数が0になることを防ぎます。
- 無名ViewControllerからLaunchScreenへの参照を切ります。
- LaunchScreenをStartupViewControllerに割り当てます。
ソースコード
GitHubにソースコード一式を置きましたの参考にしていただければ幸いです。
hackenbacker/LaunchScreenSample
動作環境
Xcode13.4.1 + iOS13.0 or later

