前回の記事でHunyuan2D 2.1をComfyUIで動かすことに成功したが、テクスチャの出力まではできなかった。
(https://qiita.com/HOS_Giken/items/eaaedc735b878a2ab9a0)
githubなどの説明にもテクスチャの出力には対応していないと記されていて、解説のYoutube動画でも「テクスチャの出力に関しては別の動画で説明」とされていた。
https://youtu.be/3WYknAD0msw?si=9b7VEwGz-vjZgCfA&t=348
今回は別のカスタムノードを使って、ComfyUIでHunyuan2D 2.1を動かし、テクスチャの出力までを行った。
以下はその環境構築のメモ。
前提環境
- デスクトップ版ComfyUIを使用
- グラボ
- NVIDIA GeForce RTX4070 Laptop GPU
参考にしたYoutube動画とソースのgithub
以下のYoutube動画で紹介されていたカスタムノードを使ってテストを行った。
https://www.youtube.com/watch?v=OtXda2Adaik
前半部分でワークフローの解説がある。
使ったカスタムノードのgithubは以下のものを使用。
https://github.com/visualbruno/ComfyUI-Hunyuan3d-2-1?tab=readme-ov-file
インストール手順
ComfyUIのターミナルから以下のコマンドを順に実行した。
カスタムノードのリポジトリをクローン
cd %userprofile%\Documents\ComfyUI\custom_nodes
git clone https://github.com/visualbruno/ComfyUI-Hunyuan3d-2-1.git
手順に従って環境を構築
ComfyUI-Hunyuan3d-2-1のREADMEにある手順に従って、順に環境を構築する。
上記REDMEで書かれているディレクトリのパスなどは、適宜自分の環境に合わせて修正しながら実行する。
1)依存関係のインストール
pip install -r .\ComfyUI-Hunyuan3d-2-1\requirements.txt
2)テクスチャ生成モジュールのインストール
pip install -r .\ComfyUI-Hunyuan3d-2-1\requirements.txt
pip install .\ComfyUI-Hunyuan3d-2-1\hy3dpaint\custom_rasterizer\dist\custom_rasterizer-0.1-cp312-cp312-win_amd64.whl
pip install .\ComfyUI-Hunyuan3d-2-1\hy3dpaint\DifferentiableRenderer\dist\mesh_inpaint_processor-0.0.0-cp312-cp312-win_amd64.whl.whl
※READMEにある「Option B: Manual Compilation (for advanced users)」は行わなかった。
3)手順「Fix UV Wrapping for High Poly Meshes (Patched Xatlas)」の対応
pip uninstall xatlas
cd %userprofile%\Documents\ComfyUI
if (Test-Path xatlas-python) { Remove-Item xatlas-python -Recurse -Force }
git clone --recursive https://github.com/mworchel/xatlas-python.git
cd .\xatlas-python\extern
if (Test-Path xatlas) { Remove-Item xatlas -Recurse -Force };
git clone --recursive https://github.com/jpcy/xatlas
(Get-Content .\xatlas\source\xatlas\xatlas.cpp) -replace '#if 0', '//#if 0' -replace '#endif', '//#endif' | Set-Content .\xatlas\source\xatlas\xatlas.cpp; `
cd %userprofile%\Documents\ComfyUI
pip install .\xatlas-python\
モデルのダウンロードと配置
- hunyuan3d-dit-v2-1.ckpt
- https://huggingface.co/tencent/Hunyuan3D-2.1/tree/main/hunyuan3d-dit-v2-1
- ComfyUI/models/diffusion_models/に配置
- hunyuan3d-vae-v2-1.ckpt
- https://huggingface.co/tencent/Hunyuan3D-2.1/tree/main/hunyuan3d-vae-v2-1
- ComfyUI/models/vae/ に配置
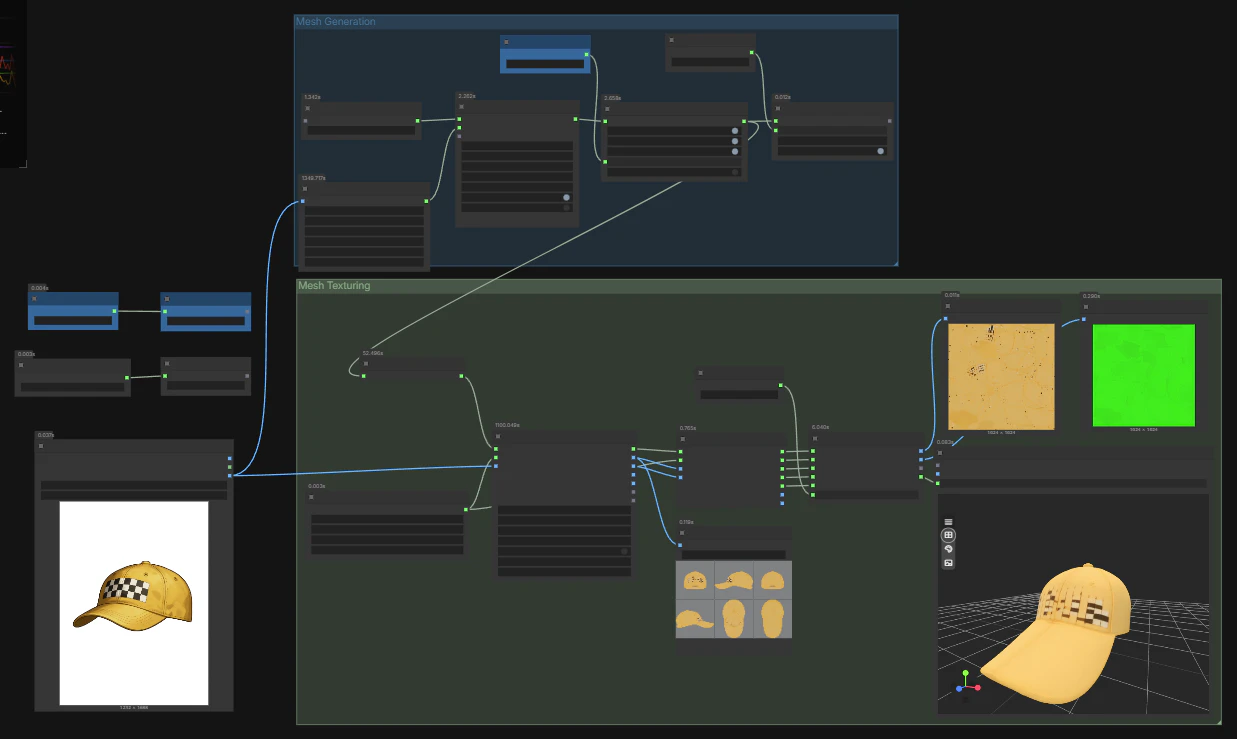
ComfyUIの再起動と動作確認
サンプルワークフローを読み込む
- \ComfyUI-Hunyuan3d-2-1\workflow_examples …から、Full_Workflow.jsonをComfyUIにドラッグ&ドロップして、サンプルのワークフローを読み込み
- 初回読み込み時に、モデルの読み込みでワーニングの表示がでた
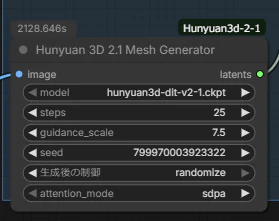
⇒マネージャーから関連のextentionを更新し、ComfyUIを再起動したところ解消。 - 実行するも、Hunyan3d 2.1 Mesh Generatorノードでエラーをはいて止まる。
※画像は問題解消後、実行中のものなので、エラー表示はない
pipelines.pyのコードを一部修正
ログを追うと、以下のコードでエラーを吐いていることがわかる。
\ComfyUI-Hunyuan3d-2-1\hy3dshape\hy3dshape\pipelines.py
ComfyUIのルートディレクトリが、パスにピリオドを含むフォルダいかに配置されると、途中でモジュールの読み込み処理が止まってしまう。
元のコード、150行目付近のこのコードを修正する。
修正前:
def get_obj_from_str(string, reload=False):
    module, cls = string.rsplit(".", 1)
    if reload:
        module_imp = importlib.import_module(module)
        importlib.reload(module_imp)
    try:
        obj = getattr(importlib.import_module(module, package=os.path.basename(os.path.dirname(os.path.dirname(os.path.dirname(os.path.abspath(__file__)))))), cls)
    except:
        obj = getattr(importlib.import_module(module, package=os.path.dirname(os.path.dirname(os.path.dirname(os.path.abspath( __file__ ))))), cls)
    return obj
修正後
def get_obj_from_str(string, reload=False):
    module, cls = string.rsplit(".", 1)
    if reload:
        module_imp = importlib.import_module(module)
        importlib.reload(module_imp)
    try:
        from pathlib import Path
        base_path = Path(os.path.dirname(os.path.abspath(__file__)))
        relative_path = Path('../..')
        package_name = (base_path / relative_path).resolve()
        obj = getattr(importlib.import_module(module, package=package_name), cls)
    except :
        package_name = '.'.join(__package__.split('.')[:-2])
        obj = getattr(importlib.import_module(module, package=package_name), cls)

    return obj
※try文内でpathlibをインポートしているのが非常に不健全だが…。
ひとまず手っ取り早くこうした。
torchバージョンを2.6.0+cu12.6に更新
上記までの対応でComfyUI上でワークフローを再実行すると、Hunyan 3D 2.1 MultiViews Generatorノードまで進んだところで止まる。
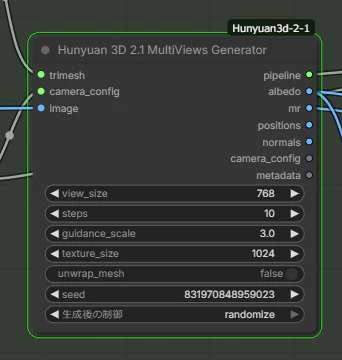
ログ表示にも何もなく、以下のようなログのところで止まったままになる。
この問題はgithubのissueでも報告がある。
https://github.com/visualbruno/ComfyUI-Hunyuan3d-2-1/issues/63
https://github.com/visualbruno/ComfyUI-Hunyuan3d-2-1/issues/57
上記issueで紹介されていた解決策として、torchのバージョンを2.6.0にすると動く、とあったのでやってみる。
以下のコードをComfyUIのターミナルから実行する。
pip install torch==2.6.0 torchvision==0.21.0 torchaudio==2.6.0 --index-url https://download.pytorch.org/whl/cu126
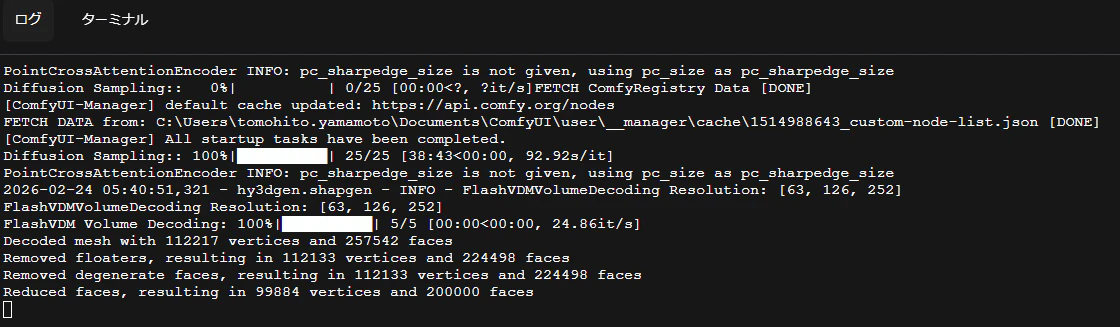
mesh_inpaint_processor-0.0.0-cp312-cp312-win_amd64.whlをpipしなおす
今度は以下のエラーで止まった。
NameError: name 'meshVerticeInpaint' is not defined
同様の不具合が以下のissueで報告されていた。
https://github.com/Comfy-Org/ComfyUI/issues/9040
解決策を見ると、mesh_inpaint_processor-0.0.0-cp312-cp312-win_amd64.whlをpipしなおすのがよさそう。

.whl.whlじゃなくて.whlに直してpipする
元のgithubのREADMEに書かれているセットアップでは、同ファイルの拡張子が.whlではなく.whl.whlを参照する形で書かれているのに対し、.whl.whlファイルは同梱されていない。
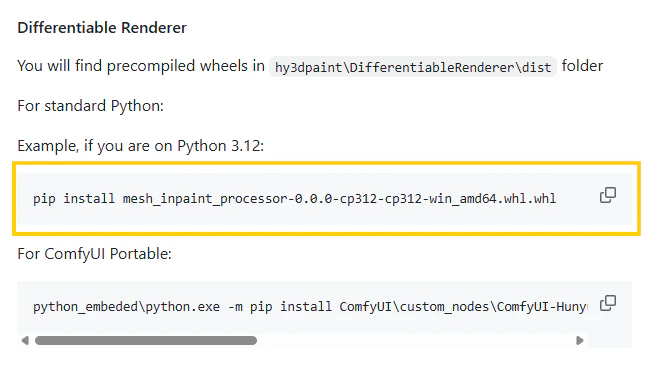
https://github.com/visualbruno/ComfyUI-Hunyuan3d-2-1?tab=readme-ov-file#differentiable-renderer
おそらく本来はmesh_inpaint_processor-0.0.0-cp312-cp312-win_amd64.whlをpipするのが正解だったのだろうと推察される。
なので、.whl.whlと書かれている部分を.whlに直し、改めて以下を改めてComfyUIのターミナルから実行。
cd %userprofile%\Documents\ComfyUI
pip install .\ComfyUI-Hunyuan3d-2-1\hy3dpaint\DifferentiableRenderer\dist\mesh_inpaint_processor-0.0.0-cp312-cp312-win_amd64.whl.whl
念のためComfyUIを再起動して、改めて実行するとテクスチャ付きモデルの生成が完了した。

 その他
その他
- ワークフローの実行完了までは相当の時間待つことになる。
- 実行中バックグラウンドで必要なAIモデルをダウンロードし、
.cacheフォルダに格納している。%userprofile%\.cache\huggingface
- そのため初回の実行では特に時間がかかる点、注意が必要
- 止まっているように見せかけて、実はAIモデルのダウンロードが走っているのかもしれない。
- 実行中バックグラウンドで必要なAIモデルをダウンロードし、
- エラー「GPUメモリが足りない」について
- ComfyUIを再起動して再実行かけるとうまくいくときもある