やりたいこと
てっとり早く、以下2点を実現したいときの方法を記載しています。
・ICOS上にあるファイルを、Node.js上のWebアプリから参照できるようにしたい ※1※2
・ファイルは認証した人だけに見えるようにしたい ※3
※1 ICOS上の画像ファイルをimgタグのsrcとして利用可能にするなど。
※2 単にWebサイトをホスト(ICOS上のhtmlファイルでサイトを公開)したい場合は、NGINXを立てれば良いようです。
参考.NGINXを使用した静的コンテンツの提供
https://www.ibm.com/cloud/blog/static-websites-cloud-object-storage-cos
※3 インターネット上に公開して良いファイルであれば、バケットごとパブリック・アクセスを許可すればOK
参考.パブリック・アクセスの許可
https://cloud.ibm.com/docs/cloud-object-storage?topic=cloud-object-storage-iam-public-access
参考.IBM Cloud Object Storage (ICOS) にアップロードしたファイルをパブリックに公開する
https://qiita.com/yamachan360/items/a5c017bb5480e81dc8eb
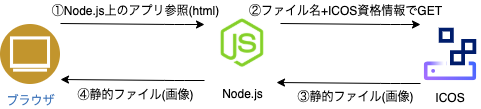
当記事での実現方法概要
Node.jsサーバーに、ICOSへの資格情報をもたせて、Node.js上にホストしているサイトからICOS上のファイルを参照する
実装サンプル
github上にも上げています。
https://github.com/GodaiAoki/get-started-node
参考.Node.jsのget started
https://github.com/IBM-Cloud/get-started-node
参考.Node.js の使用
https://cloud.ibm.com/docs/cloud-object-storage?topic=cloud-object-storage-node
事前準備
IBM Cloud上にIBM Cloud Object Stroageのインスタンスを作成し、バケット作成、ファイルアップロードします。
以下の記事の「ICOS サービスの作成」〜「アクセスのための資格情報の作成」にキャプチャ付きで手順があります。
IBM Cloud Object Storage (ICOS) に WinSCP でアクセスしてファイルサーバーとして利用してみた
https://qiita.com/yamachan360/items/e2dc986c97ee1fff6660
1.ライブラリインストール
npm install -save ibm-cos-sdk
2.実装サンプルコード(抜粋)
GET /images/{ファイル名}のエンドポイントからファイルダウンロードできるようにしています。
configの中の資格情報とbucketNameを事前準備で確認した内容に置き換えます。
//apikeyIdとInstanceIdはダミー
const config = {
  endpoint: 's3.ap.cloud-object-storage.appdomain.cloud',
  apiKeyId: 'oP581KVXr-6X4AWBWWm6ROQuv23QNbUKHxxxxxxxx',
  region: "ap-geo",
  serviceInstanceId: 'crn:v1:bluemix:public:cloud-object-storage:global:a/8181f93cf3b742dbd2ab762ed34a2319:4eac0af5-594d-464e-9fbxxxxxxxx::'
};

const bucketName = 'ga-test'

var cos = new AWS.S3(config);

/*icosのイメージ参照*/
app.get('/images/:imageFile', function(req, res){
  console.log("filename = " + req.params.imageFile);
      console.log(`Retrieving item from bucket: ` + bucketName +`, key:` + req.params.imageFile);
      return cos.getObject({
          Bucket: bucketName,
          Key: req.params.imageFile
      }).promise()
      .then((data) => {
          // console.log(data);
          if (data != null) {

              // console.log('File Contents: ' + Buffer.from(data.Body).toString());
              res.status(200).send(data.Body);
          }else{
            res.status(404).send();
          }
      })
      .catch((e) => {
          console.log(`ERROR: ${e.code} - ${e.message}\n`);
          res.status(404).send();
      });

});
参考.認証の実装
アプリで利用している認証・認可を/imagesのエンドポイントに適用します。例えばベーシック認証を実装するのであれば以下のようになります。
npm install --save basic-auth-connect
const basicAuth = require('basic-auth-connect'); // 基本認証用

app.all('/*', basicAuth(function(user, password) {
   //console.log("userCreds:"+ userCreds.users);
   return user==="test" && password==="test";
}));
実際の動作
例えば、index.htmlの背景をICOS上から取得します。
<body style="background-image: url('http://localhost:3000/images/holzreiter_small.jpg');">