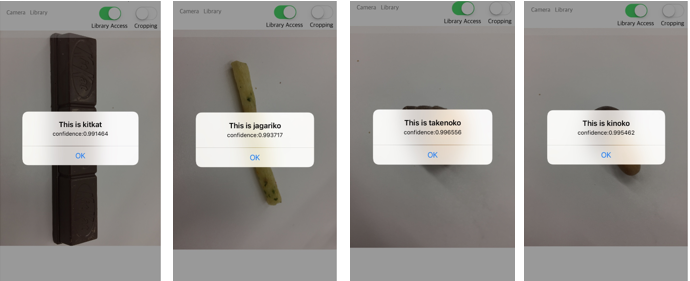
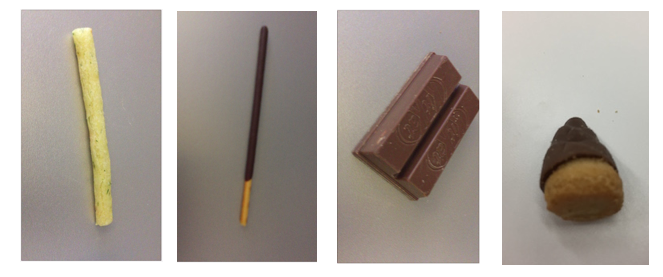
作ったもの
物体認識の例として、お菓子を判別するアプリ(iOS)を作ってみました。カメラで対象の写真を取って、写真に何が写っているかを判別します。
Gitにコードと学習に利用したデータがあるので、記事に書いてある手順を踏んでいただければそのまま動作を確認できます。学習させるデータ(画像)を変えれば好きなものの物体認識を試せます。

物体認識させるサービス
BluemixのVisual Recognitionサービスを利用します。
このサービスの凄いところは、ディープラーニング・機械学習のなんたるかを理解していなくても、認識させたい物体の画像をzipにまとめて送信、サービス側でディープラーニングを行い、分類器を作成してくれます。
フリープランがあるので、無料で試せます。
Bluemix Visual Recognition
Visual Recognitionの概要やサービス作成方法については、すでに良い記事があるのでこちら参照。
Version UpしたVisual Recognitionで、Watsonをトレーニングして独自の画像判別モデルを作る!
BluemixでWatson API のVisual Recognition を使う by curl
BluemixでWatson API のVisual Recognition を使う by python
サービスのドキュメントは こちら、制約とトレーニングのガイドとして書かれていることは下記。
Visual Recognitionのトレーニングガイド
1.最低限 1zip(1つの判定クラスに使う画像セット)あたり50枚のイメージ。
2.分類器1つにつき5000イメージくらいで学習するのが良い?(とする*と、クラスは最大25〜100くらい?)
3.150-200枚の画像/1クラス・zipが最もバランスが良い
4.1クラス・zipに使用するイメージの枚数は合わせる
5.画像サイズは320×320以下が推奨。学習に高い解像度は必要ない
Visual Recognitionのトレーニングの制約
1.1クラスあたり1万イメージ又は100MB
2.最低1イメージ当たり10枚必要
3.1トレーニングコール当たり、最大256MB
アプリ利用手順
作成したアプリは以下からclone又はダウンロードできます。 ALCameraViewControllerのサンプルを利用したシンプルなアプリです。
手順①ライブラリ追加 -carthage-
プロジェクトのTOPで、下記を実行してください。サンプルではAlamofireやSwiftyJSONを利用しています。
carthage update –platform ios
``

しばらく経ってビルドが成功したら、プロジェクトにライブラリを追加します。

[参考.Carthageを使ってビルド時間を短縮しよう](http://qiita.com/yutat93/items/97fe9bc2bf2e97da7ec1)


## 手順②Visual Recognition トレーニング
プロジェクトのLearningDataディレクトリに学習データをあらかじめおいてあります。LearningDataディレクトリから下記のcurlコマンドを実行します。

### classifierを作成する
candycheckerという名前で、各お菓子の画像を送信し分類器を作成します。
下記コマンドの(your_api_key)の箇所を作成したvisual recognitionサービスのapikeyで置換えてください(以下、同様)。

Request
curl -X POST -F "jagariko_positive_examples=@jagariko.zip" -F "kitkat_positive_examples=@kitkat.zip" -F "kinoko_positive_examples=@kinoko.zip" -F "takenoko_positive_examples=@takenoko.zip" -F "pocky_positive_examples=@pocky.zip" -F "negative_examples=@negative.zip" -F "name=candychecker" "https://gateway-a.watsonplatform.net/visual-recognition/api/v3/classifiers?api_key=(your_api_key)&version=2016-05-20"
Response
{}
### classifierのIdとステータスを確認する
下記コマンドでVisual RecognitonのClassifierが確認できます。アプリからはIdを利用するのでIdを確認します。また、ステータスが"ready"になったらトレーニングが完了しています。

Request
curl -X GET "https://gateway-a.watsonplatform.net/visual-recognition/api/v3/classifiers?api_key=(your_api_key)&version=2016-05-20"
Response例
{"classifiers": [{
"classifier_id": "candychecker_1521122420",
"name": "candychecker",
"status": "ready"
}]}
### 参考.clissifierを削除する
フリープランではVisual Recognitionサービスの1つにつき、1つのclassifierしか作成できません。ので、classifierを作り直す場合まず削除する必要があります。
コマンドは(classifier_id)と(your_api_key)の箇所を置き換えて実行します。
curl -X DELETE "https://gateway-a.watsonplatform.net/visual-recognition/api/v3/classifiers/(classifier_id)?api_key=(your_api_key)&version=2016-05-20"
Response
{ }
## 手順③ -アプリにapikeyとclassifierIdの設定-
プロジェクトのExample/Supporting Files/Info.plistを開き、apikey(Visual Recognition API Key)とclassifierId(Visual Recognition Classifier Id)を設定します。

# 判別してみる
アプリを実機にインストールし、[Camera]からアプリをカメラを起動し、お菓子の写真を撮ります。

# 参考.Visual Recognitionへ投稿しているロジック
Swift3で、Alamofire(v4.0)とSwiftyJSON(v3.1)を利用しています。AlamofireでmultipartFormDataを利用して、POSTしています。
また、投稿前に画像をリサイズ(最大でも320px*320px以下になるように)しています。
Alamofire.upload(
multipartFormData: { (multipartFormData) in
                multipartFormData.append((self?.jsonToData(json: jsonParams as AnyObject)!)!, withName: "parameters")

                multipartFormData.append(imageData, withName: "images_file", fileName: "test.png", mimeType: "image/png")
            },
            to:classifyURL,
            // リクエストボディ生成のエンコード処理が完了したら呼ばれる
            encodingCompletion: { (encodingResult) in
                switch encodingResult {
                // エンコード成功時
                case .success(let upload, _, _):
                    // 実際にAPIリクエストする
                    upload.responseJSON { response in

                        print("responseResult: \(response.result.value)")


                        guard let object = response.result.value else {
                            return
                        }

                        let json = JSON(object)

                        var matchClass = ""
                        var matchScore:Float = 0
                        json["images"][0]["classifiers"][0]["classes"].forEach { (_, json) in
                            print("class: \(json["class"].string)")
                            print("score: \(json["score"].stringValue)")
                            if(matchScore < json["score"].floatValue){
                                matchClass = json["class"].string!
                                matchScore = json["score"].floatValue
                            }
                        }

                        let message = "confidence:" + matchScore.description
                        let alert: UIAlertController = UIAlertController(title: "This is " + matchClass, message: message, preferredStyle:  UIAlertControllerStyle.alert)

                        let defaultAction: UIAlertAction = UIAlertAction(title: "OK", style: UIAlertActionStyle.default, handler:{
                            // ボタンが押された時の処理を書く(クロージャ実装)
                            (action: UIAlertAction!) -> Void in
                            print("OK")
                        })

                         alert.addAction(defaultAction)

                        self?.present(alert, animated: true, completion: nil)

                    }
                // エンコード失敗時
                case .failure(let encodingError):
                    print(encodingError)
                }
            }
        )


            // Convert from JSON to nsdata
func jsonToData(json: AnyObject) -> Data?{
    do {
        return try JSONSerialization.data(withJSONObject: json, options: JSONSerialization.WritingOptions.prettyPrinted) as Data?
    } catch let myJSONError {
        print(myJSONError)
    }
    return nil;
}

//resizeImage
func resizeImage(src: UIImage) -> UIImage {

    //Classifyするイメージはせいぜい最大320 * 320(教育データに習う)
    let maxLongSide:Int = 320
    var resizedSize:CGSize

    let ss = src.size
    if maxLongSide == 0 || ( Int(ss.width) <= maxLongSide && Int(ss.height) <= maxLongSide ) {
        resizedSize = ss
        return src
    }


    // リサイズ後のサイズを計算
    let ax = Int(ss.width) / maxLongSide
    let ay = Int(ss.height) / maxLongSide
    let ar = ax > ay ? ax : ay
    let re = CGRect(x: 0, y: 0, width: Int(ss.width) / ar, height: Int(ss.height) / ar)

    // リサイズ
    UIGraphicsBeginImageContext(re.size)
    src.draw(in: re)
    let dst = UIGraphicsGetImageFromCurrentImageContext()
    UIGraphicsEndImageContext()

    resizedSize = dst!.size

    return dst!
}
