TensorflowでCNN(Convolutional Neural Network)とRNN(Recurrent Neural Network)を組み合わせてみました。
CNN,RNNについて
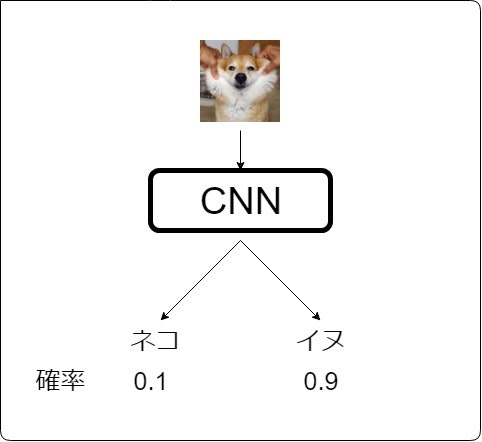
CNNとは、ご存知の方も多いと思いますが、画像を入力して何が写っているのかを判別するといったものです![]()
しかし、CNNのみでは過去の状態を記憶するといった仕組みがないので、画像の前後関係といったものを推定することはできません。
一方、RNNは内部に過去の状態を記憶し、次の状態に影響を与えます。

A recurrent neural network and the unfolding in time of the computation involved in its forward computation. Source: Nature
CNN、RNNの2つを組み合わせることで、end to end で画像の時系列データから何かしらの値を推定することができます。
例えば、サル、猿人、原人という入力があれば、
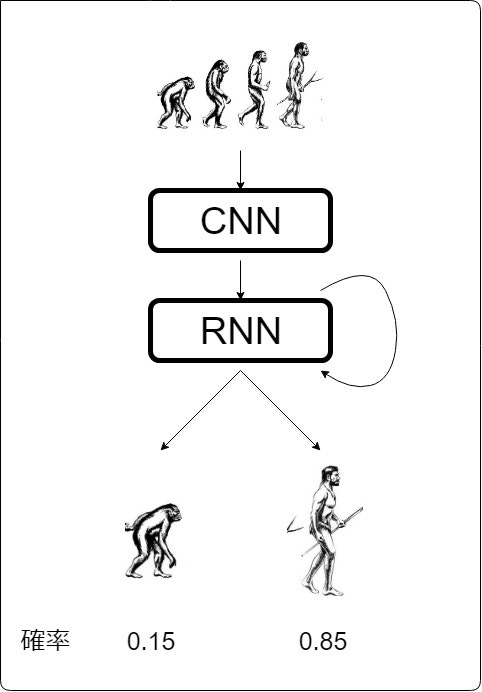
人間が出力される可能性が高いでしょう。
ラーメン、つけ麺と入力されれば、
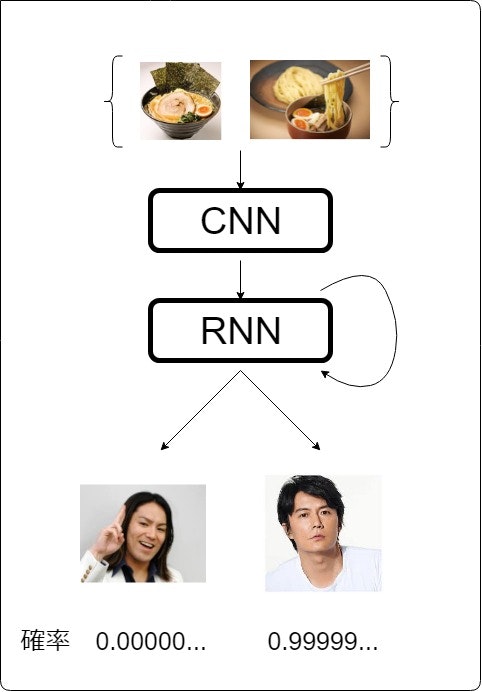
イケメンが出力されるわけです![]()
実験内容
実装するまえにどのような実験を行うのかを説明します。
データセットにはMNISTを使い次のような実験を行います。
まず、MNISTの中からランダムに2枚の画像を選び、並べたものを1つの時系列データとします。
この時系列データを入力とし、(1枚目の数字)-(2枚目の数字)の結果を推定します。
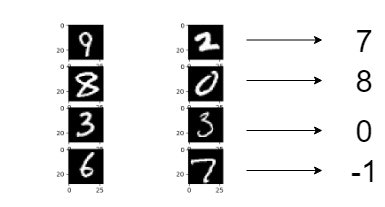
例えば、[9,2]なら9-2=7, [8,0]なら8-0=8, が推定するべき値です。
推定するべき値は-9~9までの整数なので、全部で19個になります。
実装
環境
- Windows 10
- python 3.6
- tensorflow 1.4
CRNNモデル
まず、CNNとRNNを組み合わせたモデルについてです。
import numpy as np
import tensorflow as tf
import tensorflow.contrib.layers as c_layers
import matplotlib.pyplot as plt

from keras.datasets import mnist

class CRNN_Model():
    def __init__(self,hidden_size=256,batch_size=128,sequence_size=2,img_size=28,output_size=19):
        self.hidden_size=hidden_size
        self.batch_size=batch_size
        self.sequence_size=sequence_size
        self.output_size=output_size

        self.input=tf.placeholder(tf.float32,shape=[sequence_size,None,img_size,img_size,1])
        self.correct=tf.placeholder(tf.float32,shape=[None,output_size])

        self.model=self.build_model()
        self.graph = self.build_graph()
        self.test=self.test_model()

    def build_model(self):
        #cnn
        hidden_list=[]
        for i in range(self.sequence_size):
            conv1 = tf.layers.conv2d(self.input[i], filters=16, kernel_size=[3, 3]
                                     , strides=[1, 1],padding='same', activation=tf.nn.elu)
            max_pooling1 = tf.layers.max_pooling2d(conv1, pool_size=[2, 2], strides=[2, 2])
            conv2 = tf.layers.conv2d(max_pooling1, filters=16, kernel_size=[3, 3]
                                     , strides=[1, 1], padding='same', activation=tf.nn.elu)
            max_pooling2 = tf.layers.max_pooling2d(conv2, pool_size=[2, 2], strides=[2, 2])
            flatten = c_layers.flatten(max_pooling2)
            hidden=tf.layers.dense(flatten,self.hidden_size,activation=tf.nn.elu,
                                      kernel_initializer=c_layers.variance_scaling_initializer())
            hidden_list.append(hidden)

        self.hidden_list=tf.transpose(hidden_list,perm=[1,0,2])

        #rnn
        rnn_cell = tf.nn.rnn_cell.BasicRNNCell(self.hidden_size)
        self.initial_state = rnn_cell.zero_state(self.batch_size, tf.float32)
        state = self.initial_state
        outputs = []
        for t in range(self.sequence_size):
            (output, state) = rnn_cell(self.hidden_list[:,t,:], state)
            outputs.append(output)
        self.outputs = outputs

        self.prediction = tf.layers.dense(self.outputs[-1], self.output_size)
        self.pred_output = tf.nn.softmax(self.prediction)

    def build_graph(self):
        self.loss=tf.reduce_mean(
            tf.nn.softmax_cross_entropy_with_logits(labels=self.correct,logits=self.prediction))
        optimizer=tf.train.AdamOptimizer(learning_rate=0.001,beta1=0.9,beta2=0.999)
        self.train_step=optimizer.minimize(self.loss)

    def test_model(self):
        correct_pred=tf.equal(tf.argmax(self.pred_output,1),tf.argmax(self.correct,1))
        self.accuracy=tf.reduce_mean(tf.cast(correct_pred,tf.float32))
画像の時系列データをCNN層に入力し、その出力をRNN層に入力するといった流れになります。
self.input=tf.placeholder(tf.float32,shape=[sequence_size,None,img_size,img_size,1])
入力サイズは、[シークエンス×バッチ×画像]となります。
ただ、CNNはこれを一度に処理できないので、2回に分けています。
まず、シークエンスのそれぞれに対して畳み込み演算を行い、それをつなぎ合わせたものを1つのバッチとしています。
self.hidden_list=tf.transpose(hidden_list,perm=[1,0,2])
ここで次のRNNに入力するためにデータの形を変えています。
[シークエンス×バッチ×データ]→[バッチ×シークエンス×データ]
そのあと、RNNに入力し、誤差の計算とモデルの更新となります。
self.prediction = tf.layers.dense(self.outputs[-1], self.output_size)
推定するべき値は-9~9の19個の整数なので、最終的な出力サイズは19になります。
RNNに関しては、こちらの記事を参考にさせていただきました。
第6回 リカレントニューラルネットワークの実装(2)
データのサンプリング
MNISTからデータをサンプリングして加工する処理です。
batch_size=128
sequence_size=2
img_size=28
output_size=19

def sampling_data(x,y):
    x_T = []
    y_T = []
    for _ in range(sequence_size):
        x_batch=[]
        y_batch=[]
        for i in range(batch_size):
            step = np.random.randint(0, len(x))
            # x batch
            x_step = x[step]
            x_step = np.reshape(x_step, [img_size, img_size, 1])
            x_batch.append(x_step)
            # y batch
            y_step = int(y[step])
            y_batch.append(y_step)

        # x list of sequence
        x_T.append(x_batch)
        # y list of sequence
        y_T.append(y_batch)

    y_T=np.asarray(y_T[0])-np.asarray(y_T[1])
    #one hot encording
    y_T_onehot=[]
    for i in range(batch_size):
        y_onehot = np.zeros(output_size)
        y_onehot[y_T[i]+9]=1
        y_T_onehot.append(y_onehot)

    return x_T,y_T,y_T_onehot
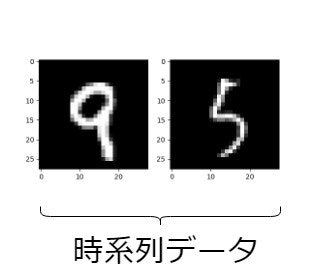
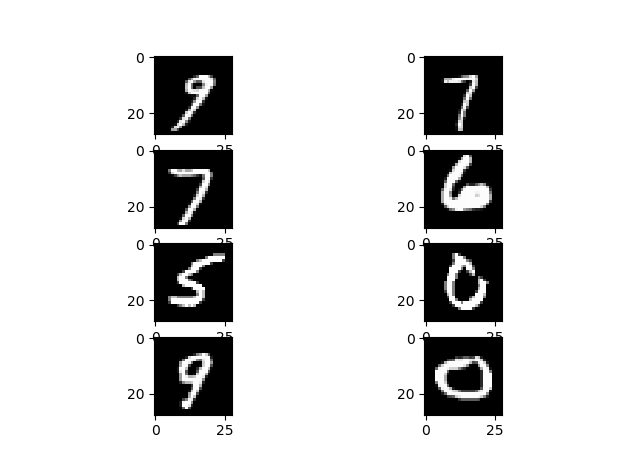
MNISTからデータをランダムに選び、画像の時系列データのバッチを作ります。また、そのときの正解の値を計算したものと、それをワンホット表現に変換したものを返します。

なのでデータサイズはこんな感じになります。
ちゃんと合っているか、4つの時系列データについて確認してみます。
batch_size = 128
sequence_size = 2
img_size = 28
output_size = 19

(x_train, y_train), (x_test, y_test) = mnist.load_data()

x_T, y_T, y_T_onehot = sampling_data(x_train, y_train)

num = 4
print('y_T',y_T[:num])
for i in range(num):
    # time series 1
    plt.subplot(num, 2, 2 * i + 1)
    img1 = np.reshape(x_T[0][i], [img_size, img_size])
    plt.imshow(img1)
    plt.gray()
    # time series 2
    plt.subplot(num, 2, 2 * i + 2)
    img2 = np.reshape(x_T[1][i], [img_size, img_size])
    plt.imshow(img2)
    plt.gray()

plt.show()

OK牧場
実行
では実際に実行してみます。
if __name__=='__main__':

    hidden_size=256
    batch_size=128
    sequence_size=2
    img_size=28
    output_size=19
    num_epochs=10000

    crnn_model=CRNN_Model(hidden_size=hidden_size,batch_size=batch_size,
                        sequence_size=sequence_size,img_size=img_size,output_size=output_size)

    sess = tf.Session()
    init = tf.global_variables_initializer()
    sess.run(init)

    (x_train, y_train), (x_test, y_test) = mnist.load_data()

    losses=[]
    accuracies=[]
    for t in range(num_epochs+1):
        x_T,_, y_T_onehot = sampling_data(x_train, y_train)
        feed_dict={crnn_model.input:x_T,crnn_model.correct:y_T_onehot}
        loss,_=sess.run([crnn_model.loss,crnn_model.train_step],feed_dict)
        if (t+1)%100==0:
            #loss
            losses.append(loss)
            #acuracy test
            x_T_test,_,y_T_onehot_test=sampling_data(x_test,y_test)
            feed_dict={crnn_model.input:x_T_test,crnn_model.correct:y_T_onehot_test}
            accuracy=sess.run([crnn_model.accuracy],feed_dict)[0]
            accuracies.append(accuracy)
            print('{} steps, {} loss, {} accuracy'.format(t+1,loss,accuracy))
精度の計算には検証用のデータを使っています。
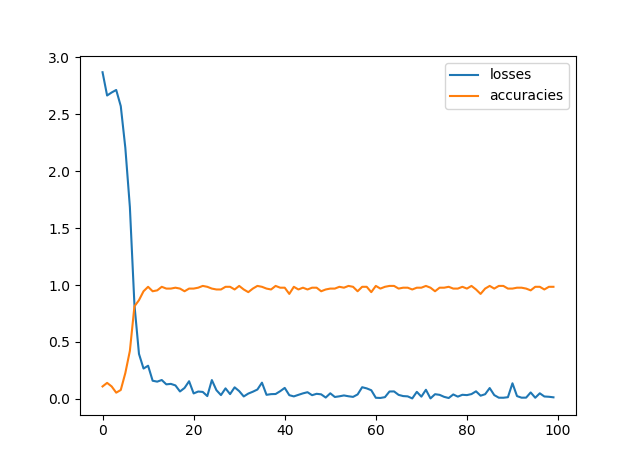
1万回ほどの実行で精度は98%前後といったところです。
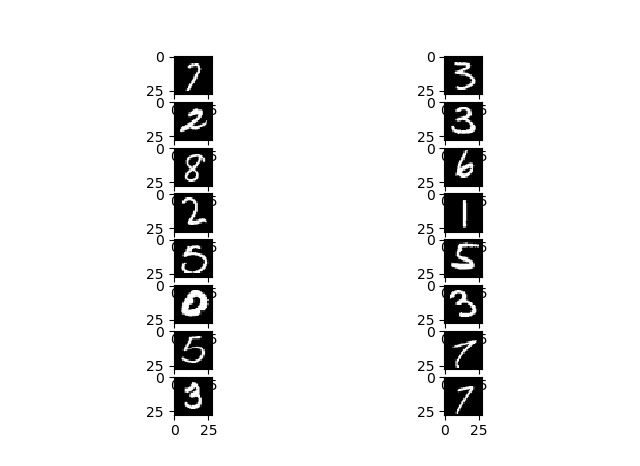

学習したモデルで検証用データを使って、推定してみました。
ちゃんと合ってますね![]()