cifar10とは
MNISTの数字データはもう飽きた!そんな方にはcifar10はいかがですか?
cifar10は、kerasのdatasetsで提供されている、ラベル付けされた5万枚の訓練画像と1万枚のテスト画像のデータセットです。
画像を表示してみる
matplotlibを使って実際に表示してみたいと思います。
5万枚の訓練データの中からランダムに25枚選び表示。
from keras.datasets import cifar10
import matplotlib.pyplot as plt
import numpy as np

(x_train,y_train),(x_test,y_test)=cifar10.load_data()

# 5x5枚の画像を表示する
plt.figure(figsize=(10,10))
for i in range(25):
    rand_num=np.random.randint(0,50000)
    cifar_img=plt.subplot(5,5,i+1)
    plt.imshow(x_train[rand_num])
    #x軸の目盛りを消す
    plt.tick_params(labelbottom='off')
    #y軸の目盛りを消す
    plt.tick_params(labelleft='off')
    #正解ラベルを表示
    plt.title(y_train[rand_num])


plt.show()
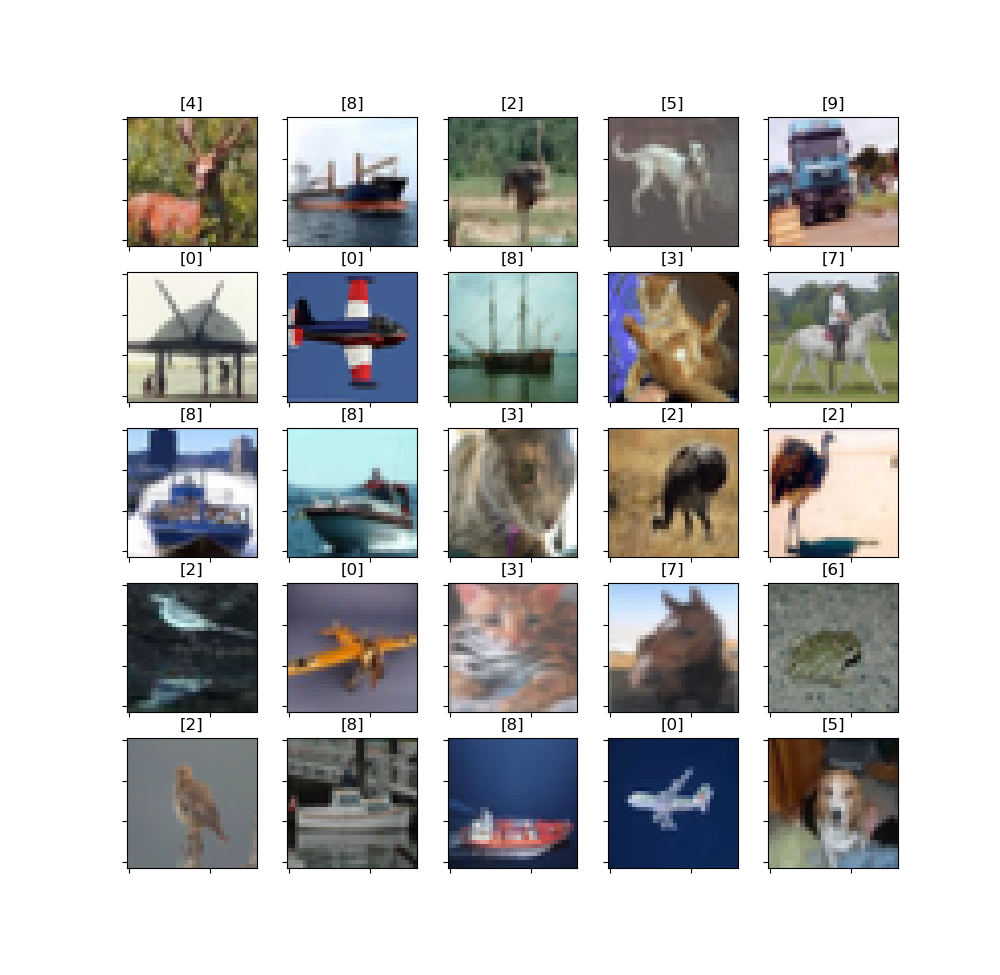
画像は32x32のRGBです。画像の上に表示されている数字が正解ラベル。
0 - airplane
1 - automobile
2 - bird
3 - cat
4 - deer
5 - dog
6 - frog
7 - horse
8 - ship
9 - truck
ラベルはこのようになっています。
CNNを実装
必要なライブラリのインポートと画像の前処理
from keras.models import Sequential
from keras.layers.convolutional import Conv2D
from keras.layers.pooling import MaxPool2D
from keras.layers.core import Dense,Activation,Dropout,Flatten
from keras.datasets import cifar10
from keras.utils import np_utils

# cifar10をダウンロード
(x_train,y_train),(x_test,y_test)=cifar10.load_data()

# 画像を0-1の範囲で正規化
x_train=x_train.astype('float32')/255.0
x_test=x_test.astype('float32')/255.0

# 正解ラベルをOne-Hot表現に変換
y_train=np_utils.to_categorical(y_train,10)
y_test=np_utils.to_categorical(y_test,10)
訓練データ5万枚、テストデータ1万枚をダウンロードします。
画像は、縦横32x32、0-255のRGBなので255で割って0-1で正規化します。
y_train,y_testはOne-Hot表現に変換します。
One-Hot表現とは、カテゴリが10のときは例えば、
4 → [0,0,0,0,1,0,0,0,0,0]
0 → [1,0,0,0,0,0,0,0,0,0]
8 → [0,0,0,0,0,0,0,0,1,0]
といった表現です。
モデルの構築
# モデルを構築
model=Sequential()

model.add(Conv2D(32,(3,3),padding='same',input_shape=(32,32,3)))
model.add(Activation('relu'))
model.add(Conv2D(32,(3,3),padding='same'))
model.add(Activation('relu'))
model.add(MaxPool2D(pool_size=(2,2)))
model.add(Dropout(0.25))

model.add(Conv2D(64,(3,3),padding='same'))
model.add(Activation('relu'))
model.add(Conv2D(64,(3,3),padding='same'))
model.add(Activation('relu'))
model.add(MaxPool2D(pool_size=(2,2)))
model.add(Dropout(0.25))

model.add(Flatten())
model.add(Dense(512))
model.add(Activation('relu'))
model.add(Dropout(0.5))
model.add(Dense(10,activation='softmax'))

model.compile(optimizer='adam',loss='categorical_crossentropy',metrics=['accuracy'])

history=model.fit(x_train,y_train,batch_size=128,nb_epoch=20,verbose=1,validation_split=0.1)

# モデルと重みを保存
json_string=model.to_json()
open('cifar10_cnn.json',"w").write(json_string)
model.save_weights('cifar10_cnn.h5')

# モデルの表示
model.summary()

# 評価
score=model.evaluate(x_test,y_test,verbose=0)
print('Test loss:',score[0])
print('Test accuracy:',score[1])
モデルの構築にはこちらのサイトを参考にさせていただきました。KerasでCIFAR-10の一般物体認識
json_string=model.to_json()
open('cifar10_cnn.json',"w").write(json_string)
モデルをjson形式のファイルで保存します。
model.save_weights('cifar10_cnn.h5')
モデルの重みをh5形式で保存します。
結果
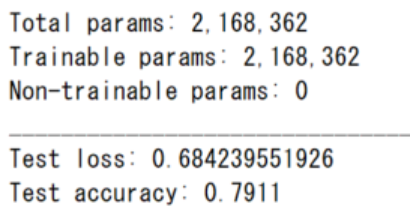
正答率は約80%になりました。
model.predict_classesを使って予測
正答率80%!kerasすげー!おしまい!
・・・じゃ流石に味気ないので、model.predict_classesを使って、テストデータの画像を何枚か抽出して写っているものを予測したいと思います。
さきほど実装したスクリプトを実行すると、同じ階層のフォルダにモデルと重みが記録されたファイルが生成されていると思います。
"cifar10_cnn.json"がモデルの記録されたファイルで、"cifar10_cnn.h5"が重みの記録されたファイルです。
これらの学習済みのファイルを使えば、2回目以降は一からモデルを構築したり、長ったらしい学習の計算をする必要がなくなります。
10000枚のテスト画像の中から25枚をランダムに抽出して、それを学習済みモデルからmodel.predict_classesを使って画像の被写体を予測します。
from keras.datasets import cifar10
from keras.models import model_from_json
from keras.utils import np_utils
import matplotlib.pyplot as plt
import numpy as np

# cifar10をダウンロード
(_,_),(x_test_img,y_test_img)=cifar10.load_data()

# 画像を0-1の範囲で正規化
x_test=x_test_img.astype('float32')/255.0

# 正解ラベルをOne-Hot表現に変換
y_test=np_utils.to_categorical(y_test_img,10)

# 学習済みのモデルと重みを読み込む
json_string=open('cifar10_cnn.json').read()
model=model_from_json(json_string)
model.compile(optimizer='adam',loss='categorical_crossentropy',metrics=['accuracy'])
model.load_weights('cifar10_cnn.h5')

# モデルを表示
model.summary()

# 評価
score=model.evaluate(x_test,y_test,verbose=0)
print('Test loss:',score[0])
print('Test accuracy:',score[1])

# predict_classesで画像のクラスを予想する
img_pred=model.predict_classes(x_test)

# 5x5枚の画像を表示する
plt.figure(figsize=(10,10))
for i in range(25):
    rand_num=np.random.randint(0,10000)
    cifar_img=plt.subplot(5,5,i+1)
    plt.imshow(x_test_img[rand_num])
    #x軸の目盛りを消す
    plt.tick_params(labelbottom='off')
    #y軸の目盛りを消す
    plt.tick_params(labelleft='off')
    #画像の予想
    plt.title('pred:{0},ans:{1}'.format(img_pred[rand_num],y_test_img[rand_num]))


plt.show()
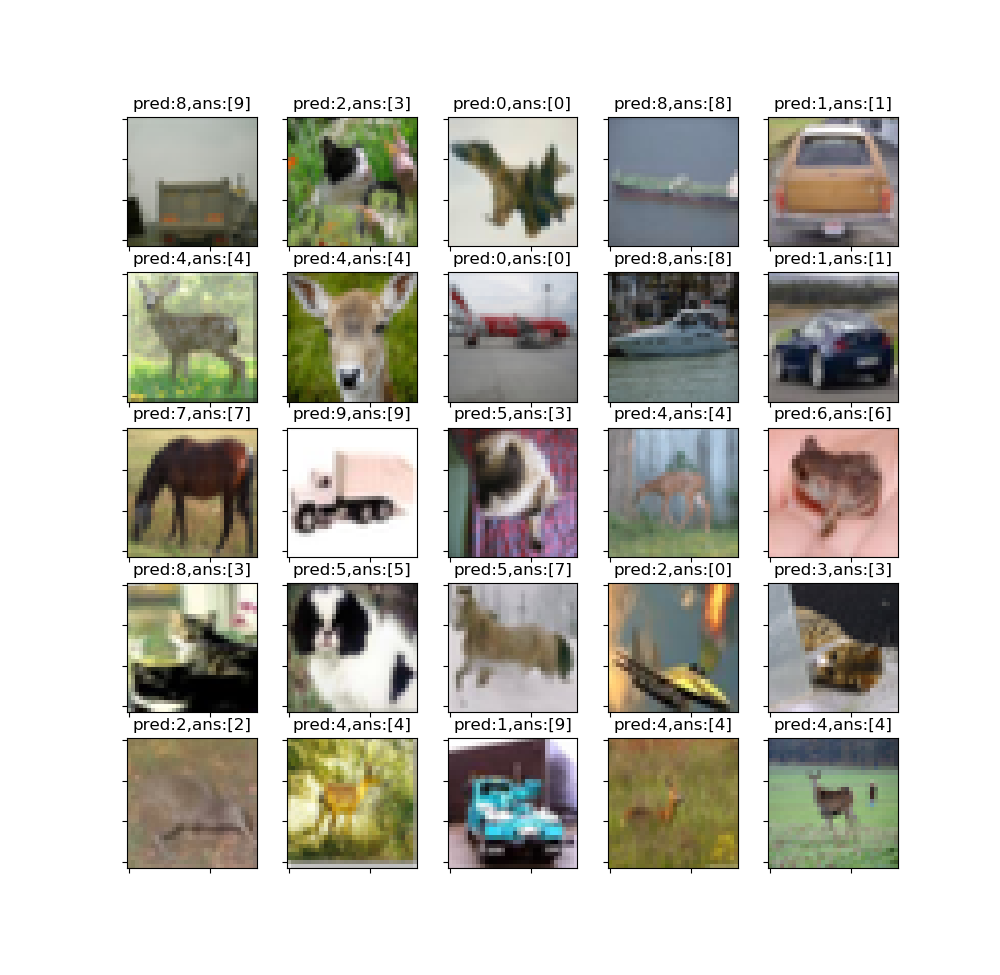
img_pred=model.predict_classes(x_test)
の部分で10000枚のテスト画像の被写体を予測します。
pred:がモデルから予測された結果で、ans:が正解です。
正答率80%なのでかなり当たっていると思います。
拾った画像を使って予測する。
最後はcifar10のデータセット画像ではなく、ネットから適当に拾った画像に写っている被写体を、さっきの学習済みモデルで予測したいと思います。
ネットで適当に拾った画像


これらの画像を今までのスクリプトと同じ階層のフォルダに、Imageというフォルダを作って保存します。
こんな感じです。
from keras.models import model_from_json
import matplotlib.pyplot as plt
from keras.preprocessing.image import img_to_array, load_img

# 画像読み込み
temp_img=load_img("./Image/automobile1.jpg",target_size=(32,32))

# 画像を配列に変換し0-1で正規化
temp_img_array=img_to_array(temp_img)
temp_img_array=temp_img_array.astype('float32')/255.0
temp_img_array=temp_img_array.reshape((1,32,32,3))

# 学習済みのモデルと重みを読み込む
json_string=open('cifar10_cnn.json').read()
model=model_from_json(json_string)
model.compile(optimizer='adam',loss='categorical_crossentropy',metrics=['accuracy'])
model.load_weights('cifar10_cnn.h5')

# モデルを表示
model.summary()

# 画像を予想
img_pred=model.predict_classes(temp_img_array)
print('\npredict_classes=',img_pred)

plt.imshow(temp_img)
plt.title('pred:{}'.format(img_pred))
plt.show()
保存した画像を読み込み、適切な形に整えて、先ほどの学習済みモデルから被写体を予測します。
temp_img=load_img("./Image/automobile1.jpg",target_size=(32,32))
この部分で読み込みたい画像の名前を入力します。
load_img()関数は、JPEGやPNGの画像をkerasで使えるように大きさや形を整えてくれる便利なやつです。
結果
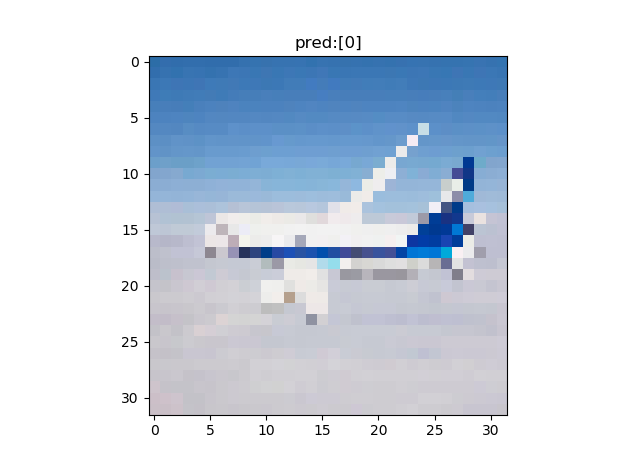
pred:[0] airplane
飛行機と予測されているので合ってますね。
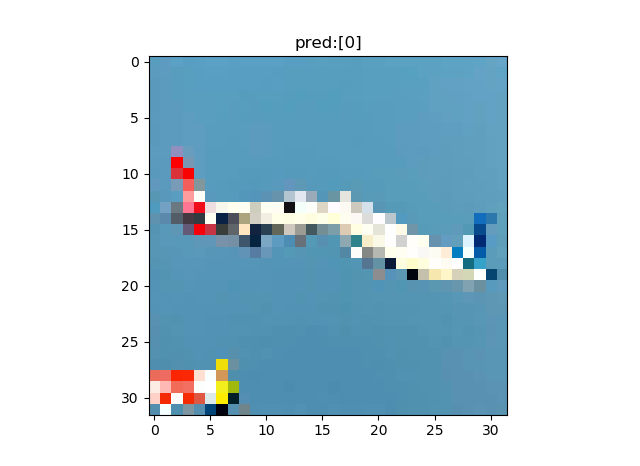
pred:[0] airplane
32ピクセルの画像だとなんだかよくわからないけど、ちゃんと飛行機と予測できてるwww

pred:[1] automobile
ちゃんと自動車と予測できてます。ちょっとごちゃごちゃした画像ですけどちゃんと予測できてます。
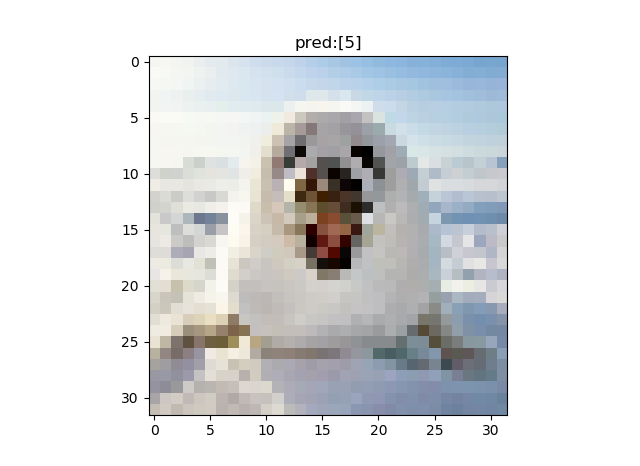
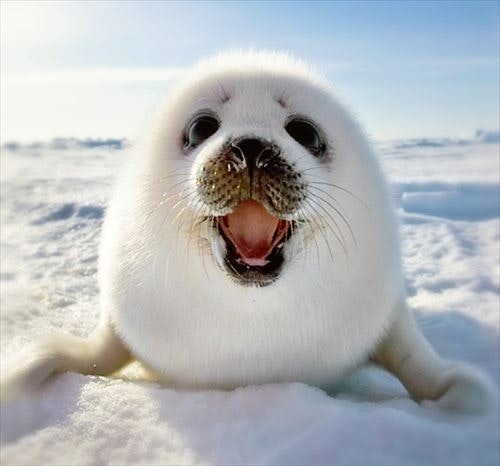
pred:[5] dog
犬と予測されてますね。アザラシなのでcifar10のデータセットには含まれていない画像ですが、10カテゴリの中ではいちばん犬に近いかもしれません。
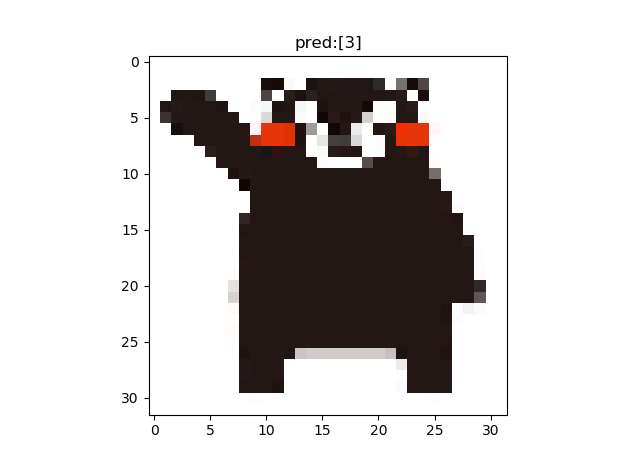
pred[3] cat
これもcifar10のデータセットには含まれていない画像です。く〇もんです。
予測では猫。うーん、?
くま〇んです。
まとめ
やっぱKerasすごい!おしまい!
参考文献
CIFAR-10
KerasでDeep Learning:CNNを組んでみる
KerasでCNNを簡単に構築
KerasでCIFAR-10の一般物体認識
SequentialモデルAPI