React Advent Calendar 2019 の2日目を担当してみたGenkiです。
一昨日 11月29日に見たらまだ空いていたのでReduxについて少し話ができればと思い色々調べたりしてみました。
State Managementについて
必要性
Reactのみでコレまで書いていくとコンポーネントを超えてデータを渡したければ Prop-drilling と言われる、Propsをどんどん下層コンポーネントに渡していく必要がありました!
そのため必要な一つのデータが親からひ孫やひしゃ孫に渡していくリレーのように次の子孫にデータを渡す必要があり、無駄と思われるようなコードがどんどん増えてきてしまいまいした!
Redux
Redux などは別にreactのためだけに作られたstate-management library ではありませんでしたが、上で出ていた問題 Prop-drillingを解決する上でとても利便性の高い
Libraryとして多くの人に使われました。
Reduxの光と闇
光
Reduxを入れたことによって Prop-drilling はなくなってStoreで管理されている Global-state に対してどこからでもアクセスできるようになりました!
おそらくこの記事を呼んでいる方なら、 connect``mapStateToProps, mapDispatchToProps を使ったことがあると思いますが、こういったfunctionやargumentを使うことで
自由にどこからでも global-stateへアクセス出来るようになりました。
闇
使うためにはいくつか覚えなければいけなくて、それが複雑性を発生させていたり、管理を行うために actions, reducers, store を覚えていく必要がありました。
reduxの詳細説明は本家へ https://redux.js.org/introduction/getting-started
ContextAPIの登場
ContextAPIがver.16.xで実験的に登場して 16.3.0で productionで使えるレベルになり、本リリースされ大きく state管理におけるreactの方向性が変わってきました。
ContextAPIの説明でも言われているように
Context provides a way to pass data through the component tree without having to pass props down manually at every level.
Contextによってコンポーネントツリー間におけるデータの橋渡しを、すべての階層ごとにpropsとして渡す必要性がなくなった。
???? これってReduxいらないってことじゃん!
ということで、Reduxを使わなくても下の階層に対して Prop-drillingをしなくても下の階層で Contextに収容されているデータにアクセスできるようになりました!
以下は ContextAPIで紹介されているSampleをかんたんな日本語意訳でお届けです!
https://reactjs.org/docs/context.html
// ContextAPIを使って default値 light(明るい) でテーマカラーの設定をします
const ThemeContext = React.createContext('light');

class App extends React.Component {
  render() {

    // Providerを使って テーマカラーを dark(暗い)にしてコンポーネントツリーに渡してしまいます
    return (
      <ThemeContext.Provider value="dark">
        <Toolbar />
      </ThemeContext.Provider>
    );
  }
}

// ここではProps Drillingを使う必要がなくなっている!!!!
function Toolbar(props) {
  return (
    <div>
      <ThemedButton />
    </div>
  );
}

class ThemedButton extends React.Component {
  // ここで親からPropsで渡されてもいないのにデータをアクセスできる!
  static contextType = ThemeContext;
  render() {
    return <Button theme={this.context} />;
  }
}
Hooksの登場で Hook into Context APIにしていく
Hooksが入ったことによって Class Componentじゃなくても State管理が出来るようになっただけでなく、既存のAPIをより強力にすることが出来るようになりました。
今から以下で使っていくHooksは2つで、全体的に Redux使わなくても ContextAPIとHooksでState managementが出来るよーってことに触れていきたいと思います。
useContext と useReducer
実際に使ってカウンターアプリを作ります!
今回作るものはボタンでプラスマイナスが出来ることと現在のカウントを表示するコンポーネントです!
以下がファイル構成
-src
|- App.jsx
|- index.jsx
|- Components
 |- Counter
  |- index.jsx
 |- Display
  |- index.jsx
|- store
 |- index.jsx
やること
- state管理の要、Storeの作成(useReducer & createContext)
- Providerをindexにおいてアプリ全体に反映させる
- Access用のComponentの作成(useContext)
- Update用のComponentの作成(useContext, dispatch)
- App.jsで定義して試してみる
1. state管理の要、Storeの作成(useReducer & createContext)
ここで行っているのは storeの定義と初期値の設定、プロバイダーを作る。
Providerが上階層で定義されていればこのファイルのstoreを呼び出せばどこからでも globalStateにアクセスできるようになります。
// 必要なAPIの呼び出し
import React, { createContext, useReducer } from 'react';

const initialState = { count: 0 };

// ここで Globalに活躍してもらうための Storeの作成
const store = createContext(initialState);

// Providerの定義
const { Provider } = store;
const StateProvider = ({ children }) => {
  const [state, dispatch] = useReducer((state, action) => {
    switch (action.type) {
      case 'INCREMENT_COUNT':
        return { ...state, count: state.count + 1 }
      case 'DECREMENT_COUNT':
        return { ...state, count: state.count - 1 }
      default:
        throw new Error();
      };
    }, initialState);
    return <Provider value={{ state, dispatch }}>{children}</Provider>;
};

export { store, StateProvider }
2. Providerをindexにおいてアプリ全体に反映させる
ここで行っているのはProviderを index.jsで定義してあげてacctionやreducerにアクセスできるようにしている
import React from 'react';
import ReactDOM from 'react-dom';
import App from './App';
import { StateProvider } from './store';

const app = (
  <StateProvider>
    <App />
  </StateProvider>
);

ReactDOM.render(app, document.getElementById('root'));
3. Access用のComponentの作成(useContext)
現在のglobalなデータに対してアクセスしている
import React, { useContext } from 'react';
import { store } from '../../store';

const Display = () => {
  const { state } = useContext(store);
  return <div>The count is { state.count }!</div>
};
4. Update用のComponentの作成(useContext, dispatch)
dispatchしている
import React, { useContext } from 'react';
import { store } from '../../store';

const Counter = () => {
  const { state, dispatch} = useContext(store);
  return (
    <div>
      <button onClick={() => dispatch({ type: "INCREMENT_COUNT" })}>Plus</button>
      <hr/>
      <button onClick={() => dispatch({ type: "DECREMENT_COUNT" })}>Minus</button>
    </div>
  )
};

export default Counter;
5. App.jsで定義して試してみる
まぁ雑にはなるがとりあえずおいてみる
import React from 'react';
import Display from './Components/Display';
import Counter from './Components/Counter';

const App = () => {
  return (
    <div>
      <div>
        <h1>Display</h1>
        <hr/>
        <AccessExampleComponent />
      </div>
      <div>
        <h1>Counter</h1>
        <hr/>
        <Counter />
      </div>
    </div>
  );
}

export default App;
完成品
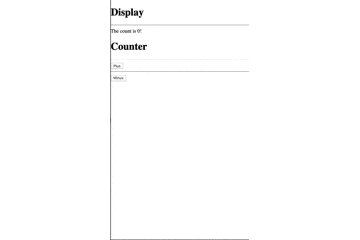
できた!!!
感想
結局Reduxから抜けたからといってあの面倒な actions&reducers&storeから抜け出せたという感覚は否めなかった。