Phonexのプロジェクト作成
# Hexのインストール
$ mix local.hex
# phx_newのインストール
$ mix archive.install hex phx_new
# アプリケーション作成
$ mix phx.new hello_tremorx --no-ecto
一度実行してみる
$ cd hello_tremorx
$ mix phx.server
ブラウザーでhttp://localhost:4000/を開く
Tremorxのインストール
cd assets
npm init -y
を実行
https://github.com/briankariuki/tremorx
のInstallationに従って作業する
部品の使い方
ドキュメント
https://hexdocs.pm/tremorx
部品のイメージ
https://tremorx.fly.dev
fly.devのサンプルコートでは、Buttonだと.buttonとなっているが、実際のコードでは、Button.buttonと書く必要があった。
Tremorxを使ったコンテンツを作ってみる
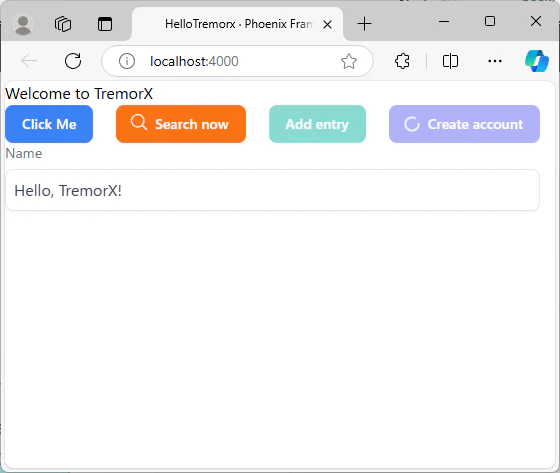
lib/hello_tremorx_web/controllers/page_html/home.html.heex
<h1>Welcome to TremorX</h1>

<Layout.flex flex_direction = "row" justify_content = "between">

<Button.button class="">
    <p>Click Me</p>
</Button.button>

<Button.button class="" color="orange">
    <:icon>
      <.icon name="hero-magnifying-glass" />
    </:icon>
    <p>Search now</p>
</Button.button>

<Button.button disabled class="" color="teal">
    <p>Add entry</p>
</Button.button>

<Button.button loading class="" color="indigo">
    <p>Create account</p>
</Button.button>

</Layout.flex>

<Layout.col class="space-y-1.5">
  <label for="name">
    <Text.text class="text-tremor-content">
      Name
    </Text.text>
  </label>

  <Input.text_input
    id="name"
    name="user[name]"
    placeholder="juma tano"
    type="text"
    value=""
    error={false}
    error_message={"Name is required"}
  />
</Layout.col>
実行結果
mix deps.get
mix phx.server