サンプルコード
Github上にサンプルコードを用意しておきました。
ColorPickerTriangleのアセットとLive2DSDKを自前でインポートする必要があります。
https://github.com/Ganeesya/Live2DLivePaintingSample
Cubism Frameworkで拡張できる領域

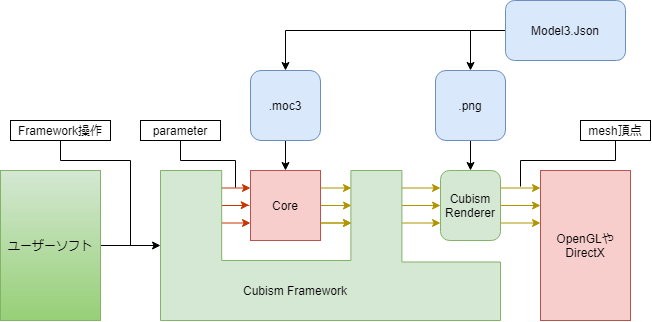
Live2Dの描画は頂点計算だけは独自で行われるものの、描画処理システムは完全に3Dのシステムで動いています。
上の図はCubism Frameworkを使用した際の大まかなデータの流れを示しますが、
うす緑色のCubismFrameworkの部分とそこに含まれるCubismRendererのコードは公開されていて、
知識があればこの部分は改造することが可能です。
今回はUnityにおいてメッシュUVポイントを求めるのにCubismFramework側を、
ペイント結果を反映させるのにCubismRendererを拡張しています。
今回のテクスチャ周りの仕組み
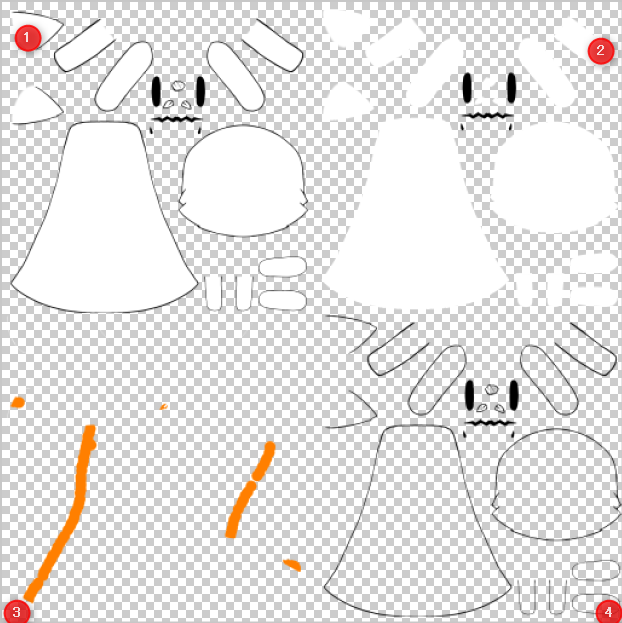
今回のサンプルでは4種類のテクスチャを使用します。
- ベースのCubismから出力されるテクスチャ。MainTextureとして使用
- ペイントできる領域を示すためのPaintArea
- ペイント結果を保持しておくRenderTexture
- ペイント結果でも塗りつぶせない主線などを上書きする情報をもつOverline
2のPaintAreaは3のペイントを行うときにだけ使用します。
残りの最終的な描画結果に関しては1,3,4をCubism Framework for Unityに含まれる標準Shaderを改造したShaderで合成して使用しています。
fixed4 frag (v2f IN) : SV_Target
{
	fixed4 OUT = tex2D(_MainTex, IN.texcoord) * IN.color;

	//RenderTexture
	fixed4 RET = tex2D(_Retatch, IN.texcoord) * IN.color;

	fixed4 Over = tex2D(_OverLine, IN.texcoord) * IN.color;

	OUT.rgb = OUT.rgb * ( 1.0 - RET.a ) + RET.rgb;

	OUT.rgb = OUT.rgb * ( 1.0 - Over.a ) + Over.rgb;

	// Apply Cubism alpha to color.
	if( isPremultiedAlphaOut == 1 ){
	    CUBISM_APPLY_ALPHA(IN, OUT);
	}

	return OUT;
}
MainTextureをベースにPaint結果をまず上書き、そのあと主線用のTextureを上書きする流れです。
RenderTextureへの描画処理

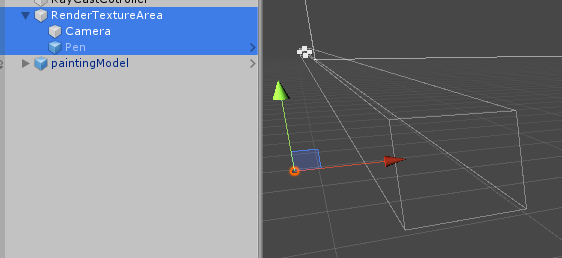
専用のレイヤーを作成してカメラとペン用のPanelの実態を作成して、
操作することで描画を行なっています。
初期ではPenのTransformを動かして描画していましたがこの方法ではメッシュが重なった箇所で描画するときに不便なので、
カメラへリンクさせたCommandBufferを使用した方式に変更して描画しています。
カメラのClearステップを解除しないと描画が消えてしまうことに注意。
クリック地点からUV空間座標を求める
参考リンク
https://qiita.com/Es_Program/items/fe9c66afc4cbddc7fdfd
https://esprog.hatenablog.com/entry/2016/05/08/165445
三角形上の点における面積比重の割合でPositionとUVを変換する考え方です。
入力が便宜上3次元になっていますがLive2Dのローカル空間を取り扱うのでZは無視されます。
Unity上でのLive2DMeshへのアクセスも難しい感じなのでUnityのMeshに変換されたあとにアクセスしています。
NativeFrameworkであればUserModel経由でDrawableの情報に直接アクセスしたほうが良いかもしれません。
private bool RayCast(Vector3 inputPosition, Mesh mesh, out Vector2 resultUV)
{
    // アクセス毎にメモリコピーするので出しておく。
    var vertices = mesh.vertices;
    var indices = mesh.triangles;
    var uvs = mesh.uv;
    for (int i = 0; i < indices.Length; i += 3)
    {
        var vertexPositionA = vertices[indices[i]];
        var vertexPositionB = vertices[indices[i + 1]];
        var vertexPositionC = vertices[indices[i + 2]];

        var crossProduct1 =
            (vertexPositionB.x - vertexPositionA.x) * (inputPosition.y - vertexPositionB.y) -
            (vertexPositionB.y - vertexPositionA.y) * (inputPosition.x - vertexPositionB.x);
        var crossProduct2 =
            (vertexPositionC.x - vertexPositionB.x) * (inputPosition.y - vertexPositionC.y) -
            (vertexPositionC.y - vertexPositionB.y) * (inputPosition.x - vertexPositionC.x);
        var crossProduct3 =
            (vertexPositionA.x - vertexPositionC.x) * (inputPosition.y - vertexPositionA.y) -
            (vertexPositionA.y - vertexPositionC.y) * (inputPosition.x - vertexPositionA.x);

        if ((crossProduct1 > 0 && crossProduct2 > 0 && crossProduct3 > 0) ||
            (crossProduct1 < 0 && crossProduct2 < 0 && crossProduct3 < 0))
        {
            var vAB = vertexPositionB - vertexPositionA;
            var vAC = vertexPositionC - vertexPositionA;
            var weightAll = ( vAB.x * vAC.y - vAB.y * vAC.x ) / 2f;

            var vAP = inputPosition - vertexPositionA;
            var weightC = ( vAB.x * vAP.y - vAB.y * vAP.x ) / 2f;

            var vBC = vertexPositionC - vertexPositionB;
            var vBP = inputPosition - vertexPositionB;
            var weightA = ( vBC.x * vBP.y - vBC.y * vBP.x ) / 2f;

            var weightB = weightAll - weightA - weightC;

            var uvA = uvs[indices[i + 0]];
            var uvB = uvs[indices[i + 1]];
            var uvC = uvs[indices[i + 2]];


            weightA /= weightAll;
            weightB /= weightAll;
            weightC /= weightAll;

            resultUV = uvA * weightA + uvB * weightB + uvC * weightC;
            return true;
        }
    }

    resultUV = new Vector2();
    return false;
}
今回はこれで手に入ったUV空間上にPenのTransfromを移動させてから転写コマンドを行なっていますが、
この方法ではペンの回転に対応していなかったりMeshのひしゃげ具合に関係なく描画されるケースがあるので、
Mesh自体の変換で行うともっときれいにできそうです。
(今回は実証のみだったのでやらない。
Live2Dの部品へ必要な処理を自動で行う
ここまでは原理面を説明してきましたが実運用面でみたときにUnity上でモデルをインポートしたあとに、
各Drawableやモデルにコンポーネントを貼り付けていく必要があります。
人力でこれをやるとDrawableへの操作があるため100枚くらいのArtMeshがあると地獄の作業になります。
これを回避する機能がCubismImporterです。
CubismFramework for Unityに含まれている機能で、概要としては
EditorフォルダにStatic関数を作成してInitializeOnLoadMethodでCubismImporter.OnDidImportModelへ関数を登録するとUnityへLive2Dモデルが読み込まれた際に登録された処理が動作してくれる仕組みです。
internal static class PaintingCustomImporter
{
    [InitializeOnLoadMethod]
    private static void RegisterModelImporter()
    {
        CubismImporter.OnDidImportModel += OnModelImport;
    }

    private static void OnModelImport(CubismModel3JsonImporter sender, CubismModel model)
    {
        // drawableのテクスチャ番号からマテリアルの入れ替えとRaycastableの付与を行う。
        var drawables = model.Drawables;

        foreach (var drawable in drawables)
        {
            if( drawable.TextureIndex != 0 ) continue;

            var renderer = drawable.GetComponent<CubismRenderer>();
            switch (renderer.Material.name.Replace(" (Instance)",""))
            {
                case "Unlit" :
                    renderer.Material =
                        Resources.Load<Material>("compositMats/UnlitRp");
                    break;
                case "UnlitAdditiveMasked" :
                    renderer.Material =
                        Resources.Load<Material>("compositMats/UnlitAdditiveMaskedRp");
                    break;
                case "UnlitAdditive" :
                    renderer.Material =
                        Resources.Load<Material>("compositMats/UnlitAdditiveRp");
                    break;
                case "UnlitMasked" :
                    renderer.Material =
                        Resources.Load<Material>("compositMats/UnlitMaskedRp");
                    break;
                case "UnlitMultiplyMasked" :
                    renderer.Material =
                        Resources.Load<Material>("compositMats/UnlitMultiplyMaskedRp");
                    break;
                case "UnlitMultiply" :
                    renderer.Material =
                        Resources.Load<Material>("compositMats/UnlitMultiplyRp");
                    break;
                default: Debug.LogWarning("unknown mat Type!!");
                    break;
            }

            var rayCastable = drawable.GetOrAddComponent(typeof(CubismRaycastable)) as CubismRaycastable;
            if (rayCastable != null)
            {
                rayCastable.Precision = CubismRaycastablePrecision.Triangles;
            }
        }

        // 不要なAnimatiorを削除
        var animator = model.GetComponent<Animator>();
        if (animator != null)
        {
            Object.DestroyImmediate(animator);
        }

        // modelに対して必要なComponentを付与
        model.GetOrAddComponent(typeof(Animation));
        model.GetOrAddComponent(typeof(SlidableMotionController));
        model.GetOrAddComponent(typeof(CubismUpdateController));
        model.GetOrAddComponent(typeof(PaintController));
        model.GetOrAddComponent(typeof(CubismRaycaster));
    }
}
今回つくったペイント用のImporterでは以下の作業が自動的に行われます。
- Texture番号が0のDrawableのマテリアルをペイントに対応したものに切り替える
- 当たり判定用のComponentをDrawableに付与
- 標準でModelへとりつけられるAnimatiorがスライダー再生が不可能なのでAnimationへ振り替え直す。
- その他ペイントに必要なComponentをModelへ付与する。
このCubismImporterを利用すれば大量にモデルを組み込んで特殊な描画を行うときも労力を少なく処置できるはずです。
