はじめに
UnityでリアルタイムテクスチャペイントするアセットUnityTexturePaintを作ったので、リアルタイムペイントを行うノウハウについて書き残そうと思います。
UnityTexturePaintは
- https://www.assetstore.unity3d.com/en/#!/content/75279
- https://github.com/EsProgram/UnityTexturePaint
から入手できます。Asset Storeでは有料ですが、GitHubから誰でもFreeで持ってこれるので気に入ったらご購入お願いします。
UnityTexturePaintって?
タイトル通り、リアルタイムでのTexturePaintを可能にするアセットです。
UnityTexturePaintで何が出来るかというと
好きな場所に好きな色塗ったり
応用して塗った場所を凹ませてみたり
アルファ値だけペイントして近未来な床を作ったり
一部鏡面反射するようなモノを作ったり
アイデア次第で色々できます。
詳しくはブログで。
ドキュメントはこちらです。
実装
おおまかな流れはこんな感じです。
- 書き込みを行うオブジェクトのテクスチャをRenderTextureに差し替える
- 塗る場所(UV座標)を求める
- その場所を中心にブラシ画像を合成する
1. 書き込みを行うオブジェクトのテクスチャをRenderTextureに差し替える
実行時にのみ書き込みを行うため、Awakeあたりで初回のみ、ペイント対象のテクスチャをRenderTextureに差し替えます。以下はその差し替え部分のC#コードです。
paintMainTexture = new RenderTexture(mainTexture.width, mainTexture.height, 0, RenderTextureFormat.ARGB32, RenderTextureReadWrite.Default);
//メインテクスチャのコピー
Graphics.Blit(mainTexture, paintMainTexture);
//マテリアルのテクスチャをRenderTextureに変更
material.SetTexture(mainTexturePropertyID, paintMainTexture);
mainTextureが元々オブジェクトに貼られていたテクスチャ、paintMainTextureが新しく生成したRenderTextureです。
2. 塗る場所(UV座標)を求める
Unityでオブジェクト表面上のどこかしらの点を取ってきたい場合、一番簡単なのがRaycastを使う方法です。
Raycastの出力するRaycastHit構造体には、ヒット位置のUV座標を取ってくるtextureCoordプロパティが定義されています。
しかし、コライダーがMeshColliderではなかった場合RaycastHitのTexcoordは常にVector2.zeroを返します。これだと、キャラクターモデルなどの頂点数の多いモデルなどにペイントを行いたい場合にもMeshColliderを使わなくちゃいけなくなったりして都合が悪くなります。具体的にどんなときに都合が悪いかというと
- 物理挙動を行わせようとすると激重(メッシュのディテールに依存)
- アニメーションさせるとMeshColliderの位置が追従してこないので塗る位置がおかしくなる
- 当たり判定で「当たった場所に塗る」とかやりたいときも、OnCollision...で当たり検出後再度Rayを飛ばして・・・ってやらないとUVが取ってこれない
などなど、かなり使いにくくなってしまいます。
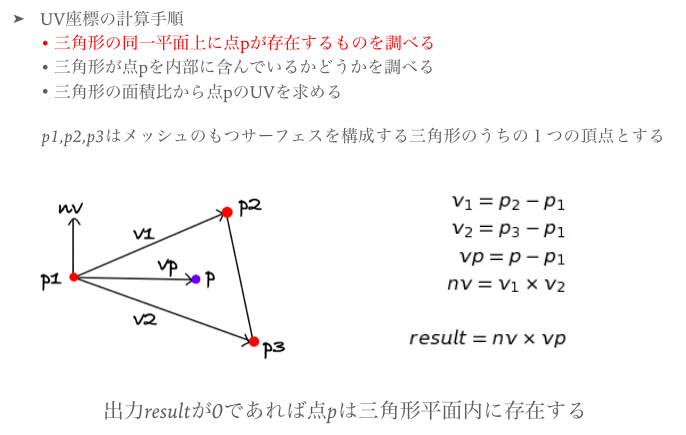
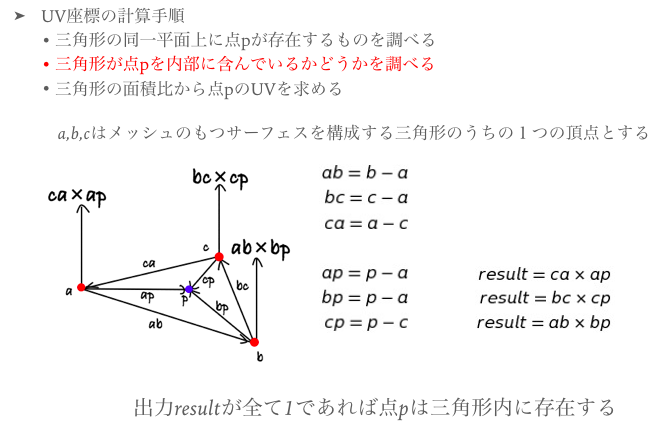
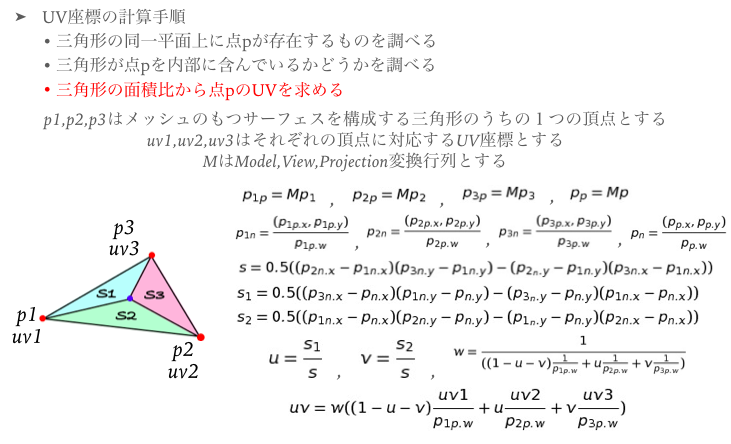
そこで、UnityTexturePaintではMeshColliderを使わなくてもペイントが行えるようにするため、メッシュの頂点やそれに対応するUV座標から求めたいUV座標を補間する方法を使っています。
以下のアルゴリズムではサーフェスが全て三角形であることを前提としていますが、Unityでは気にする必要はありません。入力する点pは、オブジェクト表面上の塗りたい場所です。
詳細は以下を参照してください。
- http://esprog.hatenablog.com/entry/2016/05/08/165445
- http://esprog.hatenablog.com/entry/2016/10/09/062952
- http://esprog.hatenablog.com/entry/2016/10/10/002656
3. その場所を中心にブラシ画像を合成する
UVさえ求まればあとは単純な画像処理です。
UVとブラシの大きさから現在参照しているピクセルに対して色を合成するかどうかを判断して書き込みを行います。以下は書き込みを行うシェーダーの重要な部分(ピクセルシェーダーと補助関数、マクロ)のみを抜粋したものです。
//メインテクスチャとブラシのブレンディングアルゴリズムをTEXTURE_PAINT_COLOR_BLENDに設定
# ifdef TEXTURE_PAINT_COLOR_BLEND_USE_CONTROL
	#define TEXTURE_PAINT_COLOR_BLEND(targetColor, brushColor, controlColor) TexturePaintColorBlendUseControl(targetColor, brushColor, controlColor)
# elif TEXTURE_PAINT_COLOR_BLEND_USE_BRUSH
	#define TEXTURE_PAINT_COLOR_BLEND(targetColor, brushColor, controlColor) TexturePaintColorBlendUseBrush(targetColor, brushColor, controlColor)
# elif TEXTURE_PAINT_COLOR_BLEND_NEUTRAL
	#define TEXTURE_PAINT_COLOR_BLEND(targetColor, brushColor, controlColor) TexturePaintColorBlendNeutral(targetColor, brushColor, controlColor)
# elif TEXTURE_PAINT_COLOR_BLEND_ALPHA_ONLY
	#define TEXTURE_PAINT_COLOR_BLEND(targetColor, brushColor, controlColor) TexturePaintColorBlendAlphaOnly(targetColor, brushColor, controlColor)
# else
	#define TEXTURE_PAINT_COLOR_BLEND(targetColor, brushColor, controlColor) TexturePaintColorBlendUseControl(targetColor, brushColor, controlColor)
# endif

float4 ColorBlend(float4 targetColor, float4 brushColor, float blend) {
	return brushColor * (1 - blend * targetColor.a) + targetColor * targetColor.a * blend;
}

# define __COLOR_BLEND(targetColor) ColorBlend((targetColor), mainColor, brushColor.a)

//ブレンド後の色を取得(指定色を使う)
float4 TexturePaintColorBlendUseControl(float4 mainColor, float4 brushColor, float4 controlColor) {
	return __COLOR_BLEND(controlColor);
}

//ブレンド後の色を取得(ブラシテクスチャ色を使う)
float4 TexturePaintColorBlendUseBrush(float4 mainColor, float4 brushColor, float4 controlColor) {
	return __COLOR_BLEND(brushColor);
}

//ブレンド後の色を取得(指定色とブラシテクスチャ色の中間色)
float4 TexturePaintColorBlendNeutral(float4 mainColor, float4 brushColor, float4 controlColor) {
	return __COLOR_BLEND((brushColor + controlColor * controlColor.a) * 0.5);
}

//ブレンド後の色を取得(アルファ値のみ書き込み)
float4 TexturePaintColorBlendAlphaOnly(float4 mainColor, float4 brushColor, float4 controlColor) {
	float4 col = mainColor;
	col.a = controlColor.a;
	return __COLOR_BLEND(col);
}

//ペイントブラシが描画範囲内かどうかを調べる
bool IsPaintRange(float2 mainUV, float2 paintUV, float brushScale) {
	return
		paintUV.x - brushScale < mainUV.x &&
		mainUV.x < paintUV.x + brushScale &&
		paintUV.y - brushScale < mainUV.y &&
		mainUV.y < paintUV.y + brushScale;
}

//描画範囲内で利用できるブラシ用UVを計算する
float2 CalcBrushUV(float2 mainUV, float2 paintUV, float brushScale) {
# if UNITY_UV_STARTS_AT_TOP
	return (mainUV - paintUV) / brushScale * 0.5 + 0.5;
# else
	return (paintUV - mainUV) / brushScale * 0.5 + 0.5;
# endif
}

float4 frag(v2f i) : SV_TARGET {
	float h = _BrushScale;
	float4 base = tex2Dlod(_MainTex, float4(i.uv.xy, 0, 0));
	float4 brushColor = float4(1, 1, 1, 1);

	if (IsPaintRange(i.uv, _PaintUV, h)) {
		float2 uv = CalcBrushUV(i.uv, _PaintUV, h);
		brushColor = tex2Dlod(_Brush, float4(uv.xy, 0, 0));

		return TEXTURE_PAINT_COLOR_BLEND(base, brushColor, _ControlColor);
	}
	return base;
}
_BrushScaleがブラシサイズ、_MainTexが元々オブジェクトに貼られていたテクスチャ、_Brushがブラシテクスチャです。あとはこのシェーダーを使ってC#側から必要な値をセットし、レンダリングしてやればペイント完了です。
var mainPaintTextureBuffer = RenderTexture.GetTemporary(mainTexture.width, mainTexture.height);
SetPaintMainData(brush, uv);
Graphics.Blit(paintMainTexture, mainPaintTextureBuffer, paintMaterial);
Graphics.Blit(mainPaintTextureBuffer, paintMainTexture);
RenderTexture.ReleaseTemporary(mainPaintTextureBuffer);
paintMaterialは先程のシェーダーを適用したマテリアルです。
SetPaintMainDataでは、ブラシのスケールや色、テクスチャ、求めたUV座標などをマテリアルにSetしています。
最後に
法線マップやハイトマップへペイントを行う場合、色のブレンディングアルゴリズムがメインテクスチャで必要なケースと多少変わってくるので、別の処理が必要になってきますが、大枠は大して変わりません。UnityTexturePaintの強みは、MeshColliderやRaycastを使わず、リアルタイムでペイントを実現できること、法線マップやハイトマップなどのペイントも行えること、応用次第で色々なことが実現可能なことです。
現在開発中の機能では、液体が流れる表現を作っています。

興味がありましたら触って感想などいただければ幸いです。
© UTJ/UCL
この記事内で使っている一部の画像ではユニティちゃんを利用させていただいてます。