この記事はサムザップ Advent Calendar 2017の6日目の記事です。
昨日はhiroki_shimadaさんのAWSをさわってみたのでつまずいた点などをメモでした。
動機
プロファイリングのための一時的なコードは、似たような処理をあちこちに記述しなければならないことがあります。
今回はそんな機械的な作業の手間を省くために、Mono.Cecilでアセンブリを編集して自動的にプロファイリングするためのコードを埋め込むことを目標に検証してみます。
検証環境
- Windows7 64bit
- Unity2017.2.0p4
- Visual Studio 2015
実装
1. 検証対象のクラスの用意
シンプルなコンポーネントと計測対象であることを示す属性の、非常に単純な2つのクラスを用意しました。
Scripts/ProfileAttribute.cs
using System;

[AttributeUsageAttribute(AttributeTargets.Method, AllowMultiple = false)]
public class ProfileAttribute : Attribute
{ }
Scripts/Foo.cs
using UnityEngine;

public class Foo : MonoBehaviour
{
    private void Awake()
    { }

    [Profile]
    private void Update()
    {
        // プロファイリングしたい何らかの処理
    }
}
2. ポストコンパイル時処理の仕込み
今回はMono.Cecilでコンパイル後のDLLを編集しますので、まずはコンパイルが終了したことを知る必要があります。
ちょうどうってつけの手段をUnityEditorは提供してくれていますので、それを使用してコンパイル毎に編集をかけられるようにします。
Editor/PostCompileProcess.cs
using UnityEditor;
using System;

// コンパイル後に処理が走るようにInitializeOnLoadAttributeを付ける
[InitializeOnLoad]
public static class PostCompileProcess
{
    static PostCompileProcess()
    {
        // UnityEditor再生中は無視する
        if (EditorApplication.isPlayingOrWillChangePlaymode) { return; }

        // 注入中に再読み込みされないようにロックする
        EditorApplication.LockReloadAssemblies();
        try {
            // ここでアセンブリに対してゴニョゴニョする
        }
        finally {
            // 必ずアンロックされるように try-finally でくくる
            EditorApplication.UnlockReloadAssemblies();
        }
    }
}
3. 注入対象の型とメソッドの探索
Editor/PostCompileProcess.cs
...
EditorApplication.LockReloadAssemblies();
try {
    var assemblies = AppDomain.CurrentDomain.GetAssemblies();
    var targetAssembly = assemblies.FirstOrDefault(asm => asm.GetName().Name == "Assembly-CSharp");

    AssemblyProcessor.Process(targetAssembly);
}
finally {
    // 必ずアンロックされるように try-finally でくくる
    EditorApplication.UnlockReloadAssemblies();
}
...
Editor/AssemblyProcessor.cs
public static void Process(Assembly targetAssembly)
{
    var assemblyDef = AssemblyDefinition.ReadAssembly(targetAssembly.Location);
    var moduleDef = assemblyDef.MainModule;

    // 注入対象の型定義の列挙
    foreach (var typeDef in moduleDef.Types.Where(t => HasProfileTargetMethod(t))) {
        // CustomSamplerのフィールドの注入を試みる
        FieldDefinition samplerFieldDef;
        if (!TryInjectCustomSamplerField(moduleDef, typeDef, out samplerFieldDef)) {
            continue;
        }

        // プロファイル対象のメソッドへコードの注入を行う
        foreach (var methodDef in typeDef.Methods.Where(m => HasProfileAttribute(m))) {
            InjectProfileCode(moduleDef, methodDef, samplerFieldDef);

            // 同じ操作を行わないように、注入出来たメソッドからProfileAttributeを取り除く
            RemoveProfileAttribute(methodDef);
        }
    }

    assemblyDef.Write(targetAssembly.Location);
}
4. 計測コードの注入
4.1. CustomSamplerフィールドの注入
Editor/AssemblyProcessor.cs
/// <summary>
/// CustomSampler型のFieldの注入を試みる。
/// インスタンスを構築するためのAwakeメソッドが指定した型に存在しない場合、この操作は失敗する。
/// </summary>
private static bool TryInjectCustomSamplerField(ModuleDefinition moduleDef, TypeDefinition typeDef, out FieldDefinition fieldDef)
{
    fieldDef = default(FieldDefinition);

    var awakeMethod = typeDef.Methods.FirstOrDefault(m => m.Name == "Awake");
    if (awakeMethod == null) { return false; }


    // フィールド定義の作成
    var fieldName = "_sampler";
    var samplerName = "Custom Sampler";

    fieldDef = new FieldDefinition(fieldName, FieldAttributes.Private, moduleDef.Import(typeof(CustomSampler)));

    // フィールド定義の追加
    typeDef.Fields.Add(fieldDef);

    // CustomSamplerの生成メソッドの取得
    var createMethod = typeof(CustomSampler).GetMethod(nameof(CustomSampler.Create), new[] { typeof(string) });
    var createMethodRef = moduleDef.Import(createMethod);


    var processor = awakeMethod.Body.GetILProcessor();
    var first = awakeMethod.Body.Instructions.First();

    // Awakeメソッドの最初の処理の前にCustomSamplerの生成処理を追加
    processor.InsertBefore(first, Instruction.Create(OpCodes.Ldarg_0));
    processor.InsertBefore(first, Instruction.Create(OpCodes.Ldstr, samplerName));
    processor.InsertBefore(first, Instruction.Create(OpCodes.Call, createMethodRef));
    processor.InsertBefore(first, Instruction.Create(OpCodes.Stfld, fieldDef));

    return true;
}
4.2. 計測の呼び出しの注入
Editor/AssemblyProcessor.cs
/// <summary>
/// CustomSampler.Begin() と CustomSampler.End() の呼び出しを注入する
/// </summary>
private static void InjectProfileCode(ModuleDefinition moduleDef, MethodDefinition methodDef, FieldDefinition samplerFieldDef)
{
    // 呼び出し対象のメソッドの参照の取得
    var beginMethod = typeof(CustomSampler).GetMethod(nameof(CustomSampler.Begin), Array.Empty<Type>());
    var endMethod = typeof(CustomSampler).GetMethod(nameof(CustomSampler.End), Array.Empty<Type>());

    var beginMethodRef = moduleDef.Import(beginMethod);
    var endMethodRef = moduleDef.Import(endMethod);

    var processor = methodDef.Body.GetILProcessor();
    var first = methodDef.Body.Instructions.First();
    var last = methodDef.Body.Instructions.Last();

    // 最初の処理の前にCustomSampler.Begin()の呼び出しを追加
    processor.InsertBefore(first, Instruction.Create(OpCodes.Ldarg_0));
    processor.InsertBefore(first, Instruction.Create(OpCodes.Ldfld, samplerFieldDef));
    processor.InsertBefore(first, Instruction.Create(OpCodes.Callvirt, beginMethodRef));

    // 最後の処理の前にCustomSampler.End()の呼び出しを追加
    processor.InsertBefore(last, Instruction.Create(OpCodes.Ldarg_0));
    processor.InsertBefore(last, Instruction.Create(OpCodes.Ldfld, samplerFieldDef));
    processor.InsertBefore(last, Instruction.Create(OpCodes.Callvirt, endMethodRef));
}
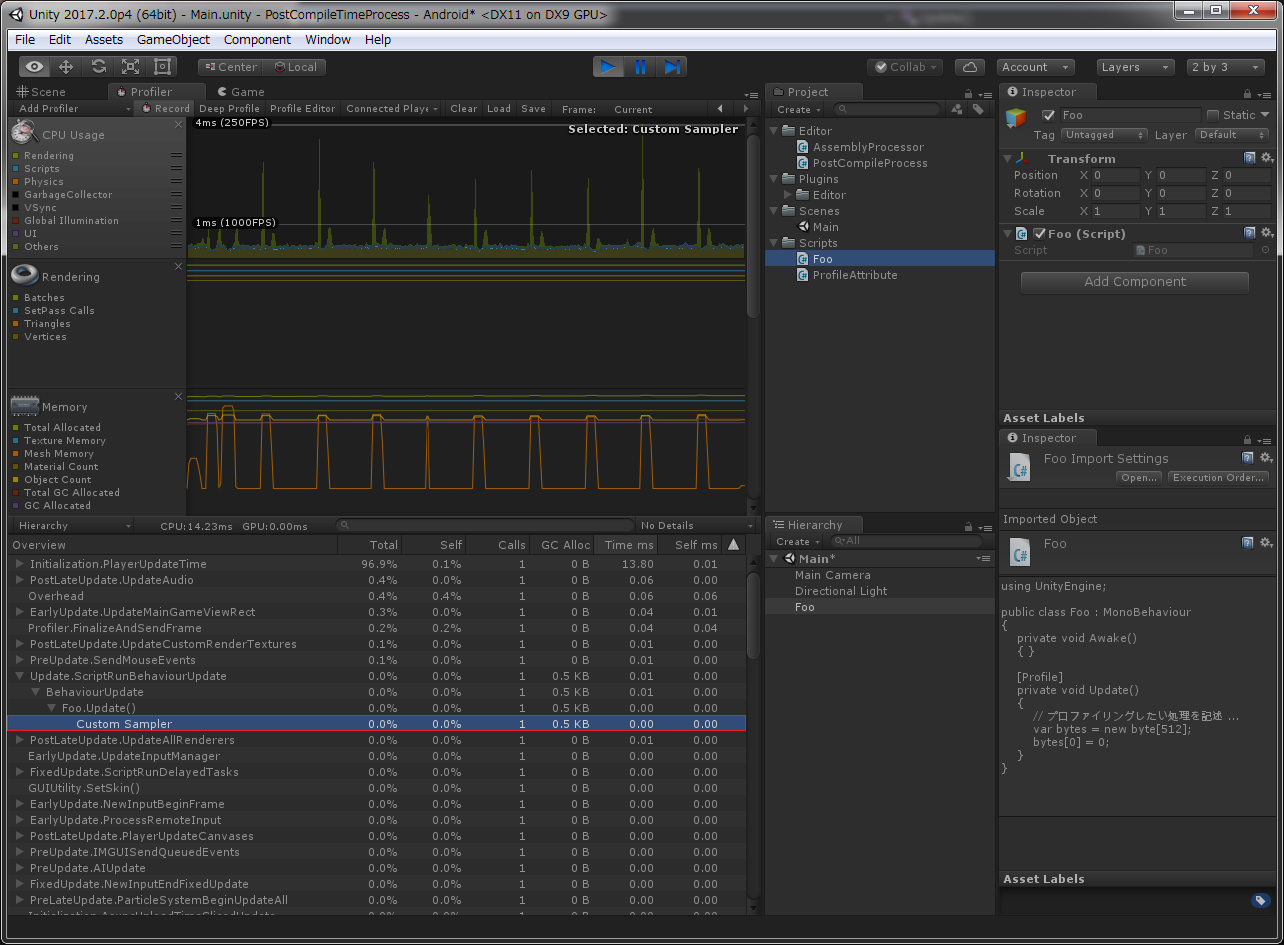
実行してみる
UnityEditorを再生してProfilerウィンドウを開いてみます。
すると期待通り、FooクラスのUpdateメソッドにCustom Samplerの表示がありました。
雑感
思っていたより簡単に実現できてしまいました。
単純な処理というのもありますが、IL命令も期待するコードをC#で書いてILSpyなどで見ることですんなり構築できました。
参考にさせていただいた記事
Introduction to the pragmatic IL via C#
既存の.NET アセンブリにMono.Cecilでコードを差し込む
Mono.Cecilで黒魔術を行う。〜トレースログをインジェクション編〜