
本記事では Redux を使用した場合の React コンポーネントに対するテスト方法を考察します。
Redux に接続された React コンポーネントは、コンポーネント内のプロパティを Redux Store の state と同期させています。 Redux に強く依存しているコンポーネントをどのように Testable にしていけば良いのでしょうか。記事のタイトルは、t-wada 先生の言葉をお借りして、Testable Redux とつけさせていただきました。
純粋な React コンポーネントをテストする
さて、まずはじめに純粋な React のコンポーネントに対するテスト方法を振り返ってみます。Facebook に習えば、jest の公式ドキュメントでも紹介されている jest と enzyme を組み合わせた方法が一般的でしょう。
以下のようなシンプルなコンポーネントを例として使用します。

count を保持する state をもち、onClick で state を変更します。簡単のために Functional Component とし、State Hooks を使用します。後のテストのために各タグにはカスタムデータ属性(data-test)を付与しておきます。プロダクションビルドでカスタムデータ属性を取り除く方法もあります。こちらの記事にて詳細に解説されていました。
import React, { useState } from "react";
export default () => {
  const [count, setCount] = useState(0);
  return (
    <div>
      <h3 data-test="count">count: {count}</h3>
      <button data-test="count-up" onClick={() => setCount(count + 1)}>⬆︎</button>
      <button data-test="count-down" onClick={() => setCount(count - 1)}>⬇︎</button>
    </div>
  );
};
これに対するテストは以下のように記述できます。初期値が 0 であること、ボタンをクリックして 1 に変わることを確認します。
import React from "react";
import { shallow } from "enzyme";
import Counter from "./PureReactCounter";

import testConfigure from "../../testConfigure";
testConfigure();

const sel = (id: string) => `[data-test="${id}"]`;
describe("<Counter /> コンポーネント", () => {
  const Component = shallow(<Counter />);
  it("ボタンをクリックしてカウントアップする", () => {
    expect(Component.find("h3").text()).toEqual("count: 0");
    Component.find(sel("count-up")).simulate("click");
    expect(Component.find("h3").text()).toEqual("count: 1");
  });
});
なお、testConfigure には以下を記述しておきます。enzyme を使用する場合のお約束のようなものです。enzyme の installationにて解説されています。
import Enzyme from "enzyme";
import EnzymeAdapter from "enzyme-adapter-react-16";
export default () => Enzyme.configure({ adapter: new EnzymeAdapter() });
結果は 8ms でした。このテストでは shallow() を使用しています。Shallow レンダリングは、コンポーネントをユニットテストの範囲でテストできるように制限します。テストが子コンポーネントの動作を間接的にアサートしないようにしてくれます。コンポーネントは子コンポーネントに依存させず、常にステートレスに保つことによって Shallow レンダリングによるテストができ、高速です。
 PASS  src/components/PureReactCounter.test.tsx
  <Counter /> コンポーネント
    ✓ ボタンをクリックしてカウントアップする (8ms)
ちなみに、mount() は完全な DOM レンダリングを行います。DOM API とやり取りする可能性のあるコンポーネントである場合や、より高次のコンポーネントにラップされているコンポーネントをテストする必要がある場合に最適です。ただしその一方で多くの依存関係を考慮することによりテストに要する時間は増える傾向にあります。
 PASS  src/components/PureReactCounter.test.tsx
  <Counter /> コンポーネント
    Shallowレンダリング
      ✓ ボタンをクリックしてカウントアップする (8ms)
    Fullレンダリング
      ✓ ボタンをクリックしてカウントアップする (8ms)
結果として実行時間はほとんど変わりませんでした。これは今回実装したコンポーネントが他のコンポーネントや API などと依存していないシンプルなコンポーネントであるためです。
Redux の使用を開始する
さて、先ほど実装したコンポーネントは、count を保持する state をもち、onClick で state を変更していました。この count という state を Redux の store で管理します。実装例を紹介する前に Redux のライフサイクルのおさらいをしましょう。
- View: ユーザが操作を行い、handleClick() などのイベント起動 function が実行される。
- ActionCreater: イベント起動 function は ActionCreater を通して action を生成する。
- Dispacther: action は Dispater に渡され、Reducer に流れる。
- Reducer: Reducer は action の type に応じて新しい state を返却する。
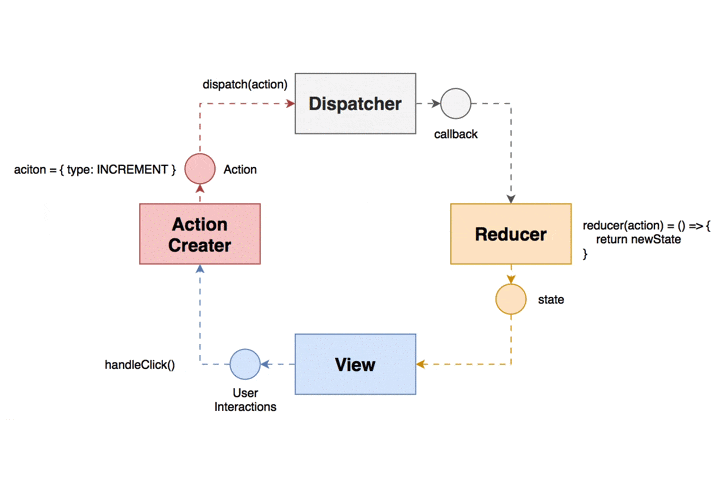
説明の粒度は荒いですが、おおまかにこのような流れで Redux による状態の管理が行われます。
さて、ディレクトリ構成は以下のようにして実装を進めていきます。
src/
├── index.tsx
├── App.tsx
├── components
│   ├── Counter.tsx
│   └── Counter.test.tsx
└── store
    ├── actions
    │   └── counterActions.ts
    ├── reducers
    │   └── counterReducer.ts
    └── store.ts
Action (actions/counterActions.ts)
Action の定義を行います。今回はカウントアップとカウントダウンする2種類の action があるので事前に定義しておき、他のファイルから参照できるようにしておきましょう。
export const INCREMENT = "INCREMENT";
export const DECREMENT = "DECREMENT";

export interface ICountReducerAction {
  type: typeof INCREMENT | typeof DECREMENT;
}
Reducer (reducers/counterReducer.ts)
Reducer は飛んできた action の type に応じて state 返却する処理を書くのでした。INCREMENT の場合は +1、DECREMENTの場合は -1された新しい state を返却しています。
import {
  ICountReducerAction,
  INCREMENT,
  DECREMENT
} from "../actions/counterActions";

const initialState = 0;
const counterReducer = (state = initialState, action: ICountReducerAction) => {
  switch (action.type) {
    case INCREMENT:
      return state + 1;
    case DECREMENT:
      return state - 1;
    default:
      return state;
  }
};
export default counterReducer;
Store
先に定義した reducer を束ねて、storeを作成しましょう。今回 reducer は1つですが、複数使用することになることも考慮して combineReducers() を使用しています。
import { createStore } from "redux";
import { combineReducers } from "redux";
import counterReducer from "./reducers/counterReducer";
const reducer = combineReducers({ count: counterReducer });
export default createStore(reducer);
Component から Redux の store を参照する
Redux の state を View に表示できるようにコンポーネントを実装していきましょう。まず初めに純粋に Redux の store を直接参照するような実装を考えます。
ReactDOM.render() を store から subscribe() します。
import React from "react";
import ReactDOM from "react-dom";
import App from "./App";
import store from "./store/store";

const render = () => ReactDOM.render(<App />, document.getElementById("root"));
render();
store.subscribe(render);
コンポーネントは以下のように実装します。この場合はどうでしょう、テストは容易でしょうか。
import React from "react";
import store from "../../store/store";
import { INCREMENT, DECREMENT } from "../../store/actions/counterActions";

export default () => {
  const count = store.getState().count; // store から直接参照する
  return (
    <div>
      <h3 data-test="count">count: {count}</h3>
      <button onClick={() => store.dispatch({ type: INCREMENT })}>⬆︎</button>
      <button onClick={() => store.dispatch({ type: DECREMENT })}>⬇︎</button>
    </div>
  );
};
テストコードを振り返ってみましょう。このままでは Redux の store を参照ができないため、ボタンをクリックした後に発火するはずの Reducer が起動しません。結果として count は 0 のままです。
const sel = (id: string) => `[data-test="${id}"]`;
describe("<Counter /> コンポーネント", () => {
  describe("Shallowレンダリング", () => {
    const Component = shallow(<Counter />);
    it("ボタンをクリックしてカウントアップする", () => {
      expect(Component.find("h3").text()).toEqual("count: 0");
      Component.find(sel("count-up")).simulate("click"); // Redux store の state が変更されない
      expect(Component.find("h3").text()).toEqual("count: 1"); // 0 のまま
    });
  });
  describe("Fullレンダリング", () => {
    const Component = mount(<Counter />);
    it("ボタンをクリックしてカウントアップする", () => {
      expect(Component.find("h3").text()).toEqual("count: 0");
      Component.find(sel("count-up")).simulate("click");
      expect(Component.find("h3").text()).toEqual("count: 1");
    });
  });
});
テスト結果(クリックして開く)
 FAIL  src/components/DirectAccessReduxStore.test.tsx
  <Counter /> コンポーネント
    Shallowレンダリング
      ✕ ボタンをクリックしてカウントアップする (11ms)
    Fullレンダリング
      ✕ ボタンをクリックしてカウントアップする (6ms)

  ● <Counter /> コンポーネント › Shallowレンダリング › ボタンをクリックしてカウントアップする

    expect(received).toEqual(expected) // deep equality

    Expected: "count: 1"
    Received: "count: 0"

      13 |       expect(Component.find("h3").text()).toEqual("count: 0");
      14 |       Component.find(sel("count-up")).simulate("click");
    > 15 |       expect(Component.find("h3").text()).toEqual("count: 1");
         |                                           ^
      16 |     });
      17 |   });
      18 |   describe("Fullレンダリング", () => {

      at Object.<anonymous> (src/components/DirectAccessReduxStore.test.tsx:15:43)

  ● <Counter /> コンポーネント › Fullレンダリング › ボタンをクリックしてカウントアップする

    expect(received).toEqual(expected) // deep equality

    Expected: "count: 1"
    Received: "count: 0"

      21 |       expect(Component.find("h3").text()).toEqual("count: 0");
      22 |       Component.find(sel("count-up")).simulate("click");
    > 23 |       expect(Component.find("h3").text()).toEqual("count: 1");
         |                                           ^
      24 |     });
      25 |   });
      26 | });

      at Object.<anonymous> (src/components/DirectAccessReduxStore.test.tsx:23:43)
Redux と React のコンポーネントが強く依存する関係になっており、React のコンポーネント単体としてテストしづらくなっています。この構成を変えていきましょう。まずは React と Redux の間の依存関係を切り離す方法を考えます。
react-redux の connect() を使用して React と Redux の依存を引き剥がず
最も代表的な実装パターンとして react-redux の connect() を使用する方法が挙げられます。これは、コンポーネントをマウントする時点で子コンポーネントや依存関係にある構成要素を考える必要がなく、シンプルです。
Counter コンポーネントと Redux store が強い依存関係にある実装から、なるべく疎結合になるように配慮します。いわゆる DI (Dependency Injection) の考え方にしたがって、Counter コンポーネントの store を外から props として注入できるように変更します。ただ単に props によって注入するだけではなく、Redux store との接合は connect() によって行います。詳細な手続きは公式チュートリアルを参照しましょう。このようなコンポーネントを HOC (Higher Order Component) と呼びます。詳細はこちらの記事が参考になります。
import React from "react";
import { connect } from "react-redux";
import { Dispatch } from "redux";
import { INCREMENT, DECREMENT } from "../../store/actions/counterActions";

interface ICounterState {
  counter: number;
}

interface ICounterProps {
  count: number;
  increment: any;
  decrement: any;
}

// props として store を流し込んで DI できるるようにする。
export const Counter = (store: ICounterProps) => {
  const { count, increment, decrement } = store;
  return (
    <div>
      <div data-testid="count">count: {count}</div>
      <button onClick={increment}>⬆︎</button>
      <button onClick={decrement}>⬇︎</button>
    </div>
  );
};

const mapStateToProps = (state: ICounterState) => ({
  count: state.counter
});
const mapDespatchToProps = (dispatch: Dispatch) => ({
  increment: () => dispatch({ type: INCREMENT }),
  decrement: () => dispatch({ type: DECREMENT })
});

// 第一引数の mapStateToProps は component に渡す props を制御する
// 第二引数の mapDespatchToProps は reducer を呼び出して、redux で管理している state を更新する
// Counter は取得したデータを props として扱いたい component を指定する
export default connect(mapStateToProps, mapDespatchToProps)(Counter);
さて、ここまでできれば勝てる気がしてきました。テストを書きます。
import React from "react";
import { mount, shallow } from "enzyme";
import { Provider } from "react-redux";
import { createStore } from "redux";
import sinon from "sinon";
import ConnectedCounter, { Counter } from "./ReactRedux";
import { reducer } from "../../store/store";
import testConfigure from "../../testConfigure";
testConfigure();
const sel = (id: string) => `[data-test="${id}"]`;
describe("<Counter /> コンポーネント", () => {
  describe("Shallowレンダリング", () => {
    const props = {
      count: 0,
      increment: sinon.spy(), // カウントアップするボタンを押した挙動を確認するためにスパイを差し込む
      decrement: sinon.spy()
    };
    const shallowComponent = shallow(<Counter {...props} />);
    it("ボタンをクリックしてカウントアップする", () => {
      expect(shallowComponent.find("h3").text()).toEqual("count: 0");
      shallowComponent.find(sel("count-up")).simulate("click");
      expect(props.increment).toHaveProperty("callCount", 1);
    });
  });
  describe("Fullレンダリング", () => {
    const getWrapper = (mockStore = createStore(reducer, { count: 0 })) =>
      mount(
        <Provider store={mockStore}>
          <ConnectedCounter />
        </Provider>
      );
    it("ボタンをクリックしてカウントアップする", () => {
      const wrapper = getWrapper();
      expect(wrapper.find("h3").text()).toEqual("count: 0");
      wrapper.find(sel("count-up")).simulate("click");
      expect(wrapper.find("h3").text()).toEqual("count: 1");
    });
  });
});
上記のテストでは、Shallow レンダリングと Full レンダリングの2つの方法でテストを記述しました。
Shallow レンダリングでは Redux の store を含めず、コンポーネント単体でテストを行います。そのため、カウントアップするボタンを押した際のハンドラ関数は simon.spy() を使用してスパイを差し込んで挙動を確認します。
一方で、Full レンダリングの場合は Redux の store だけをモックとして作成し、<Provider>の store に DI します。こちらの手法の方が Redux の store を含めたテストにはなるのですが、実行時間が増える傾向にあるため注意が必要です。ちなみに実行時間を比較すると以下のようになります。
 PASS  src/components/container/ReactRedux.test.tsx
  <Counter /> コンポーネント
    Shallowレンダリング
      ✓ ボタンをクリックしてカウントアップする (9ms)
    Fullレンダリング
      ✓ ボタンをクリックしてカウントアップする (44ms)
mount するのはインテグレーションテストだユニットテストではない、shallow の方が高速だ、などの論争があります。個人的な意見ですが、チーム開発を行う上ではシンプルかつ可読性を維持したテストコードを書いた方がむしろチームとしてアジリティが上がるのではないかと考えています。学習コストも高いですしね。
それでもプロダクトコードの量が大きくなるにつれて、テストの実行時間の増加によりアジリティが下がるケースもあります。shallow レンダリングと full レンダリングの実行時間の差は ms 程度ですが、塵も積もれば山となるということです。テストの方針を決めるのは難しいですね。
Redux Hooks を使用してコード量を減らす
怠惰で傲慢な我々は、現状に満足することはありません。上に挙げた実装は React と Redux の依存関係を引き剥がすことで、Shallow レンダリングによるテストが実現できるようになりました。その一方で少し複雑な実装をしなければならないように感じます。この章では Redux Hooks を使用して簡単に記述できる方法をご紹介します。
React の Hooks API は、Functional コンポーネントに対してローカルコンポーネントの state を使用できるようになる優秀な機能です。react-redux でも、既存の connect() を使用して実装された HOC (Higher Order Component) の代わりとして Hooks API を提供するようになりました。これを使用すると、前章の実装のようにコンポーネントをにラップして HOC を作るような面倒な作業は必要ありません。Redux store に subscribe して action を dispatch できます。
導入は非常に簡単です。useSelector() と useDispatch() を使用しましょう。
import React from "react";
import { useSelector, useDispatch } from "react-redux";
import { INCREMENT, DECREMENT } from "../../store/actions/counterActions";

export default () => {
  const count = useSelector((state: any) => state.count);
  const dispatch = useDispatch();
  const increment = () => { dispatch({ type: INCREMENT })};
  const decrement = () => { dispatch({ type: DECREMENT })};
  return (
    <div>
      <h3>count: {count}</h3>
      <button data-test="count-up" onClick={increment}>⬆︎</button>
      <button data-test="count-down" onClick={decrement}>⬇︎</button>
    </div>
  );
};
コードがとても短くなりました。かなりスマートです。あれ? でもおかしいですね、少し振り返ってみましょう。connect() を使用して HOC を作ったときには純粋な React コンポーネントと Redux との依存関係を引き剥がすことに成功していました。今回、Redux Hooks を使用した実装では、また依存関係が強くなってしまいました。これでは Full レンダリングを行うようなテストしか記述できません。
describe("<Counter /> コンポーネント", () => {
  describe("Fullレンダリング", () => {
    const getWrapper = (mockStore = createStore(reducer, { count: 0 })) =>
      mount(
        <Provider store={mockStore}>
          <ConnectedCounter />
        </Provider>
      );
    it("ボタンをクリックしてカウントアップする", () => {
      const wrapper = getWrapper();
      expect(wrapper.find("h3").text()).toEqual("count: 0");
      wrapper.find(sel("count-up")).simulate("click");
      expect(wrapper.find("h3").text()).toEqual("count: 1");
    });
  });
});
Redux Hooks でも Redux と React を分離する
基本的な考え方は今までと同様です。Redux と接続する部分を DI できるようにすれば OK です。useSelector() と useDispatch() を使用している箇所を外に出してやりましょう。
import { useSelector, useDispatch } from "react-redux";
import { IRootState } from "../../store/store";
import { INCREMENT, DECREMENT } from "../../store/actions/counterActions";
import { Dispatch } from "redux";

interface ICounterProps {
  count: number;
  increment: Dispatch;
  decrement: Dispatch;
}
export const Counter = (props: ICounterProps) => {
  const { count, increment, decrement } = props;
  return (
    <div>
      <h3>count: {count}</h3>
      <button data-test="count-up" onClick={increment}>⬆︎</button>
      <button data-test="count-down" onClick={decrement}>⬇︎</button>
    </div>
  );
};

export default (props: any) => {
  const count = useSelector<IRootState>(state => state.count);
  const dispatch = useDispatch();
  const _props = {
    count,
    increment: () => dispatch({ type: INCREMENT }),
    decrement: () => dispatch({ type: DECREMENT }),
    ...props
  };
  return <Counter {..._props} />;
};
当然といえば当然ですが、テストコードは react-redux の connect() を使用した場合の実装と同じになります。
テストコード(クリックして開く)
const sel = (id: string) => `[data-test="${id}"]`;
describe("<Counter /> コンポーネント", () => {
  describe("Shallowレンダリング", () => {
    const props = {
      count: 0,
      increment: sinon.spy(),
      decrement: sinon.spy()
    };
    const shallowComponent = shallow(<Counter {...props} />);
    it("ボタンをクリックしてカウントアップする", () => {
      expect(shallowComponent.find("h3").text()).toEqual("count: 0");
      shallowComponent.find(sel("count-up")).simulate("click");
      expect(props.increment).toHaveProperty("callCount", 1);
    });
  });
  describe("Fullレンダリング", () => {
    const getWrapper = (mockStore = createStore(reducer, { count: 0 })) =>
      mount(
        <Provider store={mockStore}>
          <ConnectedCounter />
        </Provider>
      );
    it("ボタンをクリックしてカウントアップする", () => {
      const wrapper = getWrapper();
      expect(wrapper.find("h3").text()).toEqual("count: 0");
      wrapper.find(sel("count-up")).simulate("click");
      expect(wrapper.find("h3").text()).toEqual("count: 1");
    });
  });
});
さいごに
結局のところ、どのアプローチを採用した場合も実際の Redux store を使用した React コンポーネントのテストは高速です。Redux の設計は、Action、Reducer、State のそれぞれが互いに分離される方法のため、テストに非常に適しています。
このように Dependency Injection しやすい設計のもと Redux が作られているので、このようなシンプルな構造を取ることができました。今回はご紹介できませんでしたが、Redux Saga や Redux Thunk を使用した場合のアーキテクチャでも同様にテストはシンプルに記述できます。React をとりまくエコシステムは素晴らしいですね。