はじめに
FirebaseとSwiftUIを使ってチャットアプリを作ります。
サンプルコードはこちらにアップしてあります。
仕様
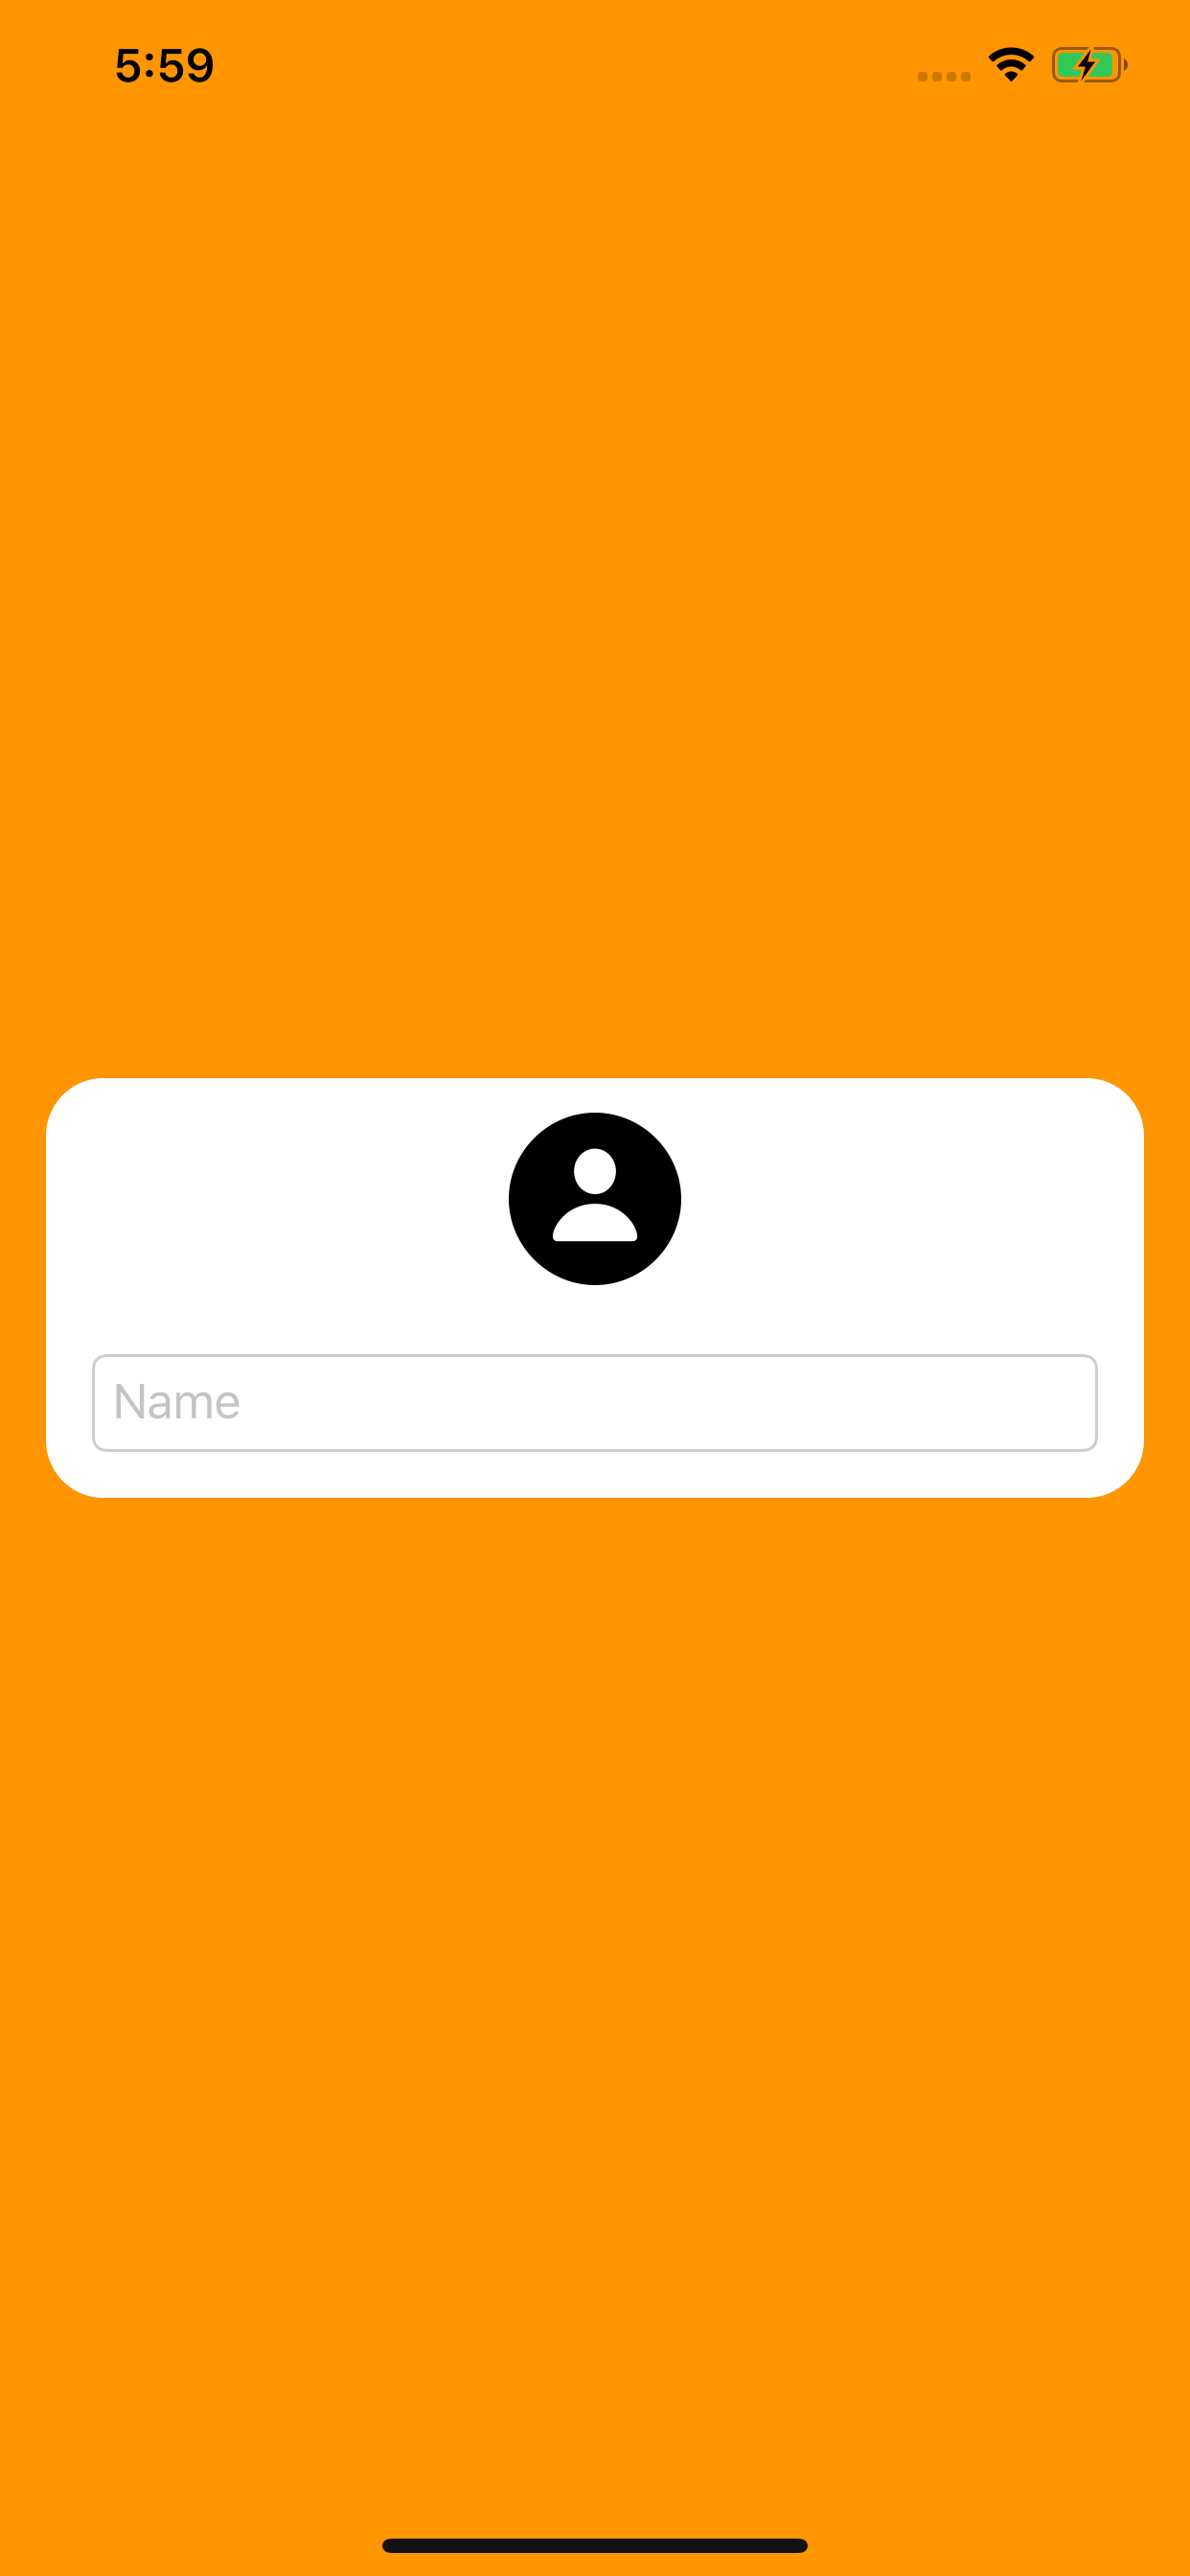
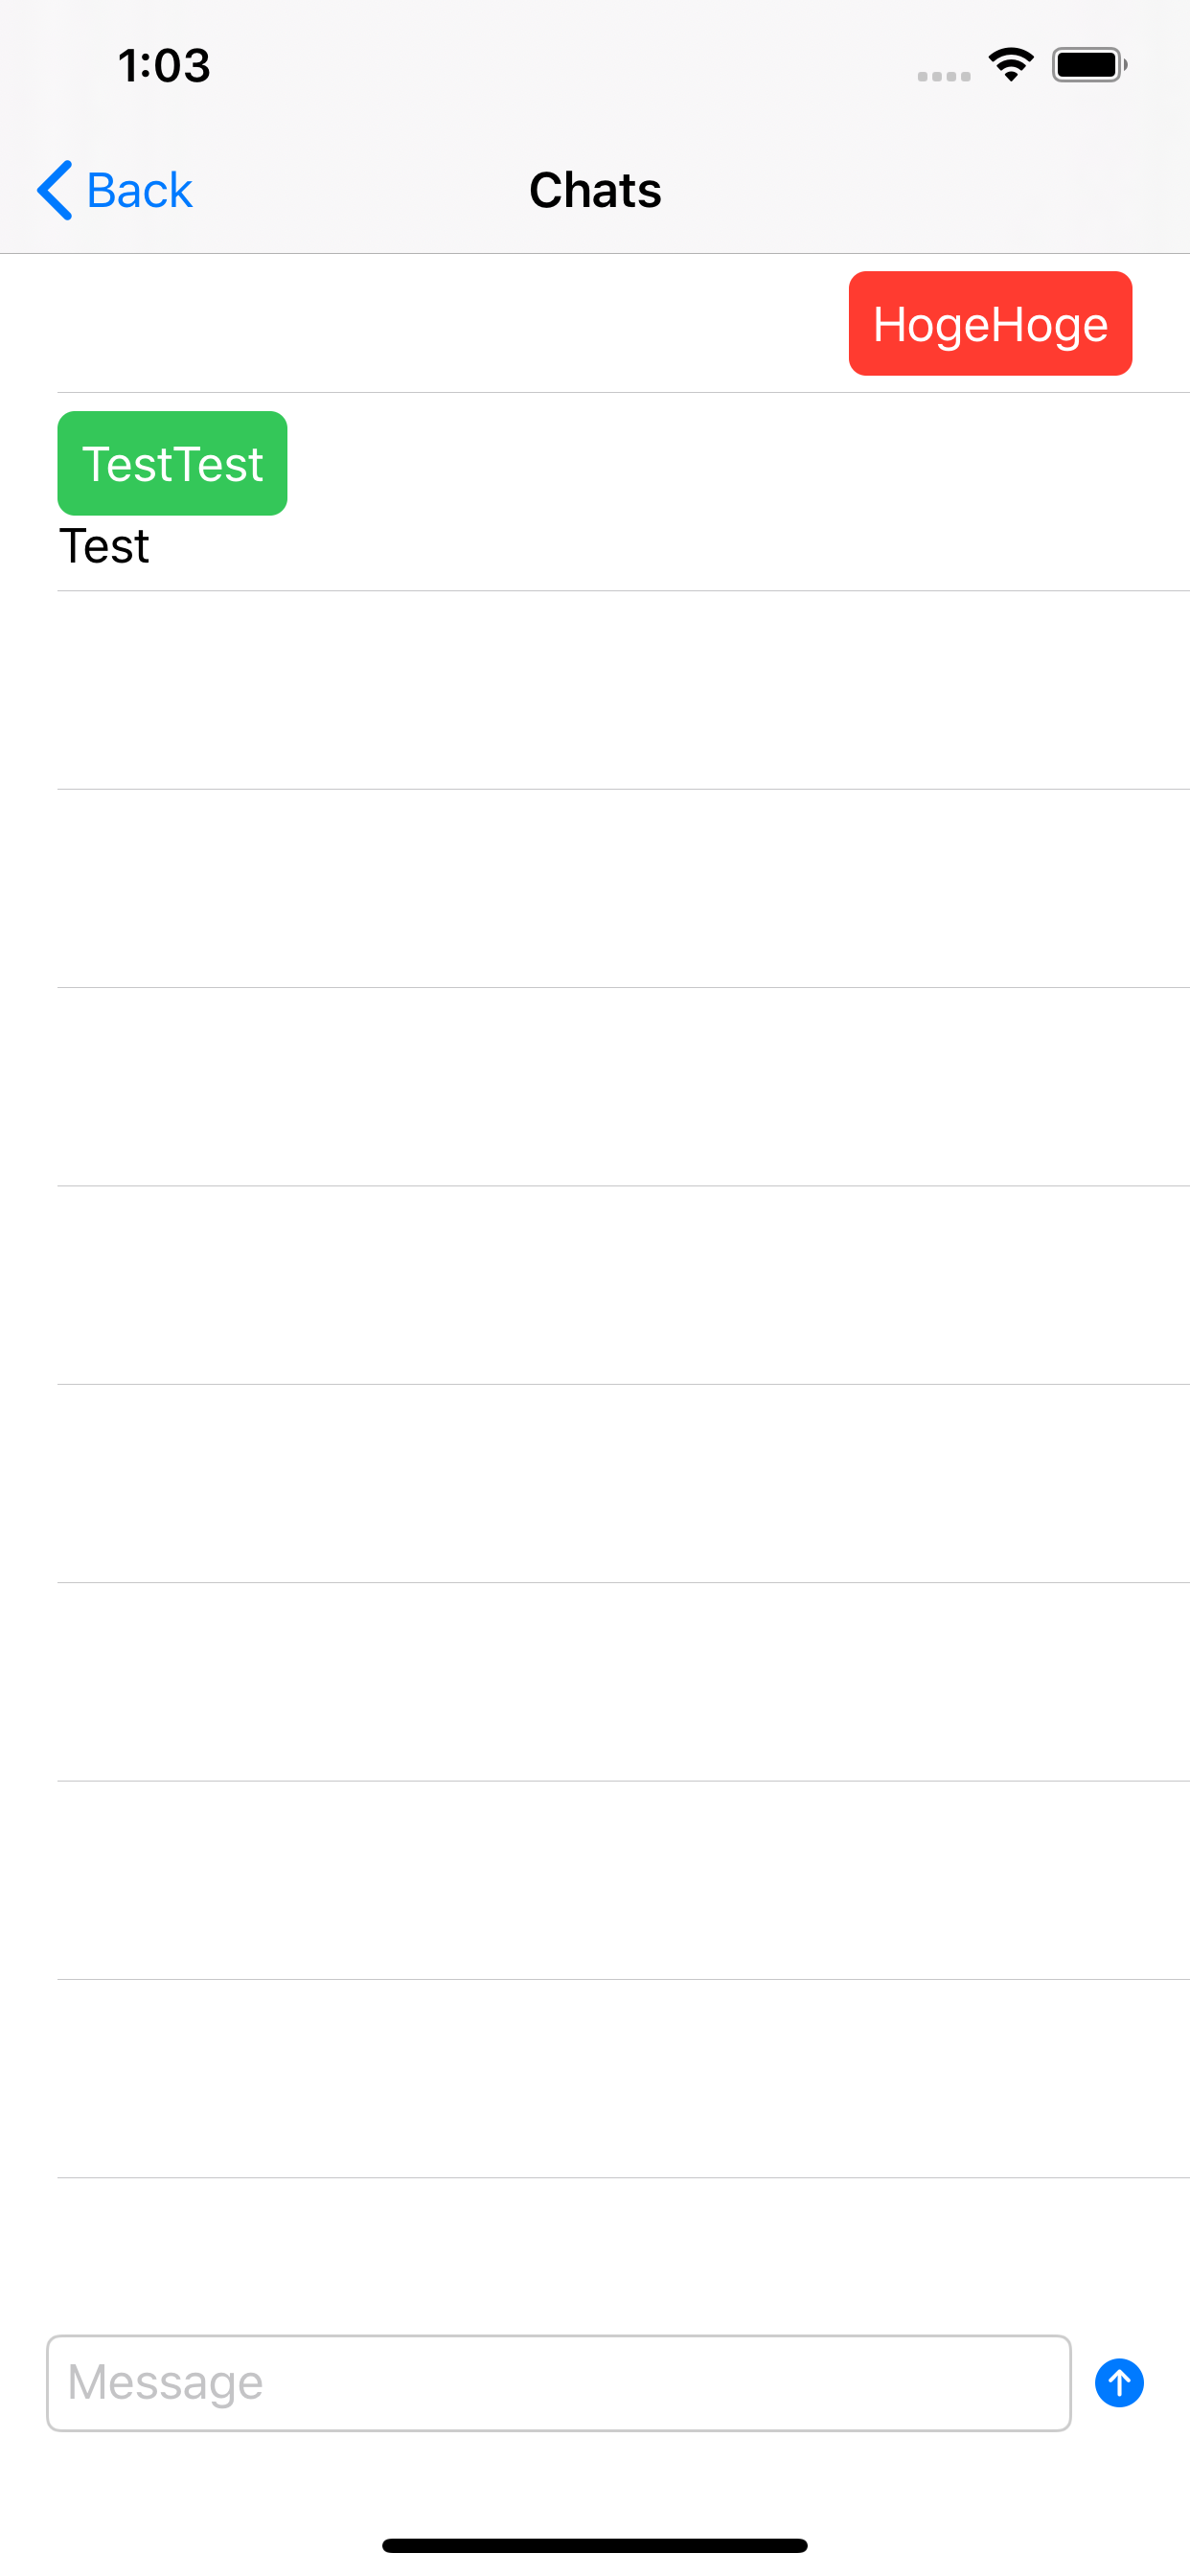
チャットアプリは最初にユーザー名を入力しチャット画面に入ると自分とそれ以外のユーザーで区別されたメッセージ一覧が表示されます。
今回は、ユーザー認証などありません。単純にCloud Firestoreを読み書きしてチャットします。
 →
→ →
→
Cloud Firestoreのポイント
まずは用語から。
-
コレクション
フォルダーに似ています。
collection()で指定します。 -
ドキュメント
ファイルに似ています。ドキュメントIDはファイル名に似ています。
ドキュメントIDはdocument()で指定します。
キーと値の組み合わせ(Key-Value形式)で保存できます。
追加
追加するときにドキュメントIDを指定するのか?Cloud Firestoreにおまかせするのかを選択できます。
-
setData():引数でドキュメントIDを指定します。 -
addDocument():自動的にドキュメントIDを付与します。
読み取り
データを読み取り方法はいくつかあります。
-
getDocument():データを1回のみ取得します。 -
addSnapshotListener { }:リアルタイムで更新されたことを取得できます。
リアルタイムアップデートを解除するには、addSnapshotListener { }の戻り値に対して.remove()を実行するとリスナーのデタッチ(リアルタイムアップデートの解除)ができます。
Codable対応
Cloud FirestoreはCodable対応しています。
Codable構造体を作成し、ドキュメントの取得やドキュメントの追加時に利用できます。
以下、使用例です。
struct Book: Codable {
  @DocumentID var id: String?
  var title: String
  var numberOfPages: Int
  var author: String
}
private func fetchBook(documentId: String) {
  let docRef = db.collection("books").document(documentId)

  docRef.getDocument(as: Book.self) { result in
    switch result {
    case .success(let book):
      // A Book value was successfully initialized from the DocumentSnapshot.
      self.book = book
      self.errorMessage = nil
    case .failure(let error):
      // A Book value could not be initialized from the DocumentSnapshot.
      self.errorMessage = "Error decoding document: \(error.localizedDescription)"
    }
  }
}
private func listenBook(documentId: String) {
    let docRef = db.collection("books").document(documentId)

    let listener = docRef.collection("books").document(documentId)
        .addSnapshotListener { documentSnapshot, error in
            guard let document = documentSnapshot else {
                print("Error fetching document: \(error!)")
                return
            }
            guard let book = document.data(as: Book.self) else {
                print("Document data was empty.")
                return
            }
            print("Current book: \(book)")
        }
}
func updateBook(book: Book) {
  if let id = book.id {
    let docRef = db.collection("books").document(id)
    do {
      try docRef.setData(from: book)
    }
    catch {
      print(error)
    }
  }
}
参考
- Cloud Firestore にデータを追加する
- データを1回取得する
- リアルタイム アップデートをリッスンする
- Swift Codable で Cloud Firestore のデータをマッピングする
作り方
Step1.準備
予めFirebaseのプロジェクトの作成、Cloud Firestoreの作成、iOSアプリのプロジェクト登録をしてください。
Cloud Firestoreを作成するときに、「テストモードで開始する」すると1週間の期間限定で認証なしでデータベースの更新ができるようになります。初めはテストモードで開始すると良いと思います。(参考:Cloud Firestore データベースを作成する)
iOSアプリのプロジェクト登録するとGoogleService-Info.plistをダウンロードできると思います。
GoogleService-Info.plistは指示通りXcodeのプロジェクトにドラッグ&ドロップして登録してください。
Step2. ライブラリー導入
Swift Package Managerを使って導入できます。
Swift Package ManagerでFirebaseライブラリを導入
-
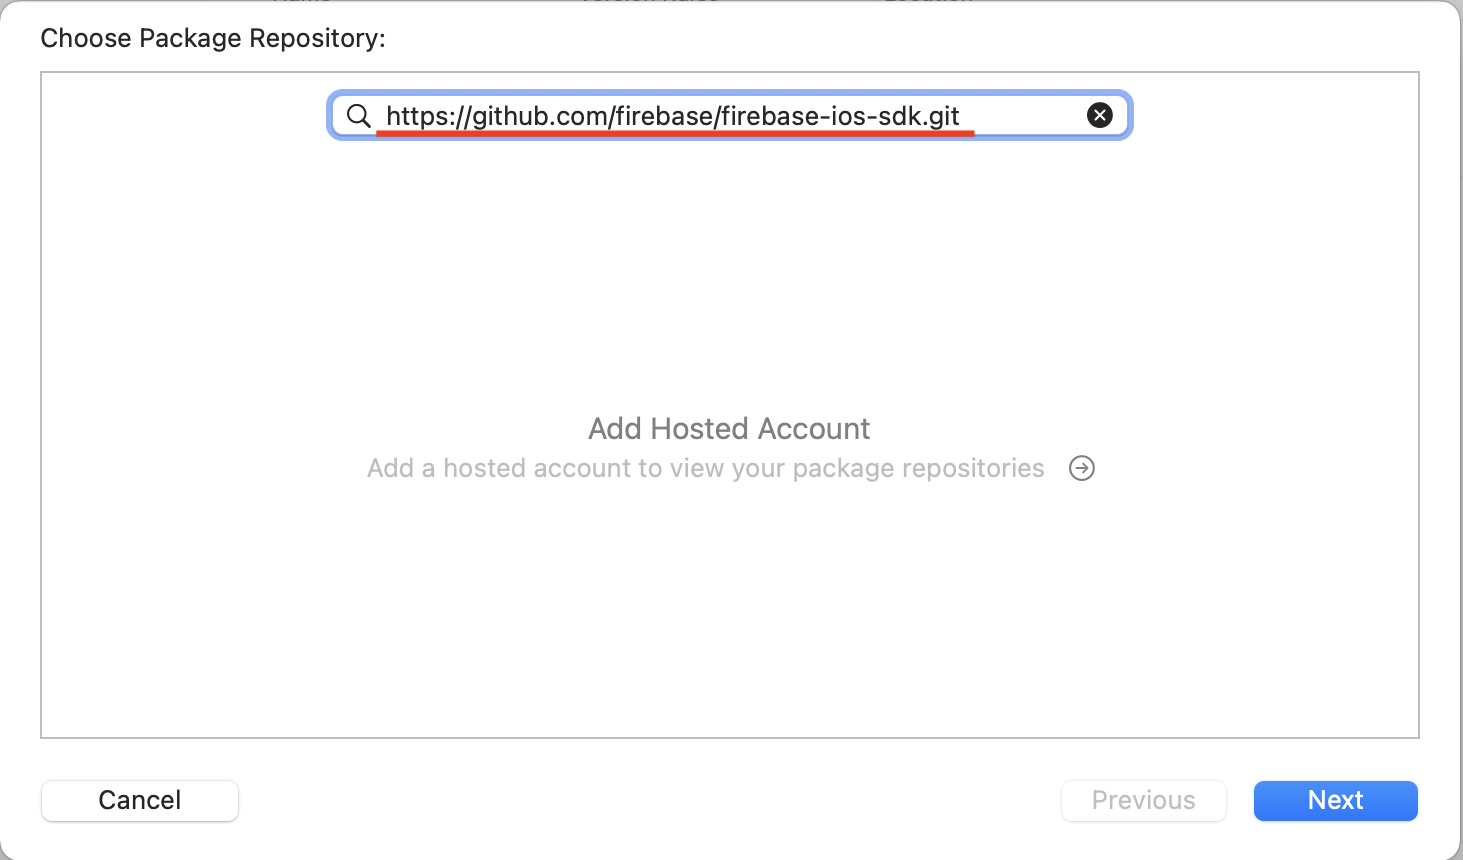
File>Swift Packages>Add Package Dependency...を選択します。
Choose Package Repositoryというウィンドウがポップアップしますので、https://github.com/firebase/firebase-ios-sdk.gitと入力しNextを選択します。
-
Choose Package Optionsウィンドウが表示されれます、そのままNextを選択します。
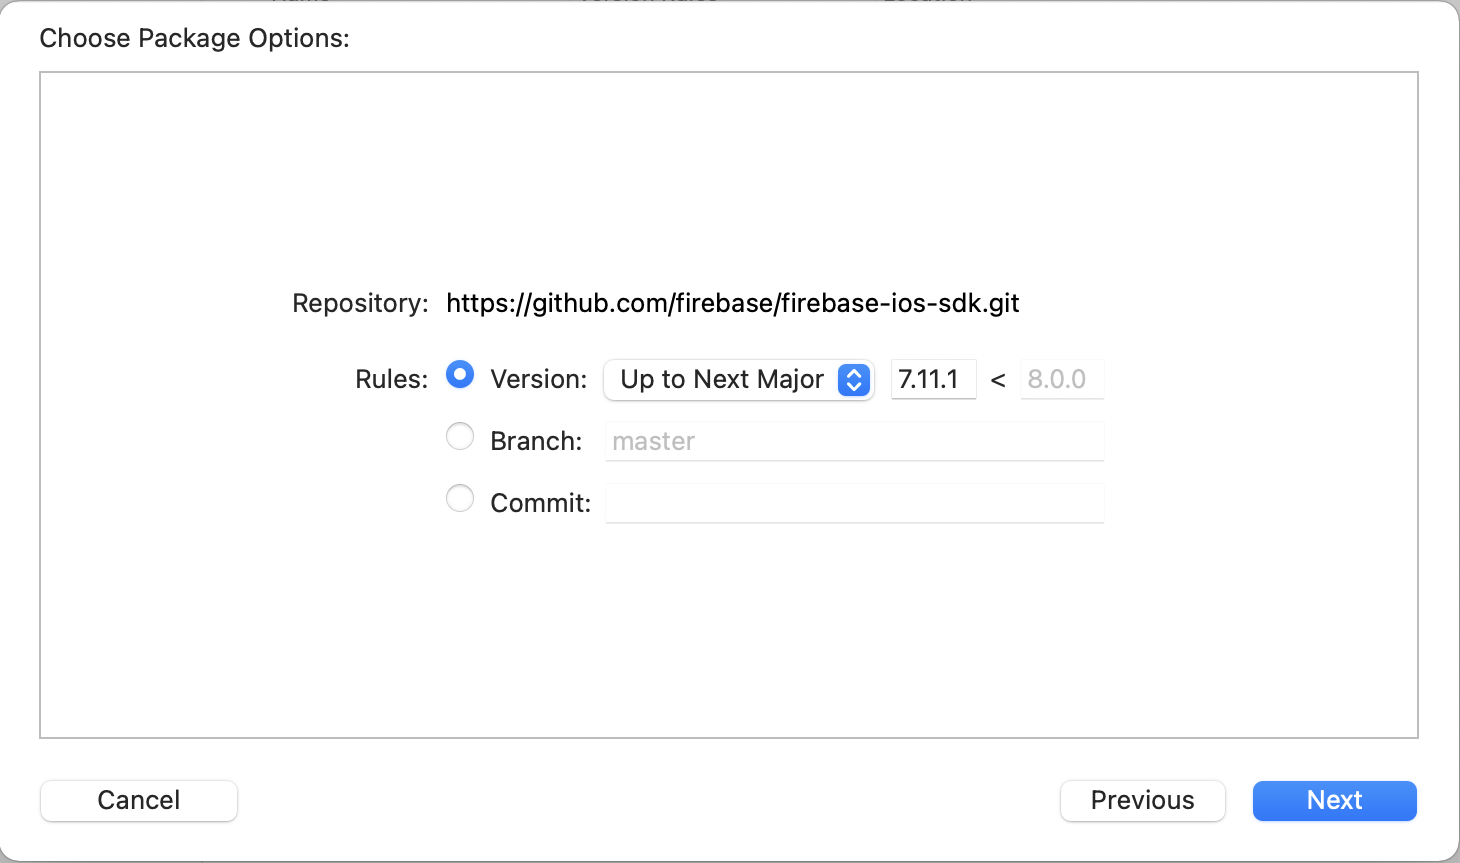
-
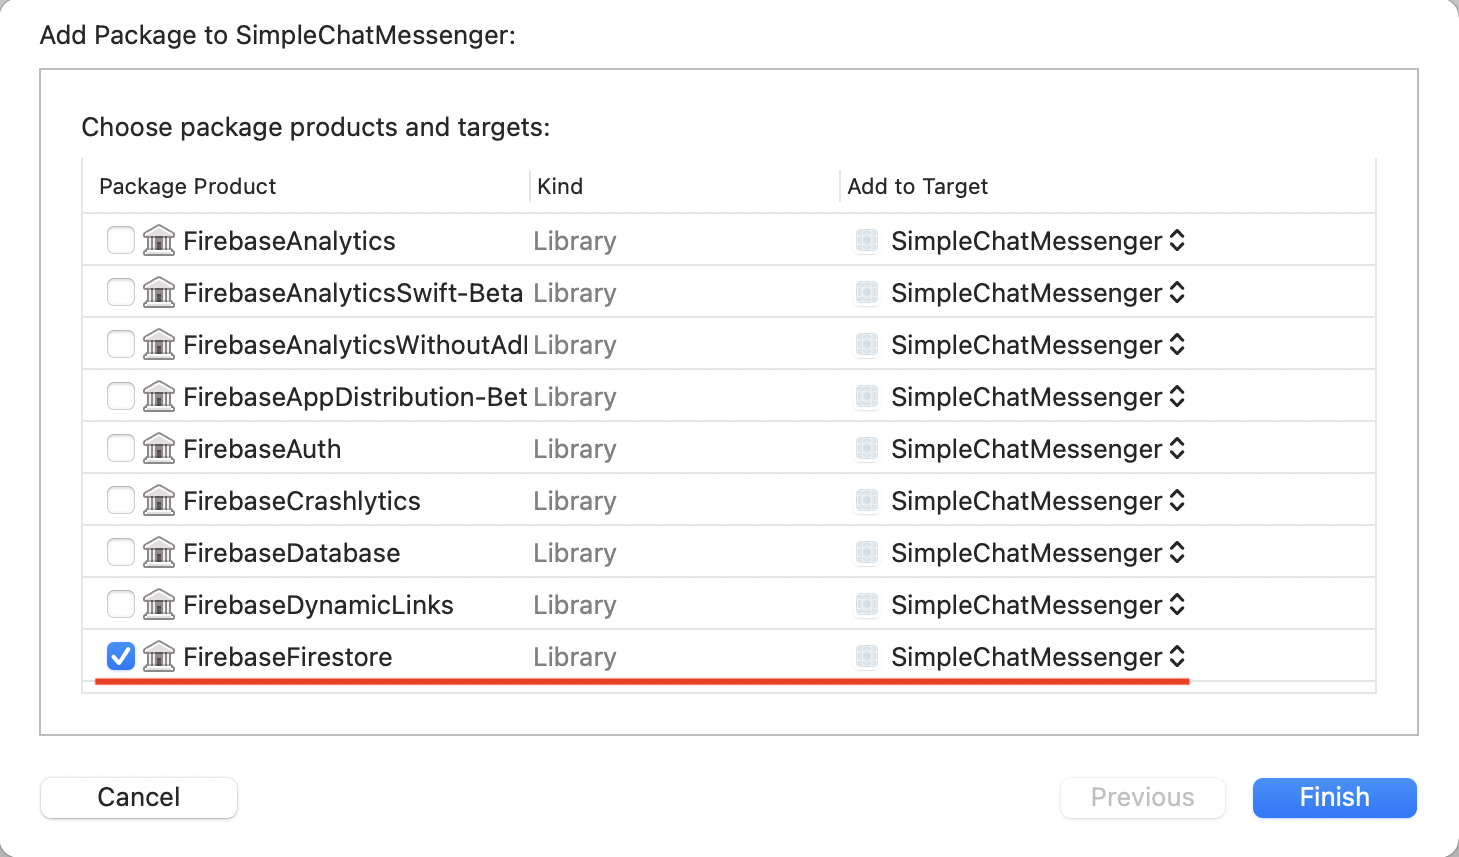
Add Package to SimpleChatMessagerとウィンドウが出てきますので、そこで
FirebaseFirestoreにチェックをしてFinishを選択します。
Step3.Firebaseの初期化追加
Xcode12の場合、Life CycleをSwiftUI Appを選択した場合もしくは、Xcode13はSwiftUIでプロジェクト作成した場合は下記のように初期化します。
SimpleChatApp.swiftに追記します。
import Firebase追記します。元々あるstruct SimpleChatApp: App内に@UIApplicationDelegateAdaptor(AppDelegate.self) var delegateを追加します。
その後class AppDelegate: NSObject, UIApplicationDelegate { ... }を追加しそこにFirebaseの初期化をします。
class AppDelegate: NSObject, UIApplicationDelegate {
    func application(_ application: UIApplication, didFinishLaunchingWithOptions launchOptions: [UIApplication.LaunchOptionsKey: Any]?) -> Bool {
        // Override point for customization after application launch.
        FirebaseApp.configure()

        return true
    }
}

@main
struct SimpleChatApp: App {
    @UIApplicationDelegateAdaptor(AppDelegate.self) var delegate

    var body: some Scene {
        WindowGroup {
            HomeView()
        }
    }
}
Step4.各種ファイルを用意する
NewFile...で下記のファイルを新規作成してプロジェクトに追加してください
| 種別 | ファイル名 | 概要 |
|---|---|---|
| SwiftUI View | MessageView | Chat画面 |
| SwiftUI View | MessageRow | Chatの吹き出しのUI |
| Swift File | MessageViewModel | FirebaseのCloud Firestoreの読み書きする |
Step5.Firebaseデータベースアクセス部分を作成
FirebaseのCloud Firestoreの読み書きするコードを記載します。
まずは、Cloud Firestoreに格納するデータ構造をCodable構造体を定義します。
import Foundation
import FirebaseFirestoreSwift

struct MessageElement: Codable {
    @DocumentID var id: String?
    var name: String
    var message: String
    var createAt: Date
}
@Observableを使うことによってプロパティー変数messagesに新しいメッセージが追加されたタイミングで自動でデータ更新が通知されるようになります。
import Foundation
import FirebaseFirestore

@Observable class MessageViewModel {
    private(set) var messages: [MessageElement] = []
    ///
    private var lister: ListenerRegistration?
    /// コレクションの名称
    private let collectionName = "messages"

    init() {
        let db = Firestore.firestore()

        lister = db.collection(collectionName).addSnapshotListener { (querySnapshot, error) in
            if let error {
                print(error.localizedDescription)
                return
            }
            if let querySnapshot {
                for documentChange in querySnapshot.documentChanges {
                    if documentChange.type == .added {
                        do {
                            // Codableを使って構造体に変換する
                            let message = try documentChange.document.data(as: MessageElement.self)
                            self.messages.append(message)
                        } catch {
                            print(error.localizedDescription)
                        }
                    }
                }
                // 日付順に並べ替えする
                self.messages.sort { before, after in
                    return before.createAt < after.createAt ? true : false
                }
            }
        }
    }

    deinit {
        lister?.remove()
    }

    func addMessage(message: String , name: String) {
        do {
            let message = MessageElement(name: name, message: message, createAt: Date())
            let db = Firestore.firestore()
            try db.collection(collectionName).addDocument(from: message) { error in
                if let error = error {
                    print(error.localizedDescription)
                    return
                }

                print("success")
            }
        } catch {
            print(error.localizedDescription)
        }
    }
}
Step6.Chatの吹き出し相当のUI作成
Chat画面に必要なメッセージアプリの吹き出しに相当する部分を作ります。
isMyMessageがtrueかfalseかによって、右寄りか左寄りにしているか決めています。
isMyMessageがfalseときは左寄りとなるのですが、その時はメッセージ本文とユーザー名を表示するようにしています。
import SwiftUI

struct MessageRow: View {
    let message: String
    let isMyMessage: Bool
    let user: String
    let date: Date

    var body: some View {
        HStack {
            if isMyMessage {
                Spacer()

                VStack {
                    Text(message)
                        .padding(8)
                        .background(Color.red)
                        .cornerRadius(6)
                        .foregroundColor(Color.white)
                    Text(date.text)
                        .font(.callout)
                }
            } else {
                VStack(alignment: .leading) {
                    Text(message)
                        .padding(8)
                        .background(Color.green)
                        .cornerRadius(6)
                        .foregroundColor(Color.white)

                    HStack {
                        Text(user)

                        Text(date.text)
                            .font(.callout)
                    }
                }

                Spacer()
            }
        }
    }
}
Point 左寄り、右寄りにするポイント
HStackとSpacer()をうまく活用して左寄り、右寄りしています。
Spacer()先にすると左側に空白が挿入されるので右寄りに表示されるようになります。
VStack(alignment: .leading) {
    Text(message)
        .padding(8)
        .background(Color.green)
        .cornerRadius(6)
        .foregroundStyle(Color.white)

    HStack {
        Text(user)

        Text(date.text)
            .font(.callout)
    }
}

Spacer()
また、VStack()は.leading指定すると左端寄せてくれます。

Step7.Chat画面の作成
次にチャット画面を作ります。
今まで作成したFirebaseデータベースアクセス部分の情報をリスト表示させてChatの吹き出しUIを表示しています。
import SwiftUI

struct MessageView: View {
    let name: String

    private var messageVM = MessageViewModel()
    @State private var typeMessage = ""

    init(name: String) {
        self.name = name
    }

    var body: some View {
        VStack {
            List(messageVM.messages, id: \.id) {message in
                if message.name == name {
                    MessageRow(message: message.message, isMyMessage: true, user:message.name, date: message.createAt)
                } else {
                    MessageRow(message: message.message, isMyMessage: false, user:message.name, date: message.createAt)
                }
            }
            .navigationBarTitle("Chats", displayMode: .inline)
            HStack {
                TextField("Message", text: $typeMessage)
                .textFieldStyle(RoundedBorderTextFieldStyle())

                Button {
                    messageVM.addMessage(message: typeMessage, name: name)
                    typeMessage = ""
                } label: {
                    Image(systemName: "arrow.up.circle.fill")
                }
            }
            .padding()
        }
    }
}
Pointナビゲーションバーのデザイン
.navigationBarTitle("Chats",displayMode: .inline)とすると下記のようなデザインとなります。.inline以外にも、.automaticと.largeがあります。

Step8.ユーザー名入力画面作成
最後に、ユーザー名入力画面を作ります。
import SwiftUI

struct ContentView: View {

    @State var name = ""

    var body: some View {
        NavigationView {
            ZStack {
                Color.orange

                VStack {
                    Image(systemName: "person.circle.fill")
                    .resizable()
                    .frame(width: 60, height: 60)
                        .padding(.top, 12)

                    TextField("Name ", text: $name)
                    .textFieldStyle(RoundedBorderTextFieldStyle())
                    .padding()

                    if name != "" {
                        NavigationLink(destination: MessageView(name: name)) {
                            HStack {
                                Text("Join")
                                Image(systemName: "arrow.right.circle.fill")
                                .resizable()
                                .frame(width: 20, height: 20)
                            }

                        }
                        .frame(width: 100, height: 54)
                        .background(Color.orange)
                        .foregroundColor(Color.white)
                        .clipShape(RoundedRectangle(cornerRadius: 27))
                        .padding(.bottom, 15)
                    }
                }
                .background(Color.white)
                .clipShape(RoundedRectangle(cornerRadius: 20))
                .padding()
            }
            .edgesIgnoringSafeArea(.all)
        }
        .animation(.default, value: name != "")
    }
}
Point ユーザー名が未入力時は次の画面に遷移できないようにする
nameが空欄の場合は、if文を使ってJoinボタン非表示にしています。
また、.animation(.default)と指定する非表示→表示変わるときに自動でアニメーションしてくれます。
if name != "" {
    NavigationLink(destination: MessageView(name: name)) {
        HStack {
            Text("Join")
            Image(systemName: "arrow.right.circle.fill")
            .resizable()
            .frame(width: 20, height: 20)
        }

    }
    .frame(width: 100, height: 54)
    .background(Color.orange)
    .foregroundStyle(Color.white)
    .clipShape(RoundedRectangle(cornerRadius: 27))
    .padding(.bottom, 15)
}
参考
- Simple Chat Messenger In SwiftUI - Chat App Using Firebase in SwiftUI - Chat App In SwiftUI - Part 1
- Simple Chat Messenger In SwiftUI - Chat App Using Firebase in SwiftUI - Chat App In SwiftUI - Part 2
- Simple Chat Messenger In SwiftUI - Chat App Using Firebase in SwiftUI - Chat App In SwiftUI - Part 3
- Swift Package Manager for Firebase Beta
- CloudFirestoreのServerTimestampがより使いやすくなりました。
- CloudFirestoreのServerTimestampBehaviorの扱い方
Appendix
CocoapodsでFirebaseのライブラリを導入
Swift Package Managerが普及しましたが、CocoaPods使った導入方法もAppendixで残しておきます。
**pod 'Firebase/Firestore'**を記述して導入します。
# Uncomment the next line to define a global platform for your project
# platform :ios, '9.0'

target 'SimpleChatMessenger' do
  # Comment the next line if you don't want to use dynamic frameworks
  use_frameworks!

  # Pods for SimpleChatMessenger
  pod 'Firebase/Firestore'
end
Life CycleをUIKit App Delegateで作成した場合
Xcode12では、SwiftUIでプロジェクト作成する時にLife CycleとしてUIKit App Delegateを選択できます。
UIKit App Delegateを選択した場合は、下記のようになります。
AppDelegate.swiftに追記します。
import Firebaseを追加して、 application(_ application: UIApplication, didFinishLaunchingWithOptions launchOptions: [UIApplication.LaunchOptionsKey: Any]?)の中にFirebaseApp.configure()を実行すると初期化されます。
    func application(_ application: UIApplication, didFinishLaunchingWithOptions launchOptions: [UIApplication.LaunchOptionsKey: Any]?) -> Bool {
        // Override point for customization after application launch.
        // Firebaseの初期化
        FirebaseApp.configure()
        return true
    }