はじめに
みなさんはNetflixをご存知ですか?
映画アプリではよく、縦スクロールすると様々な分類の映画が、横スクロールすると、ある分類に属した映画一覧を見ることができます!
今回はそのような画像の種類ごとの縦&横スクロールの実装を、tableViewの中にcollectionViewをいれて、それぞれのカスタムセルを使って作っていきたいと思います!
※今回は、仕組みを解説しているため変数の個数を指定しています。任意の個数を表示(ユーザーが登録したものを表示など)のバージョンは一番下に公開しているGitHubをご覧ください。
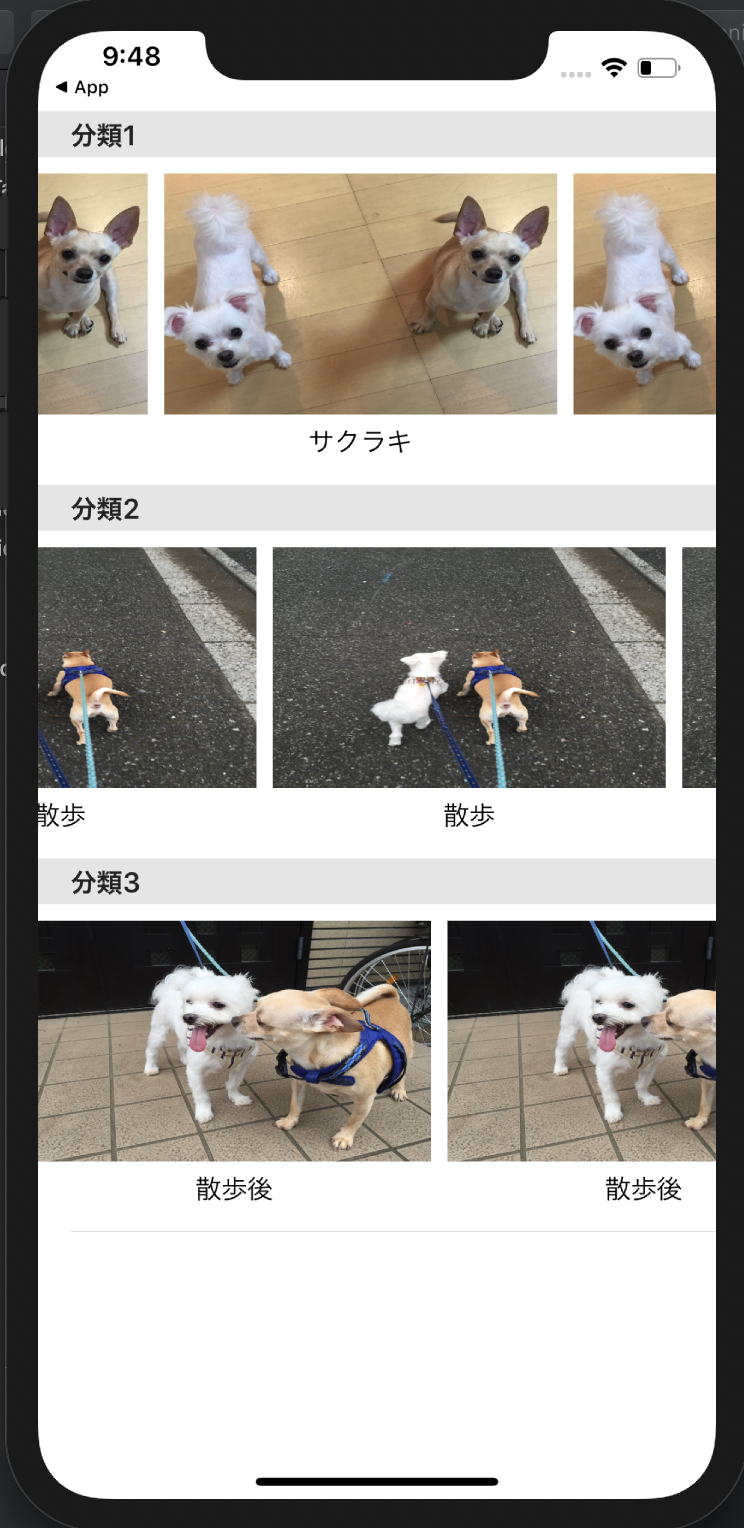
完成予想図
完成イメージはこんな感じで、縦スクロールで分類分け、横スクロールで同じ分野内のものが表示されるようになっています!
※今回は、横スクロールしても同じ画像が表示されるようにしています。
storyboard編
Main.storyboardでViewControllerにtableViewとtableViewCellのパーツをおきましょう。
tableViewCell名も忘れずに登録しておきましょう!
(今回はtableViewCell名をShopTableViewCell2としました!)
tableViewカスタムセル編
次に、ViewControllerに置いたtableViewのカスタムセルファイルを作成します。
ファイル作成の際にSubclassの登録(▶︎UITableViewCellを選択)をミスらないように注意です!
(今回はShopTableViewCellというxibファイルを作成しました!)
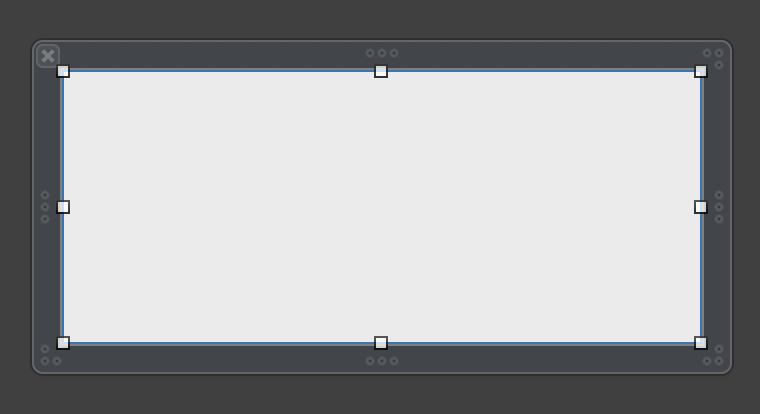
作成したら、collectionViewのパーツを、tableViewのカスタムセル内におきましょう!
こんな感じです!👇
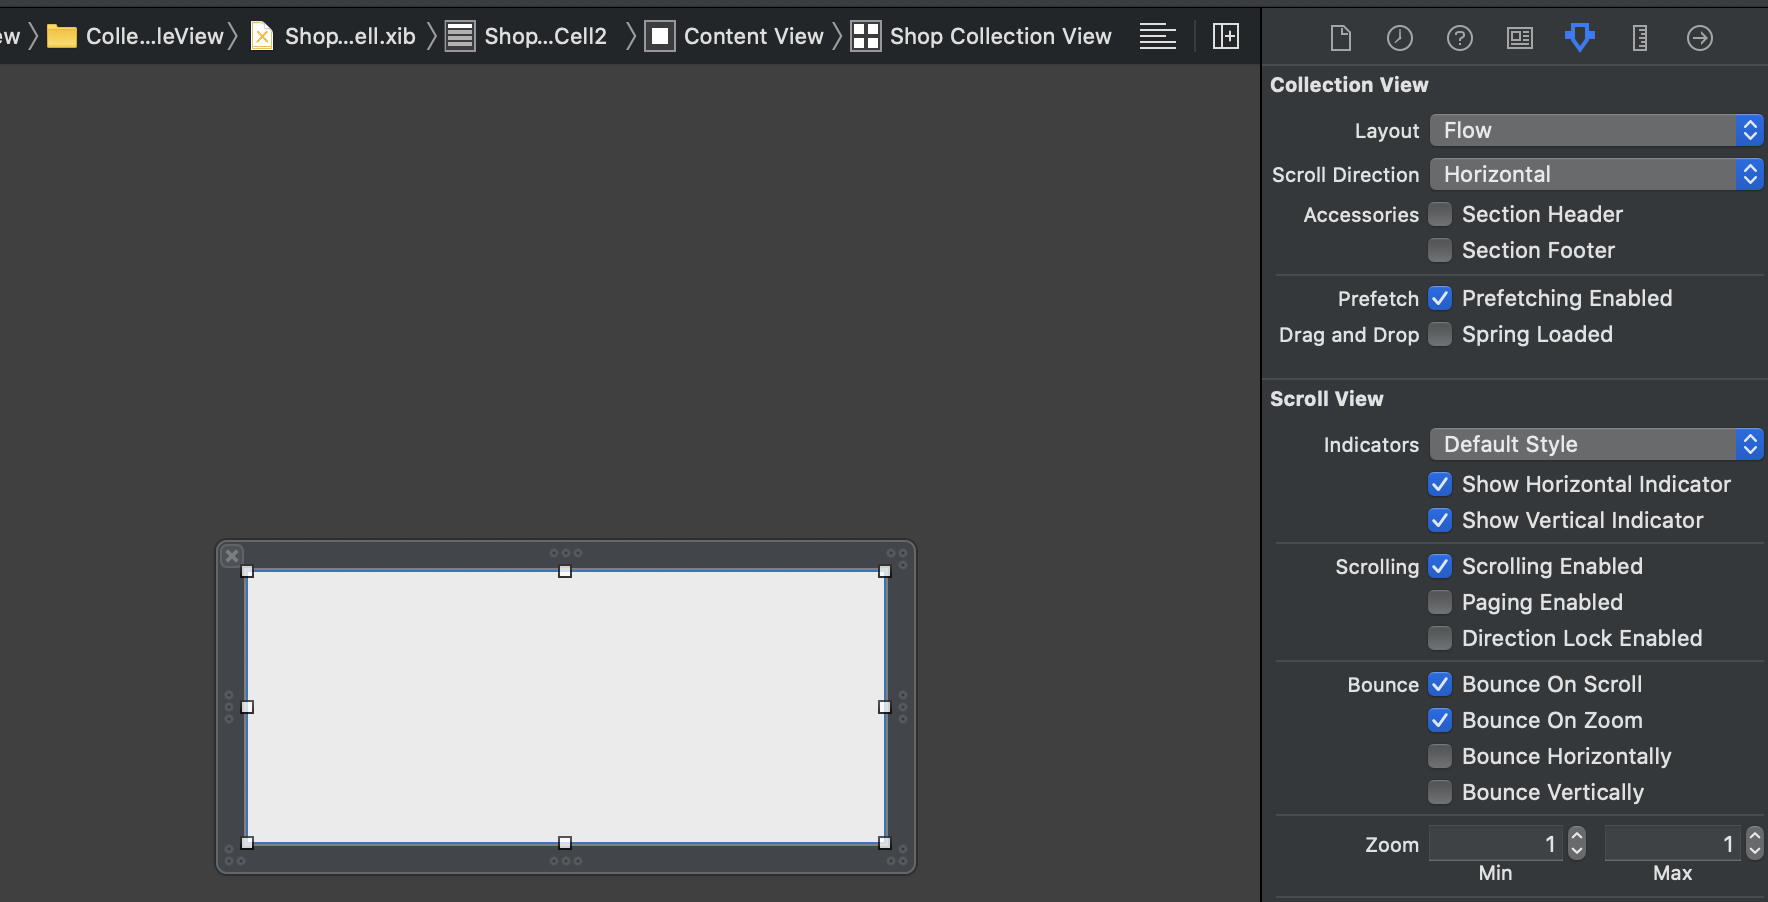
上の画像のように、collectionViewを選択している状態で、右側の設定の部分で、Scroll DirectionをHorizontal(横スクロール)にしましょう!(以下の画像の上から二番目のプルダウンです)
ここでもtableViewCell名を忘れずに登録しておきましょう!
collectionViewカスタムセル編
先ほど同様にファイルを作成しましょう!
Subclassの登録(▶︎UICollectionViewCellを選択)も注意です!
(今回はShopCollectionViewCellというxibファイルを作成しました!)
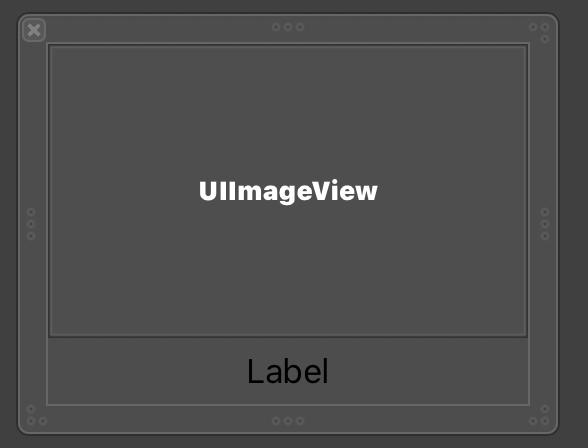
UIImageViewとLabelを配置しました!この辺りは好きなように作ってください!
もしcollectionViewのカスタムセルあたりから作るのに慣れていない方はこちらご覧下さい!
▶︎▶︎▶︎ https://qiita.com/GeekSalon/private/db2b2351fd8c6314553c
ViewController編
class ViewController: UIViewController {

    var dogs = [["name" : "サクラキ",
                 "imageName" : "sl3.jpg"],
                ["name" : "サクラキ",
                 "imageName" : "sl3.jpg"],
                ["name" : "サクラキ",
                 "imageName" : "sl3.jpg"]]
    var dogs2 = [["name" : "散歩",
                  "imageName" : "sl4.jpg"],
                 ["name" : "散歩",
                  "imageName" : "sl4.jpg"],
                 ["name" : "散歩",
                  "imageName" : "sl4.jpg"]]
    var dogs3 = [["name" : "散歩後",
                  "imageName" : "sl5.jpg"],
                 ["name" : "散歩後",
                  "imageName" : "sl5.jpg"],
                 ["name" : "散歩後",
                  "imageName" : "sl5.jpg"]]

    @IBOutlet weak var homeTableView: UITableView!

    override func viewDidLoad() {
        super.viewDidLoad()
        //ファイル内処理
        homeTableView.dataSource = self
        homeTableView.delegate = self

        //カスタムセル登録
        let nib = UINib(nibName: "ShopTableViewCell", bundle: nil)
        homeTableView.register(nib, forCellReuseIdentifier: "ShopTableViewCell2")

        //tableViewの使わないセルの区切り線を消す
        homeTableView.tableFooterView = UIView()

        //tableViewの高さ指定
        homeTableView.rowHeight = 200
    }
}

//extensionでcollectionViewについて
extension ViewController:  UICollectionViewDataSource, UICollectionViewDelegate, UICollectionViewDelegateFlowLayout{

    func collectionView(_ collectionView: UICollectionView, numberOfItemsInSection section: Int) -> Int {
        return 3
    }

    func collectionView(_ collectionView: UICollectionView, layout collectionViewLayout: UICollectionViewLayout, sizeForItemAt indexPath: IndexPath) -> CGSize {
        return CGSize(width: 240, height: 180)
    }

    func collectionView(_ collectionView: UICollectionView, cellForItemAt indexPath: IndexPath) -> UICollectionViewCell{

        let cell = collectionView.dequeueReusableCell(withReuseIdentifier: "ShopCollectionViewCell2", for: indexPath) as! ShopCollectionViewCell

        switch (collectionView.tag) {
        case 0:
            cell.imageView.image = UIImage(named: dogs[indexPath.row]["imageName"]!)
            cell.textLabel.text = dogs[indexPath.row]["name"]

        case 1:
            cell.imageView.image = UIImage(named: dogs2[indexPath.row]["imageName"]!)
            cell.textLabel.text = dogs2[indexPath.row]["name"]

        case 2:
            cell.imageView.image = UIImage(named: dogs3[indexPath.row]["imageName"]!)
            cell.textLabel.text = dogs3[indexPath.row]["name"]

        default:
            print("section error")
        }
        return cell
    }
}


//extensionでtableViewについて
extension ViewController:   UITableViewDataSource, UITableViewDelegate {

    //セクション数
    func numberOfSections(in tableView: UITableView) -> Int {
        return 3
    }

    //セクション内のセル数
    func tableView(_ tableView: UITableView, numberOfRowsInSection section: Int) -> Int {
        return 1
    }

    func tableView(_ tableView: UITableView, willDisplay cell: UITableViewCell, forRowAt indexPath: IndexPath) {
        guard let cell = cell as? ShopTableViewCell else { return }

        //ShopTableViewCell.swiftで設定したメソッドを呼び出す(indexPath.section)
        cell.setCollectionViewDataSourceDelegate(dataSourceDelegate: self, forRow: indexPath.section)
    }

    //セルの内容
    func tableView(_ tableView: UITableView, cellForRowAt indexPath: IndexPath) -> UITableViewCell{
        let cell = tableView.dequeueReusableCell(withIdentifier: "ShopTableViewCell2", for: indexPath) as! ShopTableViewCell

        //ShopTableViewCell.swiftで設定したメソッドを呼び出す(indexPath.row)
        cell.setCollectionViewDataSourceDelegate(dataSourceDelegate: self, forRow: indexPath.row)
        cell.shopCollectionView.reloadData()
        return cell
    }

    //セルが選択された時の対処
    func tableView(_ tableView: UITableView, didSelectRowAt indexPath: IndexPath) {
        tableView.deselectRow(at: indexPath, animated: true)
    }

    func tableView(_ tableView: UITableView, titleForHeaderInSection section: Int) -> String? {
        return "分類\(section + 1)"
    }

}
関連付けもお忘れなく!
tableViewカスタムセルのコード編
class ShopTableViewCell: UITableViewCell {

    @IBOutlet weak var shopCollectionView: UICollectionView!

    override func awakeFromNib() {
        super.awakeFromNib()
        // カスタムセルの登録
        let nib = UINib(nibName: "ShopCollectionViewCell", bundle: nil)
        shopCollectionView.register(nib, forCellWithReuseIdentifier: "ShopCollectionViewCell2")
    }

    override func setSelected(_ selected: Bool, animated: Bool) {
        super.setSelected(selected, animated: animated)
    }

    func setCollectionViewDataSourceDelegate
        <D: UICollectionViewDataSource & UICollectionViewDelegate>
        (dataSourceDelegate: D, forRow row: Int) {

        shopCollectionView.delegate = dataSourceDelegate
        shopCollectionView.dataSource = dataSourceDelegate
        shopCollectionView.tag = row
        shopCollectionView.reloadData()
    }
}
関連付けもお忘れなく!
collectionViewカスタムセルのコード編
class ShopCollectionViewCell: UICollectionViewCell {

    @IBOutlet weak var imageView: UIImageView!
    @IBOutlet weak var textLabel: UILabel!

    override func awakeFromNib() {
        super.awakeFromNib()
    }
}
この部分では、パーツを宣言するだけです!関連付けもしましょう!
以上のコーディングや関連付け、storyboard上でのセル名登録などが全て済んだら、完成予想図のようにきちんと表示されるはずです!
もし表示されない人やできたけど納得いかない部分がある人は次の項目を参照してください!
ありがちなミス
次は、このコードがないとどうなるかシリーズをちょこっと書きます!
気になる方いましたらみてください〜
func setCollectionViewDataSourceDelegate
        <D: UICollectionViewDataSource & UICollectionViewDelegate>
        (dataSourceDelegate: D, forRow row: Int) {

        shopCollectionView.delegate = dataSourceDelegate
        shopCollectionView.dataSource = dataSourceDelegate
        shopCollectionView.tag = row
        shopCollectionView.reloadData()
    }
この部分に関して、、
- もしCollectionViewのdelegateを書かないと、、?
- delegateは、CollectionView中のセルが選択または編集されたとき(ユーザーのアクションに応じて)呼び出されるメソッドが定義されたプロトコルです。今回はtabaleView内に配置した際に、tableViewのカスタムセルstoryboardでHorizontal設定をしましたが、それが読み込まれず縦に並んでしまいます。こんな感じです👇

- もしCollectionViewのdatasourceを書かないと、、?
- datasourceはセクションやアイテム数などの内容を提供するものです。そのためcollectionViewの関数が読み込まれなくなり、tableViewの関数のみ読み込まれている状態になります👇

- shopCollectionView.tag = rowを書かないと、、?
- 今回、collectionViewのcellForItemAt関数の中でswitch文を用いてcollectionView.tagごとに分類しました。上のコード(shopCollectionView.tag = row)を書かないと、collectionView.tagが全て0として扱われるので以下のように分類によらず同じ画像と名前が表示されてしまいます
こんな感じです👇
- 今回、collectionViewのcellForItemAt関数の中でswitch文を用いてcollectionView.tagごとに分類しました。上のコード(shopCollectionView.tag = row)を書かないと、collectionView.tagが全て0として扱われるので以下のように分類によらず同じ画像と名前が表示されてしまいます

最後に
最初このプロジェクトファイルを作った時は、八百屋などの野菜の陳列をイメージをしていたので、カスタムセル名をつける時にshop〇〇としていたのですが、気付いたら全く関係ない犬の写真で作ってしまいました😂
名前がわかりにくくて困惑してしまった方がいましたら申し訳ないです、、、!
==================
GitHubを公開しています!
・今回の記事と同じもの(決まった個数を表示)
https://github.com/EricaFujita/TableView_CollectionView
・今回の記事と類似しているもの(任意の個数を表示)
https://github.com/EricaFujita/TableViewCollectonViewSample
(↑昨年作った映画アプリMovie!のコードを一部公開したものになります)
→MovieMemorandumのMyList〇〇のコントローラー(複数)の部分です!
==================