この記事はPORT Advent Calendar16日目の記事です。
先日Google Homeをもらったので、何か画期的な事がしたかったのですが、なかなか思いつきません。大抵やり尽くされてるので・・・
なので今回は軽い内容でお茶を濁します。
概要
Github上で新しいPull Requestが上がったらGoogle Homeが喋って教えてくれる感じのやつ。
今回は簡易的にPull Requestだけを扱いますが、同様の方法でコメントやMergeの通知も可能です。
必要なもの
動かすためには最低限以下のものが必要です。適宜導入して下さい。
- 5.0以上のRails
- ngrok
- node.js
APIサーバーの作成
Githubのイベントを受け取って処理するためのサーバーを作成します。今回はRailsのAPIモードで作成しました。
rails new github_google_home --api
適当にルーティング切ります
Rails.application.routes.draw do
  post 'events' => 'events#receive'
end
とりあえず空でいいので、ルーティングに対応したコントローラーとアクションも作っときます。
class EventsController < ApplicationController
  def receive
  end
end
ひとまずローカルでサーバーを起動させます。
rails s
また、ローカルホストだとGithubのhookイベントを受け取る事ができないので、ngrokを使ってネットワーク上に公開します。今回は本番環境を準備するのが面倒だったのでngrokを使いました。
ngrok http 3000
すると、以下のようなログが出力されるので、httpsの方のURLをメモっときます。
Forwarding                    http://80270e0f.ngrok.io -> localhost:3000
Forwarding                    https://80270e0f.ngrok.io -> localhost:3000
Github側の準備
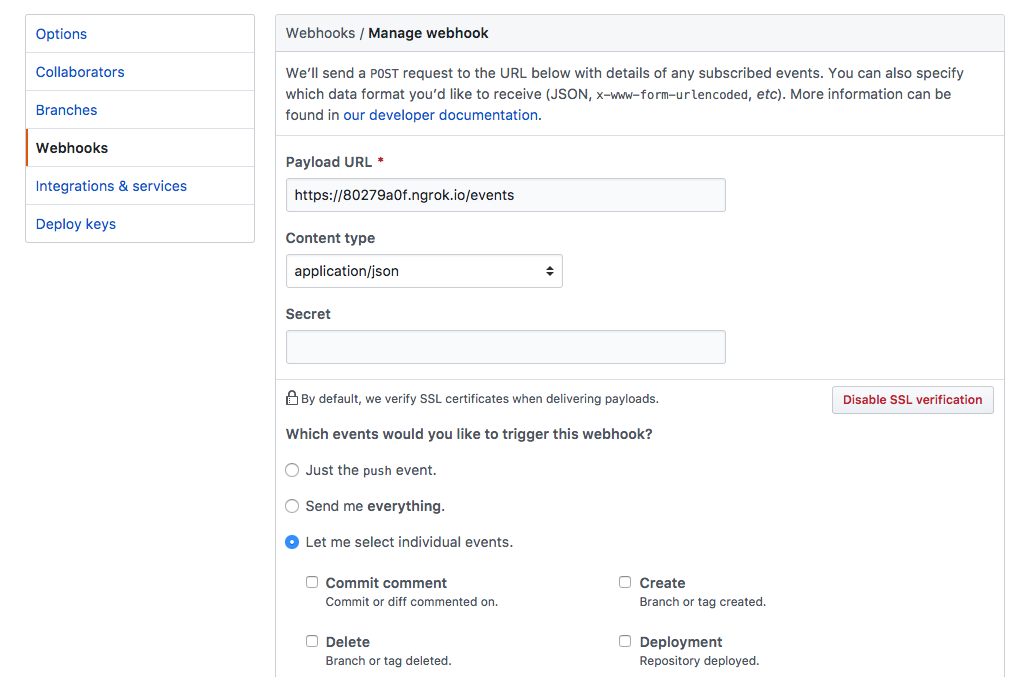
任意のリポジトリから、Settings -> Webhooksと遷移して、Add WebhookからWebhookを作成します。
Payload URLに先ほどメモったURLに/eventsを付与したURLを入力します。Content typeをapplication/jsonにします。最後に、Let me select individual eventsからPull requestを選択して登録完了します。
Google Homeに喋らせる設定
google-home-notifierを使います。以下のページを参考にさせてもらいました。
google-home-notifierをリポジトリからクローンし、初期化します。
git clone https://github.com/noelportugal/google-home-notifier.git

cd google-home-notifier

npm i
google-home-notifier/example.jsを編集します。
まず、Google HomeのIPアドレスを指定する必要があります。Google HomeのIPアドレスは、アプリの設定画面最下部からチェックする事ができます。
example.jsの9行目でipにIPアドレスを指定します。
var ip = 'ここにIPアドレス'; // default IP
日本語に対応させるための設定を行います。var language = 'pl'とある箇所を、var language = 'ja'に変更し、googlehome.ip(ip, language);の行の下にgooglehome.device(deviceName,language)を追加します。二か所ずつあります。
var language = 'ja'; // default language code
if (req.query.language) {
  language;
}

googlehome.ip(ip, language);
googlehome.device(deviceName,language)
上記の編集が終わったら、google-home-notifierを起動します。
node example.js
すると、以下のようなログな表示されるので、https://5e2de285.ngrok.io/google-home-notifierの部分をメモります。このURLがgoogle-home-notifierのエンドポイントになります。
Endpoints:
    http://192.168.0.3:8091/google-home-notifier
    https://5e2de285.ngrok.io/google-home-notifier
最後に、先ほど作成したRailsサーバーのアクションを編集します。5行目のURI.parseに渡してるURLに先ほどメモったgoogle-home-notifierのエンドポイントを指定します。
require 'net/http'
class EventsController < ApplicationController
  def receive
    if params['pull_request']['state'] == 'open'
      res = Net::HTTP.post_form(URI.parse('https://5e2de285.ngrok.io/google-home-notifier'), {'text' => '新しいプルリクエストが作成されました'})
    end
  end
end
動作検証・まとめ
後はプルリクを作れば、Google Homeが喋って知らせてくれます。
今回は本番環境を準備するのが面倒だったのでngrokを使いましたが、実際に運用させる場合はheroku等で簡易的な本番環境作れば良さそうです。
slackとかメールとかの通知だと見落とす事もあるので、意外と実用性あるかもしれません。あと職場で使えば和むかも(Google Homeである必要性ないですが・・・)。
最後になりますが、PORT株式会社では自社サービスを支えてくれる優秀なRubyエンジニアを募集しています(Rubyエンジニア以外も)。
もくもく会も行なっていますので、ぜひ一緒にもくもくしましょう!
PORTもくもく会
