
マイコンで距離を測るとき、まず思い浮かぶのは300円台で買える超音波センサーですよね。
手軽で便利なのですが、測れるのは最大4mほどで、もう少し距離がほしい場面では物足りなく感じていました。
そこで調べてみたところ、TSD20 というセンサーなら2500円程度と比較的安く、20m前後まで測れることが分かり、試してみることにしました。
ところが実際に使ってみると、データシートに”罠”がいくつもありましたので、そのあたりをまとめてみました。
TSD10,TSD80というセンサーもありますが、似たような罠があるようです。
罠1 データシートにウソが書いてある
Overviewがいきなり間違ってます。
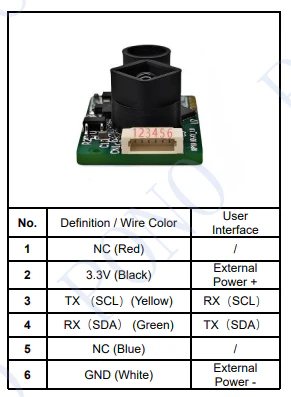
同梱ケーブルの話ではあるのですが、実際には
| No. | Def/Col |
|---|---|
| 1 | NC(White) |
| 2 | 3.3V(Red) |
| 3 | TX(Yellow) |
| 4 | RX(Green) |
| 5 | NC(Blue) |
| 6 | GND(Black) |
です
罠2 チェックサムがわかりにくい
data sheet
にあるコマンド表のチェックサムの扱いが分かりにくいです
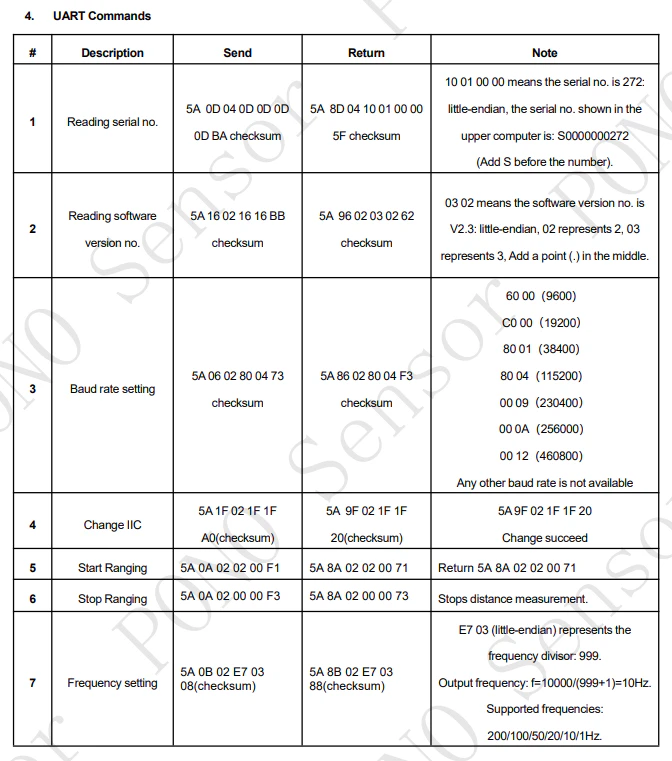
実際はこんな感じです。
| 表記例 | (bytes) |
|---|---|
| ww xx yy checksum | ww,xx,yy,checksum(4bytes) |
| ww xx yy(checksum) | ww,xx,yy(3bytes) |
| ww xx yy | ww,xx,yy(3bytes) |
つまり
checksumとあるのは
「ww,xx,yyからチェックサムを計算して後ろに足す」
(checksum)、および無印は
「直前のyyがチェックサム」
です。
チェックサム計算方法
```cpp uint8_t CheckSum(uint8_t *_pbuff, uint16_t _cmdLen) { uint8_t cmd_sum=0; uint16_t i; for(i=0;i<_cmdLen;i++) { cmd_sum += _pbuff[i]; } cmd_sum = (~cmd_sum); return cmd_sum; } ```罠3 一度セットしたレジスタは保存される
工場出荷状態はUART出力、ボーレート460800bpsですが、
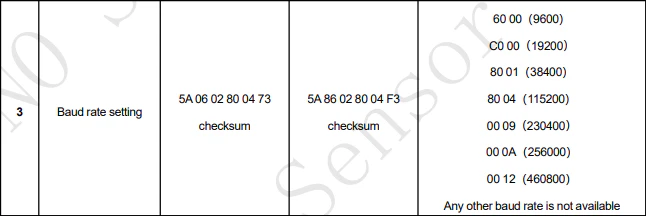
UARTから5A06 02 80 04 73 checksumを実行した後だと電源を落としてもボーレートが115200bpsになり、

5A1F 02 1F 1F A0を実行した後では電源を落としてもIICモードで立ち上がります。
データシートには書いてありません。
その他
・センサーのTXはマイコンのRXに、RXはマイコンのTXにつなぐ
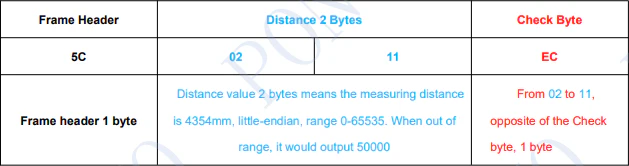
・0x5C, 0x02, 0x11, EC は 0x1102 = 0x02+(0x11<<8) = 4354mm
サンプルコード
// https://positive-inno.com/wp-content/uploads/2026/04/TSD20-user-manual.pdf
#include <Arduino.h>
#include <M5Unified.h>

#define RX_PIN G38 // from sensor TX // M5AtomS3
#define TX_PIN G39 // from sensor RX // M5AtomS3

uint8_t trushBuf[256]; // TSD20Serialの受信バッファをクリアするための一時的なバッファ

HardwareSerial TSD20Serial(1); // UART1を使用

uint8_t CheckSum(uint8_t *_pbuff, uint16_t _cmdLen)
{
  uint8_t cmd_sum=0;
  uint16_t i;
  for(i=0;i<_cmdLen;i++)
  {
  cmd_sum += _pbuff[i];
  }
  cmd_sum = (~cmd_sum);
  return cmd_sum;
}

bool SendCmd(uint8_t *_pbuff, uint16_t _cmdLen, bool _addCkSum = true)
{
    uint8_t serialCmd[_cmdLen+2]; // head(1) + cmd(_cmdLen) + sum(1)
    uint8_t checksum = CheckSum(_pbuff, _cmdLen); // データ部分のチェックサム
    serialCmd[0] = 0x5A; // ヘッダ
    memcpy(&serialCmd[1], _pbuff, _cmdLen); // コマンドデータをコピー
    if(_addCkSum){
      serialCmd[_cmdLen+1] = checksum; // チェックサムをコマンドの最後のバイトにセット
      TSD20Serial.write(serialCmd, sizeof(serialCmd));
    } else {
      TSD20Serial.write(serialCmd, _cmdLen+1); // チェックサムなしで送信
    }
    TSD20Serial.flush();
    return true;
  }

  void DisplayHex(const uint8_t* data, size_t length) {
    M5.Lcd.printf("%02X:", length);
    for (size_t i = 0; i < length; ++i) {
      M5.Lcd.printf("%02X ", data[i]);
    }
    M5.Lcd.println();
  }

  void WaitAndHoldResponce(uint16_t expectedLen, uint16_t displayMs = 3000, uint16_t timeoutMs=1000) {
    // 応答の前に受信バッファをクリア
//    TSD20Serial.readBytes(trushBuf, TSD20Serial.available());
    while (TSD20Serial.available() > 0) {
      TSD20Serial.readBytes(trushBuf, TSD20Serial.available()); // バッファをクリア
    }
    uint32_t startTime = millis();
    while (TSD20Serial.available() < expectedLen) {
      if (millis() - startTime > timeoutMs) {
        M5.Lcd.println("Timeout waiting for response");
        delay(displayMs);
        return;
      }
      uint8_t retCmd[expectedLen];
      DisplayHex(retCmd, expectedLen);
      delay(displayMs);
    }
  }


void setup() {
  Serial.begin(460800);

  // put your setup code here, to run once:
  M5.begin();

  // ディスプレイに「Start!」と表示
  M5.Lcd.setTextSize(1); // 文字サイズ調整(必要に応じて)
  M5.Lcd.setTextColor(WHITE, BLACK); // 白文字・黒背景
  M5.Lcd.setCursor(0, 0); // 表示位置(必要に応じて調整)
  M5.Lcd.clear();
  M5.Lcd.print("Start!\n");

  // TSD20 UART初期化(初回のみ460800,2回目以降はSet Frequencyした値)
  // Change to IICした後であればIICでコマンドを送る必要がある
  TSD20Serial.begin(115200, SERIAL_8N1, RX_PIN, TX_PIN);
  delay(100);

  /* --- シリアルナンバー取得 ---
  M5.Lcd.print("Get S/N\n");
  uint8_t serialCmd[] = {0x0D, 0x04, 0x0D, 0x0D, 0x0D, 0x0D, 0xBA};
  SendCmd(serialCmd, sizeof(serialCmd));
  WaitAndHoldResponce(9);
  */

  /* Set Frequency
  */
  M5.Lcd.print("Set Frequency\n");
  uint8_t freqCmd[] = {0x0B, 0x02, 0xE7, 0x03, 0x08};
  SendCmd(freqCmd, sizeof(freqCmd));
  WaitAndHoldResponce(6);

  /* Start Reading
  */
  M5.Lcd.print("Start Reading\n");
  uint8_t startCmd[] = {0x0A, 0x02, 0x02, 0x00, 0xF1};
  SendCmd(startCmd, sizeof(startCmd),false);
  WaitAndHoldResponce(6);

  /* Stop Reading
  M5.Lcd.print("Stop Reading\n");
  uint8_t stopCmd[] = {0x0A, 0x02, 0x00, 0x00, 0xF3};
  SendCmd(stopCmd, sizeof(stopCmd),false);
  WaitAndHoldResponce(6);
  */

  /* Change to IIC
  M5.Lcd.print("Change to IIC\n");
  uint8_t iicCmd[] = {0x1F, 0x02, 0x1F, 0x1F, 0xA0};
  SendCmd(iicCmd, sizeof(iicCmd),false);
  WaitAndHoldResponce(6);
  */

}

void loop() {
  while (TSD20Serial.available() > 0) {
    int cmdLen = TSD20Serial.available();
    uint8_t cmd[cmdLen];
    cmdLen = TSD20Serial.readBytes(cmd, cmdLen);
    M5.Lcd.clear();
    M5.Lcd.setCursor(0, 10); // 表示位置(必要に応じて調整)
    DisplayHex(cmd, cmdLen);
    if(cmd[0] == 0x5C){ // データフレームのヘッダ
      uint16_t distance = (cmd[2] << 8) | cmd[1]; // 距離データ(例: 2バイト little endian)
      M5.Lcd.setCursor(0, 30); // 距離表示位置
      M5.Lcd.printf("Distance: %d mm", distance);
    }
  }
  delay(1);
}
以上、はまりどころはありましたが、センサー自体は優秀でした。