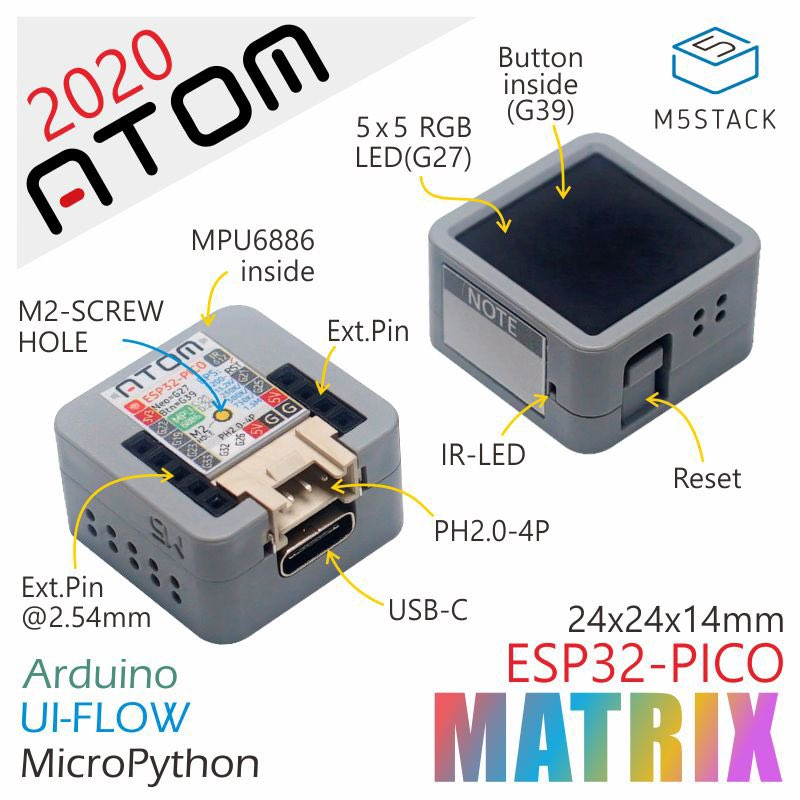
##ウチにもM5Atomが届きました!
横のボタンはリセットボタンで、いわゆるボタンは画面押しなんですね。ほー。
ちなみにボタンは背面側を押しても機能するようです。
早速PlatformIOで試してみたところ、M5StickCを指定してビルドが通りました。
[env:m5stick-c]
platform = espressif32
board = m5stick-c
framework = arduino
monitor_speed = 115200
##ライブラリのインストール
さらにこちらに公式ライブラリの初期バージョンが上がっていたので、こちらも試してみました。

PlatformIOのコマンドライン(一番右の[>])を開いて
platformio lib install 3113
と入力するとM5Atomのライブラリがインストールされます。
現時点でのライブラリバージョンは0.0.1です
##FastLEDライブラリのインストール
そのままビルドするとエラーになりました。どうやらFaltLEDライブラリが必要のようです。
しかも自分の環境だと最新版(3.3.3)でビルドするとエラーになりました。
PlatformIO>Librariesでライブラリ画面に移動し、FastLEDを選択した後、3.2.10を選択してインストールしたところビルドが通るようになりました。
[訂正]ビルドエラーはAdafruit_NeopixelライブラリとFastLEDライブラリを#ifで切り替えようとしていたのが原因のようでした。#ifの問題についてはこちらのページにあるように
platformio.ini(part)
lib_ignore = RF24_STM32
>*の追加で回避することができました(Macだけ?)*

##加速度を取得してみる
サンプルの動作も確認できたので、ついでにサンプルに手を加えて加速度を取ってみます。
```main.cpp
#include "M5Atom.h"
#define SIG_MAX (4096)
extern const unsigned char AtomImageData[375 + 2];
uint8_t DisBuff[2 + 5 * 5 * 3];
int16_t adX,adY,adZ;
void setBuffP(uint8_t posData, uint8_t Rdata, uint8_t Gdata, uint8_t Bdata)
{
DisBuff[2 + posData * 3 + 0] = Rdata;
DisBuff[2 + posData * 3 + 1] = Gdata;
DisBuff[2 + posData * 3 + 2] = Bdata;
}
void setBuff(uint8_t Rdata, uint8_t Gdata, uint8_t Bdata)
{
for (uint8_t i = 0; i < 25; i++)
setBuffP(i, Rdata, Gdata, Bdata);
}
void shftBuff()
{
for (uint8_t i = 24; i > 0; i--)
{
for (uint8_t j = 0; j < 3; j++)
DisBuff[2 + i * 3 + j] = DisBuff[2 + (i-1) * 3 + j];
}
}
void setup()
{
DisBuff[0] = 0x05;
DisBuff[1] = 0x05;
M5.begin(false, true, true);
delay(10);
M5.IMU.Init();
setBuff(0x20, 0x20, 0x20);
M5.dis.displaybuff(DisBuff);
}
void loop()
{
M5.update();
if (M5.Btn.read()==0)
{
M5.IMU.getAccelAdc(&adX, &adY, &adZ);
int r = min(max((int)map(adX,-SIG_MAX,SIG_MAX,0,255),0),255);
int g = min(max((int)map(adY,-SIG_MAX,SIG_MAX,0,255),0),255);
int b = min(max((int)map(adZ,-SIG_MAX,SIG_MAX,0,255),0),255);
shftBuff();
setBuffP(0,r,g,b);
M5.dis.displaybuff(DisBuff);
}
delay(20);
}
これで傾きに合わせてLEDが光るようになると思います。
動画

一応簡単に補足をしておきます。
M5.begin(false, true, true);
の引数は左からSerial,I2C,Display(LED Matrix)の有効/無効フラグです。
Serial を true にすると Serial.println() 等が使えるようになります。
また、I2Cを有効にしても加速度センサーは初期化されないので(Wire.begin()が呼ばれるだけ)、
M5.IMU.Init();
を追加で呼びます。
IMUにはこんな感じで関数が用意されています
       :
    public:
      MPU6886();
      int Init(void);
      void getAccelAdc(int16_t* ax, int16_t* ay, int16_t* az);
      void getGyroAdc(int16_t* gx, int16_t* gy, int16_t* gz);
      void getTempAdc(int16_t *t);

      void getAccelData(float* ax, float* ay, float* az);
      void getGyroData(float* gx, float* gy, float* gz);
      void getTempData(float *t);

      void SetGyroFsr(Gscale scale);
      void SetAccelFsr(Ascale scale);

      void getAhrsData(float *pitch,float *roll,float *yaw);
       :
ボタンは
       :
  public:
    uint8_t read();
    uint8_t isPressed();
    uint8_t isReleased();
    uint8_t wasPressed();
    uint8_t wasReleased();
    uint8_t pressedFor(uint32_t ms);
    uint8_t releasedFor(uint32_t ms);
    uint8_t wasReleasefor(uint32_t ms);
    uint32_t lastChange();
       :
等が用意されています。
if (M5.Btn.read()==0)
は```押下時が1,離している時が0です。
Wi-Fi等の機能も試してみましたがM5StickCそのままビルドで動作しました。
他にもいろいろ遊べそうです!
