概要
イエール大学のMichael Hinesらによって開発されている汎用の神経細胞・神経回路シミュレータであるNEURONを用いて,Hodgkin-Huxleyモデルによる神経細胞シミュレーションを行います.
若干とっつきにくいところはありますが,神経細胞のマルチコンパートメントモデルのシミュレータとしては,ほぼ標準として用いられている他,MPIによる大規模シミュレーションも可能なため,使いこなせればとても強力なツールになると思います.
(余談ですが,AGE OF SUPER SENSING センシングデザインの未来という書籍の,表紙の画像は,NEURONによる神経回路シミュレーションを元に可視化したものです.)
テスト環境
- Ubuntu 16.04
- Docker 1.12.6
- Python 2.7
- Jupyter notebook
- NEURON 7.4
NEURON+Jupyter notebookが動作していれば,CentOSやMac,Windows等,他の環境でも同じように動くと思います.
セットアップ
Python用のNEURON環境を構築するのは若干面倒なので,Docker Imageを作りました.
Dockerのインストール
http://docs.docker.jp/engine/installation/ などを参考にしてください.
古いバージョンであれば,以下のコマンドでインストールすることも可能です.
- Ubuntu
$ sudo apt-get install docker.io
- CentOS
$ sudo yum install docker-io
Dockerイメージの実行
以下のコマンドを実行すると,NEURONセットアップ済みのJupyter notebookが起動するので,表示されたURL(以下の例では,http://localhost:8888/?token=91d2)にアクセスします.
$ docker run -p 8888:8888 dmiyamoto/neuron:jupyter
/usr/local/lib/python2.7/dist-packages/IPython/paths.py:69: UserWarning: IPython parent '/home/neuron' is not a writable location, using a temp directory.
  " using a temp directory.".format(parent))
[I 15:21:30.297 NotebookApp] Writing notebook server cookie secret to /home/neuron/.local/share/jupyter/runtime/notebook_cookie_secret
[W 15:21:30.307 NotebookApp] WARNING: The notebook server is listening on all IP addresses and not using encryption. This is not recommended.
[I 15:21:30.311 NotebookApp] Serving notebooks from local directory: /work
[I 15:21:30.311 NotebookApp] 0 active kernels
[I 15:21:30.311 NotebookApp] The Jupyter Notebook is running at: http://[all ip addresses on your system]:8888/?token=91d2
[I 15:21:30.311 NotebookApp] Use Control-C to stop this server and shut down all kernels (twice to skip confirmation).
[C 15:21:30.311 NotebookApp]

    Copy/paste this URL into your browser when you connect for the first time,
    to login with a token:
        http://localhost:8888/?token=91d2
なお,Jupyter notebookを使用しない場合は,以下のコマンドで,pythonインタプリタとしても使用できます.
$ docker run -it neuron:jupyter python
Python 2.7.12 (default, Nov 19 2016, 06:48:10)
[GCC 5.4.0 20160609] on linux2
Type "help", "copyright", "credits" or "license" for more information.
>>>
使用するコード
今回使用するサンプルコードは以下になります.
なお,Jupyter Notebookのファイル画面の,examplesの中に同様のコードが入っているのでこちらを使用します.
calc_hh()
calc_hh()関数以外は,一般的なPythonやMatplotlibの知識があれば理解できると思いますので,calc_hh()の中身についてのみ解説します.
細胞の定義
soma = neuron.h.Section(name="soma")

soma.nseg = 1
soma.diam = 10   # [um]
soma.L = 10      # [um]
soma.insert("hh")
NEURON Pythonでは,hクラスの下に,HOCと同名の関数が定義されています.(わかる人向け説明)
ここでは,まずSection関数を用いて,新たに計算する細胞somaの定義をします.
その後,somaオブジェクトに対するパラメータの設定を行っています.各パラメータの説明は以下の通りです.
-
nseg: 細胞の電位を計算をする際の分割数.細長い細胞を対象とする際は,中心点と末端の電位が異なるため,分割数を多くする必要がある. -
diam: 細胞の直径 -
L: 細胞の長さ -
insert('hh'): Hodgkin-Huxley型(hh)のモデルを設定する.他には,Leak電流のみを想定したpasなどがある.自分でモデルを作成することもできる.
また,どのようなパラメータが存在しているか,値がどうなっているかは,psection関数で表示することができます.(はずなのですが,Jupyter上ではNEURON内部のprint関数がうまく表示されないようなので,インタプリタでの実行例を示します.)'hh'モデルをinsertすることで,新たに設定可能なパラメータが増えているところも観察できます.
>>> soma = neuron.h.Section(name='soma')
>>> neuron.h.psection()
soma { nseg=1  L=100  Ra=35.4
	/*location 0 attached to cell 0*/
	/* First segment only */
	insert morphology { diam=500}
	insert capacitance { cm=1}
}
1.0
>>> soma.insert('hh')
<nrn.Section object at 0x7fe655562648>
>>> neuron.h.psection()
soma { nseg=1  L=100  Ra=35.4
	/*location 0 attached to cell 0*/
	/* First segment only */
	insert morphology { diam=500}
	insert capacitance { cm=1}
	insert hh { gnabar_hh=0.12 gkbar_hh=0.036 gl_hh=0.0003 el_hh=-54.3}
	insert na_ion { ena=50}
	insert k_ion { ek=-77}
}
1.0
刺激の設定
stim = neuron.h.IClamp(soma(0.5))
stim.delay = 50  # [ms]
stim.dur = 200   # [ms]
stim.amp = 0.1   # [nA]
細胞を定義し,Hodgkin-Huxley型モデルを導入しても,何も刺激がないと,一定電位のまま変化しないので,定電流刺激の設定を行います.
NEURONでは,IClamp関数により,定電流刺激を追加することができます.
パラメータの説明は以下の通り.
-
deley: 刺激を開始するまでの時間 -
dur: 刺激の継続時間 -
amp: 刺激強度
測定手法の設定
rec_t = neuron.h.Vector()
rec_t.record(neuron.h._ref_t)
rec_v = neuron.h.Vector()
rec_v.record(soma(0.5)._ref_v)
Vector関数でNEUORON内に配列を確保し,record関数により記録する値を設定します.
これにより,計算ステップごとに設定した値が,配列に追加されます.
シミュレーション条件の設定と実行
neuron.h.finitialize(-65)
tstop = 300
neuron.run(tstop)
finitialize関数により,細胞の電位を-65 [mV]に初期化します.
また,run関数を用いて,実際にシミュレーションを開始します.引数はシミュレーションの終了時刻です(この場合は,300 msec).
後処理
t = rec_t.as_numpy()
v = rec_v.as_numpy()
return np.array(t), np.array(v)
記録した値を,as_numpy関数により,NEURONの内部形式からndarrayに変換します.
また,(おそらく)NEURON側のバグで,オブジェクトが勝手に開放されることがあるため,np.arrayを用いて値をコピーして戻り値にします.
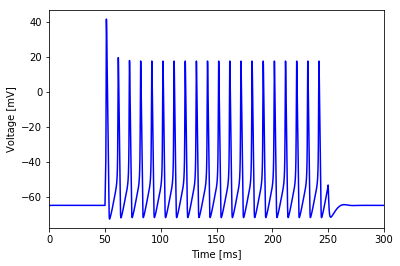
この値をmatplotlibでグラフ化すれば,以下のような,Hodgkin-Huxley的スパイクを得ることができます.
おわりに
世間では人工知能が大ブーム中ですが,Deep Learningのような極めて高度に抽象化されたモデルではなく,実際の脳や神経回路のシミュレーションに興味を持った人のために,本雑文が一助になれば幸いです.
参考
- https://hub.docker.com/r/dmiyamoto/neuron/
- https://github.com/DaisukeMiyamoto/docker-neuron
- https://neuron.yale.edu
- http://neuron.yale.edu/neuron/static/docs/neuronpython/firststeps.html
- https://www.neuron.yale.edu/neuron/static/new_doc/index.html
- (私的)NEURON事始め---第2版(Python版)
- Conductance-Based Models - Scholarpedia
- Hodgkin and Huxley, 1952.
変更履歴
- dockerイメージの設定が変わっていたので一部修正
