やりたいこと
ブラウザからS3に画像を直接アップロードする
経緯
carrierwaveを使ってアップロード処理を実装していたが、複数枚あげる場合非常に時間がかかる。
ブラウザ → Railsアプリ → S3
という流れなので当然といえば当然。
「時間がかかるが、待てば無事処理完了」、となればいいが、
今回Herokuを使っており、Herokuには30秒制限があるため30秒を越えると落ちる。
なのでブラウザからS3に直接アップロードすることにした。
Herokuのドキュメントでも4MBを越えるものはダイレクトアップロードを推奨している。
環境
Ruby 2.5.0
Rails 5.2.0
手順
Herokuにダイレクトアップロードの手順についてのドキュメントがあったので、それを参考に実装する
Direct to S3 Image Uploads in Rails
なお、他の言語のドキュメントもある。
Direct to S3 File Uploads in Node.js
Direct to S3 File Uploads in Python
[Uploading Files to S3 in Java with Play 2](Uploading Files to S3 in Java with Play 2)
Uploading Files to S3 in PHP
アプリケーションの作成
$ rails new direct-s3-example
$ cd direct-s3-example
ユーザモデルの作成
scaffoldで作る
$ rails generate scaffold user name avatar_url
      invoke  active_record
      create    db/migrate/20140519195131_create_users.rb
      create    app/models/user.rb
      invoke    test_unit
      create      test/models/user_test.rb
      create      test/fixtures/users.yml
      # ...
マイグレーション
$ rake db:migrate
S3のバケット作成およびアクセスキーの取得
ググれば出てくるので割愛します。
aws-sdkのインストール
gem 'aws-sdk', '~> 2'
$ bundle install
バケット名等々の設定
ドキュメントには.envを使っている前提で書かれているが今回はもっと簡略化します。
awsの初期設定ファイルを生成する
$ touch config/initializers/aws.rb
バケット名、リージョン、アクセスキー、シークレートキーの設定
※簡略化のためハードコーディングしてますが、実際はNGです
Aws.config.update({
  region: 'ap-northeast-1',
  credentials: Aws::Credentials.new('xxxxxxxxxxxxxxxx', 'xxxxxxxxxxxxxxxx'),
})

S3_BUCKET = Aws::S3::Resource.new.bucket('xxxxxxxxxxxxxxxx')
Cross Originの設定
ブラウザからS3へのダイレクトアップロードを可能にするためにはCrossOriginの設定が必要。
S3 → バケット名選択 → アクセス権限 → CORSの設定

以下をコピペ
<?xml version="1.0" encoding="UTF-8"?>
<CORSConfiguration xmlns="http://s3.amazonaws.com/doc/2006-03-01/">
  <CORSRule>
    <AllowedOrigin>http://localhost:3000</AllowedOrigin>
    <AllowedMethod>GET</AllowedMethod>
    <AllowedMethod>POST</AllowedMethod>
    <AllowedMethod>PUT</AllowedMethod>
    <AllowedHeader>*</AllowedHeader>
  </CORSRule>
</CORSConfiguration>
UsersController.rbの編集
class UsersController < ApplicationController
  before_action :set_user, only: [:show, :edit, :update, :destroy]
  before_action :set_s3_direct_post, only: [:new, :edit, :create, :update] # 追加

...

private
  # 追加
  def set_s3_direct_post
    @s3_direct_post = S3_BUCKET.presigned_post(key: "uploads/#{SecureRandom.uuid}/${filename}", success_action_status: '201', acl: 'public-read')
  end
ファイルアップロード用ライブラリの設置
以下二つのライブラリをダウンロードし、app/assets/javascripts配下に設置
https://raw.githubusercontent.com/jquery/jquery-ui/master/ui/widget.js
→app/assets/javascripts/jquery.ui.widget.js
https://raw.githubusercontent.com/blueimp/jQuery-File-Upload/master/js/jquery.fileupload.js
→app/assets/javascripts/z.jquery.fileupload.js
先頭にzをつけることで読み込み順を調整しているみたい。
viewの編集
javascriptで色々制御するためにclass等々を設定しておく。
<%= form_for(@user, html: { class: 'directUpload', data: { 'form-data' => (@s3_direct_post.fields), 'url' => @s3_direct_post.url, 'host' => URI.parse(@s3_direct_post.url).host } }) do |f| %>
text_fieldをfile_fieldに変更する。
<div class="field">
  <%= f.label :avatar_url %><br>
  <%= f.file_field :avatar_url %> # もともとはf.text_field
</div>
javascript、styleの設定
今回は簡略化のために_form.html.erbに直接書いた。
script。ファイルを選択したタイミングでS3にアップロードしてくれる処理。アップロードに成功したらその画像のパスがhidden項目に入ったinput要素を生成してくれる。
<script>
$(function() {
  $('.directUpload').find("input:file").each(function(i, elem) {
    var fileInput    = $(elem);
    var form         = $(fileInput.parents('form:first'));
    var submitButton = form.find('input[type="submit"]');
    var progressBar  = $("<div class='bar'></div>");
    var barContainer = $("<div class='progress'></div>").append(progressBar);
    fileInput.after(barContainer);
    fileInput.fileupload({
      fileInput:       fileInput,
      url:             form.data('url'),
      type:            'POST',
      autoUpload:       true,
      formData:         form.data('form-data'),
      paramName:        'file', // S3 does not like nested name fields i.e. name="user[avatar_url]"
      dataType:         'XML',  // S3 returns XML if success_action_status is set to 201
      replaceFileInput: false,
      progressall: function (e, data) {
        var progress = parseInt(data.loaded / data.total * 100, 10);
        progressBar.css('width', progress + '%')
      },
      start: function (e) {
        submitButton.prop('disabled', true);

        progressBar.
          css('background', 'green').
          css('display', 'block').
          css('width', '0%').
          text("Loading...");
      },
      done: function(e, data) {
        submitButton.prop('disabled', false);
        progressBar.text("Uploading done");

        // extract key and generate URL from response
        var key   = $(data.jqXHR.responseXML).find("Key").text();
        var url   = '//' + form.data('host') + '/' + key;

        // create hidden field
        var input = $("<input />", { type:'hidden', name: fileInput.attr('name'), value: url })
        form.append(input);
      },
      fail: function(e, data) {
        submitButton.prop('disabled', false);

        progressBar.
          css("background", "red").
          text("Failed");
      }
    });
  });
});
</script>
スタイル。あってもなくてもいい。
<style>
.progress {
  max-width: 600px;
  margin:    0.2em 0 0.2em 0;
}

.progress .bar {
  height:  1.2em;
  padding-left: 0.2em;
  color:   white;
  display: none;
}
</style>
これでひとまず完成。
ファイルを選択すると自動でS3にアップしてくれて、かつプログレスバーが表示される。
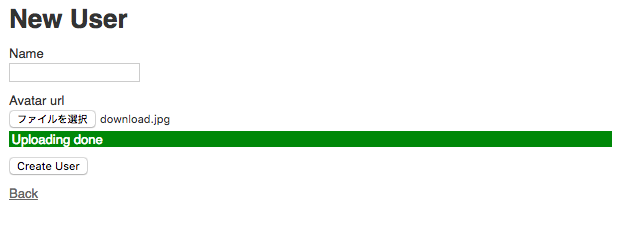
hidden項目に画像のパスが入っているので、この状態でサブミットすればユーザモデルのavatar_urlカラムに画像のパスが入る。
表示するときはこれで表示できる。
<%= image_tag @user.avatar_url %>
画像を複数枚アップしたいとき
Herokuのドキュメントは1枚の画像をあげる想定でつくられている。
複数枚アップロードするときは単純にmultiple: trueを追記してあげればOK。
<%= form.file_field :avatar_url, multiple: true %>
ただ、これだとS3へのアップはできるが、モデルとの紐付けができないので何か方法を考えないといけない。
また、carrierwaveを使用しなくなったのでサムネイルの作成処理も別途考えないといけない。