本記事の内容は書籍『いちばんやさしいPython入門教室』のChapter 5~6にあたる。
ヒット&ブローとは
- 親が0~9の数字を用いて4桁の数字を設定する
- 子はその数字を予想して親に提示する
- 提示された数字に対して親はヒット(数字と位置が正しい)とブロー(数字は正しいが位置が異なる)で判定を行い、子に判定結果を提示する
- 上記を繰り返して子は解答の4桁の数字を当てる
コードの完成形
import random
import tkinter as tk
import tkinter.messagebox as tkmb

def ButtonClick():
    number_inputted = editbox_1.get()

    flag = False
    if len(number_inputted) != 4:
        tkmb.showerror("エラー", "入力された値が4桁ではありません")
    else:
        check_int_0_9 = True
        for i in range (4):  # 以下を4回繰り返す
            if (number_inputted[i] < "0") or (number_inputted[i] > "9"):
                tkmb.showerror("エラー:入力された値が数字ではありません")
                check_int_0_9 = False
                break
            if check_int_0_9:
                flag = True
    if flag:
        count_hit = 0
        for i in range(4):
            if number_answer[i] == int(number_inputted[i]):
                count_hit = count_hit + 1

        count_blow = 0
        for i_1 in range(4):
            for i_2 in range(4):
                if (int(number_inputted[i_2]) == number_answer[i_1]) and (number_answer[i_1] != int(number_inputted[i_1])) and (number_answer[i_2] != int(number_inputted[i_2])):
                    count_blow += 1
                    break

        if count_hit == 4:
            tkmb.showinfo("", "正解")
            window_1.destroy()
        else:
            box_history.insert(tk.END, number_inputted + " / H:" + str(count_hit) + " B:" + str(count_blow) + "\n")

number_answer = [(random.randint)(0,9),
                 (random.randint)(0,9),
                 (random.randint)(0,9),
                 (random.randint)(0,9)]

window_1 = tk.Tk()
window_1.geometry("500x150")
window_1.title("ヒット&ブロー")

box_history = tk.Text(window_1, font=("Helvetica", 14))
box_history.place(x=400, y=0, width=200, height=400)

label_1 = tk.Label(window_1, text="4桁の数字を入力してください", font=("Helvetica", 14))
label_1.place(x = 120, y = 20)

editbox_1 = tk.Entry(width = 4, font=("Helvetica", 28))
editbox_1.place(x = 120, y = 60)

button_1 = tk.Button(window_1, text = "チェック", font=("Helvetica", 14), command=ButtonClick)
button_1.place(x = 220, y = 60)

window_1.mainloop()
コードの各部分の解説
import random
import tkinter as tk
import tkinter.messagebox as tkmb
ここではまず、乱数を生成するためのrandomモジュールと、GUIを生成するためのtkinterモジュールをインポートしている。
def ButtonClick():
ここでGUI上のボタンをクリックした際に呼び出される関数を定義している。
flag = False
    if len(number_inputted) != 4:
        tkmb.showerror("エラー", "入力された値が4桁ではありません")
    else:
        check_int_0_9 = True
        for i in range (4):  # 以下を4回繰り返す
            if (number_inputted[i] < "0") or (number_inputted[i] > "9"):
                tkmb.showerror("エラー:入力された値が数字ではありません")
                check_int_0_9 = False
                break
            if check_int_0_9:
                flag = True
この部分では、入力された値が4桁の数字であるかどうかを判定し、異なる場合はエラー文を表示する処理が記述されている。
    if flag:
        count_hit = 0
        for i in range(4):
            if number_answer[i] == int(number_inputted[i]):
                count_hit = count_hit + 1

        count_blow = 0
        for i_1 in range(4):
            for i_2 in range(4):
                if (int(number_inputted[i_2]) == number_answer[i_1]) and (number_answer[i_1] != int(number_inputted[i_1])) and (number_answer[i_2] != int(number_inputted[i_2])):
                    count_blow += 1
                    break
ここにはヒットとブローをカウントする処理が記述されている。ブローとして判定されるのは、入力された値がランダム生成された4桁の数字と同じ場合かつブローではない場合であるので、if文を用いて条件を設定している。
        if count_hit == 4:
            tkmb.showinfo("", "正解")
            window_1.destroy()
        else:
            box_history.insert(tk.END, number_inputted + " / H:" + str(count_hit) + " B:" + str(count_blow) + "\n")
ここでは、入力された値が正解であるか否かの判定と、不正解の場合は判定履歴にヒットとブローの数をそれぞれ挿入する処理を記述している。
number_answer = [(random.randint)(0,9),
                 (random.randint)(0,9),
                 (random.randint)(0,9),
                 (random.randint)(0,9)]
ここでランダムな4桁の数字を生成している。
window_1 = tk.Tk()
window_1.geometry("500x150")
window_1.title("ヒット&ブロー")

box_history = tk.Text(window_1, font=("Helvetica", 14))
box_history.place(x=400, y=0, width=200, height=400)

label_1 = tk.Label(window_1, text="4桁の数字を入力してください", font=("Helvetica", 14))
label_1.place(x = 120, y = 20)

editbox_1 = tk.Entry(width = 4, font=("Helvetica", 28))
editbox_1.place(x = 120, y = 60)

button_1 = tk.Button(window_1, text = "チェック", font=("Helvetica", 14), command=ButtonClick)
button_1.place(x = 220, y = 60)

window_1.mainloop()
残りはそれぞれウィンドウの生成、判定履歴の配置、入力エリアの配置、判定ボタンの配置、ウィンドウの表示を持続させるためのコードを記述している。
アプリケーション実行の様子
起動直後
入力エラー
入力過程

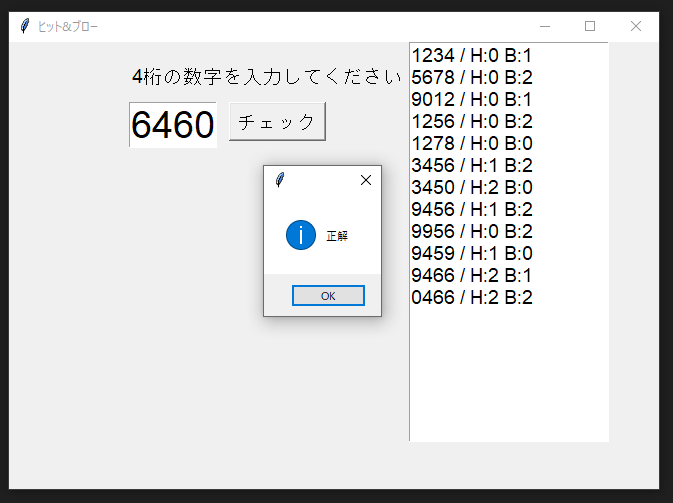
入力した予想の数字の判定履歴が右側のボックスに表示されるので、この情報をもとにして正解を導く。


