はじめに
UnityでOpenCVを利用したアプリが簡単に作れるようになるAssetプラグイン「OpenCV for Unity」がAssetStoreで販売されています。有料版と無料版がありますが今回は無料版で制作していこうと思います。
概要
Webカメラ内にカード(めんこ使用)が投げ入れられたとき、リアルタイムで矩形と認識し中心点を特定、その位置にエフェクトを出すというものを目指します!
デモ
※今回はここまで行きません

目次
1.環境
2.OpenCV Plus Unity のインポート
3.Webカメラの映像を取得する
4.カメラ映像の二値化し矩形の判別&中心点抽出
5.参考
環境
- Windows11
- Unity 2022.3.10f1
・OpenCVforUnity 1.7.1 - Spedal 60fps 1080P HD Webカメラ
OpenCV Plus Unityのインポート
1. 上記のリンクまたはUnityのAsset Store内のSearch for assetsにopencv plus unityと入力してパッケージをインポートしてください ※無料版をインポート
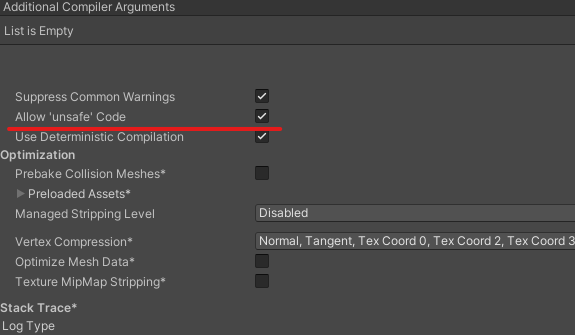
2. ライブラリ使用の許可をする
インポートをすると大量のエラーが出てきます
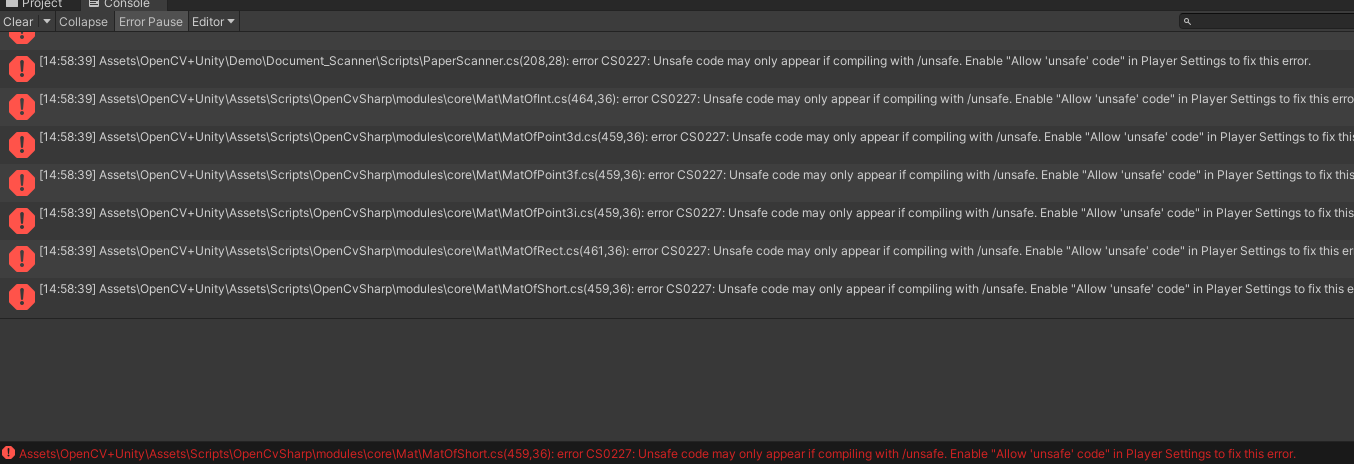
「Edit」→「Project Settings」→「Player」の中のOther Settings内の「Arrow 'unsafe' Code」チェックボックスにチェックを入れます
少し恐ろしく見えますが、どうやらCやC++言語ではよく見るポインタをC#内で使っているみたいで、そのためにunsafeを使用しています。
Webカメラの映像を取得する
まず手始めにWebカメラが無事にUnity内で見れるか確認してみましょう
1. Hierarchyタブから「Create」→「UI」→「rawimage」と選択しSceneに追加
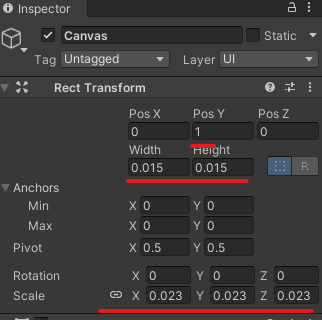
2. 以下のようにCanvasのポジション、サイズ、Render ModeをWorld Spaceに変更
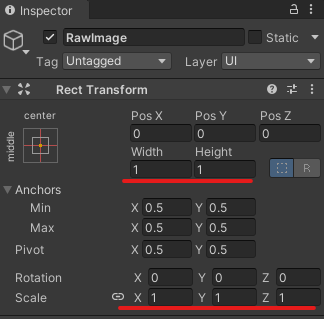
3. 同様にRawImageのポジションとサイズも以下のように変更します
4. スクリプトを追加
以下のスクリプトを作成し,Rawimageにアタッチ
using OpenCvSharp;
using OpenCvSharp.Demo;
using System;
using System.Collections.Generic;
using UnityEngine;
using UnityEngine.UI;
public class CameraDemo : WebCamera
{
    [SerializeField] private FlipMode ImageFlip;  // 画像の反転モード
    [SerializeField] private bool ShowProcessingImage = true;

    private Mat image;  // ウェブカメラからの入力画像
    private Mat processImage = new Mat();  // 画像処理後の画像

    protected override bool ProcessTexture(WebCamTexture input, ref Texture2D output)
    {
        // ウェブカメラのテクスチャをMatに変換
        image = OpenCvSharp.Unity.TextureToMat(input);
        // 画像処理開始
        Cv2.Flip(image, image, ImageFlip);  // 画像を反転
        Cv2.CvtColor(image, processImage, ColorConversionCodes.BGR2GRAY);  // グレースケールに変換
        output = output ?? OpenCvSharp.Unity.MatToTexture(ShowProcessingImage ? processImage : image);
        OpenCvSharp.Unity.MatToTexture(ShowProcessingImage ? processImage : image, output);
        return true;
    }
}
5.
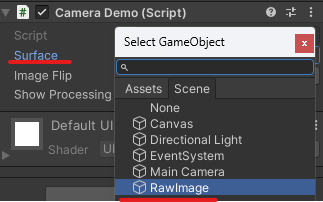
アタッチしたCamera DemoのSurfaceにRawimageを設定し、実行してみるとWebカメラの映像がプレイ画面に表示されれば完了です!
カメラ映像の二値化し矩形の判別&中心点抽出
今回は中心点をわかりやすく可視化するため「O」と表示させています
先程のCameraDemoスクリプトを以下のように変更します
using OpenCvSharp;
using OpenCvSharp.Demo;
using System;
using System.Collections;
using System.Collections.Generic;
using System.Threading;
using Unity.VisualScripting;
using UnityEngine;
using UnityEngine.UI;
using UnityEngine.UIElements;
public class CardInfo
{
public Point Center;
public Point[] Contour;
// 他にも必要な情報やメソッドを追加できます。
}
public class CountorFinder : WebCamera
{
[SerializeField] private FlipMode ImageFlip; // 画像の反転モード
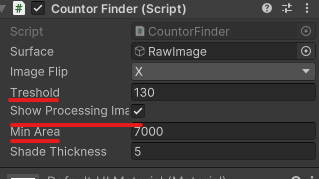
[SerializeField] private float Treshold = 96.4f; // 画像処理の閾値
[SerializeField] private bool ShowProcessingImage = true; // 処理後の画像を表示するか
[SerializeField] private float MinArea = 7000f; // カードとして認識する領域の最小面積
[SerializeField] private int ShadeThickness = 5; // 輪郭線の太さ
private Mat image; // ウェブカメラからの入力画像
private Mat processImage = new Mat(); // 画像処理後の画像
private bool isCardDetected = false; // カードが検出されたかどうか
private Point[][] countours; // 画像から検出される輪郭
private HierarchyIndex[] hierarchy; // 輪郭の階層情報
private List<Point> cardCenters = new List<Point>(); // 現在のフレームで検出
protected override bool ProcessTexture(WebCamTexture input, ref Texture2D output)
{
// ウェブカメラのテクスチャをMatに変換
image = OpenCvSharp.Unity.TextureToMat(input);
//画像を反転
Cv2.Flip(image, image, ImageFlip);
//グレースケールに変換
Cv2.CvtColor(image, processImage, ColorConversionCodes.BGR2GRAY);
//閾値比較
Cv2.Threshold(processImage, processImage, Treshold, 255, ThresholdTypes.BinaryInv);
//輪郭を見つける
Cv2.FindContours(processImage, out countours, out hierarchy, RetrievalModes.Tree, ContourApproximationModes.ApproxSimple, null);
// 複数の中心点を格納するリストを作成
cardCenters.Clear(); // 現在のフレームのカードの中心リストをリセット
foreach (Point[] countour in countours)
{
double length = Cv2.ArcLength(countour, true);
Point[] points = Cv2.ApproxPolyDP(countour, length * 0.01, true);
var area = Cv2.ContourArea(countour);
if (area > MinArea)
{
if (points.Length == 4)
{
drawContour(processImage, new Scalar(127, 127, 127), ShadeThickness, points);
string Name = "O"; //中心点にOと表示
if (Name == "O")
{
// 輪郭の中心点を計算
Moments m = Cv2.Moments(countour);
int cx = (int)(m.M10 / m.M00);
int cy = (int)(m.M01 / m.M00);
cardCenters.Add(new Point(cx, cy)); // リストに中心点を追加
OpenCvSharp.Rect rect = Cv2.BoundingRect(countour);
Cv2.PutText(image, Name, new Point(cx, cy), HersheyFonts.HersheySimplex, 1.0, new Scalar(255, 0, 0));
}
}
}
}
if (output == null)
output = OpenCvSharp.Unity.MatToTexture(ShowProcessingImage ? processImage : image);
else
OpenCvSharp.Unity.MatToTexture(ShowProcessingImage ? processImage : image, output);
return true;
}
private void drawContour(Mat Image, Scalar Color, int Thickness, Point[] Points)
{
for (int i = 1; i < Points.Length; i++)
{
Cv2.Line(Image, Points[i - 1], Points[i], Color, Thickness);
Debug.Log($"Point1:{Points[i - 1]}, Points2:{Points[i]}");
}
Cv2.Line(Image, Points[Points.Length - 1], Points[0], Color, Thickness);
}
}
スクリプトを書き終えRawimageにAdd Componentし、先程と同様にSurfaceにRawimageを設定します。
momentsによる重心の計算 重心=(輝度値×位置)の合計/輝度値の合計
実行結果
カードをカメラで読み取るとグレーの枠が引かれ、Show Processing imageのチェックボックスを外すと中心点Oが表示されると思われます!
うまく表示されない場合はTresholdの閾値を上げてみたり、MinAreaを調整してみると良いかも知れません
まとめ
OpenCV for Unityを使いWebカメラで読み取ったものが矩形であるかどうか判別し、その中心点を表示させるというところまでまとめました!次回はここにエフェクトをつけていきます!座標変換などかなり手間取りました...
マークダウン記法に少しづつ慣れてきました!
参考