Phoenixに関する資料は限られているので断片的なものを収集している.
人に見せるものではない.メインに参考にしている資料は下のリンク
http://www.phoenixframework.org/
phoenixをインストールした後にmy_appというプロジェクトを~/Projects/に作る
$ mix local.hex
$ mix archive.install https://github.com/phoenixframework/phoenix/releases/download/v0.13.1/phoenix_new-0.13.1.ez
$ mix phoenix.new ~/Projects/my_app --no-brunch
$ cd ~/Projects/my_app
$ iex -S mix phoenix.server
Running Elixir.HelloPhoenix.Router with Cowboy on port 4000
Let's say we have a read-only posts resource. We could define it like this.
resources "posts", PostController, only: [:index, :show]
Running $ mix phoenix.routes shows that we now only have the routes to the index and show actions defined.
post_path  GET     /posts                         HelloPhoenix.PostsController.index/2

post_path  GET     /posts/:id                     HelloPhoenix.PostsController.show/2
Similarly, if we have a comments resource, and we don't want to provide a route to delete one, we could define a route like this.
resources "comments", CommentController, except: [:delete]
Running $ mix phoenix.routes now shows that we have all the routes except the DELETE request to the delete action.
どのディレクトリからでも $ mix phoenix.new ../projectXが使えるように下のコマンドでphoenix 0.13バージョンをインストール
$ mix archive.install https://github.com/phoenixframework/phoenix/releases/download/v0.13.1/phoenix_new-0.13.1.ez
下のコマンドの結果の中にpage_pathとかpost_pathとかはControllerの名前に基づいて自動的生成されたものです。
Phoenix.Routerページにこれについて書いています。
Phoenix automatically generates a module Helpers inside your router which contains named helpers to help developers generate and keep their routes up to date.
Helpers are automatically generated based on the controller name.
$ mix phoenix.routes
page_path  GET     /                ElixirFriends.PageController.index/2
post_path  GET     /posts           ElixirFriends.PostController.index/2
post_path  GET     /posts/:id/edit  ElixirFriends.PostController.edit/2
post_path  GET     /posts/new       ElixirFriends.PostController.new/2
post_path  GET     /posts/:id       ElixirFriends.PostController.show/2
post_path  POST    /posts           ElixirFriends.PostController.create/2
post_path  PATCH   /posts/:id       ElixirFriends.PostController.update/2
           PUT     /posts/:id       ElixirFriends.PostController.update/2
post_path  DELETE  /posts/:id       ElixirFriends.PostController.delete/2
phoenixのジェネレーターでデータモデルを作ります。
$ mix phoenix.gen.html Post posts image_url:string content:string source_url:string
* creating priv/repo/migrations/20150606011714_create_post.exs
* creating web/models/post.ex
* creating test/models/post_test.exs
* creating web/controllers/post_controller.ex
* creating web/templates/post/edit.html.eex
* creating web/templates/post/form.html.eex
* creating web/templates/post/index.html.eex
* creating web/templates/post/new.html.eex
* creating web/templates/post/show.html.eex
* creating web/views/post_view.ex
* creating test/controllers/post_controller_test.exs

Add the resource to the proper scope in web/router.ex:

    resources "/posts", PostController

and then update your repository by running migrations:

    $ mix ecto.migrate
priv/repo/migrations/ディレクトリ下にテーブル作成するためのモジュールが作成されます。
web/models/post.exファイルにPostモジュールが生成され、postsスキーマが定義されます。
$ mix ecto.createコマンド実行するとelixir_friends_devデータベースが作成されます。elixir_friends_devはconfig/config.exsに定義されています。
$ mix ecto.migrateコマンドを実行するとpriv/repo/migrations/ディレクトリ下のファイルを利用して、下のようなテーブル(posts)が作成されます。
You are now connected to database "elixir_friends_dev" as user "wang".
elixir_friends_dev=# \d
No relations found.
elixir_friends_dev=# \d
                List of relations
 Schema |       Name        |   Type   |  Owner
--------+-------------------+----------+----------
 public | posts             | table    | postgres
 public | posts_id_seq      | sequence | postgres
 public | schema_migrations | table    | postgres
(3 rows)
Phoenix views have several important jobs. They render templates.
In order to render any templates for our HelloController, we need a HelloView.
We can define functions in any individual view in web/views. Functions defined in an individual view will only be available to templates which that view renders. For example, functions defined in the PageView will only be available to templates in web/templates/page.
Phoenix generates a main application view at web/view.ex. Functions we define there are visible to every view module and every template in our application.
The Phoenix PubSub layer consists of the Phoenix.PubSub module and a variety of modules for different adapters and their Genservers. These modules contain functions which are the nuts and bolts of organizing Channel communication - subscribing to topics, unsubscribing from topics, and broadcasting messages on a topic.
Channels use them under the hood to do much of their work. As end users, we shouldn't have any need to use them directly in our applications.
Topics are string identifiers - names that the various layers use in order to make sure messages end up in the right place. As we saw above, topics can use wildcards. This allows for a useful "topic:subtopic" convention. Often, you'll compose topics using record IDs from your model layer, such as "users:123".
Every keyword passed to render in the controller is available as an assign within the template, so you can use <%= @message %> in the eex template that is rendered in the controller example.
All controller actions take two arguments. The first is conn, a struct which holds a ton of data about the request. The second is params, which are the request parameters.
defmodule App.PageController do
  use Phoenix.Controller

  plug :action

  def index(conn, _params) do
    render conn, "index", message: "hello"
  end
end
By default, eex is supported. To add haml support, simply include the following in your mix.exs deps:
{:phoenix_haml, "~> 0.1.0"}
and add the PhoenixHaml.Engine to your config/config.exs
config :phoenix, :template_engines,
  haml: PhoenixHaml.Engine
We can implement a channel by creating a module in the channels directory and by using Phoenix.Channel:
defmodule App.MyChannel do
  use Phoenix.Channel
end
The first thing to do is to implement the join function to authorize sockets on this Channel's topic:
defmodule App.MyChannel do
  use Phoenix.Channel

  def join(socket, "topic", message) do
    {:ok, socket}
  end

  def join(socket, _no, _message) do
    {:error, socket, :unauthorized}
  end
end
join events are specially treated. When {:ok, socket} is returned from the Channel, the socket is subscribed to the channel and authorized to pubsub on the channel/topic pair. When {:error, socket, reason} is returned, the socket is denied pubsub access.
You can use plug in your projects in two steps:
Add plug and your webserver of choice (currently cowboy) to your mix.exs dependencies:
def deps do
  [{:cowboy, "~> 1.0.0"},
   {:plug, "~> 0.8.0"}]
end
List both :cowboy and :plug as your application dependencies:
def application do
  [applications: [:cowboy, :plug]]
end
A plug takes two shapes. It is a function that receives a connection and a set of options as arguments and returns the connection or it is a module that provides an init/1 function to initialize options and implement the call/2 function, receiving the connection and the initialized options, and returning the connection.
As per the specification above, a connection is represented by the Plug.Conn struct:
%Plug.Conn{host: "www.example.com",
           path_info: ["bar", "baz"],
           ...}
Plug.Static - serves static files;
Channels are based on a simple idea - sending and receiving messages. Senders broadcast messages about topics. Receivers subscribe to topics so that they can get those messages. Senders and receivers can switch roles on the same topic at any time.
A channel will use a socket underneath to send responses and receive events. As said, sockets are bidirectional, which mean you can receive events (similar to requests in your controller). You handle events with pattern matching directly on the event name and message map.
Prints all routes for the default or a given router.
$ mix phoenix.routes
Compiled web/views/page_view.ex
Generated chatty.app
page_path  GET  /  Chatty.PageController.index/2
Controllers are used to group common functionality in the same (pluggable) module.
For example, the route:
get "/users/:id", UserController, :show
will invoke the show/2 action in the UserController:
defmodule UserController do
  use Phoenix.Controller

  plug :action

  def show(conn, %{"id" => id}) do
    user = Repo.get(User, id)
    render conn, "show.html", user: user
  end
end
An action is just a regular function that receives the connection and the request parameters as arguments. The connection is a Plug.Conn struct, as specified by the Plug library.
Connection
A controller by default provides many convenience functions for manipulating the connection, rendering templates, and more.
Those functions are imported from two modules:
Plug.Conn - a bunch of low-level functions to work with the connection
Phoenix.Controller - functions provided by Phoenix to support rendering, and other Phoenix specific behaviour
broadcast(socket, event, message) (function)
broadcast(channel, topic, event, message) (function)
Broadcast event, serializable as JSON to topic namedspaced by channel
Examples
iex> Channel.broadcast "rooms", "global", "new:message", %{id: 1, content: "hello"}
:ok
iex> Channel.broadcast socket, "new:message", %{id: 1, content: "hello"}
:ok
plug/2 support guards, allowing a developer to configure a plug to only run in some particular action:
plug :log_message, "before action" when action in [:show, :edit]
plug :action
plug :log_message, "after action" when not action in [:index]
The first plug will run only when action is show and edit, while the second will always run except for the index action.
Those guards work like regular Elixir guards and the only variables accessible in the guard are conn, the action as an atom and the controller as an alias.
Like routers, controllers are plugs, but they are wired to dispatch to a particular function which is called an action.
For example, the route:
get "/users/:id", UserController, :show
will invoke UserController as a plug:
UserController.call(conn, :show)
which will trigger the plug pipeline and which will eventually invoke the inner action plug that dispatches to the show/2 function in the UserController.
As controllers are plugs, they implement both init/1 and call/2, and it also provides a function named action/2 which is responsible for dispatching the appropriate action in the middle of the plug stack (and is also overridable).
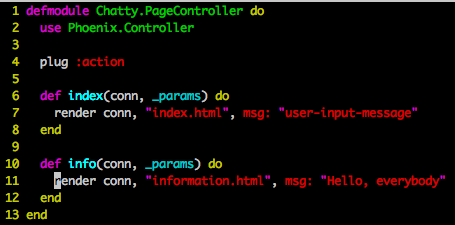
web/controllers/page_controller.exにあるmsgは
web/templates/page/index.html.eexの中に呼び出すことができる
def index(conn, _params) do
  render conn, "index.html", msg: "user-input-message"
  end
end
下のコードみたいなやり方で
<input type="text" id="<%= @msg %>" />
info.html画面一つ追加したいときに,まず web/router.exを開いて,ルートを追加する
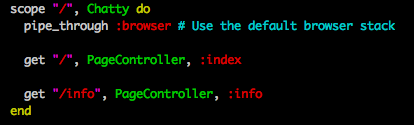
そしてweb/controllers/page_controller.exにinfo関数一つ追加
これらにあわせてweb/templates/pageの下に
information.html.eexを追加するといい
Put this line into your router.ex file inside the scope "/" do block: resources "users", Chatty.UserController.
Then go to the root of your project, and run
$ mix phoenix.routes

Generated chatty.app
 page_path  GET     /                  Chatty.PageController.index/2
hello_path  GET     /hello             Chatty.HelloController.index/2
hello_path  GET     /hello/:messenger  Chatty.HelloController.show/2
 user_path  GET     /users             Chatty.UserController.index/2
 user_path  GET     /users/:id/edit    Chatty.UserController.edit/2
 user_path  GET     /users/new         Chatty.UserController.new/2
 user_path  GET     /users/:id         Chatty.UserController.show/2
 user_path  POST    /users             Chatty.UserController.create/2
 user_path  PATCH   /users/:id         Chatty.UserController.update/2
            PUT     /users/:id         Chatty.UserController.update/2
 user_path  DELETE  /users/:id         Chatty.UserController.destroy/2
iex(9)> Chatty.Router.Helpers.user_path(:show, 17, admin: true, active: false)
"/users/17?admin=true&active=false"