Hyperlink 要素を使うと NavigateUri プロパティにパスを指定することでページ遷移を実現することができますが、Button コントロールには NavigateUri プロパティがありません。
どのようにページを遷移させればよいでしょうか。
すぐに思いつくのは、ページのコードビハインドに Click イベントハンドラを実装して NavigationService.Navigate を呼び出すことです。
ただ、MVVM(Model-View-ViewModel)パターンを採用する場合、なるべくコードビハインドは汚したくありません。
ここではコードビハインドを使わずにページを遷移させる方法を3つご紹介します。
1. ビューモデルで遷移先のページインスタンスを指定する
NavigationWindow にホストされたページをコマンドバインディングで遷移させる例です。
ビューモデル
ビューからコマンドを受けて遷移を実行します。
Application.Current.MainWindow から NavigationWindow を取得し、Navigate メソッドの引数に Page インスタンスを渡しています。
※ICommand の実装(RelyCommand/DelegateCommand/独自 Command 実装)については説明を省略させていただきます。
public ICommand NavigateNextCommand { get; protected set; }
// :
public FirstPageViewModel()
{
    this.NavigateNextCommand = new RelayCommand<object>(this.NavigateNext);
}
// :
protected void NavigateNext(object parameter)
{
    var navigationWindow = (NavigationWindow)Application.Current.MainWindow;
    navigationWindow.Navigate(new SecondPage(), parameter);
}
ビュー
ページのXAMLでボタンにビューモデルのコマンドをバインドします。
<Page.Resources>
    <vm:FirstPageViewModel x:Key="PageViewModel" />
</Page.Resources>
<Page.DataContext>
    <StaticResourceExtension ResourceKey="PageViewModel" />
</Page.DataContext>
    :
    <Button Content="次へ" Command="{Binding NavigateNextCommand}" CommandParameter="パラメータも渡せます" />
CommandParameter でパラメータを渡すこともできます。
渡したパラメータは、たとえば NavigationService.LoadCompleted の NavigationEventArgs から受け取ることができます。
(遷移先のビューモデルでパラメータを受け取るためには、それをサポートするMVVMフレームワークを採用するか、自前で渡す仕組みを実装する必要があります)
2. ビューモデルで遷移先のページ相対パスを指定する
ビューモデルでコマンドを受けた後、Navigate メソッドの引数にアプリケーションルートからの相対パスを渡します。
protected void NavigateNext(object parameter)
{
    var navigationWindow = (NavigationWindow)Application.Current.MainWindow;
    var uri = new Uri("Views/SecondPage.xaml", UriKind.Relative);
    navigationWindow.Navigate(uri, parameter);
}
ビューモデルのほかの部分やXAMLは「1」と同じです。
3. ビヘイビアを使用してXAMLで遷移先を指定する
ビヘイビアを定義しておけば、ビューモデルへの記述も不要となり、ビューで指定するだけで遷移できるようになります。
ビヘイビア
ボタンコントロールにナビゲーション機能を提供するビヘイビアを定義します。
- 遷移先ページ指定用に
Uri型の依存関係プロパティを定義し、XAMLから指定できるようにします。 -
ClickイベントハンドラでNavigationServiceを取得してNavigateメソッドを呼び出します。
public class NavigateButtonBehaivior : Behavior<ButtonBase>
{
    public static readonly DependencyProperty NavigatePageProperty =
        DependencyProperty.Register("NavigatePage", typeof(Uri), typeof(NavigateButtonBehaivior), new UIPropertyMetadata(null));

    public static readonly DependencyProperty NavigateExtraDataProperty =
        DependencyProperty.Register("NavigateExtraData", typeof(object), typeof(NavigateButtonBehaivior), new UIPropertyMetadata(null));

    // 遷移先のページ
    public Uri NavigatePage
    {
        get { return (Uri)GetValue(NavigatePageProperty); }

        set {  SetValue(NavigatePageProperty, value); }
    }

    // 遷移先に渡すパラメータ
    public object NavigateExtraData
    {
        get { return GetValue(NavigateExtraDataProperty); }

        set { SetValue(NavigateExtraDataProperty, value); }
    }

    protected override void OnAttached()
    {
        base.OnAttached();

        this.AssociatedObject.Click += this.AssociatedObjectClick;
    }

    protected override void OnDetaching()
    {
        this.AssociatedObject.Click -= this.AssociatedObjectClick;

        base.OnDetaching();
    }

    // クリックされたときの処理
    private void AssociatedObjectClick(object sender, RoutedEventArgs e)
    {
        if (this.NavigatePage == null)
        {
            return;
        }

        var button = (ButtonBase)sender;
        var navigationService = GetNavigationService(button);
        if (navigationService == null)
        {
            return;
        }

        // 現ページのパッケージURLを取得して相対パスを絶対パスに変換する。
        // ※new Uri(((IUriContext)navigationWindow).BaseUri, this.NavigatePage) だと
        //  ナビゲーションウィンドウXAMLからの相対パスになるので、サブディレクトリとの間で遷移できない。
        var baseUri = BaseUriHelper.GetBaseUri(button);
        var uri = new Uri(baseUri, this.NavigatePage);

        // ナビゲート
        navigationService.Navigate(uri, this.NavigateExtraData);
    }

    protected virtual NavigationService GetNavigationService(DependencyObject element)
    {
        var window = Window.GetWindow(element);
        if (window is NavigationWindow navigationWindow)
        {
            // NavigationWindow の場合
            return navigationWindow.NavigationService;
        }

        var parent = element;
        while ((parent = VisualTreeHelper.GetParent(parent)) != null)
        {
            if (parent is Frame frame)
            {
                // プレーンな(非 Navigation)Window で Frame を使用している場合
                return frame.NavigationService;
            }
        }

        return null;
    }
}
ビュー
ページのXAMLでは、Button に子要素としてナビゲーション用のビヘイビアを追加します。
<Page
    :
    xmlns:i="http://schemas.microsoft.com/expression/2010/interactivity"
    xmlns:b="clr-namespace:WpfNavigation.Behaviors">

    <Page.Resources>
        <vm:FirstPageViewModel x:Key="PageViewModel" />
    </Page.Resources>
    <Page.DataContext>
        <StaticResourceExtension ResourceKey="PageViewModel" />
    </Page.DataContext>
        :
    <Button Content="次へ" >
        <i:Interaction.Behaviors>
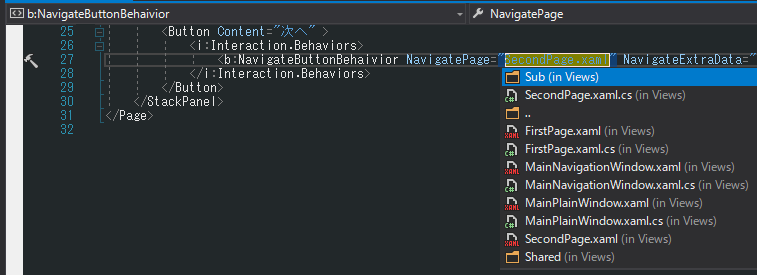
            <b:NavigateButtonBehaivior NavigatePage="SecondPage.xaml" NavigateExtraData="パラメータも渡せます" />
        </i:Interaction.Behaviors>
    </Button>
Uri 型のプロパティを定義すると、ReSharper を導入した環境ではXAMLデザイナでリストからページを選択できるようになります。

設定されるパス文字列は現在のビューからの相対パスとなります。
パス文字列は既定のコンバーター UriTypeConverter によって Uri 型に変換されますが、そのまま Navigate メソッドに渡しても検索することができません。
Navigate メソッドには「パッケージの URI」が必要です。
ビヘイビアでは AssociatedObjectClick で BaseUriHelper.GetBaseUri メソッドを使ってこのページパスの変換を行っています。