背景
画像生成AIである「Stable Diffusion」を、WindowsPCで動作させたい。
できたこと
Windows10 (22H2) +WSL2 (GPGPU) +Ubuntu22.04環境下で、「Stable Diffusion Web UI (AUTOMATIC1111版)1」を動作させた。
やったこと
- Windows10 (22H2) +WSL2 (GPGPU) +Ubuntu22.04環境を構築する
- Ubuntuに、SDWUのインストールに必要なアプリケーションをインストールする
- SDWUのリポジトリに記載の手順をトレースする
- SDWUの動作に必要なファイルを用意する
- 動かす
動作環境
- ホスト環境
- Windows10 Education (22H2)
- Intel Core i5-12400F
- 16GB RAM
- GeForece GTX 1060 6GB
- NVIDIA Driver バージョン: 536.23
- WSL バージョン: 2.2.4.0
- ゲスト環境
- Ubuntu 22.04
- カーネル バージョン: 5.15.153.1-2
具体的な手順
- Windows10 (22H2) +WSL2+Ubuntu22.04環境を構築する
- Windows10上でWSL2を有効化する
- WSL2上で動作するUbuntu22.04をインストールする
- Ubuntuに、SDWUのインストールに必要なアプリケーションをインストールする
- aptで「libgoogle-perftools-dev」をインストールする
- SDWUのリポジトリに記載の手順をトレースする
- Installation and Runningに記載の手順に従う
- SDWUの動作に必要なファイルを用意する
- checkpointファイルをダウンロード&インストールする
- 動かす
- Windows環境のブラウザでSDWUにアクセスする
各項目について、下記で順を追って説明する。
Windows10上でWSL2を有効化する
「Windowsの機能の有効化または無効化」より、下記機能を有効化する。
- Hyper-V
- Linux用Windowsサブシステム
- 仮想マシン プラットフォーム
WSL2上で動作するUbuntu22.04をインストールする
下記コマンドを入力する。
PS C:\Users\hoge> wsl --install -d Ubuntu-22.04
Ubuntu 22.04 LTS は既にインストールされています。
Ubuntu 22.04 LTS を起動しています...
Installing, this may take a few minutes...
Please create a default UNIX user account. The username does not need to match your Windows username.
For more information visit: https://aka.ms/wslusers
Enter new UNIX username: hoge
New password:
Retype new password:
passwd: password updated successfully
この操作を正しく終了しました。
Installation successful!
To run a command as administrator (user "root"), use "sudo <command>".
See "man sudo_root" for details.

Welcome to Ubuntu 22.04.3 LTS (GNU/Linux 5.15.153.1-microsoft-standard-WSL2 x86_64)

 * Documentation:  https://help.ubuntu.com
 * Management:     https://landscape.canonical.com
 * Support:        https://ubuntu.com/advantage


This message is shown once a day. To disable it please create the
/home/hoge/.hushlogin file.
hoge@DESKTOP-FUGA:~$
なお、この時点でnvidia-smiが動作する。
hoge@DESKTOP-FUGA:~$ nvidia-smi
Sun Sep 15 00:19:57 2024
+---------------------------------------------------------------------------------------+
| NVIDIA-SMI 535.54.04              Driver Version: 536.23       CUDA Version: 12.2     |
|-----------------------------------------+----------------------+----------------------+
| GPU  Name                 Persistence-M | Bus-Id        Disp.A | Volatile Uncorr. ECC |
| Fan  Temp   Perf          Pwr:Usage/Cap |         Memory-Usage | GPU-Util  Compute M. |
|                                         |                      |               MIG M. |
|=========================================+======================+======================|
|   0  NVIDIA GeForce GTX 1060 6GB    On  | 00000000:01:00.0  On |                  N/A |
|  0%   50C    P8               8W / 120W |    475MiB /  6144MiB |      1%      Default |
|                                         |                      |                  N/A |
+-----------------------------------------+----------------------+----------------------+

+---------------------------------------------------------------------------------------+
| Processes:                                                                            |
|  GPU   GI   CI        PID   Type   Process name                            GPU Memory |
|        ID   ID                                                             Usage      |
|=======================================================================================|
|    0   N/A  N/A        37      G   /Xwayland                                 N/A      |
+---------------------------------------------------------------------------------------+
CUDA Toolkitのインストールは不要なようである。
aptで「libgoogle-perftools-dev」をインストールする
リポジトリの手順をトレースするだけだと、「Cannot locate TCMalloc (improves CPU memory usage)」というエラーが出る。事前に「libgoogle-perftools-dev」をインストールしておく。
hoge@DESKTOP-FUGA:~$ sudo apt install libgoogle-perftools-dev
Reading package lists... Done
Building dependency tree... Done
Reading state information... Done
The following additional packages will be installed:
  libgoogle-perftools4 liblzma-dev libtcmalloc-minimal4 libunwind-dev
Suggested packages:
  liblzma-doc
The following NEW packages will be installed:
  libgoogle-perftools-dev libgoogle-perftools4 liblzma-dev libtcmalloc-minimal4 libunwind-dev
0 upgraded, 5 newly installed, 0 to remove and 131 not upgraded.
Need to get 2822 kB of archives.
After this operation, 11.9 MB of additional disk space will be used.
Do you want to continue? [Y/n] y
Get:1 http://archive.ubuntu.com/ubuntu jammy/main amd64 libtcmalloc-minimal4 amd64 2.9.1-0ubuntu3 [98.2 kB]
Get:2 http://archive.ubuntu.com/ubuntu jammy/main amd64 libgoogle-perftools4 amd64 2.9.1-0ubuntu3 [212 kB]
Get:3 http://archive.ubuntu.com/ubuntu jammy/main amd64 liblzma-dev amd64 5.2.5-2ubuntu1 [159 kB]
Get:4 http://archive.ubuntu.com/ubuntu jammy-updates/main amd64 libunwind-dev amd64 1.3.2-2build2.1 [1883 kB]
Get:5 http://archive.ubuntu.com/ubuntu jammy/main amd64 libgoogle-perftools-dev amd64 2.9.1-0ubuntu3 [470 kB]
Fetched 2822 kB in 2s (1278 kB/s)
Selecting previously unselected package libtcmalloc-minimal4:amd64.
(Reading database ... 24208 files and directories currently installed.)
Preparing to unpack .../libtcmalloc-minimal4_2.9.1-0ubuntu3_amd64.deb ...
Unpacking libtcmalloc-minimal4:amd64 (2.9.1-0ubuntu3) ...
Selecting previously unselected package libgoogle-perftools4:amd64.
Preparing to unpack .../libgoogle-perftools4_2.9.1-0ubuntu3_amd64.deb ...
Unpacking libgoogle-perftools4:amd64 (2.9.1-0ubuntu3) ...
Selecting previously unselected package liblzma-dev:amd64.
Preparing to unpack .../liblzma-dev_5.2.5-2ubuntu1_amd64.deb ...
Unpacking liblzma-dev:amd64 (5.2.5-2ubuntu1) ...
Selecting previously unselected package libunwind-dev:amd64.
Preparing to unpack .../libunwind-dev_1.3.2-2build2.1_amd64.deb ...
Unpacking libunwind-dev:amd64 (1.3.2-2build2.1) ...
Selecting previously unselected package libgoogle-perftools-dev:amd64.
Preparing to unpack .../libgoogle-perftools-dev_2.9.1-0ubuntu3_amd64.deb ...
Unpacking libgoogle-perftools-dev:amd64 (2.9.1-0ubuntu3) ...
Setting up libtcmalloc-minimal4:amd64 (2.9.1-0ubuntu3) ...
Setting up liblzma-dev:amd64 (5.2.5-2ubuntu1) ...
Setting up libgoogle-perftools4:amd64 (2.9.1-0ubuntu3) ...
Setting up libunwind-dev:amd64 (1.3.2-2build2.1) ...
Setting up libgoogle-perftools-dev:amd64 (2.9.1-0ubuntu3) ...
Processing triggers for man-db (2.10.2-1) ...
Processing triggers for libc-bin (2.35-0ubuntu3.4) ...
/sbin/ldconfig.real: /usr/lib/wsl/lib/libcuda.so.1 is not a symbolic link

hoge@DESKTOP-FUGA:~$
Installation and Runningに記載の手順に従う
リポジトリのInstallation and Runningに丁寧に記載されているので、上から順に実行していく。UbuntuはDebian-basedなので、下記コマンドを順に実行する。
- sudo apt install wget git python3 python3-venv libgl1 libglib2.0-0
- wget -q https://raw.githubusercontent.com/AUTOMATIC1111/stable-diffusion-webui/master/webui.sh
- ./webui.sh
なお、webui.shには実行権限が付与されていなかったので、要すれば下記コマンドで実行権限を付与してからwebui.shを実行する。
- chmod 777 webui.sh
checkpointファイルを自力でダウンロード&インストールする
webui.shを実行すると、プリセットされているcheckpointファイルがダウンロード&インストールされるはずである。しかし、2024年09月15日現在、当該checkpointファイルへのリンクが切れており、ダウンロードに失敗する。
hoge@DESKTOP-FUGA:/mnt/c/share/wsl-sd$ ./webui.sh

(略)

Downloading: "https://huggingface.co/runwayml/stable-diffusion-v1-5/resolve/main/v1-5-pruned-emaonly.safetensors" to /mnt/c/share/wsl-sd/stable-diffusion-webui/models/Stable-diffusion/v1-5-pruned-emaonly.safetensors

loading stable diffusion model: FileNotFoundError
Traceback (most recent call last):
  File "/usr/lib/python3.10/threading.py", line 973, in _bootstrap
    self._bootstrap_inner()
  File "/usr/lib/python3.10/threading.py", line 1016, in _bootstrap_inner
    self.run()
  File "/usr/lib/python3.10/threading.py", line 953, in run
    self._target(*self._args, **self._kwargs)
  File "/mnt/c/share/wsl-sd/stable-diffusion-webui/modules/initialize.py", line 149, in load_model
    shared.sd_model  # noqa: B018
  File "/mnt/c/share/wsl-sd/stable-diffusion-webui/modules/shared_items.py", line 175, in sd_model
    return modules.sd_models.model_data.get_sd_model()
  File "/mnt/c/share/wsl-sd/stable-diffusion-webui/modules/sd_models.py", line 693, in get_sd_model
    load_model()
  File "/mnt/c/share/wsl-sd/stable-diffusion-webui/modules/sd_models.py", line 788, in load_model
    checkpoint_info = checkpoint_info or select_checkpoint()
  File "/mnt/c/share/wsl-sd/stable-diffusion-webui/modules/sd_models.py", line 234, in select_checkpoint
    raise FileNotFoundError(error_message)
FileNotFoundError: No checkpoints found. When searching for checkpoints, looked at:
 - file /mnt/c/share/wsl-sd/stable-diffusion-webui/model.ckpt
 - directory /mnt/c/share/wsl-sd/stable-diffusion-webui/models/Stable-diffusionCan't run without a checkpoint. Find and place a .ckpt or .safetensors file into any of those locations.


Stable diffusion model failed to load

(略)
Civitai等から好みのモデルのcheckpointファイルをダウンロードして、指定のフォルダ内に配置する。上記の例では「/mnt/c/share/wsl-sd/stable-diffusion-webui」下に置けば良いことになる。
Windows環境のブラウザでSDWUにアクセスする
インストール、起動が完了すれば、下記のように出力される。
hoge@DESKTOP-FUGA:/mnt/c/share/wsl-sd$ ./webui.sh

(略)

Calculating sha256 for /mnt/c/share/wsl-sd/stable-diffusion-webui/models/Stable-diffusion/v1-5-pruned-emaonly.safetensors: Running on local URL:  http://127.0.0.1:7860

(略)

vocab.json: 100%|████████████████████████████████████████████████████████████████████| 961k/961k [00:00<00:00, 2.11MB/s]
merges.txt: 100%|████████████████████████████████████████████████████████████████████| 525k/525k [00:00<00:00, 1.06MB/s]
special_tokens_map.json: 100%|█████████████████████████████████████████████████████████| 389/389 [00:00<00:00, 1.29MB/s]
tokenizer_config.json: 100%|███████████████████████████████████████████████████████████| 905/905 [00:00<00:00, 3.15MB/s]
config.json: 100%|█████████████████████████████████████████████████████████████████| 4.52k/4.52k [00:00<00:00, 10.4MB/s]
Applying attention optimization: Doggettx... done.
Model loaded in 54.8s (calculate hash: 23.7s, load weights from disk: 1.0s, create model: 0.3s, apply weights to model: 28.6s, load textual inversion embeddings: 0.3s, calculate empty prompt: 0.9s).
記載されているURLに、Windows環境のブラウザでアクセスする。上記の例では「http://127.0.0.1:7860」にアクセスすれば良いことになる。
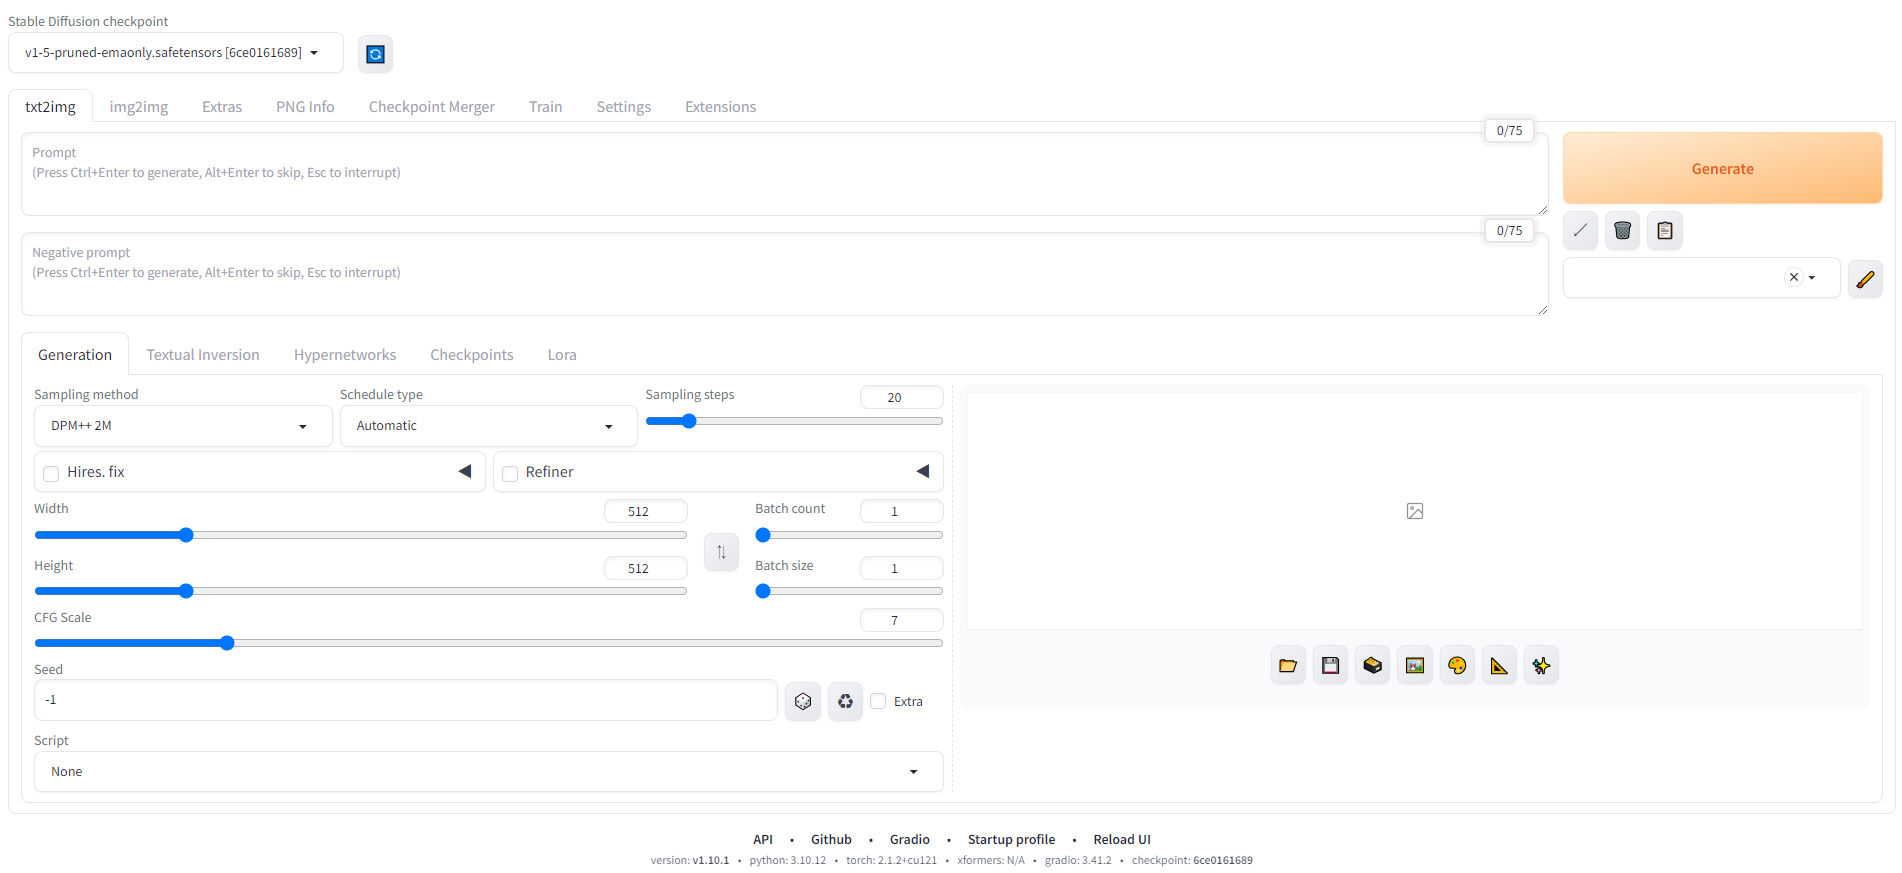
環境構築完了できていれば、下記のような画面がブラウザ上に表示されるはずである。
初生成画像
参考資料
- 深層学習用にWindows機を購入したのでセットアップするメモ 2023年5月
https://zenn.dev/atom/scraps/2a65b201605570
「Cannot locate TCMalloc (improves CPU memory usage)」エラーの対策として、「libgoogle-perftools-dev」をインストールすることを記載したエントリ。一応他の方法でもあるようではある。
参考(のみ)資料 (自分用)
- VRAM 4GBでStable Diffusion(Automatic1111)を動かす
https://note.com/baron_marmarade/n/ne409e32fe7b1
メモリ周りのエラーが出た件に対応。
- 2017年の自作PCでStable Diffusionを遊べるようにするまで
https://note.com/2378tcdf/n/n7184063b2b10
GTX1060でも動くんだと勇気づけてくれた記事。medvramオプションの存在を知る。
- CUDA on WSL User Guide
https://docs.nvidia.com/cuda/wsl-user-guide/index.html
上記資料の参考元である、NVIDIA公式ドキュメント。「sudo apt-get -y install cuda-toolkit-12-5」でインストールが完了する旨表示されるが、「nvcc -v」コマンドの変化なし。
- WSL2でCUDAをインストールする
https://qiita.com/cacaoMath/items/65d6a76b545eb662f581
WSL2でGPGPU環境を構築するための手順が記載されているが、公式では「sudo apt-get -y install cuda-toolkit-12-5」となっているところ、「sudo apt-get -y install cuda」となっている。
- WSLで動かす AUTOMATIC1111 stable-diffusion-webui
https://zenn.dev/ilai/articles/545114f1b59903
CUDAに加え、cuDNNもインストールしている。xformersのビルドには必要なのかも。ただ、現時点でxformersを利用せずに動作させているので、特に関係なし。
なお、こちらのエントリもCUDAインストール時に「sudo apt-get -y install cuda」と入力している。
学習モデルのダウンロードや追加設定の項は参考になると思われるが、まだ目を通せていない。
- Stable Diffusion(WebUI)をローカル環境(Windows11のWSL2のUbuntu)上で使ってみた
https://qiita.com/hirta/items/46c72980af81035af9c6
CUDAインストールしてるっぽい。
- WSL で Windows のシンボリック リンクを作る
https://qiita.com/hanohrs/items/c26ddd367167b1fcdb82
モデルや出力画像をWindows領域に保管するときに参考にした。後で記事にする。
- Google Colab版Stable Diffusionの立ち上げ方法から使い方までを徹底解説!
https://romptn.com/article/5220
VAEを使い始めるタイミングで読むかも。
- xformersを導入してStable Diffusionを高速化しよう!
https://romptn.com/article/6616
VAEを使い始めるタイミングで読むかも。
- Stable Diffusion Web UIとは?使い方まとめ・ダウンロード方法 | 画像生成AI
https://soroban.highreso.jp/article/article-034
日本語化させるタイミングで読むかも。
- 【Stable Diffusion Web UI】モデルの入れ方・使い方(Checkpoint)
https://soroban.highreso.jp/article/article-040#651d3601d90c7102d4621e0a-43ccfbbd501d9e1e87a98dd3
後で読むかも。
- 【Stable Diffusion Web UI】Dockerの使い方 | AUTOMATIC1111版
https://soroban.highreso.jp/article/article-049
後で読むかも。
-
以後、SDWUと記載する。 ↩


