PepperでGet, Postの通信を行うことがありましたので、忘れないためにメモ。
GETリクエスト
シンプルにユーザー名をサーバーに取得しに行くものです。
URLにユーザーIDをパラメーターとして送ります。
Choregrapheはこんな感じです。
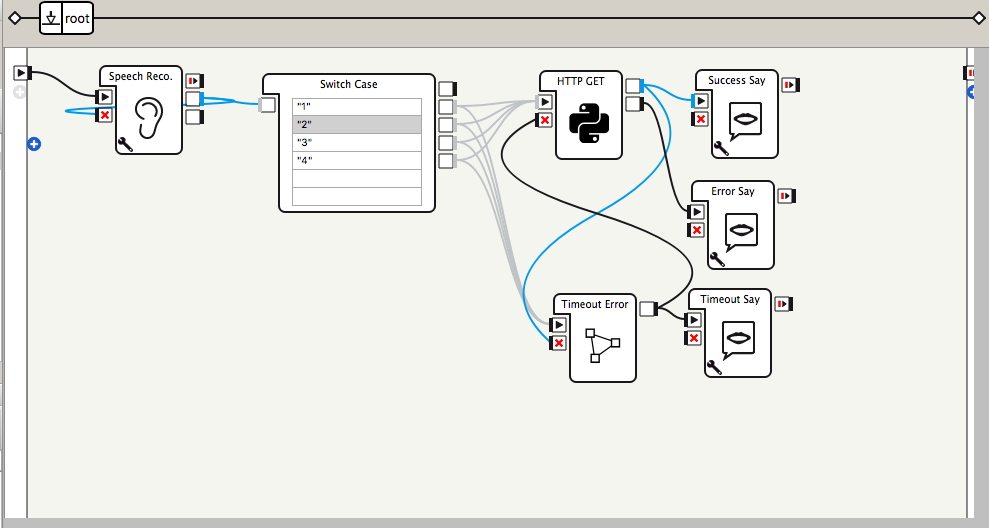
処理の流れ
1. Pepperに番号(ユーザーID)を言う(1~4)
2. Switchで1~4のどれかを判別する
3. Python Scriptボックス(HTTP GET)でサーバーにユーザー名をGetしに行く。
4. もしHTTP通信時間が15秒を過ぎたら、タイムアウトする(Waitボックス)。
5. HTTP GETの中で、レスポンスが正常に帰ってきている場合は、Success Say、失敗の場合は、Failure Say
※Switchにより引き渡される値は、GETの際に使用するパラメーターと考えてください。
Python Scriptボックスの中のコード
HTTPGET
import urllib2, json

class MyClass(GeneratedClass):
    def __init__(self):
        GeneratedClass.__init__(self)

    def onLoad(self):
        self.userName = None

    def onUnload(self):
        #put clean-up code here
        pass

    def onInput_onStart(self, p):
        #pは、ユーザーのID
        if  len(str(p)) > 0:
            #GETのURL(URL+パラメーター)
            url = "https://example.com/users/" + str(p)

            try:
                r = urllib2.urlopen(url)

                #ルートのJSONデータ
                root = json.loads(r.read())

                #必要な項目をUTF8でエンコードする
                self.userName = root["user"]["userName"].encode("utf-8")

                #userNameがあればデータあり、なければなし(今回の仕様)
                if len(self.userName) > 0:
                    self.logger.info(self.userName)
                    self.onSuccess(self.userName)
                else:
                    self.onFailure()

            except urllib2.HTTPError, e:    #HTTPエラー
                self.logger.info(e.msg)
                self.onFailure()

            except urllib2.URLError, e:    #サーバーに接続できない場合
                self.logger.info(e)
                self.onFailure()

        else:
            self.logger.info("failure")
            self.onFailure()

    def onInput_onStop(self):
        self.onUnload() #it is recommended to reuse the clean-up as the box is stopped
        self.onStopped() #activate the output of the box
POSTリクエスト
ユーザー情報を更新するためのPOST処理
利用する前に、requestsモジュールをプロジェクトにインストールする。(インストール方法は参考を参照)
タイムアウト等は、GETと同じ方法を使用する。
以下、POSTを行うときのPython Scriptボックスのコード
HTTPPOST
import requests

class MyClass(GeneratedClass):
    def __init__(self):
        GeneratedClass.__init__(self)

    def onLoad(self):
        self.memory = ALProxy("ALMemory")
        self.pts = None
    def onUnload(self):
        #put clean-up code here
        pass

    def onInput_onStart(self):
        #Pepperのメモリの中に格納された情報でサーバーのユーザー情報を書き換える
        #self.pts = self.memory.getData("Sample/P")
        #userId = self.memory.getData("Sample/UserId")

        #更新する情報
        payload = {
            "userId":"1",
            "points":6
        }

        #POSTのURL
        self.url = "https://example.com/points/"

        try:
            self.r = requests.post(self.url, data=json.dumps(payload))
            self.logger.info(self.r.status_code)    #ステータスコードの取得
            self.logger.info("success")
            self.onSuccess()    #成功したときの処理へ(出力の名前)

        except requests.exceptions.RequestException as e:    #例外発生
            self.logger.info("failure")
            self.logger.info(e)
            self.onFailure()    #失敗したときの処理へ(出力の名前)


    def onInput_onStop(self):
        self.onUnload() #it is recommended to reuse the clean-up as the box is stopped
        self.onStopped() #activate the output of the box
参考
POSTのRequestsモジュールのインストール
http://qiita.com/hththt/items/14bfc2bf23192b020371
POSTのRequestモジュールの使い方
http://requests-docs-ja.readthedocs.io/en/latest/user/quickstart/