NAOのマイクを使用してSTT(Speech to Text)サービス接続を試したので、方法をメモしておく。
現在試したみたのは以下のSTTサービス
- Google Speech API
- Azure Bing Speech API
- Watson STT API
前提条件
- 各種サービスのアカウント作成済み
- サービス接続のためのトークン等の取得済み
Choregrapheアプリ
ChoregrapheからNAOのマイクを使用して、STTAPIに接続します。
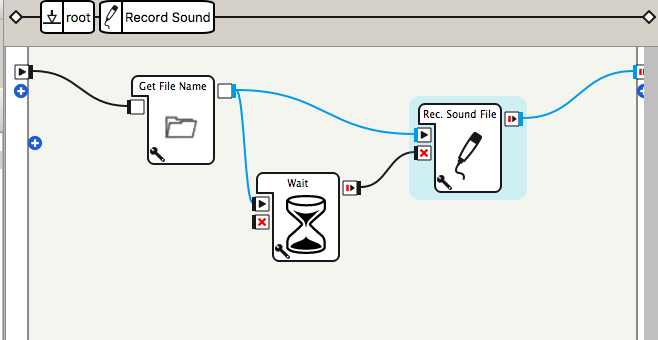
Record Audioボックスを変更する
Record Soundボックスを配置して、その中のRec.SoundRec.Sound Fileボックスのソースコードを編集する。

Pythonのソースは以下のようになる。
class MyClass(GeneratedClass):
    def __init__(self):
        GeneratedClass.__init__(self, False)
        try:
            #self.ad = ALProxy("ALAudioDevice")
            self.ar = ALProxy("ALAudioRecorder")
        except Exception as e:
            #self.ad = None
            self.logger.error(e)
        self.filepath = ""

    def onLoad(self):
        self.bIsRecording = False
        self.bIsRunning = False

    def onUnload(self):
        self.bIsRunning = False
        if( self.bIsRecording ):
            self.ar.stopMicrophonesRecording()
            #self.ad.stopMicrophonesRecording()
            self.bIsRecording = False

    def onInput_onStart(self, p):
        if(self.bIsRunning):
            return
        self.bIsRunning = True

        sExtension = self.toExtension( self.getParameter("Microphones used") )
        self.filepath = p + sExtension
        #if self.ad:
        if self.ar:
            self.ar.startMicrophonesRecording(self.filepath, 'wav', 16000, (0,0,1,0))
            #self.ad.startMicrophonesRecording( self.filepath )
            self.bIsRecording = True
        else:
            self.logger.warning("No sound recorded")

    def onInput_onStop(self):
        if( self.bIsRunning ):
            self.onUnload()
            self.onStopped(self.filepath)

    def toExtension(self, sMicrophones):
        if( sMicrophones == "Front head microphone only (.ogg)" ):
            return ".ogg"
        else:
            return ".wav"
ALAudioDeviceプロキシを使用している部分をALAudioRecorderに変更した。
NAOのFrontマイクを使用している。
以下の部分で設定を行なっている。
self.ar.startMicrophonesRecording(self.filepath, 'wav', 16000, (0,0,1,0))
第4引数として(Right, Left, Front, Rear)マイクのうち、使用するものを1としている。
STTサービスとの接続
Google Speech API
※Google Speech APIのAPIキーが必要なので、持っていなければ取得する。
流れ
- wavデータ→flacデータ変換
- base64データに変換
- 変換内容をリクエストボディに入れてPOSTリクエスト
- レスポンス取得。変換されたテキストを取得。
Pythonボックスを配置して、入力を文字列にして、Record Audioボックスと線を繋げる。
PythonボックスのGoogle Speech APIと接続のための、onInput_onStart(self, p)関数のコードは以下。
def onInput_onStart(self, p):
        import requests, base64, json
        APIKEY = "YOUR_API_KEY"
        GOOGLE_SPEECH_URL = "https://speech.googleapis.com/v1/speech:recognize?key={0}".format(APIKEY)


        #wav -> flac に変更
        FLAC_CONV = 'flac -f'
        filename = p
        del_flac = False
        if 'flac' not in filename:
            del_flac = True
            os.system(FLAC_CONV + ' ' + filename)
            filename = filename.split('.')[0] + '.flac'

        #base64にエンコード
        f = open(filename, 'rb')
        flac_cont = f.read()
        base64_data = base64.b64encode(flac_cont)
        f.close()

        body = {
            'config': {
                'encoding':'FLAC',
                'sampleRateHertz':'16000',
                'languageCode':'ja-JP'
            },
            'audio': {
                'content': base64_data
            }
        }

        res = requests.post(GOOGLE_SPEECH_URL, data=json.dumps(body))
        if res.status_code == 200:
            data = res.json()
            result = data['results']
            if len(result) > 0:
                if len(result[0]['alternatives']) > 0:
                    text = result[0]['alternatives'][0]['transcript'].encode('utf')
            self.onNext(text)
        else:
            self.logger.info(res.status_code)
            self.logger.info(res.text.encode('utf8'))
            self.onError()
Azure Bing Speech API
※Azureも接続のためのキーが必要になるので、取得する。
流れ
- 接続キーから、アクセストークンを発行するためにGETリクエストする
- アクセストークン取得できたら、wavデータをbase64に変換する
- POSTリクエスト
- レスポンス取得
Pythonボックスの入力はGoogleと同じく文字列に変更する。
ボックスの中に、以下のソースコードを追加する。
def fetchAccessToken(self, key):
        import requests
        AUTH_URL = 'https://api.cognitive.microsoft.com/sts/v1.0/issueToken'
        AUTH_KEY = key

        auth_headers = {
            'Content-type': 'application/x-www-form-urlencoded',
            'Content-Length': '0',
            'Ocp-Apim-Subscription-Key': AUTH_KEY
        }

        ACCESS_TOKEN = ''
        res = requests.post(AUTH_URL, headers=auth_headers)
        if res.status_code == 200:
            return res.text
        else:
            return None

def stt (self, token, filename):
    import uuid, urllib, requests

    #base64にエンコード
    f = open(filename, 'rb')
    data = f.read()
    f.close()

    language = 'ja-JP'
    format = 'simple'
    instanceid = str(uuid.uuid4()).replace('-', '')
    requestid = uuid.uuid4()

    params = {
        "version": "3.0",
        "appID": "D4D52672-91D7-4C74-8AD8-42B1D98141A5",
        "instanceid": instanceid,
        "requestid": requestid,
        "format": "json",
        "locale": language,
        "device.os": "naoqi",
        "scenarios": 'ulm',
    }

    url = "https://speech.platform.bing.com/recognize/query?" + urllib.urlencode(params)
    headers = {"Content-type": "audio/wav; samplerate={0}".format('16000'),
                "Authorization": "Bearer " + token,
                "X-Search-AppId": "07D3234E49CE426DAA29772419F436CA",
                "X-Search-ClientID": "1ECFAE91408841A480F00935DC390960",
                "User-Agent": "OXFORD_TEST"}

    response = requests.post(url, data=data, headers=headers)

    if response.ok:
        result = response.json()["results"][0]
        self.logger.info(result["lexical"].encode('utf8'))
        return result["lexical"].encode('utf8')
    else:
        self.logger.info(response.raise_for_status())
        return ''

def onInput_onStart(self, p):
    APIKEY = "YOUR_BING_API_KEY"
    #ACCESS_TOKEN取得する
    ACCESS_TOKEN = self.fetchAccessToken(APIKEY)

    if ACCESS_TOKEN != None:
        #BING Speech APIへPOSTリクエスト
        result = self.stt(ACCESS_TOKEN, p)
        if result != '':
            self.onNext(result)
        else:
            self.onError()
Watson STT API
※WatsonのSTTに接続するには、ユーザー名とパスワード情報が必要です。
流れ
- wavをbase64データに変換
- 認証情報を含めてPOSTリクエスト
- レスポンスからテキストを取得
Pythonボックスを配置して、入力を文字列に変更します。
PythonのソースコードをonInput_onStart(self, p)関数に追加します。
def onInput_onStart(self, p):
    import requests
    endpoint = 'https://stream.watsonplatform.net/speech-to-text/api'
    username = 'YOUR_WATSON_USERNAME'
    password = 'YOUR_WATSON_PASSWORD'

    #Encode audio data into base64
    f = open(p, 'rb')
    flac_cont = f.read()
    f.close()

    headers = {'Content-Type': 'audio/wav'}
    language = 'ja-JP_BroadbandModel'
    url = endpoint + '/v1/recognize?model={}'.format(language)
    res = requests.post(url, auth=(username, password), data=flac_cont, headers=headers)
    if res.status_code == 200:
        data = res.json()
        result = data['results'][0]['alternatives'][0]['transcript'].encode('utf8')
        self.logger.info(result)
        self.onNext(result)
    else:
        self.logger.info('error')
        self.onError()
