Javaアプリケーション(データベースから値を取得し、JSON形式で結果を返す)をCodePipelineでElasticBeanstalkにCI/CDするハンズオンです。
長いので、
- 【CodePipeline×ElasticBeanstalk】JavaアプリケーションをCodePipelineでElasticBeanstalkにCI/CDする その1(本記事)
→ 1. Java(Spring Boot)アプリケーションの作成, 2. Gitリポジトリの作成 -
【CodePipeline×ElasticBeanstalk】JavaアプリケーションをCodePipelineでElasticBeanstalkにCI/CDする その2
→ 3. Elastic Beanstalk環境の作成, 4. データベースの設定 -
【CodePipeline×ElasticBeanstalk】JavaアプリケーションをCodePipelineでElasticBeanstalkにCI/CDする その3
→ 5. パイプラインの作成, 6. 後片付け
にの3記事に内容を分割しています。
作業時間は事前準備を除いて、トータル3時間前後を想定。各記事1時間程度が目安。
環境
- OS:Windows10
- IDE:Eclipse 2020-03
- JDK:Amazon Correto 8
- フレームワーク:Spring Boot
- AWS
- CodePipeline
- CodeCommit
- CodeBuild
- CodeDeploy
- Elastic Beantalk
- Java SE(Java 8 バージョン 2.10.8)
→ 異なるプラットフォームブランチ(Corretto 11など)でも同手順でできます。 - RDS:MySQL Community Edition(バージョン8.0.17)
- Java SE(Java 8 バージョン 2.10.8)
- CodePipeline
イメージ図
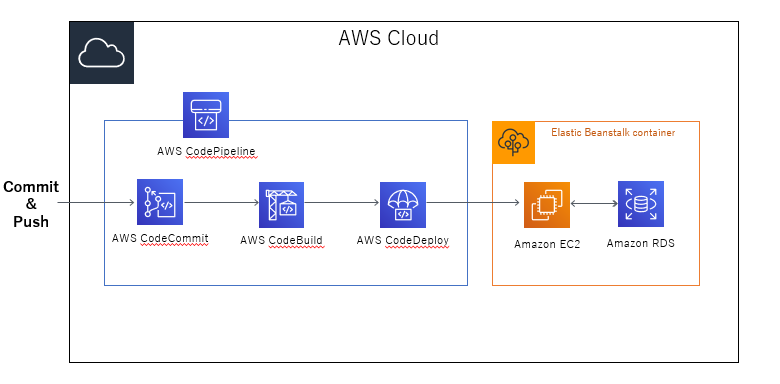
本手順でできる内容のざっくりとしたイメージ図です。
ローカルで編集したコードをコミット → CodeCommitにプッシュすると、CodePipelineにより、アプリケーション実行環境であるElastic Beanstalkまで自動でビルド、デプロイを行ってくれるCI/CDの仕組みを構築します。
事前準備
①Eclipseが未インストールの場合は、
Pleiades All in One Eclipse ダウンロード(リリース 2020-06) | MergeDoc Project
より最新版(2020年8月3日時点)をダウンロードしてください。STS と Lombok が設定済みのため、Spring Bootによる開発にすぐ着手できます。
②JDKはAmazon Correto 8を想定しています。
Amazon Corretto 8 のダウンロード | aws
より、ダウンロード→インストールし、Eclipseへの設定を済ませておいてください。
③CodeCommitが使えるよう、
AWSのCodeCommit使い方。アクセスキー作るところからなど。| Qiita
を参考に、事前準備を行っておいてください。
手順
1. Java(Spring Boot)アプリケーションの作成
まず、EclipseでJava(Spring Boot)アプリケーションを作成します。
店舗IDをもとに、店舗詳細情報を取得する至ってシンプルな内容になっています。
パッケージの構成は以下の通り。
sample-eb-java
     |
    src/main/java
     |----jp.co.sample_eb_java
     |               |---- app
     |               |     |---- controller
     |               |     |---- response
     |               |
     |               |---- domain
     |               |      |---- service
     |               |      |---- repository
     |               |      |---- model
     |               |
     |               |---- exception
     |
     |
    src/main/resources
     |----application.yml
     |
    Buildfile
    Procfile
    build.gradle
    .ebextensions

・・・以下、省略
[1] プロジェクトの作成
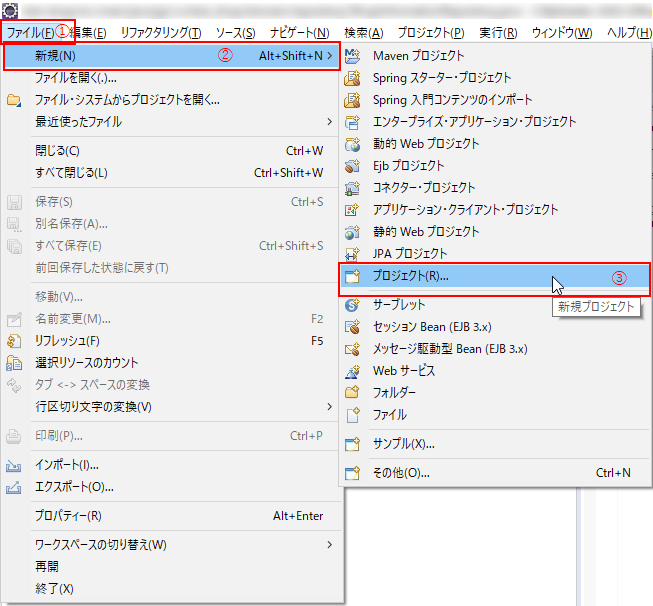
(1) Eclipseを開いたら、「ファイル」(①)> 「新規」(②) > 「プロジェクト」(③)の順でクリック。
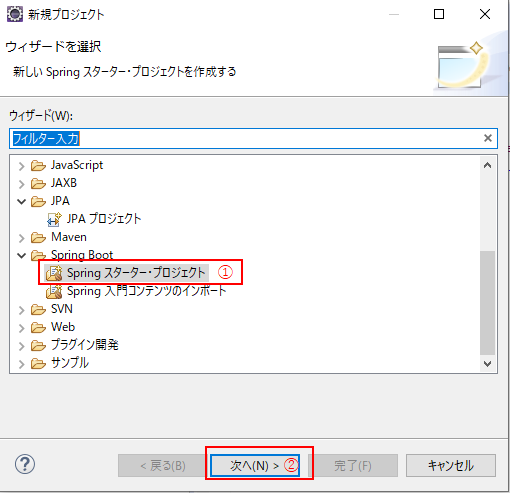
(2) ウィザードが立ち上がったら、「Springスターター・プロジェクト」を選択し(①)、「次へ」(②)をクリック。
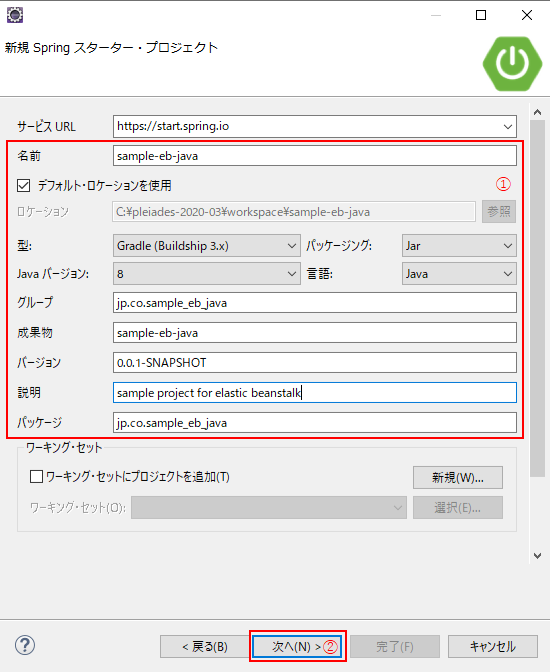
(3) 以下のキャプチャのように設定し(①)、「次へ」(②)をクリック。
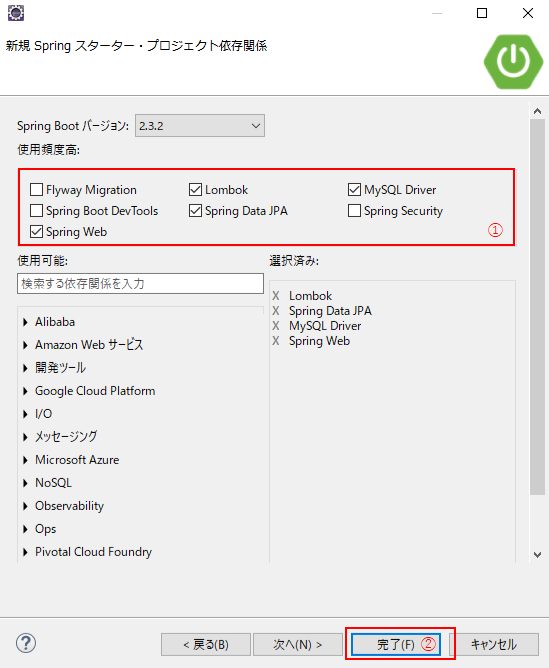
(4)Lombok, MySQL Driver, Spring Data JPA, Spring Webにチェックを入れ(候補に出ていない場合は検索ボックスより検索してください)、「次へ」(②)を押下
[2] 設定ファイルの変更・作成
次に、設定ファイルの変更と作成を行います。
(1)application.propertiesをapplication.ymlに名前変更し、以下のように記述します。
※application.propertiesのままでもいいのですが、最近の潮流(?)を踏まえてそうしました。

spring:
  datasource:
    driver-class-name: com.mysql.cj.jdbc.Driver
    url: jdbc:mysql://${DB_HOST:ホスト名}:${DB_PORT:ポート番号}/${DB_NAME:データベース名}?serverTimezone=JST
    username: ${DB_USERNAME:ユーザー名}
    password: ${DB_PASSWORD:パスワード}
  jpa:
    database: MYSQL
    hibernate.ddl-auto: none
server:
  port: ${SERVER_PORT:サーバーポート番号}
日本語の箇所は後で変更するので、いったんこのままで。
(2)ルートディレクトリにBuildfileを作成し、以下の通り記述。
build: ./gradlew assemble
(3)ルートディレクトリにProcfileを作成し、以下の通り記述。
web: java -jar build/libs/sample-eb-java.jar
(4) build.gradleに追記します。追記前の箇所を探し、「bootJar.archiveName = "sample-eb-java.jar"」を追記してください。
configurations {
	compileOnly {
		extendsFrom annotationProcessor
	}
}
configurations {
	compileOnly {
		extendsFrom annotationProcessor
	}
	bootJar.archiveName = "sample-eb-java.jar"
}
[3]ソースコードの作成
続いて、ソースコードの作成です。
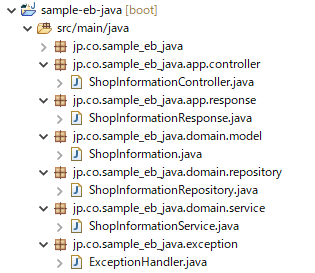
パッケージ構成はこの章(1. Java(Spring Boot)アプリケーションの作成)の冒頭の通りですが、上まで戻るのも面倒かと思うので、キャプチャを貼っておきます。
(1)まずはEntityクラス。
後から出てきますが、データベースに作成するshop_informationsテーブルに対応する内容となっています。
package jp.co.sample_eb_java.domain.model;

import java.io.Serializable;
import javax.persistence.*;

import lombok.Getter;
import lombok.Setter;


/**
 * 店舗情報テーブルに紐づくEntityクラス
 *
 * @author CHI-3
 *
 */
@Entity
@Getter
@Setter
@Table(name="shop_informations")
@NamedQuery(name="ShopInformation.findAll", query="SELECT s FROM ShopInformation s")
public class ShopInformation implements Serializable {
	private static final long serialVersionUID = 1L;

	@Id
	@GeneratedValue(strategy=GenerationType.IDENTITY)
	@Column(name="shop_id")
	private Integer shopId;

	private String access;

	private String address;

	@Column(name="business_hour")
	private String businessHour;

	@Column(name="regular_holiday")
	private String regularHoliday;

	@Column(name="shop_name")
	private String shopName;

	private String tel;

	@Column(name="zip_code")
	private String zipCode;

	public ShopInformation() {
	}

}
(2)続いて、Repositoryインターフェース。テーブル操作に使用するインターフェースです。
package jp.co.sample_eb_java.domain.repository;

import org.springframework.data.jpa.repository.JpaRepository;
import org.springframework.stereotype.Repository;

import jp.co.sample_eb_java.domain.model.ShopInformation;

/**
 * 店舗情報を扱うリポジトリインターフェース
 *
 * @author CHI-3
 *
 */
@Repository
public interface ShopInformationRepository extends JpaRepository<ShopInformation, Integer>{

	/**
	 * 店舗IDに紐づく店舗情報を取得
	 *
	 * @param shopId 店舗ID
	 * @return 店舗情報
	 */
	public ShopInformation findByShopId(Integer shopId);

}
(3) 続いて、Serviceクラス。ロジックを提供します。
package jp.co.sample_eb_java.domain.service;

import java.util.Optional;

import org.springframework.stereotype.Service;

import jp.co.sample_eb_java.domain.model.ShopInformation;
import jp.co.sample_eb_java.domain.repository.ShopInformationRepository;
import lombok.RequiredArgsConstructor;

/**
 * 店舗情報を取得するサービスクラス
 *
 * @author CHI-3
 *
 */
@Service
@RequiredArgsConstructor
public class ShopInformationService {

	private final ShopInformationRepository shopInformationRepository;

	/**
	 * 店舗情報を取得
	 *
	 * @param shopId 店舗ID
	 * @return 店舗情報
	 * @throws Exception
	 */
	public ShopInformation getShopInformation(Integer shopId) throws Exception{
		// 店舗情報を取得:対象店舗が存在しなければ例外をThrow
		ShopInformation shopInformation = Optional.ofNullable(shopInformationRepository.findByShopId(shopId)).orElseThrow(Exception::new);
		return shopInformation;
	}

}
(4)次に、Responseクラス。返却する値の成形を行います。
package jp.co.sample_eb_java.app.response;

import jp.co.sample_eb_java.domain.model.ShopInformation;
import lombok.Builder;
import lombok.Getter;

/**
 * 店舗情報取得用レスポンスクラス
 * @author CHI-3
 *
 */
@Getter
@Builder
public class ShopInformationResponse {
	/** 店舗情報 */
	private ShopInformation shopInformation;
}
(5)お次は、Controllerクラス。JSON形式で値を返却するため、@RestControllerを使っています。
package jp.co.sample_eb_java.app.controller;

import org.springframework.http.HttpStatus;
import org.springframework.http.ResponseEntity;
import org.springframework.web.bind.annotation.GetMapping;
import org.springframework.web.bind.annotation.PathVariable;
import org.springframework.web.bind.annotation.RestController;

import jp.co.sample_eb_java.app.response.ShopInformationResponse;
import jp.co.sample_eb_java.domain.model.ShopInformation;
import jp.co.sample_eb_java.domain.service.ShopInformationService;
import lombok.RequiredArgsConstructor;

/**
 * 店舗情報を取得するAPI
 *
 * @author CHI-3
 *
 */
@RestController
@RequiredArgsConstructor
public class ShopInformationController {

	private final ShopInformationService shopInformationService;

	/**
	 * 店舗情報を取得
	 *
	 * @param shopId 店舗ID
	 * @return レスポンスエンティティ(店舗情報)
	 * @throws Exception
	 */
	@GetMapping("/shop-information/{shopId}")
	public ResponseEntity<ShopInformationResponse> getShopInformation(@PathVariable("shopId") Integer shopId) throws Exception{
		ShopInformation shopInformation = shopInformationService.getShopInformation(shopId);
		ShopInformationResponse shopInformationResponse = ShopInformationResponse.builder().shopInformation(shopInformation).build();
		return new ResponseEntity<>(shopInformationResponse, HttpStatus.OK);
	}

}
(6) 最後に、ExceptionHandler。エラーハンドリングしてくれるクラスです。
今回は、存在しない店舗IDをリクエストした際などに、400エラー(Bad Request)を返却する内容になっています。
package jp.co.sample_eb_java.exception;


import org.springframework.http.HttpStatus;
import org.springframework.http.ResponseEntity;
import org.springframework.web.bind.annotation.ControllerAdvice;
import org.springframework.web.bind.annotation.ResponseBody;
import org.springframework.web.bind.annotation.ResponseStatus;

import lombok.extern.slf4j.Slf4j;

/**
 * 例外ハンドラー
 *
 * @author CHI-3
 *
 */
@ControllerAdvice
@Slf4j
public class ExceptionHandler {

    @ResponseStatus(HttpStatus.BAD_REQUEST)
    @org.springframework.web.bind.annotation.ExceptionHandler({Exception.class})
    public @ResponseBody
    ResponseEntity<Object> handleError(final Exception e) {
        log.info("call ExceptionHandler", e);
        return new ResponseEntity<>(HttpStatus.BAD_REQUEST);
    }
}
[4] jarファイルの作成
(1) Elastic Beantalkの環境作成時用にjarファイルを作成します。
プロジェクトのルートディレクトリに移動し、ビルドコマンドを実行。
配置が以下のような場合は下記のようになります。
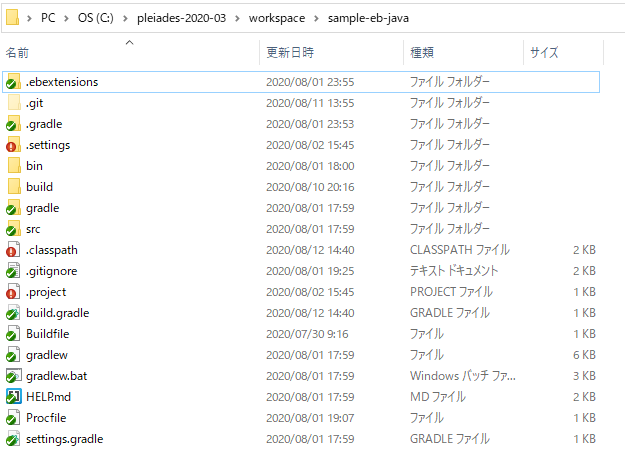
> cd C:\pleiades-2020-03\workspace\sample-eb-java
> gradlew build
結果が「BUILD SUCCESSFUL」となればOK!
(2) build/libs配下にjarファイルが作成されていることを確認しましょう。
(これを環境作成時に使用します。)

2. Gitリポジトリの作成
手順1で作成したプロジェクトをGit管理できるようにします。
手順1で作成したプロジェクト上でローカルリポジトリを作成し、リモートリポジトリと同期する流れで行います。
[1] ローカルリポジトリの作成
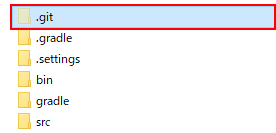
(1) コマンドプロンプト、またはGitBashを開き、1で作成したプロジェクトのルートディレクトリに移動(cd)した後、リポジトリの初期化を行います(以下のコマンドを実行)。
> git init
プロジェクトのルートディレクトリに.gitフォルダができればOK。
(2)コミットする前に、 .gitignoreの書き換えを行います。
デフォルトの記述では、STSなど、必要な機能がコミット対象外となってしまい、後々動作しないなど、不具合の原因になりかねません。
以下の通り記述を変更します。
classファイルやlockファイルなど、コミットの必要のないものが対象外となります。
bin/*
.lock
(3) 編集内容をコミットします。
以下のコマンドを順に実行すればOK。
> git add .
> git commit -m "first commit"
「first commit」の部分(コミットメッセージ)は任意の内容でOKですが、編集内容がわかるメッセージにしましょう(以降同様。)
(4) 再度、.gitignoreを編集します。
機能としては必要だけれども、ローカルからのコミット対象外となるものを記述。
# Created by https://www.toptal.com/developers/gitignore/api/java,gradle,eclipse
# Edit at https://www.toptal.com/developers/gitignore?templates=java,gradle,eclipse

### Eclipse ###
.metadata
bin/
tmp/
*.tmp
*.bak
*.swp
*~.nib
local.properties
.settings/
.loadpath
.recommenders

# External tool builders
.externalToolBuilders/

# Locally stored "Eclipse launch configurations"
*.launch

# PyDev specific (Python IDE for Eclipse)
*.pydevproject

# CDT-specific (C/C++ Development Tooling)
.cproject

# CDT- autotools
.autotools

# Java annotation processor (APT)
.factorypath

# PDT-specific (PHP Development Tools)
.buildpath

# sbteclipse plugin
.target

# Tern plugin
.tern-project

# TeXlipse plugin
.texlipse

# STS (Spring Tool Suite)
.springBeans

# Code Recommenders
.recommenders/

# Annotation Processing
.apt_generated/
.apt_generated_test/

# Scala IDE specific (Scala & Java development for Eclipse)
.cache-main
.scala_dependencies
.worksheet

# Uncomment this line if you wish to ignore the project description file.
# Typically, this file would be tracked if it contains build/dependency configurations:
# .project

### Eclipse Patch ###
# Spring Boot Tooling
.sts4-cache/

### Java ###
# Compiled class file
*.class

# Log file
*.log

# BlueJ files
*.ctxt

# Mobile Tools for Java (J2ME)
.mtj.tmp/

# Package Files #
*.jar
*.war
*.nar
*.ear
*.zip
*.tar.gz
*.rar

# virtual machine crash logs, see http://www.java.com/en/download/help/error_hotspot.xml
hs_err_pid*

### Gradle ###
.gradle
build/

# Ignore Gradle GUI config
gradle-app.setting

# Avoid ignoring Gradle wrapper jar file (.jar files are usually ignored)
!gradle-wrapper.jar

# Cache of project
.gradletasknamecache

# # Work around https://youtrack.jetbrains.com/issue/IDEA-116898
# gradle/wrapper/gradle-wrapper.properties

### Gradle Patch ###
**/build/

# End of https://www.toptal.com/developers/gitignore/api/java,gradle,eclipse
※上記はgitignore.ioで、
- Java
- Gradle
- Eclipse
を条件として作成しました。
変更が完了したら、コミットしておきましょう。
> git add .gitignore
> git commit -m "fix .gitignore"
(5) gradlewの権限変更を行います。
【重要】この手順を飛ばしてしまうと、ビルド、デプロイ時にエラーになるので、忘れず実施してください。
まず、gradlewの権限を確認します。
> git ls-files -s gradlew
100644 fbd7c515832dab7b01092e80db76e5e03fe32d29 0       gradlew
上記のままだと、読み取り権限しかないので、以下のコマンドを実行して、実行権限を与えます。
> git update-index --add --chmod=+x gradlew
実行が完了したら、再度権限確認を行いましょう。
以下の通り、最初の6桁の数字の下3桁が755になっていればOK。
> git ls-files -s gradlew
100755 fbd7c515832dab7b01092e80db76e5e03fe32d29 0       gradlew
変更内容をコミットします。
> git add gradlew
> git commit -m "fix permission of gradlew"
[2] リモートリポジトリの作成
(1) AWSマネジメントコンソールにログインし、「サービス」(①)からCodeCommitを探してクリック(②)。

(2) CodeCommitのページに遷移したら、「リポジトリを作成」をクリック。

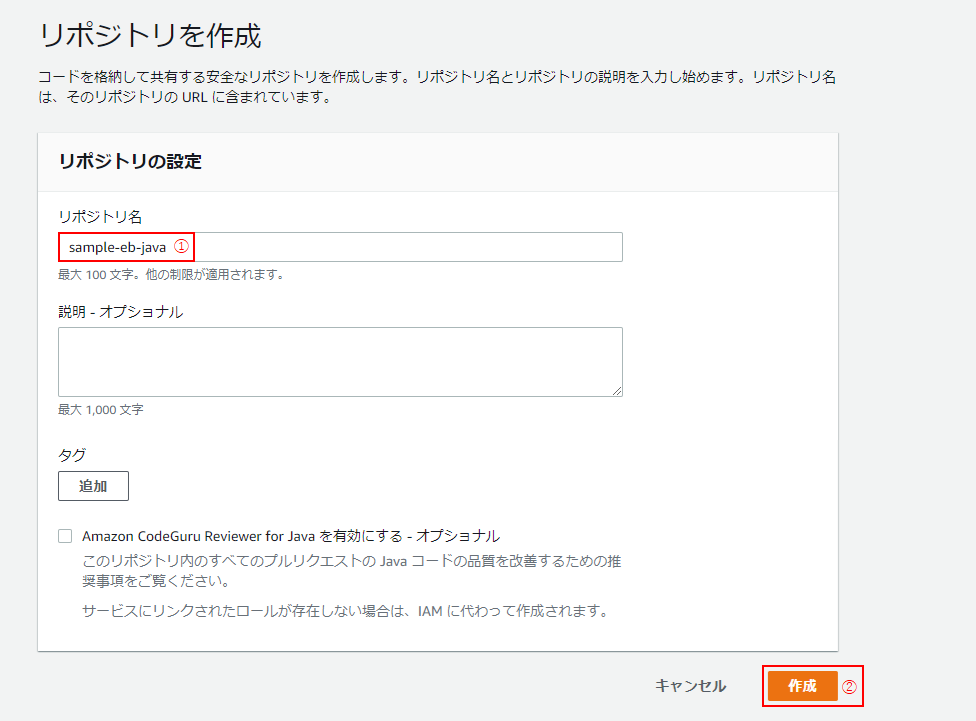
(3)手順1で作成したプロジェクトと同名のリポジトリ名をつけ(①)、「作成」をクリック。
[3] ローカルリポジトリとリモートリポジトリを同期
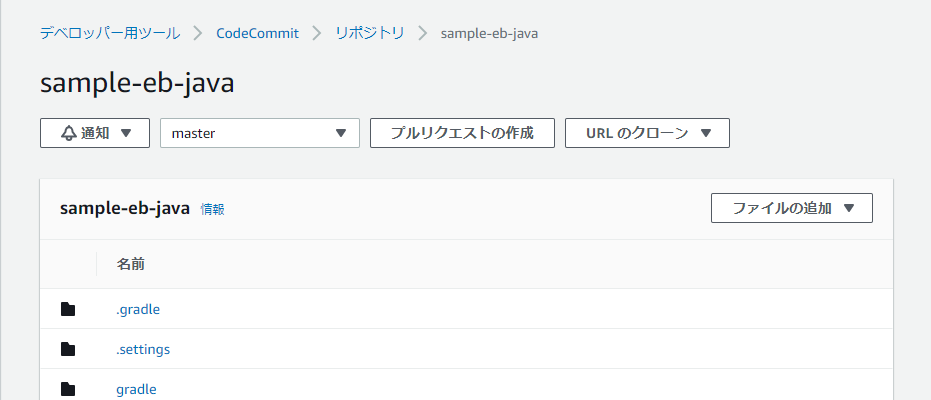
(1)リモートリポジトリの作成が完了すると、以下のようなページに遷移するので、「URLのクローン」(①) > 「HTTPSのクローン」(②)をクリック。

(2)コマンドプロンプト or GitBashを開き、プロジェクトのルートディレクトリにて、以下のコマンドを実行。
> git remote add origin (1)の「HTTPSのクローン」でコピーされたURI
(3) 内容をリモートリポジトリのmasterにプッシュ。
> git push -u origin master
(4)コンソールにて、リモートリポジトリにローカルリポジトリの内容が反映されていることを確認しましょう。
続編について
続きは、
にて。
3. Elastic Beanstalk環境の作成, 4. データベースの接続設定を行います。
更新履歴
- 2020/08/13:手順「1. Java(Spring Boot)アプリケーションの作成」に「[4] jarファイルの作成」を追記