本記事は JUCE Advent Calendar 2017 の12月10日向けに投稿した記事です。
英国ROLI社が開発・販売しているBlocksシリーズは、プログラマブルな楽器インターフェースです。製品サイト
Blocksシリーズの中でもLEDグリッドが特徴的なLightpad Blockで電光掲示板を作りました。
作ったもの
Blocksで電光掲示板を作る。文字ドットの定義だけで結構なバイト数食うのね。#ROLI #BLOCKS #JUCE #技術書典 pic.twitter.com/yCuEGPGW74
— COx2 ))))@ (@CO_CO_) 2017年10月21日
ソースコード
Lightpad Blockのスペック
- 5Dタッチセンシティブ・コントロール・サーフェス
- 15 x 15 LEDマトリクス
- 94 mm x 94 mm x 20 mm / 250g
- DNAコネクター8基搭載
- 充電式バッテリー内蔵
- USB-C端子(MIDI出力/電源供給)
- USBおよびBluetoothによるMIDI互換(DAWでも使用可能)
ROLI Blocksのセットアップ
こちらの記事 "ROLI BLOCKSプログラミング はじめの一歩" を参考にセットアップを進めておきます。
キャラクター(文字)を定義する
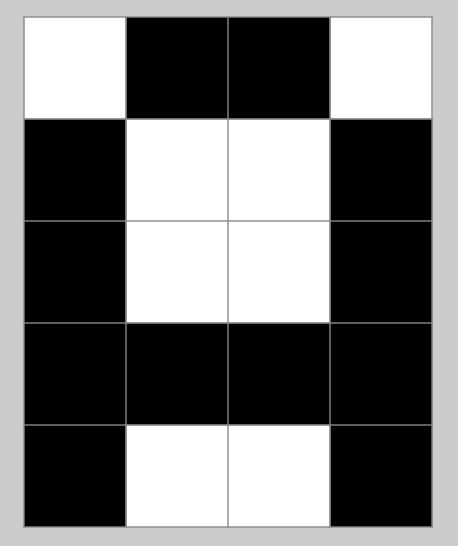
Lightpad Blockは15 x 15 LEDマトリクスを持ちます。3文字は同時に表示できるようにしたい、また、文字の間には1ドットの隙間は開けるようにしておきたいので、1文字あたりの大きさを横4 × 縦5にします。
例えば、アルファベットの"A"を横4 × 縦5で作成する場合、LEDマトリクスの点灯を制御するのにLittlefoot言語で以下のように記述します。

charColor = 0xffffffff;  //ARGB(255,255,255,255)=ホワイト色
x = 0;                  //X方向基準座標
y = 0;                  //Y方向基準座標

fillPixel(charColor, x,y+1);
fillPixel(charColor, x,y+2);
fillPixel(charColor, x,y+3);
fillPixel(charColor, x,y+4);
fillPixel(charColor, x+1,y);
fillPixel(charColor, x+1,y+3);
fillPixel(charColor, x+2,y);
fillPixel(charColor, x+2,y+3);
fillPixel(charColor, x+3,y+1);
fillPixel(charColor, x+3,y+2);
fillPixel(charColor, x+3,y+3);
fillPixel(charColor, x+3,y+4);
キャラクター表示制御用の関数を定義する
表示したいアルファベットの数だけキャラクター(文字)フォントのマトリクスを定義します。
それを"showCharactor"関数でラップし、表示したい文字コード(ASCIIコード)、文字の色(ARGB)、文字のX方向原点、Y方向原点を引数として設定し、関数内の条件分岐で描画する文字を決定します。
void showCharactor(int charcode, int charColor, int x, int y)
{
    if(charcode == 0x41) //A
    {
        fillPixel(charColor, x,y+1);
        fillPixel(charColor, x,y+2);
        fillPixel(charColor, x,y+3);
        fillPixel(charColor, x,y+4);
        fillPixel(charColor, x+1,y);
        fillPixel(charColor, x+1,y+3);
        fillPixel(charColor, x+2,y);
        fillPixel(charColor, x+2,y+3);
        fillPixel(charColor, x+3,y+1);
        fillPixel(charColor, x+3,y+2);
        fillPixel(charColor, x+3,y+3);
        fillPixel(charColor, x+3,y+4);
    }

    else if(charcode == 0x42) //B
    {
        fillPixel(charColor, x,y);
        fillPixel(charColor, x,y+1);
        fillPixel(charColor, x,y+2);
        fillPixel(charColor, x,y+3);
        fillPixel(charColor, x,y+4);
        fillPixel(charColor, x+1,y);
        fillPixel(charColor, x+1,y+2);
        fillPixel(charColor, x+1,y+4);
        fillPixel(charColor, x+2,y);
        fillPixel(charColor, x+2,y+2);
        fillPixel(charColor, x+2,y+4);
        fillPixel(charColor, x+3,y+1);
        fillPixel(charColor, x+3,y+3);
    }
    //
    // キャラクター定義が続く
    //
}
スクロールアニメーションを実装する
Littlefoot言語では、毎フレーム"repaint()"関数が実行されます。"repaint()"関数内でキャラクターの基準座標を変更する処理を行い、変更された基準座標を"showCharactor"関数に渡すことで、フレーム単位でのアニメーションを実装することができます。
void repaint()
{
    clearDisplay();   // LEDマトリクスの点灯状態をクリアにする

    updateBar();

    if(moveSwitch)
    {
        basePostionX = updateBasePosition(basePostionX);
    }

    showCharactor(0x4a, touchColor0, basePostionX+0, basePostionY+0); //J
    showCharactor(0x55, touchColor1, basePostionX+5, basePostionY+0); //U
    showCharactor(0x43, touchColor2, basePostionX+10,basePostionY+0); //C
    showCharactor(0x45, touchColor3, basePostionX+15,basePostionY+0); //E

    showCharactor(0x4a, touchColor0, basePostionX+25,basePostionY+0); //J
    showCharactor(0x41, touchColor4, basePostionX+30,basePostionY+0); //A
    showCharactor(0x50, touchColor1, basePostionX+35,basePostionY+0); //P
    showCharactor(0x41, touchColor4, basePostionX+40,basePostionY+0); //A
    showCharactor(0x4e, touchColor2, basePostionX+45,basePostionY+0); //N
}

int updateBasePosition(int currentPosition)
{
    internalCounter++;
    if(internalCounter % 3 == 0)
    {
        currentPosition--;
    }

    if(currentPosition < -50)
    {
        return 25;
    }
    return currentPosition;
}

void updateBar()
{
    if(internalCounter % 3 == 0)
        barColor = getRandomColor();

    fillRect(barColor, 0, 0, 15, 2);
    fillRect(barColor, 0,13, 15, 2);
}
