第1回「Webフロントエンド開発勉強会」、第2回「Webフロントエンド開発勉強会」 に続き、今回は Angular について説明します。
Angular について
Angular(アンギュラー)は、Googleによって開発されているフルスタックのフレームワークで、以下のような特徴があります。
- フルスタックで、開発に必要な機能を公式で提供しているため、エンジニアは自分が開発するサービスのことだけに集中できる
- TypeScript で記述量少なく保守性の高いソースコードを書くことができる
- コンポーネント思考で、パーツごとにソースコードを分割できる
- モジュール分割して遅延ロードすることで、初期ロード時の読み込みを短縮できる
- Incremental DOM で DOM操作のパフォーマンスが良い
準備
Node.js のインストール
以下から Node.js をダウンロードしてインストールしてください。
https://nodejs.org/ja/
Angular CLI のインストール
$ npm install -g @angular/cli
この記事を書いたときの Angular CLI のバージョンは 6.0.8 です。
新しいアプリケーションの作成
$ ng new my-angular-app
--routing オプションでルーティングの設定を追加したり、--style=scss オプションで SCSS を指定することもできます。
ここでは以下のようにアプリケーションを作成してください。
$ ng new my-angular-app --routing
ビルド&ローカルサーバ起動
$ cd my-angular-app
$ ng serve
アプリケーションの実行
Webブラウザで http://localhost:4200 へアクセスすると起動したアプリケーションを実行できます。
また、Visual Studio Code を利用する場合は、デバッグパネルの構成を追加で chrome を選択し、launch.json の url を "http://localhost:4200" に変更することでデバッグ実行ができます。
{
    "version": "0.2.0",
    "configurations": [
        {
            "type": "chrome",
            "request": "launch",
            "name": "localhost に対して Chrome を起動",
            "url": "http://localhost:4200",
            "webRoot": "${workspaceFolder}"
        }
    ]
}
Visual Studio Code でのデバッグについては、以下を参照してください。
Visual Studio Code でフロントエンドの開発環境を構築してデバッグする
ページの追加
アプリケーションを生成した直後の状態では app.component の1ページしかありません。
この記事では各章でページを作成して動作を確認しながら進めていきたいのでページを追加します。
Angular でページの管理は ルーティング という機能で行いますが、ルーティングの説明については別の回で説明するので、ここではこんなもんだと覚えて進めてください。
angular-cli には、コードの雛形を自動生成する generate という機能が備わっています。
以下のコマンドを実行して index component を生成してください。
$ ng generate component index
※エイリアスを使用して ng g c index でも生成できます
同様に次の章で使用するページ type-script を生成してください。
ルーティングについては別の回で説明するので、ひとまず以下のファイルを変更してください。
import { NgModule } from '@angular/core';
import { Routes, RouterModule } from '@angular/router';

import { IndexComponent } from './index/index.component';
import { TypeScriptComponent } from './type-script/type-script.component';

const routes: Routes = [
  { path: '', redirectTo: '/index', pathMatch: 'full' },
  { path: 'index', component: IndexComponent },
  { path: 'type-script', component: TypeScriptComponent },
];

@NgModule({
  imports: [RouterModule.forRoot(routes)],
  exports: [RouterModule]
})
export class AppRoutingModule { }
<a routerLink="/">Top</a>
<router-outlet></router-outlet>
<h1>第1回 Angular勉強会</h1>
<ul>
  <li><a routerLink="/type-script">type-script</a></li>
</ul>
正しくできていればページ遷移ができていると思います。
TypeScript
Angular の標準言語は JavaScript のスーパーセットである TypeScript を使用しています。
TypeScript でよく使用する構文を以下にまとめました。
import { Component } from '@angular/core';

/**
 * クラス <ジェネリック>
 */
class BodyContent<T> {

  /** 読み取り専用プロパティ */
  readonly createdAt: Date;

  /** 公開プロパティ */
  public updatedAt: Date;

  /** 非公開プロパティ */
  private _content: T;

  /** クラス変数 */
  static classInfo = 'BodyContent Class.';

  /** Getter */
  get content(): T {
    return this._content;
  }

  /** Setter */
  set content(value: T) {
    this.updatedAt = new Date();
    this._content = value;
  }

  /**
   * コンストラクタ
   */
  constructor(content?: T) {
    this._content = content;
    this.createdAt = new Date();
  }

  /** 公開メソッド */
  publicMethod() {

    // ブロック内のスコープの変数
    let letVal = '再代入可能';
    const constVal = '再代入不可';

    return letVal + constVal;
  }

  /** 非公開メソッド */
  private privateMethod() {
  }
}

/**
 * 抽象クラス
 */
abstract class AbstractComponent {

  body: BodyContent<string>;

  constructor(public title: string, public subTitle?: string) {
    this.body = new BodyContent();
  }
}

/**
 * インターフェース
 */
interface InterfaceComponent {

  /** プロパティ定義 */
  message: string;

  /** メソッド定義 */
  countUp();
}

@Component({
  selector: 'app-type-script',
  templateUrl: './type-script.component.html',
  styleUrls: ['./type-script.component.css']
})
export class TypeScriptComponent extends AbstractComponent implements InterfaceComponent {

  message: string;

  // 初期値を設定する場合は型を省略しても型を自動で判別する
  typeMessage = '';
  count = 1;

  // 共用型で複数指定可能(string または Array<string>)
  unionType: string | Array<string>;

  constructor() {
    super('TypeScript', '入門');

    // (引数): 戻り値型 => { 処理 } でアロー関数
    const appendMessage = (text: string): void => {
      // アロー関数の this は常に自身のオブジェクトを参照する
      this.typeMessage += text;
    }

    // テンプレート文字列
    this.message = `${this.title} ~${this.subTitle}~
テンプレート文字列は変数を埋め込めたり
改行がそのまま扱えたりします`;

    this.body.content = `はじめての ${this.title}`;

    // プリミティブ型は typeof演算子 で判別できる
    if (typeof this.count === 'number') {
      appendMessage('count は number です。');
    }
    if (typeof this.message === 'string') {
      appendMessage('message は string です。');
    }

    // どのコンストラクタから生成されたかは instanceof演算子 で判別できる
    this.unionType = [];
    if (this.unionType instanceof Array) {
      appendMessage('unionType は Array です。');
    }
    if (this.body instanceof BodyContent) {
      appendMessage('body は BodyContent です。');
    }

    // for of 文で値を取り出してループ処理
    this.unionType = ['for ', 'of ', 'loop'];
    for (let value of this.unionType) {
      appendMessage(value);
    }
  }

  // メソッドの戻り値は省略可能(return で返した値の型で自動判別)
  countUp() {
    this.body.content = `${++ this.count}回目の ${this.title}`;
    return this.body.content;
  }
}
<p>{{title}}</p>
<pre>{{message}}</pre>
<div>{{typeMessage}}</div>
<div>createdAt: {{body.createdAt}}</div>
<div>updatedAt: {{body.updatedAt}}</div>
<p>{{body.content}}</p>
<div><button (click)="countUp()">Count Up</button></div>
データバインディング
データバインディングは、テンプレート(html)と、コンポーネント(*.component.ts)を繋ぐ仕組みです。
コンポーネントの状態をテンプレートに伝えて表示したり、テンプレートで入力した状態をコンポーネントに伝えて処理したりすることができます。
generate で data-bindingコンポーネントを生成し、type-scriptコンポーネントと同様に app-routing.module.ts と index.component.html に追加してください。
$ ng generate component data-binding
<!-- Interpolation(補間) -->
<h1>{{title}}</h1>

<!-- プロパティバインディング -->
<div><img [src]="url"></div>

<!-- 属性バインディング -->
<div><input type="text" [attr.list]="datalistId"></div>
<datalist id="datalist1">
    <option>属性</option>
    <option>バインディング</option>
</datalist>

<!-- クラスバインディング -->
<p [class.red]="classRed">クラスバインディング</p>

<!-- スタイルバインディング -->
<p [style.color]="blueStyle">スタイルバインディング</p>

<!-- イベントバインディング -->
<div><button (click)="onClick()">イベントバインディング</button></div>

<!-- 双方向バインディング -->
<div><input [(ngModel)]="inputValue"></div>{{inputValue}}

<!-- テンプレート参照変数 -->
<div>テンプレート参照変数 <input #input1 (keyup)="0">{{input1.value}}</div>
import { Component } from '@angular/core';

@Component({
  selector: 'app-data-binding',
  templateUrl: './data-binding.component.html',
  styleUrls: ['./data-binding.component.css']
})
export class DataBindingComponent {

  title = 'データバインディング';
  url: string;
  datalistId: string;
  classRed: boolean;
  blueStyle: string;
  inputValue: string;

  onClick() {
    this.url = 'https://qiita-image-store.s3.amazonaws.com/0/158277/profile-images/1528249969';
    this.datalistId = 'datalist1';
    this.classRed = true;
    this.blueStyle = '#0000ff';
    this.inputValue = '双方向バインディング';
  }
}
.red {
    color: red;
}
[イベントバインディング]ボタンをクリックすると、data-binding.component.ts で変更したプロパティがテンプレートに反映されることがわかります。
データバインディングの種類
Angular のデータバインディングには以下の種類があります。
- Interpolation(補間)
- プロパティバインディング
- 属性バインディング
- クラスバインディング
- スタイルバインディング
- イベントバインディング
- 双方向バインディング
Interpolation(補間)
コンポーネントのプロパティを、テンプレートの {{ プロパティ名 }} にバインドします。
<h1>{{title}}</h1>
プロパティバインディング
コンポーネントのプロパティを、テンプレートの要素のプロパティにバインドします。
<img [src]="url">
属性バインディング
コンポーネントのプロパティを、テンプレートの要素の属性にバインドします。
<input type="text" [attr.list]="datalistId">
クラスバインディング
コンポーネントのプロパティを、テンプレートの要素の class にバインドします。
<p [class.red]="classRed">クラスバインディング</p>
スタイルバインディング
コンポーネントのプロパティを、テンプレートの要素の style にバインドします。
<p [style.color]="blueStyle">スタイルバインディング</p>
イベントバインディング
テンプレートのイベントを、コンポーネントのメソッドにバインドします。
<button (click)="onClick()">イベントバインディング</button>
双方向バインディング
テンプレートのプロパティをコンポーネントのプロパティへ、コンポーネントのプロパティをテンプレートのプロパティへバインドします。
プロパティバインディングとイベントバインディングを組み合わせたようなバインドです。
<input [(ngModel)]="inputValue"></div>
双方向バインディングの ngModel を使用するには、FormsModule を import する必要があります。
import { BrowserModule } from '@angular/platform-browser';
import { NgModule } from '@angular/core';
import { FormsModule } from '@angular/forms';

import { AppRoutingModule } from './app-routing.module';
import { AppComponent } from './app.component';
import { DataBindingComponent } from './data-binding/data-binding.component';

@NgModule({
  declarations: [
    AppComponent,
    DataBindingComponent,
  ],
  imports: [
    BrowserModule,
    FormsModule,
    AppRoutingModule
  ],
  providers: [],
  bootstrap: [AppComponent]
})
export class AppModule { }
テンプレート参照変数
バインディング以外にテンプレートを参照する方法として、テンプレート参照変数があります。
テンプレートの要素に #変数名 を指定することで、要素を変数として扱えるようになります。
以下は、どのタイミングでバインディングするかを (keyup)="0" で指定しており、場合は keyup イベントのタイミングでバインディングしています。
<input #input1 (keyup)="0">{{input1.value}}
パイプ
パイプ(Pipe)は、テンプレート上のデータを加工して表示する役割をします。
標準パイプ
Angular には予めいくつかのパイプが用意されています。
ここでは以下のパイプを使用してみましょう。
-
lowercase大文字を小文字に変換する -
uppercase小文字を大文字に変換する -
titlecase頭文字を大文字に変換する -
slice文字列または配列から部分的に抜き出す -
date日時のフォーマット変換 -
number数値をカンマ区切り表示 -
percent数値をパーセント表示 -
currency数値を通貨表示
その他の標準パイプは以下を参照してください。
https://angular.io/api?type=pipe
pipeコンポーネントを生成して app-routing.module.ts と index.component.html に追加してください。
$ ng generate component pipe
<p>lowercase: {{'LOWERCASE' | lowercase}}</p>

<p>uppercase: {{'uppercase' | uppercase}}</p>

<p>titlecase: {{'titlecase' | titlecase}}</p>

<p>slice: {{'slice' | slice: 2: 5}}</p>

<p>slice(Array): {{[1, 2, 3, 4, 5, 6] | slice: 2: 5}}</p>

<p>date: {{now | date: 'yyyy/MM/dd HH:mm:ss'}}</p>

<p>number: {{10000 | number}}</p>

<p>percent: {{0.12 | percent}}</p>

<p>currency: {{1000 | currency: 'JPY'}}</p>
import { Component } from '@angular/core';

@Component({
  selector: 'app-pipe',
  templateUrl: './pipe.component.html',
  styleUrls: ['./pipe.component.css']
})
export class PipeComponent {

  now = new Date();
}
lowercase: lowercase

uppercase: UPPERCASE

titlecase: Titlecase

slice: ice

slice(Array): 3,4,5

date: 2018/06/27 16:52:46

number: 10,000

percent: 12%

currency: ¥1,000
このように、コンポーネント側で処理を書かなくてもテンプレート側だけでデータの加工ができます。
カスタムパイプ
標準パイプ以外にも独自でパイプを作成することもできます。
以下の generate で以下のようにパイプを作成できます。
$ ng generate pipe bracket
transform 関数の第一引数にはテンプレートで指定したパイプ | の左側の文字列が渡され、第二引数以降にはパイプの : の右側の引数が渡されます。
以下は、文字列をパイプの引数で渡した文字で囲う BracketPipe の例です。
import { Pipe, PipeTransform } from '@angular/core';

@Pipe({
  name: 'bracket'
})
export class BracketPipe implements PipeTransform {

  transform(value: string, start?: string, end?: string): any {
    return `${start}${value}${end || start}`;
  }

}
<p>bracket: {{'ABCD' | bracket: '"'}}</p>
<p>bracket: {{'ABCD' | bracket: '{': '}'}}</p>
bracket: "ABCD"

bracket: {ABCD}
チャレンジ
文字列、または配列を反転させる reverse パイプを作成してください。
<p>reverse(string): {{'ABCD' | reverse}}</p>

<p>reverse(Array): {{[1, 2, 3, 4] | reverse}}</p>
reverse(string): DCBA

reverse(Array): 4,3,2,1
ヒント
答え
import { Pipe, PipeTransform } from '@angular/core';

@Pipe({
  name: 'reverse'
})
export class ReversePipe implements PipeTransform {

  transform(value: string | Array<any>): any {
    // 文字列の場合は配列にする
    let result = typeof value === 'string' ? value.split('') : value;
    // 反転させる
    result = result.reverse();
    // 文字列の場合は結合する
    return typeof value === 'string' ? result.join('') : result;
  }
}
ディレクティブ
ディレクティブ(Directive)は、要素や属性を指定することでその要素に振る舞いを持たせる役割をします。
ディレクティブには、コンポーネント、属性ディレクティブ、構造ディレクティブがあり、コンポーネントは別の回で説明するので、ここでは残りの2つについて説明します。
directiveコンポーネントを生成して app-routing.module.ts と index.component.html に追加してください。
$ ng generate component directive
属性ディレクティブ
要素の属性を変更することで、要素のスタイルを変更したり、振る舞いを変更するディレクティブを属性ディレクティブといいます。
ngClass
以下は、要素の class を変更する属性ディレクティブ ngClass の例です。
<p [ngClass]="pClass">ngClassディレクティブ</p>
<ul>
  <li><label><input type="checkbox" [(ngModel)]="pClass.red">Red</label></li>
  <li><label><input type="checkbox" [(ngModel)]="pClass.bold">Bold</label></li>
  <li><label><input type="checkbox" [(ngModel)]="pClass.big">Big</label></li>
</ul>
import { Component } from '@angular/core';

class MyClass {
  red: boolean;
  bold: boolean;
  big: boolean;
}

@Component({
  selector: 'app-directive',
  templateUrl: './directive.component.html',
  styleUrls: ['./directive.component.css']
})
export class DirectiveComponent {

  pClass = new MyClass();
}
その他のディレクティブは以下を参照してください。
https://angular.io/api?type=directive
カスタム属性ディレクティブ
ディレクティブは ng generate directive ディレクティブ名 で作成することができます。
以下は、フォント色を変更するディレクティブの例です。
$ ng generate directive font-color
import { Directive, Input, ElementRef, Renderer2, AfterViewInit } from '@angular/core';

@Directive({
  selector: '[appFontColor]'
})
export class FontColorDirective {

  @Input('appFontColor') fontColor: string;

  constructor(private element: ElementRef, private renderer: Renderer2) {
  }

  ngAfterViewInit() {
    this.renderer.setStyle(this.element.nativeElement, 'color', this.fontColor);
  }
}
<p appFontColor="red">Red</p>
<p appFontColor="green">Green</p>
<p appFontColor="blue">Blue</p>
selector: '[appFontColor]' が、ディレクティブを使用するときに指定するセレクタ名、@Input('appFontColor') fontColor: string; が、ディレクティブに渡した引数を参照するための定義です。
ngAfterViewInit() は Angular のライフサイクルで、ビューが生成された直後に呼ばれるメソッドです。
ライフサイクルについては別の回で説明します。
this.renderer.setStyle() でスタイルの変更をしていますが、JavaScript の経験がある方はわざわざ Renderer2 を使わなくても以下のように直接 DOMを変更しても良いのではと思った方もいるのではないでしょうか。
this.element.nativeElement.style.color = this.fontColor;
ネイティブ要素への直接アクセスがサポートされていない場合(Web Workerという仕組みで実行した場合等)、nativeElement は null となってしまうため、Angular では要素へ安全に使用できるように Renderer2 が提供されています。
Angular で DOM操作する場合は、Renderer2 を使用するようにしましょう。
https://angular.io/api/core/ElementRef#properties
構造ディレクティブ
要素を追加・除去したり、繰り返したり、DOM要素の構造を変更するディレクティブを構造ディレクティブといいます。
ngIf
*ngIf="プロパティ" でプロパティの真偽値によって、要素の表示/非表示を真偽値で設定します。
<input type="checkbox" #check1 (change)="0">
<span *ngIf="check1.checked">チェック中</span>
*ngIf="プロパティ; else テンプレート定義名" で、条件が false のときに表示するテンプレートの指定もできます。
テンプレート定義は ng-template の要素に #定義名 で指定しますが、この ng-template 要素はHTMLのタグとして出力されません。
<input type="checkbox" #ifCheck2 (change)="0">
<span *ngIf="ifCheck2.checked; else ifCheck2Else">チェック中</span>
<ng-template #ifCheck2Else>
  <span>チェックしてください</span>
</ng-template>
*ngIf="プロパティ; then テンプレート定義名; else テンプレート定義名" で、条件が true / false それぞれで表示するテンプレートの指定もできます。
<input type="checkbox" #ifCheck3 (change)="0">
<span *ngIf="ifCheck3.checked; then ifCheck3Then else ifCheck3Else">チェック中</span>
<ng-template #ifCheck3Then>
  <span>チェック中</span>
</ng-template>
<ng-template #ifCheck3Else>
  <span>チェックしてください</span>
</ng-template>
ngSwitch
[ngSwitch]="プロパティ" でプロパティの値によって、要素の表示/非表示を切り替えます。
ngSwitchCase でそれぞれの条件値を指定、ngSwitchDefault でそれ以外の値を設定します。
必要カロリー
<select #ngSwitchSelect (change)="0">
  <option value="1">男性</option>
  <option value="2">女性</option>
  <option value="0">その他</option>
</select>
<span [ngSwitch]="ngSwitchSelect.value">
  <span *ngSwitchCase="1">2650 kcal</span>
  <span *ngSwitchCase="2">2000 kcal</span>
  <span *ngSwitchDefault>不明</span>
</span>
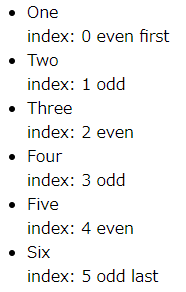
ngFor
*ngFor="let 変数名 of リスト" で Iterableインターフェースを実装したリストをループして要素を表示できます。
<ul>
  <li *ngFor="let num of [1, 2, 3]">{{num}}</li>
</ul>

ngFor には ループ処理内で使用できる以下の変数が用意されています。
-
index現在のループ回数(0開始) -
first最初の要素かどうか -
end最後の要素かどうか -
oddindexが奇数かどうか -
evenindexが偶数かどうか
<ul>
  <li *ngFor="let item of items; index as i; first as first; last as last; odd as odd; even as even">
    <div>{{item}}</div>
    <span>index: {{i}}</span>
    <span *ngIf="odd"> odd </span>
    <span *ngIf="even"> even </span>
    <span *ngIf="first"> first </span>
    <span *ngIf="last"> last </span>
  </li>
</ul>
1つの要素に構造ディレクティブを複数指定する場合
構造ディレクティブは1つの要素に複数指定することができないため、別々の要素に指定する必要がありますが、ツリー構造を変更したくない場合は ng-container を使用することで、出力される HTML には影響なく指定できます。
<ul class="margin-top">
  <ng-container *ngFor="let num of [0, 1, 2, 3]; odd as odd">
    <li *ngIf="odd">{{num}}</li>
  </ng-container>
</ul>
カスタム構造ディレクティブ
以下は、引数に渡した日付が本日の日付の場合に要素を表示するディレクティブの例です。
$ ng generate directive ifToday
import { Directive, Input, TemplateRef, ViewContainerRef, OnChanges } from '@angular/core';

@Directive({
  selector: '[appIfToday]'
})
export class IfTodayDirective implements OnChanges {

  @Input('appIfToday') targetDate: Date;

  constructor(private templateRef: TemplateRef<any>, private viewContainer: ViewContainerRef) { }

  ngOnChanges() {
    if (this.targetDate.toLocaleDateString() === new Date().toLocaleDateString()) {
      this.viewContainer.createEmbeddedView(this.templateRef);
    } else {
      this.viewContainer.clear();
    }
  }
}
<p *appIfToday="date">{{date.toLocaleDateString()}} は本日です</p>
date = new Date('2018-07-03');
チャレンジ
指定文字数より多く入力した場合に文字を赤く表示する属性ディレクティブ overColor、指定文字数を超えたら要素を表示する構造ディレクティブ ifOverLength を作成してください。
<input type="text" [appOverColor]="{ length: 3, color: 'red' }" #text1 (keyup)="0">
<span *appIfOverLength="{ text: text1.value, length: 3 }">文字数オーバー</span>
- HostListener でイベントリスナーを設定できる
- ngOnChanges でプロパティが変わったことを検知できる
答え
import { Directive, Input, ElementRef, Renderer2, HostListener } from '@angular/core';

class OverColorInfo {
  length: number;
  color: string;
}

@Directive({
  selector: '[appOverColor]'
})
export class OverColorDirective {

  @Input('appOverColor') overColor: OverColorInfo;

  constructor(private renderer: Renderer2) { }

  @HostListener('keyup', ['$event.target']) onKeyup(element: HTMLInputElement) {

    if (this.overColor.length < element.value.length) {
      this.renderer.setStyle(element, 'color', this.overColor.color);
    } else {
      this.renderer.removeStyle(element, 'color');
    }
  }
}
import { Directive, Input, TemplateRef, ViewContainerRef, OnChanges } from '@angular/core';

class OverLengthInfo {
  text: string;
  length: number;
}

@Directive({
  selector: '[appIfOverLength]'
})
export class IfOverLengthDirective {

  @Input('appIfOverLength') info: OverLengthInfo;

  private isShown = false;

  constructor(private templateRef: TemplateRef<any>, private viewContainer: ViewContainerRef) { }

  ngOnChanges() {
    if (!this.isShown && this.info.length < this.info.text.length) {
      this.viewContainer.createEmbeddedView(this.templateRef);
      this.isShown = true;
    } else if (this.isShown && this.info.length >= this.info.text.length) {
      this.viewContainer.clear();
      this.isShown = false;
    }
  }
}
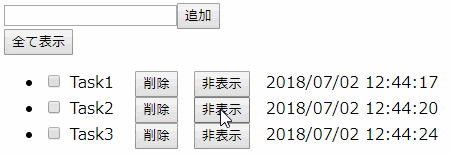
ToDoアプリ作成
第1回「Webフロントエンド開発勉強会」 で作成したTODOアプリを Angular で実装してください。
追加1 タスク作成日時の表示
削除ボタンの右側に、タスク作成日時を 2018/07/03 15:00:00 の形式で表示してください。

追加2 非表示ボタン
非表示ボタンを押したらタスクを非表示にし、全て表示ボタンを押したら再表示してください。