概要
ユーザーが複数のバージョンを同一マシンにインストール可能なアプリケーション(ex. Adobe Illuctrator CCなど)用に、インストール済のバージョンを一覧表示して、任意のバージョンを起動できるLauncherアプリケーションを作る。
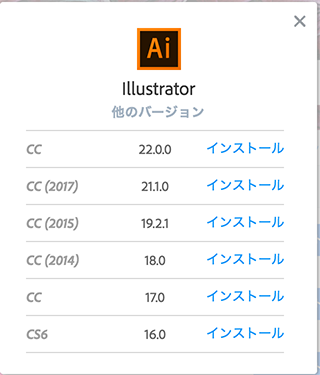
参考までに、Illustratorで現在インストールできるバージョン一覧がこちら。
作ろうと思った経緯
Adobe Illuctrator CCの最新バージョン(CC 2018、公式にはv22.0?)に致命的なバグがあって、そのバージョンを使って印刷事故を起こす人を減らしたいと思って、書いてみることにした。
どんなバグかは、下記フォーラムを参照。かなり致命的なバグ。
CC 2018のトラブルシューティング
なお、すでにものかのさんが同じ趣旨、かつもっと素晴らしいものを公開されている(Glee Ai 1.0.0)が、私は少し違うアプローチのアプリにする予定。
ものかのさんのには似たようなアプリを作ることを了承いただいている。
当面の目標
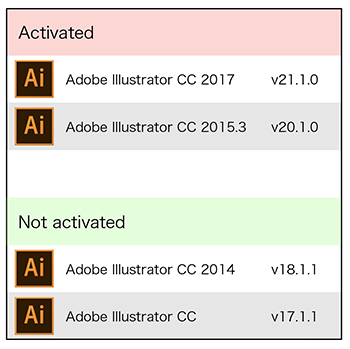
他にも追加したい機能はあるものの、形にしないと先に進まないので、下記のようなアプリケーションを当面の目標とする。
- Activated(起動中)とNot activated(未起動)のリストを表示
- 未起動リストのセルをタップすると、そのバージョンが起動して起動中リストのセルに移動
この記事を読んでできること
- 最低限必要な情報を有したModelと、そのModelをメンバ変数に持つViewModelを作成
この記事を読んでできないこと
- UI との繋ぎ込み(画面表示については一行も書けず…)
- アプリケーションの起動処理
どのように実現するか
インストール済のアプリケーションを取得する
真っ先に思いつくのはApplicationディレクトリの中をアプリケーション名でゴリゴリ検索するという手段だが、さすがにイケてなさすぎる。
調べたところ、BundleIdentifierを渡すと該当するアプリケーションのファイルURLの配列を返してくれる関数があることがわかった。
LSCopyApplicationURLsForBundleIdentifier(::)
// BundleIdentifierにマッチするApplicationのファイルUrlを取得
// 同じBundleIdentifierのApplicationがインストールされている場合もあり得るので配列となる
let bundleIdentifier = "com.apple.dt.xcode"
guard let applicationUrls = LSCopyApplicationURLsForBundleIdentifier(bundleIdentifier as CFString, nil)?.takeUnretainedValue() as? [URL] else {
    return
}

/*
(lldb) po applicationUrls
▿ 2 elements
  ▿ 0 : file:///Applications/Xcode.app/
    - _url : file:///Applications/Xcode.app/
▿ 1 : file:///Applications/Xcode8.3.3.app/
    - _url : file:///Applications/Xcode8.3.3.app/
 */
アプリケーションの基本的な情報を取得する
現状、必要と思われる情報は下記。
- アプリケーションの名前
- アプリケーションのバージョン
- アイコン画像
- 起動しているか否かを判断するフラグ
- Bundle Identifier
- アプリケーションのファイルパス
ほとんどの情報がinfo.plistを参照すれば取得できるので、info.plistをNSDictionaryとして展開して取得することにした。
let fileUrl = URL(fileURLWithPath: "/Applications/Xcode.app")

// エンコーディングされているのでデコード
guard let filePath = fileUrl.path.removingPercentEncoding else {
    return
}
// 情報を取得するためにplistを取得
let plistPath = filePath + "/Contents/Info.plist"
if !FileManager.default.fileExists(atPath: plistPath) {
    return
}
guard let infoDictionary = NSDictionary(contentsOfFile: plistPath) else {
    return
}

/*
(lldb) po infoDictionary
▿ 37 elements
  ▿ 0 : 2 elements
    - key : NSAppleScriptEnabled
    - value : 1
  ▿ 1 : 2 elements
    - key : CFBundleInfoDictionaryVersion
    - value : 6.0
  ▿ 2 : 2 elements
    - key : DTPlatformVersion
    - value : GM
(以下略)
*/
上述した情報の一部を展開したNSDictionaryから取得する方法は下記の通り。
// アプリケーションのバージョン
let bundleVersion = infoDictionary["CFBundleVersion"] as? String ?? ""
// Bundle Identifier
let bundleIdentifier = infoDictionary["CFBundleIdentifier"] as? String ?? ""
アプリケーションの名前はinfo.plistから取得すると、Finder上の名称と異なってしまうので、FileManagerから取得した。
let fileUrl = URL(fileURLWithPath: "/Applications/Xcode.app")
guard let filePath = fileUrl.path.removingPercentEncoding else {
    return
}
let displayName = FileManager.default.displayName(atPath: filePath)
アイコン画像を生成する
アイコン画像は /Applications/hoge.app/Contents/Resources/ の中に格納されている拡張子が「.icns」のファイルから作成する。
まず、アイコンファイル名を取得。
let iconFileName = infoDictionary["CFBundleIconFile"] as? String
続いて、ファイル名と格納されているディレクトリのパスをつなげればファイルパスがわかるので、そのファイルパスを元にNSImageを生成する。
var icon: NSImage = nil
// Applicationのiconファイル名を取得
if let iconFilePath = infoDictionary["CFBundleIconFile"] as? String {
    // ファイルパスからNSImageを作成
    icon = generateIconImage(filePath: filePath + "/Contents/Resources/" + iconFilePath, iconSize: iconSize)
}

/// iconを作成する
///
/// - Parameters:
///   - filePath: iconのファイルパス
///   - iconSize: 作成するiconのサイズ
/// - Returns: 作成に成功したらicon画像、失敗したらnilを返す
private func generateIconImage(filePath: String) -> NSImage? {
    let iconSize = NSSize(width: 120, height: 120)
    // ファイル名の末尾が.icnsでなければ拡張子を追加する(アプリケーションによってアイコンファイル名に拡張子がない場合もある)
    var imagePath = filePath
    if !imagePath.hasSuffix(".icns") {
        imagePath += ".icns"
    }
    let iconImage = NSImage(contentsOfFile: imagePath)
    iconImage?.size = iconSize
    iconImage?.lockFocus()
    NSGraphicsContext.current?.imageInterpolation = .high
    iconImage?.draw(in: CGRect(x: 0, y: 0, width: iconSize.width, height: iconSize.height))
    iconImage?.unlockFocus()
    return iconImage
}
起動中か否かのフラグをもたせる
未実装!(ごめんなさい)
NSWorkSpace クラスに起動中のアプリケーションを取得する関数があるので、それと比較させれば初期化時は判断できると考えている。
ただ、随時起動状態を監視しなければいけないので、一旦先送りとした。
今回作成したもの
プロジェクトをGitHubにアップした。
LaunchAppFromBundleIdentifier
Model、ViewModel、ユニットテストのみ、転記しておく。
まず、ViewModelと付随するテスト。
import Cocoa

struct AppListViewModel {
    // icon画像のサイズをstaticで保持
    static let iconSize = NSSize(width: 120, height: 120)
    var items = [AppModel]()

    init?(bundleIdentifier: String) {
        // BundleIdentifierにマッチするApplicationのファイルUrlを取得
        // 同じBundleIdentifierのApplicationがインストールされている場合もあり得るので配列となる
        guard let applicationUrls = LSCopyApplicationURLsForBundleIdentifier(bundleIdentifier as CFString, nil)?.takeUnretainedValue() as? [URL] else {
            return nil
        }
        // モデルを作成
        for applicationUrl in applicationUrls {
            guard let model = AppModel(fileUrl: applicationUrl, iconSize: AppListViewModel.iconSize) else {
                break
            }
            items.append(model)
        }
    }
}
import XCTest
@testable import LaunchAppFromBundleIdentifier

class AppListViewModelTests: XCTestCase {

    override func setUp() {
        super.setUp()
        // Put setup code here. This method is called before the invocation of each test method in the class.
    }

    override func tearDown() {
        // Put teardown code here. This method is called after the invocation of each test method in the class.
        super.tearDown()
    }

    func testInitializeFromValidBundleIdentifier() {
        let viewModel = AppListViewModel(bundleIdentifier: "com.apple.dt.xcode")
        XCTAssertTrue(viewModel!.items.count >= 0)
        let model = viewModel!.items.first
        XCTAssertEqual(model!.displayName, "Xcode.app")
        XCTAssertEqual(model!.bundleIdentifier, "com.apple.dt.Xcode")
        XCTAssertEqual(model!.bundleVersion, "13532")
        XCTAssertNotNil(model!.icon)
        XCTAssertEqual(model!.filePath, "/Applications/Xcode.app")
        XCTAssertEqual(model!.isActive, false)
    }

    func testInitializeFromInValidBundleIdentifier() {
        let viewModel = AppListViewModel(bundleIdentifier: "com.hoge.fuga")
        XCTAssertNil(viewModel)
    }
}
続いて、Modelと付随するテスト。
import Cocoa

struct AppModel {
    let displayName: String
    let bundleIdentifier: String
    let bundleVersion: String
    var icon: NSImage? = nil
    let filePath: String
    var isActive: Bool = false

    init?(fileUrl: URL, iconSize: NSSize) {
        // エンコーディングされているのでデコード
        guard let filePath = fileUrl.path.removingPercentEncoding else {
            return nil
        }
        // 情報を取得するためにplistを取得
        let plistPath = filePath + "/Contents/Info.plist"
        if !FileManager.default.fileExists(atPath: plistPath) {
            return nil
        }
        guard let infoDictionary = NSDictionary(contentsOfFile: plistPath) else {
            return nil
        }
        // Applicationの名称はdisplayNameじゃないとFinder上の名称と異なることがある
        self.displayName = FileManager.default.displayName(atPath: filePath)
        self.bundleIdentifier = infoDictionary["CFBundleIdentifier"] as? String ?? ""
        self.bundleVersion = infoDictionary["CFBundleVersion"] as? String ?? ""
        self.filePath = filePath
        // Applicationのiconファイル名を取得
        if let iconFilePath = infoDictionary["CFBundleIconFile"] as? String {
            // ファイルパスからNSImageを作成
            self.icon = generateIconImage(filePath: filePath + "/Contents/Resources/" + iconFilePath, iconSize: iconSize)
        }
    }


    /// iconを作成する
    ///
    /// - Parameters:
    ///   - filePath: iconのファイルパス
    ///   - iconSize: 作成するiconのサイズ
    /// - Returns: 作成に成功したらicon画像、失敗したらnilを返す
    private func generateIconImage(filePath: String, iconSize: NSSize) -> NSImage? {
        var imagePath = filePath
        if !imagePath.hasSuffix(".icns") {
            imagePath += ".icns"
        }
        let iconImage = NSImage(contentsOfFile: imagePath)
        iconImage?.size = iconSize
        iconImage?.lockFocus()
        NSGraphicsContext.current?.imageInterpolation = .high
        iconImage?.draw(in: CGRect(x: 0, y: 0, width: iconSize.width, height: iconSize.height))
        iconImage?.unlockFocus()
        return iconImage
    }
}
import XCTest
@testable import LaunchAppFromBundleIdentifier

class AppModelTests: XCTestCase {

    override func setUp() {
        super.setUp()
        // Put setup code here. This method is called before the invocation of each test method in the class.
    }

    override func tearDown() {
        // Put teardown code here. This method is called after the invocation of each test method in the class.
        super.tearDown()
    }

    func testInitislizeFromValidFileUrl() {
        let fileUrl = URL(fileURLWithPath: "/Applications/Xcode.app")
        let model = AppModel(fileUrl: fileUrl, iconSize: NSSize(width: 120, height: 120))
        XCTAssertEqual(model!.displayName, "Xcode.app")
        XCTAssertEqual(model!.bundleIdentifier, "com.apple.dt.Xcode")
        XCTAssertEqual(model!.bundleVersion, "13532")
        XCTAssertNotNil(model!.icon)
        XCTAssertEqual(model!.filePath, "/Applications/Xcode.app")
        XCTAssertEqual(model!.isActive, false)
    }

    func testInitislizeFromInValidFileUrl() {
        let fileUrl = URL(fileURLWithPath: "/hoge/hoge.app")
        let model = AppModel(fileUrl: fileUrl, iconSize: NSSize(width: 120, height: 120))
        XCTAssertNil(model)
    }
}
次回以降の予定
- UI(View)を作る
- 各アプリケーションの起動状態を検知できるようにする
- 各アプリケーションを起動できるようにする
- たぶんRxSwiftを導入する
まとめ
今回初めてMVVMを意識して書いてみたものの、実装よりも構造に悩む時間のほうが長かったかもしれない。
今回書いたViewModelもテストするために必要だったから書いたようなものなので、どうViewに結びつけていいのかよくわかっていない。
エラー処理をまったく入れていないので、どう入れたらいいのかわからない。
初期化に失敗したらnilを返すようにしてて、そういうときにどうエラーに結びつけるのか、よくわからない。
わからないことだらけなので、気が向いた方にアドバイスをいただきたい…。

