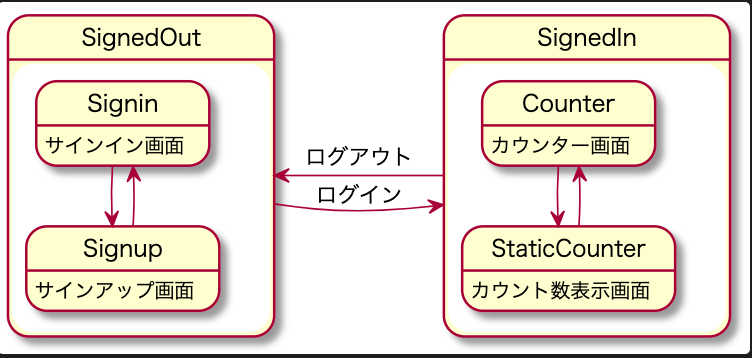
はじめに
Expo+Redux(+firebase)でログインフォーム③ 〜ファイル整理・Debugger〜 の続きです。
この記事では、ログイン画面を作り、ReactNavigationで画面遷移をできるようにしていきます。
まだログインのロジック自体は実装していないので、ボタンをクリックすると画面遷移されるようにしておきます。
画面構成

React Navigation
2020/2/22時点での最新は5.xです
3.xや4.xとは文法が変わっているので、ネットの記事を参考にする際は注意してください!!(僕はこれでハマりました)
Reduxとの共存ですが、App.tsxとコンポーネントをいじるだけで使えるようになります。
storeやmodulesを気にせず使えるので便利ですね
App
import React from 'react';
import { Provider } from 'react-redux'
import { NavigationContainer } from '@react-navigation/native'
import { createStackNavigator } from '@react-navigation/stack'
import store from './store'
import CounterContainer from './containers/Counter'
import StaticCounterContainer from './containers/StaticCounter'
import SigninContainer from './containers/Signin'
import SignupContainer from './containers/Signup'


export default function App() {
  // サインイン中のScreen
  const SignedInStack = createStackNavigator()

  const SignedInStackScreen = () => {
    return (
      <SignedInStack.Navigator>
        <SignedInStack.Screen name='Counter' component={CounterContainer} />
        <SignedInStack.Screen name='StaticCounter' component={StaticCounterContainer} />
      </SignedInStack.Navigator>
    )
  }

  // サインアウト後のスクリーン(Auth関連の画面)
  const SignedOutStack = createStackNavigator()

  const SignedOutStackScreen = () => {
    return (
      <SignedOutStack.Navigator>
        <SignedOutStack.Screen name='Signin' component={SigninContainer} />
        <SignedOutStack.Screen name='Signup' component={SignupContainer} />
      </SignedOutStack.Navigator>
    )
  }

  // RootのScreen(ローディング画面、サインイン中、サインアウト後)
  const RootStack = createStackNavigator()

  const RootStackScreen = () => (
    <RootStack.Navigator>
      <RootStack.Screen name='SignedIn' component={SignedInStackScreen} options={{ headerShown: false }}/>
      <RootStack.Screen name='SignedOut' component={SignedOutStackScreen} options={{ headerShown: false }} />
    </RootStack.Navigator>
  )
  return (
    <Provider store={store}>
      <NavigationContainer>
        <RootStackScreen />
      </NavigationContainer>
    </Provider>
  )
}
StackNavigationを使用しています
createStackNavigator()で各スクリーンのナビゲーターを作り、それを使ってスクリーンを作っています。
ログイン中とログアウト中のスクリーンをそれぞれ作ったら、それらをcomponentとしてRootStackに渡してまとめることで、ネストしたルーティングを実現します。
  return (
    <Provider store={store}>
      <NavigationContainer>
        <RootStackScreen />
      </NavigationContainer>
    </Provider>
  )
Providerの内側にNavigationContainerを置くのを忘れないようにしましょう。
Containers
Signup.tsx
import { connect } from 'react-redux'
import Signup from '../components/Signup'

const SignupContainer = connect()(Signup)

export default SignupContainer
Signup画面では、使うpropsはnavigationだけですが、これはconnect関数に渡さなくともReactNavigationがよしなにしてくれるっぽいです。なので、mapStateToProps, dispatchToPropsは共に使いません。
Signin.tsもほぼこれと変わらないので、省略します。
Counter.tsは前回の記事から変更はありません。
Components
Signup.tsx
import React from 'react'
import { View, Text, Button } from 'react-native'
import styles from '../Styles'

const Signup = ({ navigation }) => (
  <View style={styles.container}>
    <Text style={styles.paragraph}>Signup</Text>
    <Button
      title='Go to Signin'
      onPress={() => navigation.navigate('Signin')}
    />
    <Button
      title='Go to Counter'
      onPress={() => navigation.navigate('Counter')}
    />
  </View>
)

export default Signup
propでnavigationを受け取っています。これはContainerから受け取ったものではなくReactNavigationが提供しているものです。
画面遷移するには、navigation.navigate()に移動したいスクリーンの名前を渡します。
navigate()だけでなく、goBack()等あるので、公式ドキュメントを参考に。
Counter.tsx
import React from 'react'
import { View, Text, Button } from 'react-native'
import styles from '../Styles'

const Counter = ({ count, increment, decrement, navigation }) => (
  <View style={styles.container}>
    <Text style={styles.paragraph}>{count}</Text>
    <Button
      title='Increment'
      onPress={increment}
    />
    <Button
      title='DECREMENT'
      onPress={decrement}
    />
    <Button
      title='Go to Static Count page'
      onPress={() => navigation.navigate('StaticCounter')}
    />
    <Button
      title='Go to SignedOut'
      onPress={() => navigation.navigate('SignedOut', { screen: 'Signup' } )}
    />
  </View>
)

export default Counter
Signup.tsxとあまり変わらないですね。
'Go to SignedOut'のコールバックのように、ネストした深いスクリーンまで指定して画面遷移したい場合は、スクリーンの名前の後に、paramsに{ screen: "スクリーンの名前" }を加えると実現できます。
ここで、いきなりnavigation.navigate('Signup')とすると、スクリーンが見つからずエラーになるので気をつけましょう。
次回
上と同じようにSignin画面、StaticCounter画面を作れば、ボタンを押すことで画面遷移を行えるようになりました。
次回では、フォームの作成とfirebaseのAuthenticationを用いたパスワード認証を実装していきましょう。
Expo+Redux(+firebase)でログインフォーム⑤ 〜入力フォームとログインロジックの実装〜