概要
以下のgifのように、クリックしたオブジェクトにのみアウトラインを設定するようなものを、Unityの機能であるCommandBufferを利用して作成しました。
プロジェクトのソースコードはこちら
https://github.com/Arihide/unity-selective-outline
解説
CommandBufferを用いると、レンダリングパイプラインの任意の箇所に、別の描画処理を挟み込むことができます。
今回はこの機能を用いて、以下の図のように、一部メッシュに対してだけレンダリング・輪郭抽出を行った後に合成を行いました。
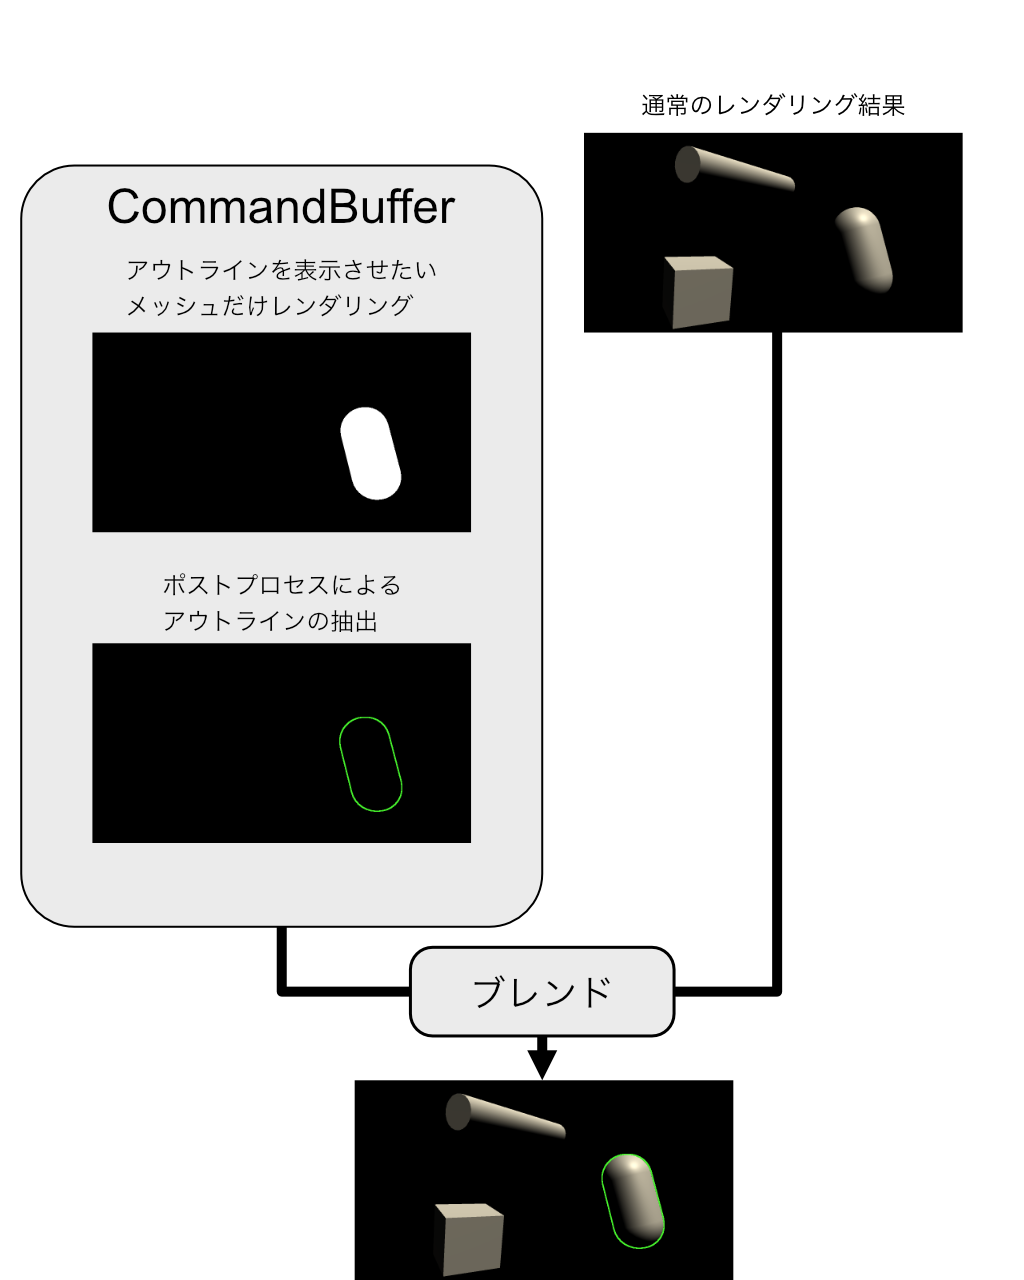
次からは具体的なスクリプト部分について説明します。
スクリプト部分
まずは、CommandBufferを用いたスクリプト部分を見てみましょう。
using UnityEngine;
using UnityEngine.Rendering;

[ExecuteInEditMode]
[RequireComponent(typeof(Camera))]
public class SelectiveOutline : MonoBehaviour
{
    public Material emissionMaterial;
    public Material outlineMaterial;

    private new Camera camera;
    private CommandBuffer commandBuffer;

    [SerializeField] private Renderer targetRenderer = null;

    void OnEnable()
    {
        camera = GetComponent<Camera>();

        commandBuffer = new CommandBuffer();
        commandBuffer.name = "Selective Outline";

        SetCommandBuffer();

        // ImageEffects前(OnRenderImageが呼ばれる前)に適用
        camera.AddCommandBuffer(CameraEvent.BeforeImageEffects, commandBuffer);
    }

    void OnDisable()
    {
        camera.RemoveCommandBuffer(CameraEvent.BeforeImageEffects, commandBuffer);
    }

    void SetCommandBuffer()
    {
        commandBuffer.Clear();

        if (targetRenderer != null)
        {
            // レンダリング結果を格納するテクスチャ作成
            var id = Shader.PropertyToID("_OutlineTex");
            commandBuffer.GetTemporaryRT(id, -1, -1, 24, FilterMode.Bilinear);
            commandBuffer.SetRenderTarget(id);

            // アウトラインを表示させたいメッシュの描画
            commandBuffer.ClearRenderTarget(false, true, Color.clear);
            commandBuffer.DrawRenderer(targetRenderer, emissionMaterial);

            // アウトラインを抽出して合成
            commandBuffer.Blit(id, BuiltinRenderTextureType.CameraTarget, outlineMaterial);
        }
    }

    void Update()
    {
        if (Input.GetMouseButtonDown(0))
        {
            Ray ray = camera.ScreenPointToRay(Input.mousePosition);
            if (Physics.Raycast(ray, out RaycastHit hit))
            {
                targetRenderer = hit.transform.GetComponent<Renderer>();
                SetCommandBuffer();
            }
        }
    }
}
具体的な内容はソースコードのコメントを見ていただくとして、
大まかな処理の流れとしては、
OnEnable関数内でCommandBufferオブジェクトを作成し、さらにSetCommandBuffer関数内でどのような流れで描画するのかを設定しています。
その後、
camera.AddCommandBuffer(CameraEvent.BeforeImageEffects, commandBuffer);
とすることによって、設定したCommandBufferをImageEffectsの直前(一通りメッシュの描画が完了したあと)に挟み込むようにします。
またUpdate関数内でオブジェクトがクリックされたのを検出したとき、そのオブジェクトにアウトラインをつけるように、CommandBufferの再設定を行っています。
シェーダー部分
さて、処理の流れがわかったところで、次にアウトラインを抽出するシェーダーを見てみましょう。
Shader "Custom/Outline"
{
    Properties
    {
        [HideInInspector]_MainTex ("Texture", 2D) = "white" {}

        _OutlineColor ("Outline Color", Color) = (1,1,1,1)
        _OutlineWidth ("Outline Width", Range(0, 10)) = 1
    }
    SubShader
    {
        Tags { "Queue" = "Transparent" }
        Blend SrcAlpha OneMinusSrcAlpha
        Cull Off ZWrite Off ZTest Always

        Pass
        {
            CGPROGRAM
            #pragma vertex vert_img
            #pragma fragment frag

            #include "UnityCG.cginc"

            sampler2D _MainTex;
            half2 _MainTex_TexelSize;

            half4 _OutlineColor;
            half _OutlineWidth;

            half4 frag (v2f_img i) : SV_Target
            {
                fixed4 col = tex2D(_MainTex, i.uv);

                half2 destUV = _MainTex_TexelSize * _OutlineWidth;

                half left   = tex2D(_MainTex, i.uv + half2(destUV.x, 0)).a;
                half right  = tex2D(_MainTex, i.uv + half2(-destUV.x, 0)).a;
                half bottom = tex2D(_MainTex, i.uv + half2(0, destUV.y)).a;
                half top    = tex2D(_MainTex, i.uv + half2(0, - destUV.y)).a;
                half topLeft = tex2D(_MainTex, i.uv + half2(destUV.x, destUV.y)).a;
                half topRight = tex2D(_MainTex, i.uv + half2(-destUV.x, destUV.y)).a;
                half bottomLeft = tex2D(_MainTex, i.uv + half2(destUV.x, -destUV.y)).a;
                half bottomRight = tex2D(_MainTex, i.uv + half2(-destUV.x, -destUV.y)).a;

                // あるピクセルの近傍が不透明であれば 1
                half result = saturate(left + right + bottom + top + topLeft + topRight + bottomLeft + bottomRight);

                // 透過じゃないところはそのまま
                clip(0.99 - col.a);

                half4 outline = result * _OutlineColor;

                return outline;
            }
            ENDCG
        }
    }
}
よく見かけるアウトラインシェーダーは深度や法線による方法が多いですが、
今回はあるピクセルの近くが不透明だったら自分のピクセルも不透明とみなして輪郭を広げ、もともと不透明だったピクセル部分はくり抜く。という単純な方法で実装しました。
理由としては今回は描画対象が1つなので、重なりなどを考慮する必要がないからです。