はじめに
「Swagger は便利だから使おう」と言われても、
- API って何なのか
- OpenAPI / Swagger / Swagger UI の違い
- Laravel にどう組み込むのか
最初はなかなかイメージしづらいものです。
私が実務で初めて Swagger(OpenAPI)を導入したときも、概念やツールの関係性、実装との紐づけ方などでつまずく場面が多くありました。
そこで本記事では、私がそのときに理解したポイントを整理しつつ、
- 「API / OpenAPI / Swagger / Swagger UI」の関係
- Laravel + Docker への Swagger UI の導入手順
- サンプルの書籍管理 API を題材に、OpenAPI と実装を揃えていく方法
を分かりやすくまとめていきます。
そもそも API / OpenAPI / Swagger UI って何?
「APIって何?」ざっくりイメージ
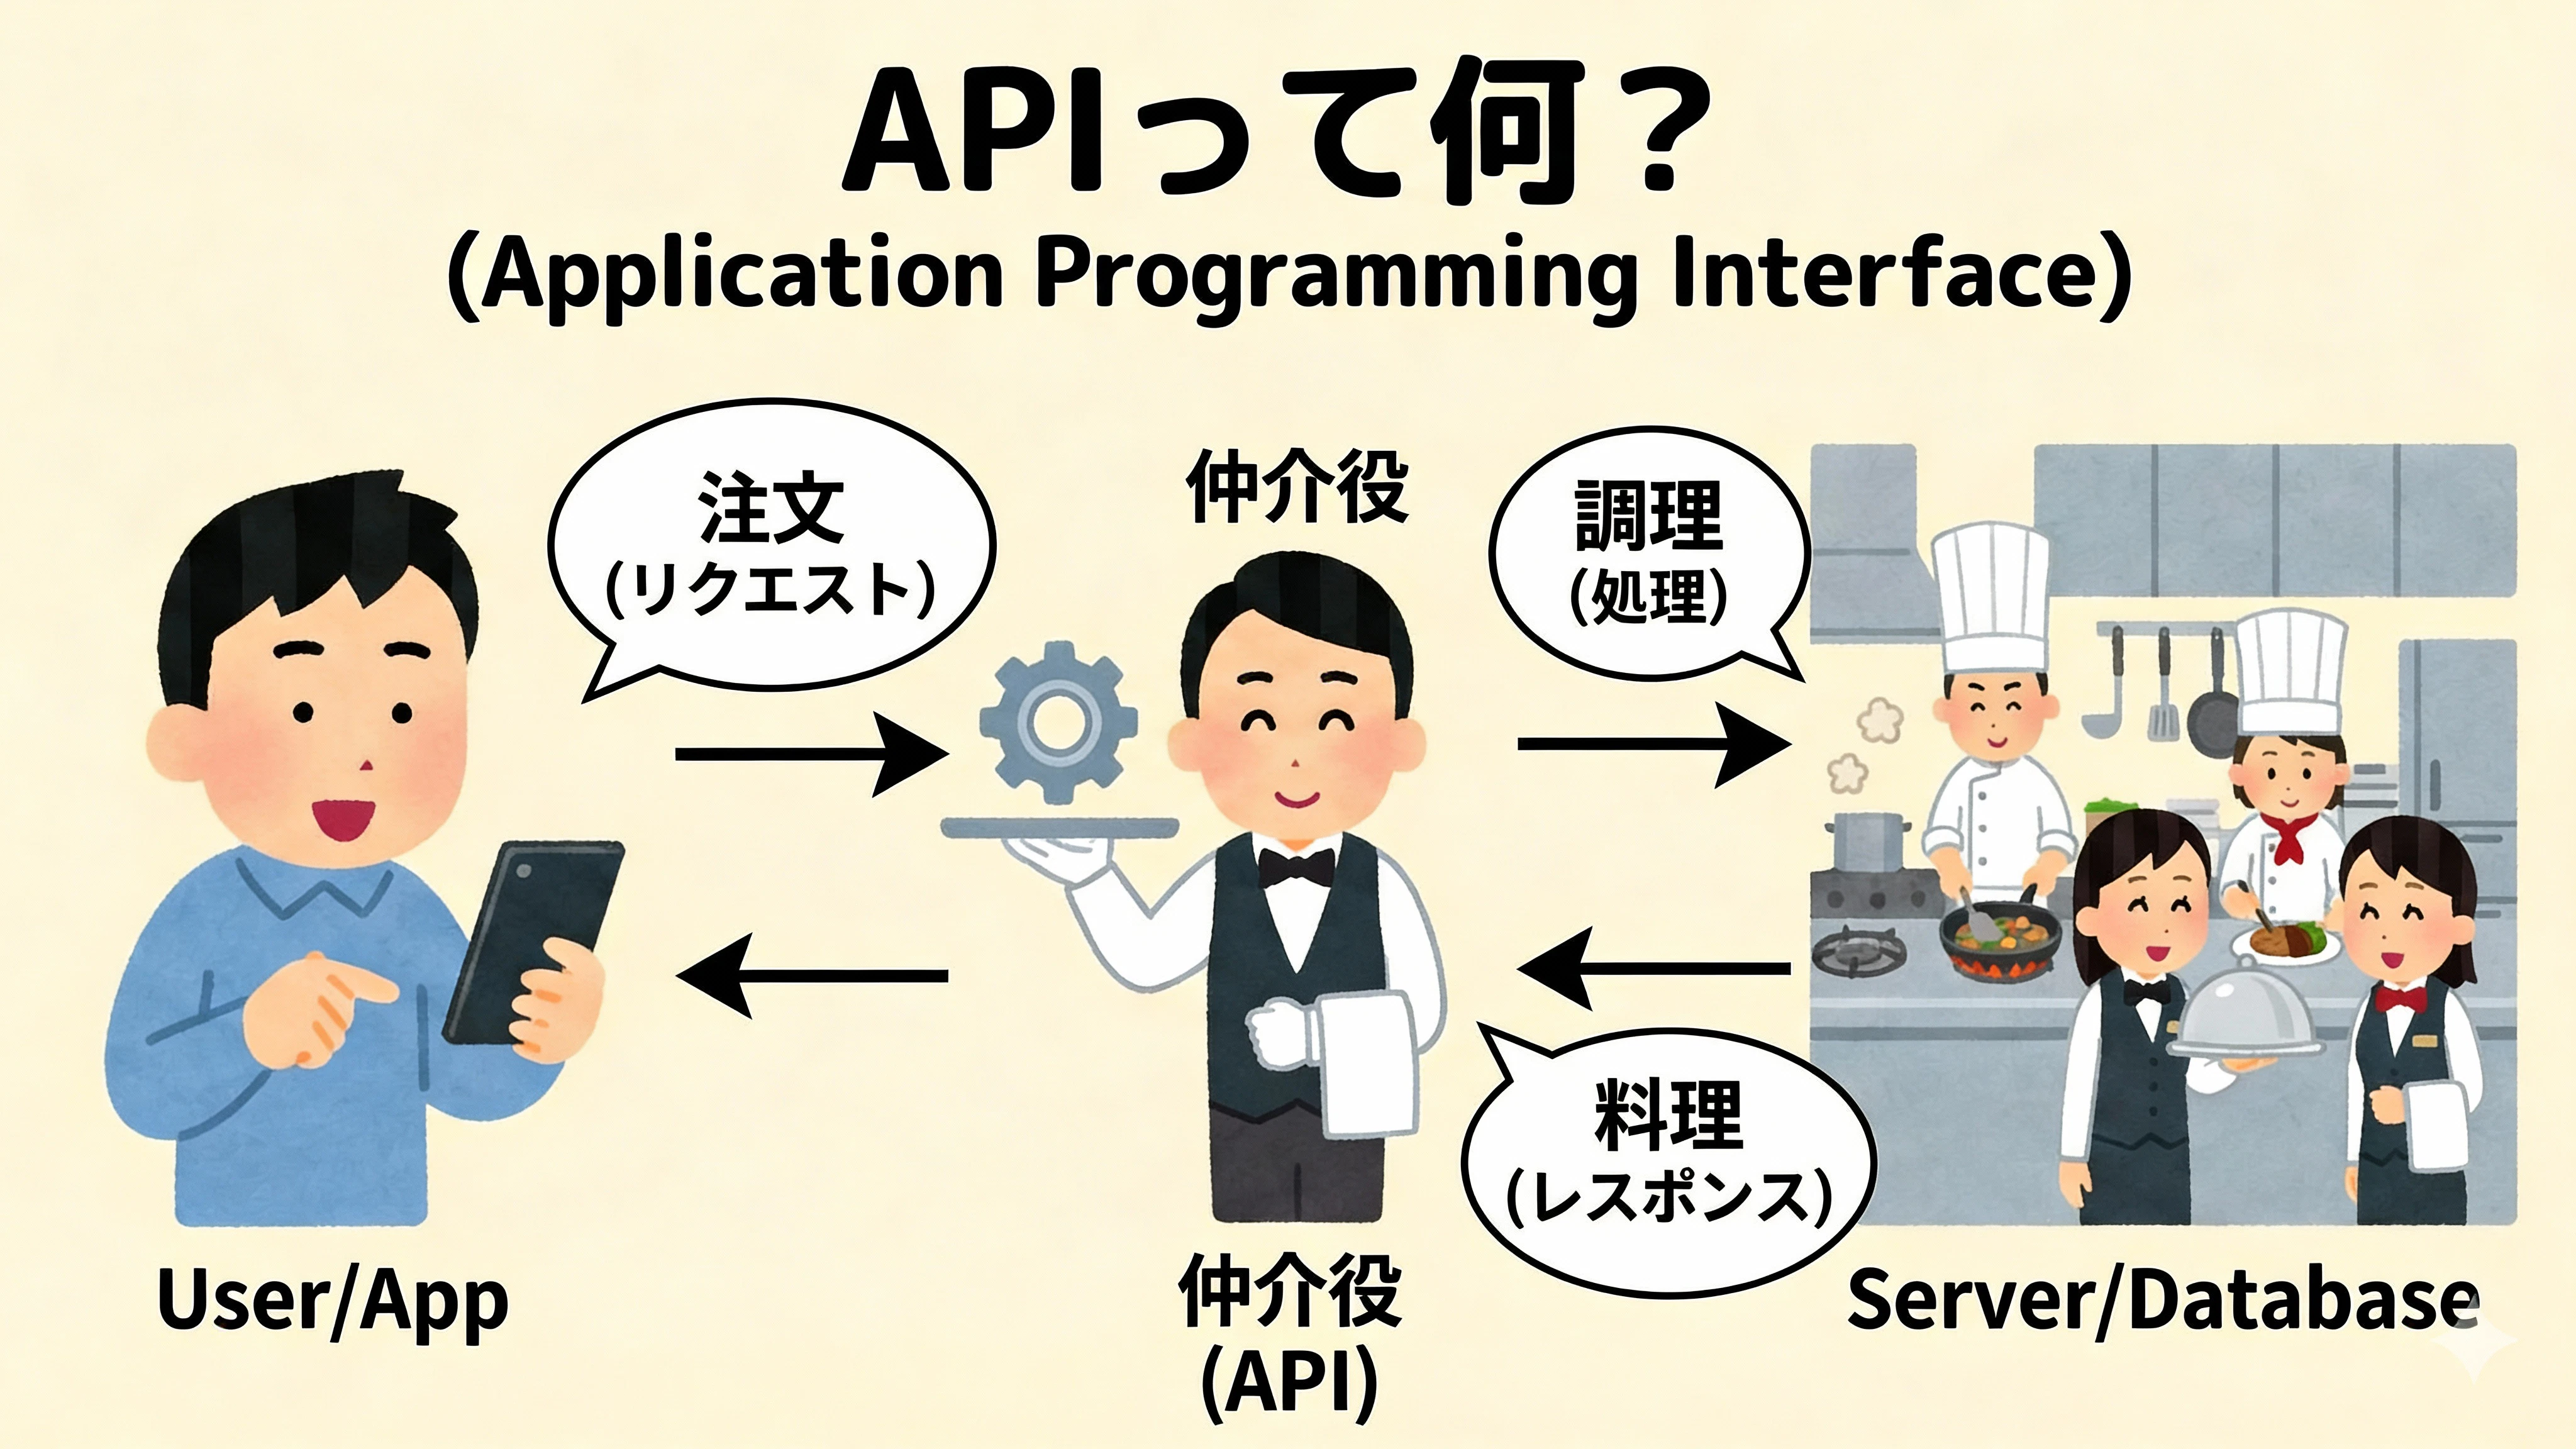
API(Application Programming Interface) は、
ざっくり言うと「アプリ同士が会話するための決まりごと」です。
- レストランでいうと → メニュー表
- 「この URL に、こういうデータを送ると、こういう結果が返ってくるよ」という約束
フロントエンド(画面)や他のサービスは、この「メニュー表(API の仕様)」を見ながら
この API にこういうパラメータでリクエストすればいいんだな
と理解します。
OpenAPI って何?

OpenAPI は、その「API の仕様」を
- 人間にも
- ツール(機械)にも
読みやすい形で記述するための フォーマット(ルール) です。
例えば:
- 「
GET /booksはこういうレスポンスを返します」 - 「
POST /booksのリクエストボディはこういう JSON です」 - 「この項目は string で必須です」
といった情報を YAML / JSON で書き下せます。
OpenAPI 形式で書いておくと…
- Swagger UI などで きれいな API ドキュメントを自動生成できる
- OpenAPI Generator などで クライアントコードや型定義を自動生成できる
- 契約テストなどで 仕様と実装のズレを検知しやすくなる
といったメリットがあります。
Swagger / Swagger UI って何?
名前が似ていてややこしいので整理します。
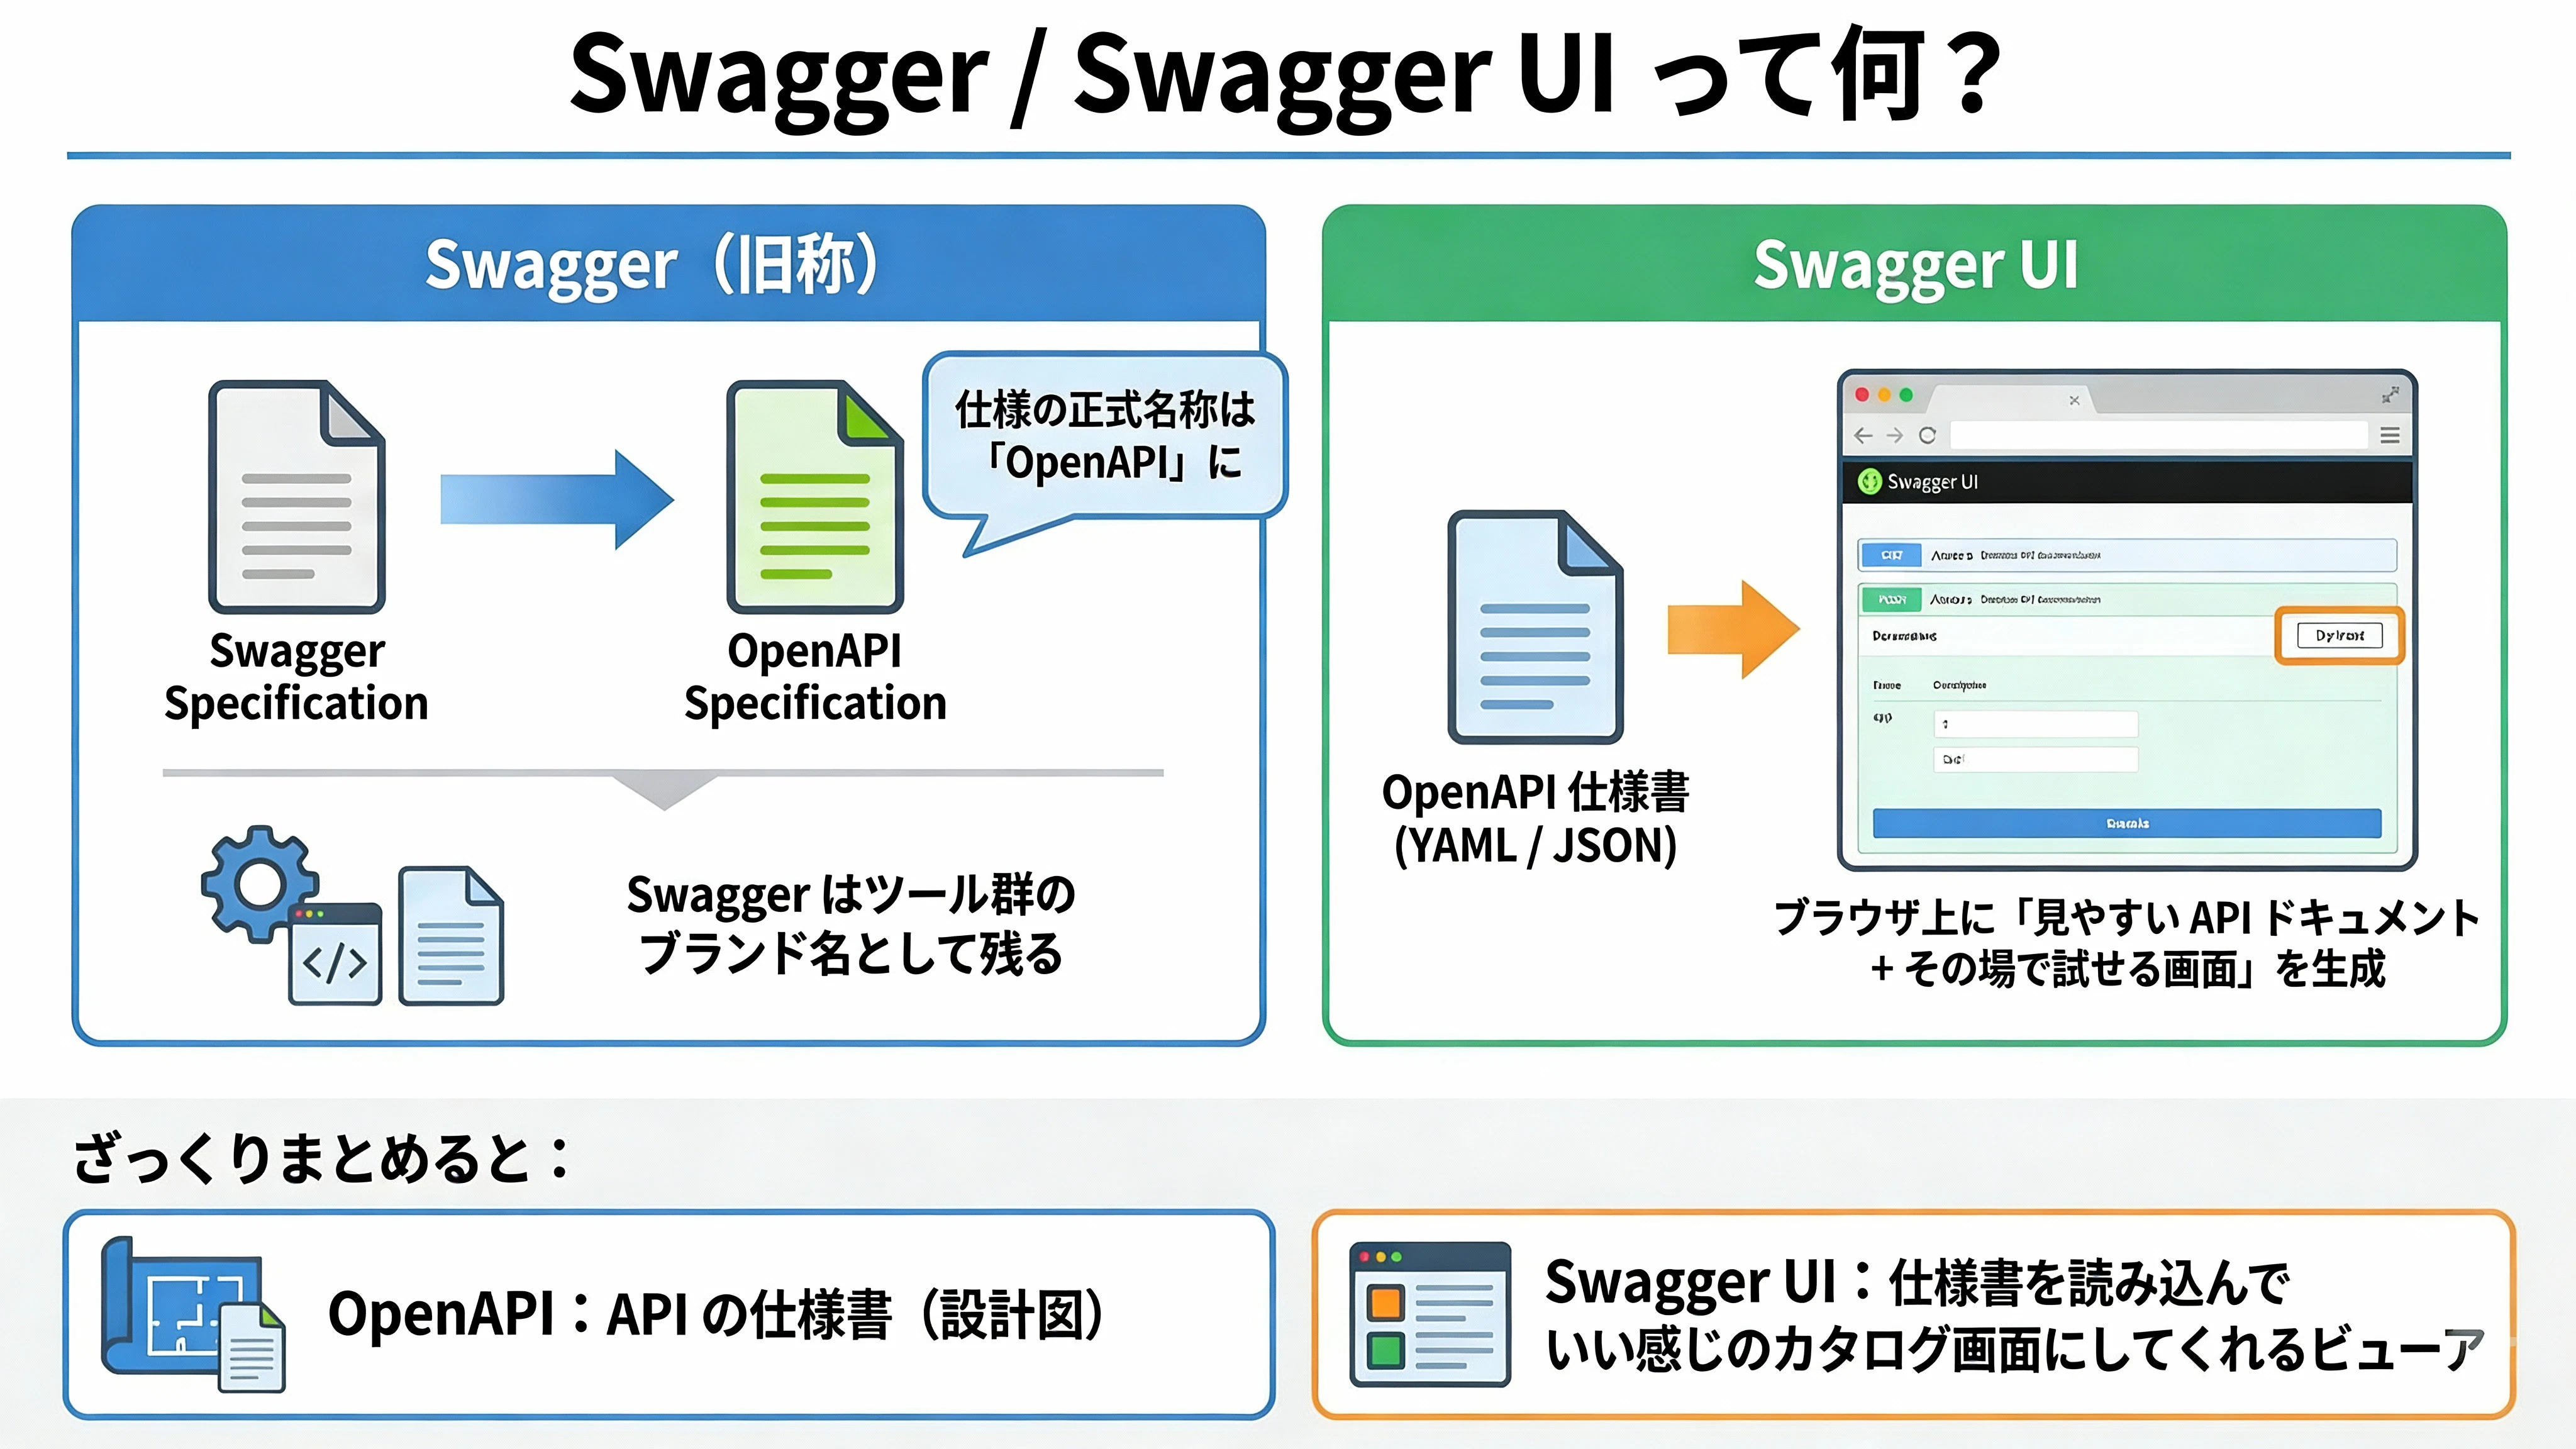
-
Swagger(旧称)
OpenAPI の前身となる仕様の名前。
現在は仕様の正式名称は「OpenAPI」になり、Swagger はツール群のブランド名として残っています。 -
Swagger UI
OpenAPI 仕様(YAML / JSON)を読み込んで、
ブラウザ上に 「見やすい API ドキュメント + その場で試せる画面」 を生成してくれるツール。
ざっくりまとめると:
- OpenAPI:API の仕様書(設計図)
- Swagger UI:仕様書を読み込んで いい感じのカタログ画面にしてくれるビューア
という関係です。
OpenAPI を図でイメージしてみる
文字だけだとイメージしづらいので、関係性を図にしてみます。
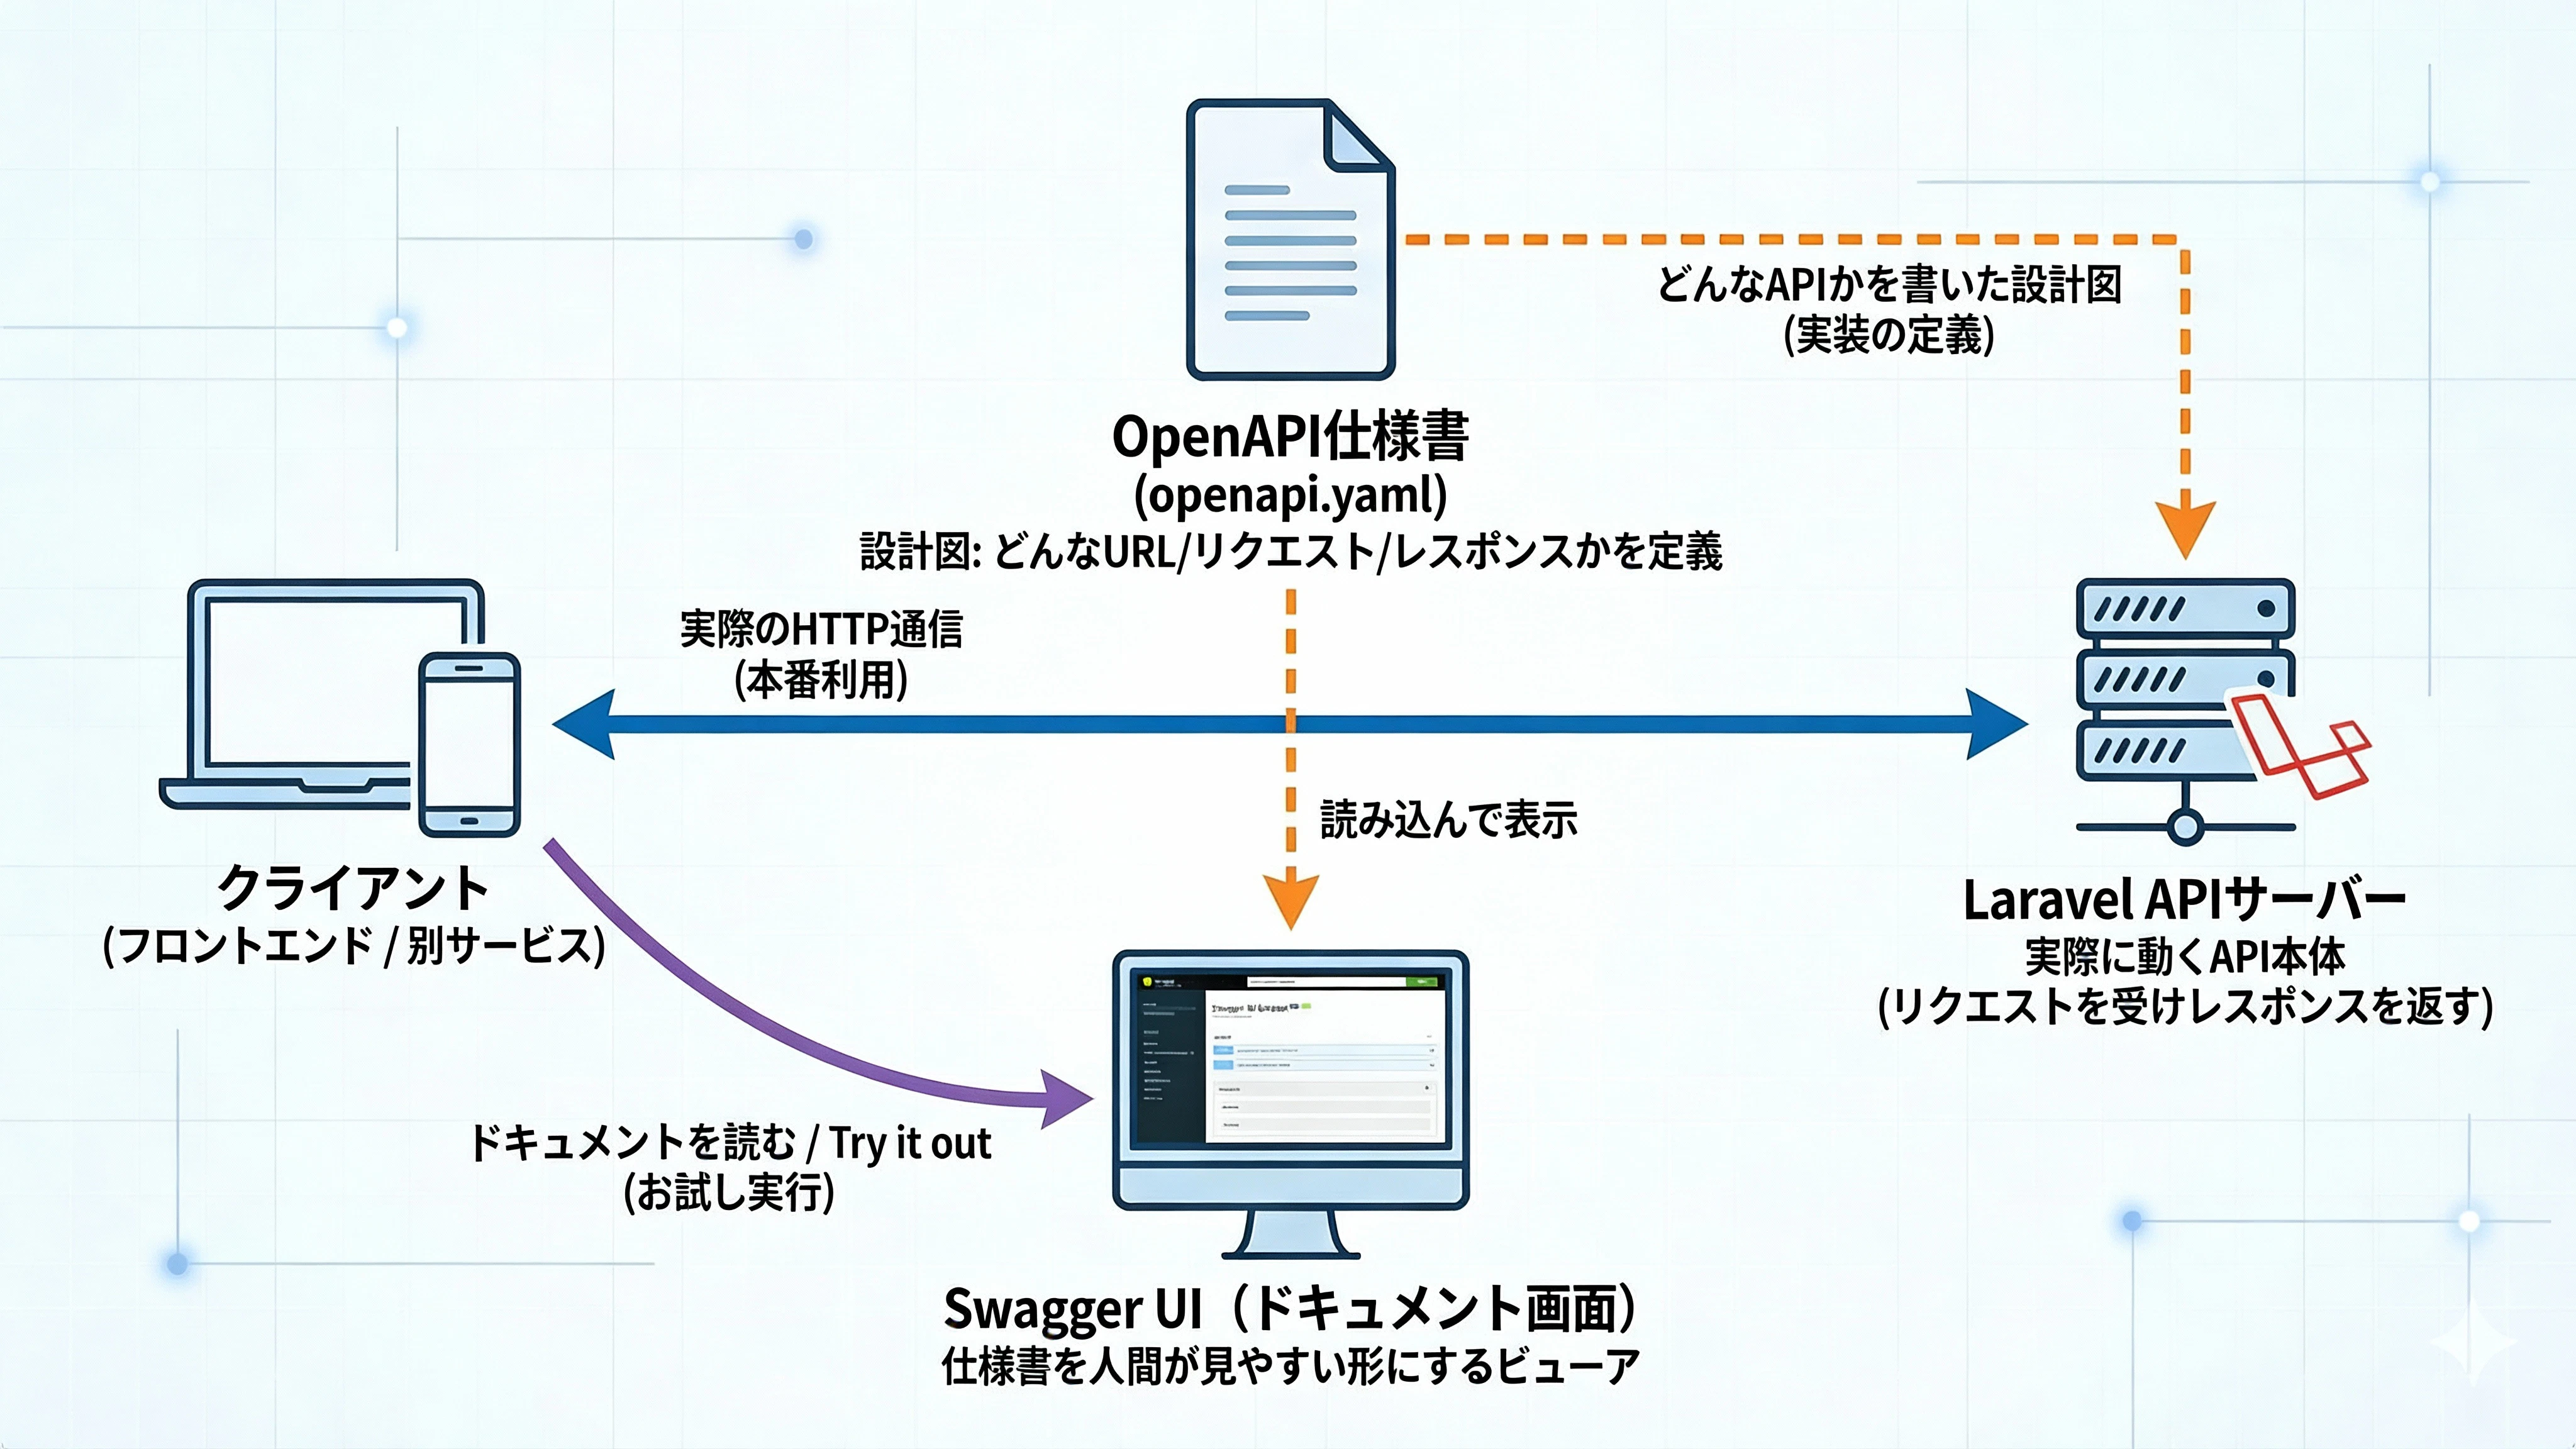
-
Laravel の API サーバー
実際にリクエストを受けてレスポンスを返す本体 -
OpenAPI 仕様書(
openapi.yaml)
「どんな URL があって、どんなリクエスト・レスポンスなのか」を定義した設計図 -
Swagger UI
その設計図を読み込んで、ブラウザ上にドキュメントとして表示+試せるようにしてくれるツール
つまり、
- Laravel:実際に動く API
- OpenAPI:API の仕様書
- Swagger UI:仕様書(OpenAPI)を人間が見やすい形にしてくれるビューア
という役割分担になっています。
OpenAPI ファイル(openapi.yaml)の中身の構造も、ざっくり図にしておきます。
-
paths
→ 「どの URL に、どんなメソッド(GET / POST…)があるか」 -
components.schemas
→ 「Book や Error などの共通スキーマ」を定義する場所
この記事では、この中の paths と components.schemas を中心に、Laravel の実装と揃えていきます。
この記事で学べること
この記事を通じて、以下の流れを一通り体験できます。
- Docker Compose で Swagger UI を導入する方法
- OpenAPI 仕様書(YAML)の 基本構造と書き方
- Laravel の API 実装と OpenAPI ドキュメントを 同じ形に揃えるコツ
- 一覧・詳細・検索・ページネーション・エラーなど、
実務でよく出てくる API パターンの定義方法
「まずは Swagger UI でいい感じのドキュメントが見えるようにしたい」
「後からちゃんとした設計に育てていきたい」
という人向けの内容です。
使用技術
| 技術 | バージョン | 用途 |
|---|---|---|
| Laravel | 11.x | PHPフレームワーク |
| Docker / Docker Compose | - | コンテナ環境 |
| Swagger UI | latest | APIドキュメント表示 |
| OpenAPI | 3.0.3 | API仕様記述フォーマット |
サンプルプロジェクト概要
例として、シンプルな書籍管理システムの API を題材にします。
実装する主な API は以下のとおりです。
-
書籍API (
/books)- 書籍一覧の取得(検索・ページネーション対応)
- 書籍の詳細取得
- 書籍の新規登録・更新・削除(CRUD)
-
著者API (
/authors)- 著者一覧・詳細の取得(読み取り専用)
-
カテゴリAPI (
/categories)- カテゴリのマスターデータ(読み取り専用)
「1つの Book に Author と Category が紐づいている」よくある構成を想定しています。
環境構築
1. Docker ComposeにSwagger UIを追加
すでに Laravel + MySQL などのサービスがある前提で、
compose.yaml(または docker-compose.yml)に Swagger UI 用のサービスを 1 つ追加します。
services:
  # ... 既存のサービス(app, mysql等)

  swagger-ui:
    image: "swaggerapi/swagger-ui:latest"
    ports:
      - "${FORWARD_SWAGGER_PORT:-8080}:8080"
    environment:
      SWAGGER_JSON: /openapi/openapi.yaml
    volumes:
      - "./openapi.yaml:/openapi/openapi.yaml:ro"
    networks:
      - app-network
ここでやっていること
-
swaggerapi/swagger-ui:latestイメージを使って Swagger UI コンテナを起動 -
SWAGGER_JSONで読み込む OpenAPI ファイルを指定
→ コンテナ内では/openapi/openapi.yamlとして扱う - ローカルの
./openapi.yamlをコンテナの/openapi/openapi.yamlにマウント(読み取り専用)
2. OpenAPI仕様書の雛形を作成
まだ中身はあとで埋めるので、まずは形だけ用意します。
プロジェクトルートに openapi.yaml を作成します。
openapi: 3.0.3
info:
  title: Book Management API
  version: 1.0.0
  description: 書籍管理システム API

servers:
  - url: http://localhost/api
    description: ローカル開発環境

tags:
  - name: books
    description: 書籍
  - name: authors
    description: 著者
  - name: categories
    description: カテゴリ

paths:
  # ここにエンドポイントを定義

components:
  schemas:
    # ここにスキーマを定義
この状態でも、Swagger UI は起動できます。
3. 起動確認
# Swagger UI コンテナを起動
docker compose up -d swagger-ui

# ブラウザでアクセス(Mac の場合)
open http://localhost:8080
ブラウザで Swagger UI が表示されれば成功です。

OpenAPI仕様書の書き方(Book API 編)
ここからは、openapi.yaml の中身を実際の API に近づけていくステップです。
例として GET /books から順に追加していきます。
基本的なGETエンドポイント(一覧取得)
paths:
  /books:
    get:
      tags:
        - books
      summary: 書籍一覧を取得
      description: 登録されている全ての書籍を取得します
      operationId: getBooks
      responses:
        '200':
          description: 成功
          content:
            application/json:
              schema:
                type: object
                properties:
                  data:
                    type: array
                    items:
                      $ref: '#/components/schemas/Book'
この定義を追加して openapi.yaml を保存し、Swagger UI をリロードすると、
画面左側のエンドポイント一覧に GET /books が表示されます。
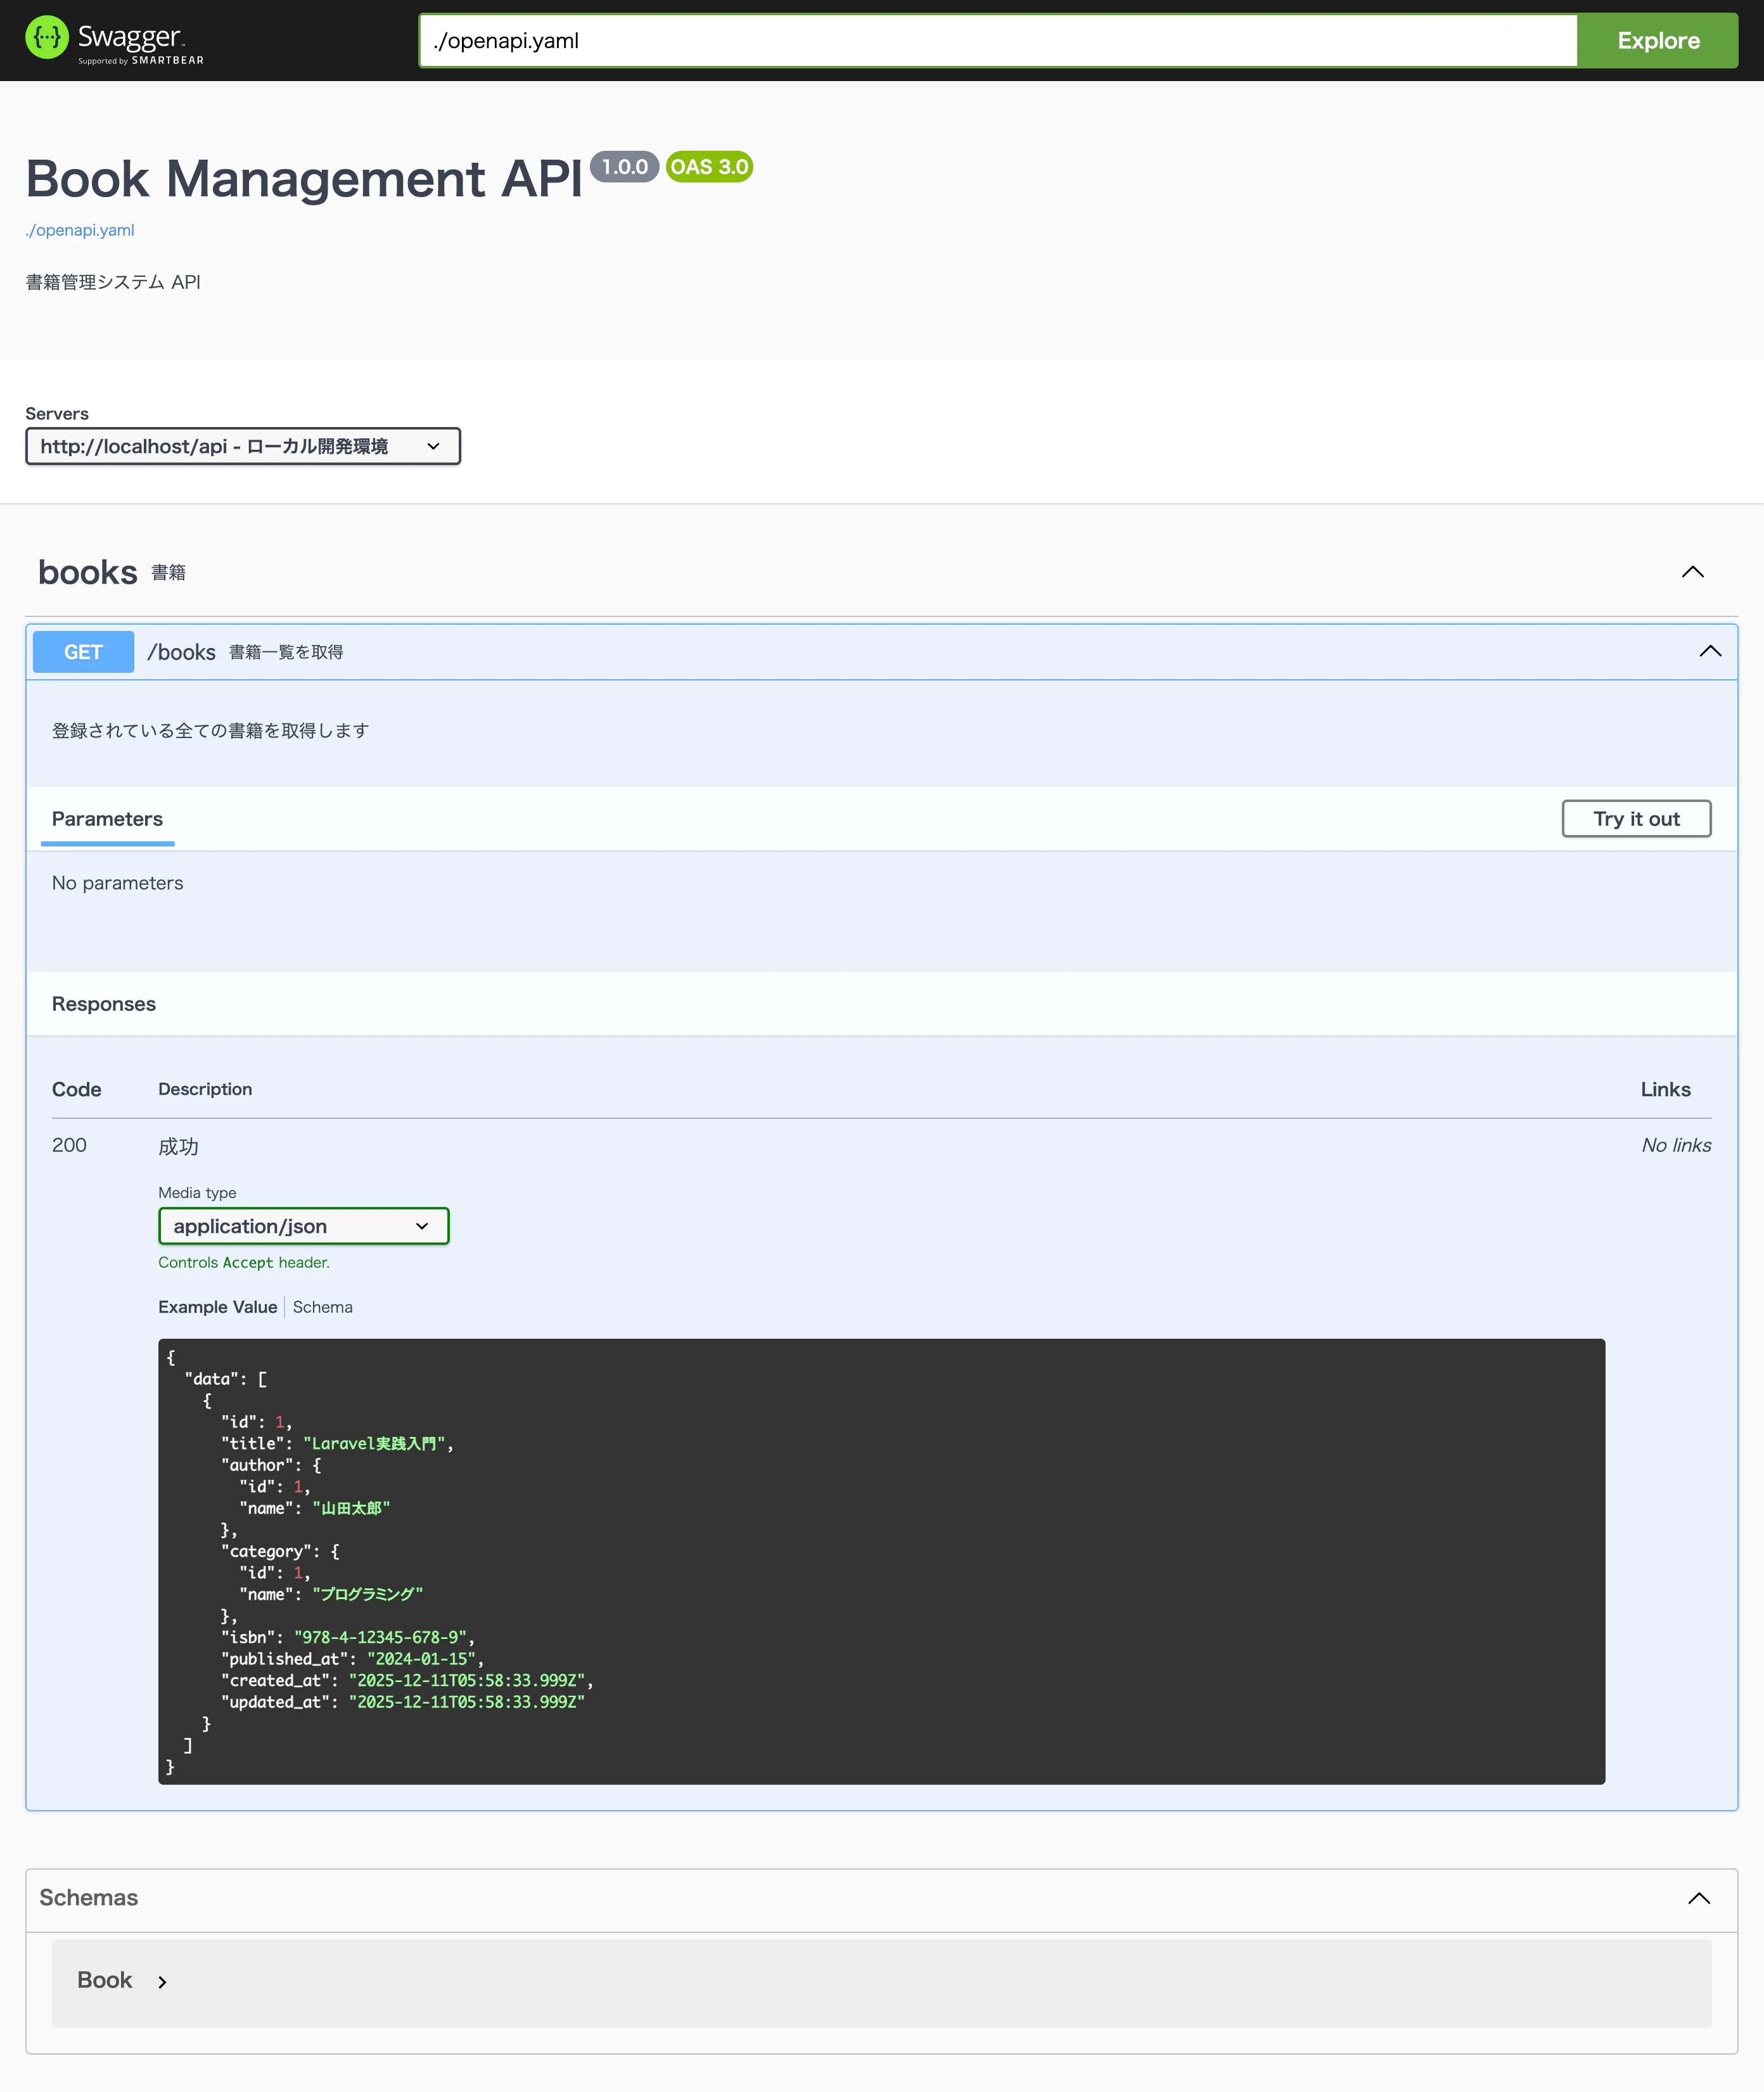
書籍一覧API(GET /books)が Swagger UI 上に反映された状態。「Try it out」から実際にリクエストも送れる
「Try it out」ボタンから実際にリクエストを投げることもできるので、
API 実装後の動作確認やフロントエンドとのすり合わせにも便利です。
パスパラメータ付きエンドポイント(詳細取得)
  /books/{id}:
    get:
      tags:
        - books
      summary: 書籍詳細を取得
      operationId: getBookById
      parameters:
        - name: id
          in: path
          required: true
          description: 書籍ID
          schema:
            type: integer
            example: 1
      responses:
        '200':
          description: 成功
          content:
            application/json:
              schema:
                type: object
                properties:
                  data:
                    $ref: '#/components/schemas/Book'
        '404':
          description: 書籍が見つかりません
          content:
            application/json:
              schema:
                $ref: '#/components/schemas/Error'
/books/{id} のような URL の {id} 部分は、
parameters で パスパラメータ として定義します。
クエリパラメータとページネーション
ページネーションや検索条件も OpenAPI に書いておくと、
フロント側や他チームとのコミュニケーションがかなり楽になります。
  /books:
    get:
      tags:
        - books
      summary: 書籍一覧を取得
      operationId: getBooks
      parameters:
        - name: page
          in: query
          description: ページ番号
          schema:
            type: integer
            default: 1
        - name: per_page
          in: query
          description: 1ページあたりの件数
          schema:
            type: integer
            default: 15
        - name: category_id
          in: query
          description: カテゴリIDでフィルタ
          schema:
            type: integer
        - name: keyword
          in: query
          description: タイトル検索キーワード
          schema:
            type: string
      responses:
        '200':
          description: 成功
          content:
            application/json:
              schema:
                $ref: '#/components/schemas/PaginatedBooks'
POSTエンドポイント(新規作成)
  /books:
    post:
      tags:
        - books
      summary: 書籍を登録
      operationId: createBook
      requestBody:
        required: true
        content:
          application/json:
            schema:
              $ref: '#/components/schemas/BookCreate'
      responses:
        '201':
          description: 作成成功
          content:
            application/json:
              schema:
                type: object
                properties:
                  data:
                    $ref: '#/components/schemas/Book'
        '422':
          description: バリデーションエラー
          content:
            application/json:
              schema:
                $ref: '#/components/schemas/ValidationError'
-
requestBodyで入力データの形式を定義 - バリデーションエラー
422をあらかじめ定義しておくと、
実装時・テスト時に「仕様と合っているか」を確認しやすくなります。
PUT/DELETEエンドポイント(更新・削除)
  /books/{id}:
    put:
      tags:
        - books
      summary: 書籍を更新
      operationId: updateBook
      parameters:
        - name: id
          in: path
          required: true
          schema:
            type: integer
      requestBody:
        required: true
        content:
          application/json:
            schema:
              $ref: '#/components/schemas/BookUpdate'
      responses:
        '200':
          description: 更新成功
          content:
            application/json:
              schema:
                type: object
                properties:
                  data:
                    $ref: '#/components/schemas/Book'

    delete:
      tags:
        - books
      summary: 書籍を削除
      operationId: deleteBook
      parameters:
        - name: id
          in: path
          required: true
          schema:
            type: integer
      responses:
        '204':
          description: 削除成功
        '404':
          description: 書籍が見つかりません
スキーマ定義(Book / Author / Categoryなど)
components:
  schemas:
    Book:
      type: object
      properties:
        id:
          type: integer
          example: 1
        title:
          type: string
          example: Laravel実践入門
        author:
          $ref: '#/components/schemas/Author'
        category:
          $ref: '#/components/schemas/Category'
        isbn:
          type: string
          example: "978-4-12345-678-9"
        published_at:
          type: string
          format: date
          example: "2024-01-15"
        created_at:
          type: string
          format: date-time
        updated_at:
          type: string
          format: date-time

    BookCreate:
      type: object
      required:
        - title
        - author_id
        - category_id
      properties:
        title:
          type: string
          example: Laravel実践入門
        author_id:
          type: integer
          example: 1
        category_id:
          type: integer
          example: 1
        isbn:
          type: string
          example: "978-4-12345-678-9"
        published_at:
          type: string
          format: date

    Author:
      type: object
      properties:
        id:
          type: integer
          example: 1
        name:
          type: string
          example: 山田太郎

    Category:
      type: object
      properties:
        id:
          type: integer
          example: 1
        name:
          type: string
          example: プログラミング

    PaginatedBooks:
      type: object
      properties:
        data:
          type: array
          items:
            $ref: '#/components/schemas/Book'
        meta:
          type: object
          properties:
            current_page:
              type: integer
            last_page:
              type: integer
            per_page:
              type: integer
            total:
              type: integer

    Error:
      type: object
      properties:
        message:
          type: string
          example: Resource not found

    ValidationError:
      type: object
      properties:
        message:
          type: string
          example: The given data was invalid.
        errors:
          type: object
          additionalProperties:
            type: array
            items:
              type: string
ここまで書くと、Swagger UI 上で「書籍 API 一式」がかなりそれっぽく表示されるようになります 🙌
全体画像

LaravelでのAPI実装
ここからは、OpenAPI に書いた内容を Laravel の実装で再現していきます。
ディレクトリ構成
app/
├── Http/
│   ├── Controllers/
│   │   └── Api/
│   │       ├── BookController.php
│   │       ├── AuthorController.php
│   │       └── CategoryController.php
│   └── Requests/
│       └── Api/
│           ├── StoreBookRequest.php
│           └── UpdateBookRequest.php
├── Services/
│   └── BookService.php
└── Models/
    ├── Book.php
    ├── Author.php
    └── Category.php
役割としてはざっくりこんな感じです。
- Controller:HTTP リクエストの入口(どのメソッドを呼ぶか)
- Request:バリデーション担当
- Service:ビジネスロジックをまとめる場所
- Model:DB とやり取りするクラス
コントローラーの実装例
<?php

namespace App\Http\Controllers\Api;

use App\Http\Controllers\Controller;
use App\Http\Requests\Api\StoreBookRequest;
use App\Http\Requests\Api\UpdateBookRequest;
use App\Services\BookService;
use Illuminate\Http\JsonResponse;

class BookController extends Controller
{
    public function __construct(
        private BookService $bookService
    ) {}

    public function index(): JsonResponse
    {
        $books = $this->bookService->getAll();

        return response()->json([
            'data' => $books->items(),
            'meta' => [
                'current_page' => $books->currentPage(),
                'last_page' => $books->lastPage(),
                'per_page' => $books->perPage(),
                'total' => $books->total(),
            ]
        ]);
    }

    public function show(int $id): JsonResponse
    {
        $book = $this->bookService->findById($id);

        if (!$book) {
            return response()->json([
                'message' => 'Resource not found'
            ], 404);
        }

        return response()->json([
            'data' => $book
        ]);
    }

    public function store(StoreBookRequest $request): JsonResponse
    {
        $book = $this->bookService->create($request->validated());

        return response()->json([
            'data' => $book
        ], 201);
    }

    public function update(UpdateBookRequest $request, int $id): JsonResponse
    {
        $book = $this->bookService->update($id, $request->validated());

        return response()->json([
            'data' => $book
        ]);
    }

    public function destroy(int $id): JsonResponse
    {
        $this->bookService->delete($id);

        return response()->json(null, 204);
    }
}
ルーティング設定
// routes/api.php
use App\Http\Controllers\Api\BookController;
use App\Http\Controllers\Api\AuthorController;
use App\Http\Controllers\Api\CategoryController;

Route::apiResource('books', BookController::class);
Route::apiResource('authors', AuthorController::class)->only(['index', 'show']);
Route::apiResource('categories', CategoryController::class)->only(['index', 'show']);
Route::apiResource を使うことで、OpenAPI で書いた CRUD と対応したルートが一気に定義できます。
テスト戦略
OpenAPI で「こういうレスポンス」と決めたら、テストでもその形を検証しておくと安心です。
Feature Test の実装例
<?php

namespace Tests\Feature\Api;

use App\Models\Book;
use App\Models\Author;
use App\Models\Category;
use Illuminate\Foundation\Testing\RefreshDatabase;
use Tests\TestCase;

class BookApiTest extends TestCase
{
    use RefreshDatabase;

    public function test_can_get_books_list(): void
    {
        Book::factory()->count(3)->create();

        $response = $this->getJson('/api/books');

        $response->assertStatus(200)
            ->assertJsonStructure([
                'data' => [
                    '*' => ['id', 'title', 'author', 'category', 'created_at']
                ],
                'meta' => ['current_page', 'last_page', 'per_page', 'total']
            ]);
    }

    public function test_can_get_book_by_id(): void
    {
        $book = Book::factory()->create();

        $response = $this->getJson("/api/books/{$book->id}");

        $response->assertStatus(200)
            ->assertJsonPath('data.id', $book->id);
    }

    public function test_can_create_book(): void
    {
        $author = Author::factory()->create();
        $category = Category::factory()->create();

        $response = $this->postJson('/api/books', [
            'title' => 'テスト書籍',
            'author_id' => $author->id,
            'category_id' => $category->id,
        ]);

        $response->assertStatus(201)
            ->assertJsonPath('data.title', 'テスト書籍');
    }

    public function test_returns_404_for_non_existent_book(): void
    {
        $response = $this->getJson('/api/books/999');

        $response->assertStatus(404)
            ->assertJsonPath('message', 'Resource not found');
    }

    public function test_returns_422_for_invalid_data(): void
    {
        $response = $this->postJson('/api/books', []);

        $response->assertStatus(422)
            ->assertJsonStructure(['message', 'errors']);
    }
}
段階的な実装の進め方
OpenAPI を活用した API 開発は、次のようなステップで進めるとスムーズです。
Phase 1: 基盤構築
- Docker Compose で Swagger UI を導入
-
openapi.yamlの雛形を作成 - Swagger UI で表示・動作を確認
Phase 2: マスターデータAPI
- 読み取り専用のシンプルな API から実装
- カテゴリ・著者などの参照データを実装
# 読み取り専用APIの例
/categories:
  get:
    summary: カテゴリ一覧取得
/categories/{id}:
  get:
    summary: カテゴリ詳細取得
Phase 3: メインリソースAPI
- CRUD 操作を持つメイン API を実装
- リレーションを含めたレスポンス設計を行う
Phase 4: 高度な機能
- ページネーション対応
- 検索・フィルタリング機能
- ファイルアップロードなどの拡張機能
API設計のベストプラクティス
1. 一貫したレスポンス形式
// 単一リソース
{
  "data": { ... }
}

// コレクション(ページネーションあり)
{
  "data": [ ... ],
  "meta": {
    "current_page": 1,
    "last_page": 10,
    "per_page": 15,
    "total": 150
  }
}

// エラー
{
  "message": "The given data was invalid.",
  "errors": {
    "title": ["タイトルは必須です"]
  }
}
-
dataに実データ -
metaにページネーション情報 - エラー時は
messageとerrorsを統一
のように形式を揃えておくと、フロントエンド側も扱いやすくなります。
2. 適切な HTTP ステータスコード
| コード | 用途 |
|---|---|
| 200 | 成功(GET, PUT, PATCH) |
| 201 | 作成成功(POST) |
| 204 | 削除成功(DELETE) |
| 400 | 不正なリクエスト |
| 401 | 認証エラー |
| 403 | 権限エラー |
| 404 | リソースが見つからない |
| 422 | バリデーションエラー |
| 500 | サーバーエラー |
3. スキーマの再利用
同じ構造を複数箇所で使う場合は、$ref で参照して再利用します。
# 定義
components:
  schemas:
    Timestamps:
      type: object
      properties:
        created_at:
          type: string
          format: date-time
        updated_at:
          type: string
          format: date-time

# 使用(allOfで合成)
Book:
  allOf:
    - $ref: '#/components/schemas/Timestamps'
    - type: object
      properties:
        id:
          type: integer
        title:
          type: string
こうしておくと、共通項目を追加・変更したいときにも 1 箇所直すだけで済みます。
トラブルシューティング
Swagger UI が表示されないとき
# コンテナのログを確認
docker compose logs swagger-ui

# ファイルのマウント状態を確認
docker compose exec swagger-ui ls -la /openapi/

# コンテナを再起動
docker compose restart swagger-ui
-
openapi.yamlのマウントパスが間違っていないか - ファイルが存在しているか
などを確認します。
YAML の構文エラー
# YAMLの構文チェック(Python)
python -c "import yaml; yaml.safe_load(open('openapi.yaml'))"

# swagger-cliでバリデーション
npx @apidevtools/swagger-cli validate openapi.yaml
よくある YAML エラー
# NG: インデントが揃っていない
properties:
id:
  type: integer

# OK: 正しいインデント
properties:
  id:
    type: integer
YAML はインデント命なので、スペースのズレでエラーになりやすい点に注意です。
まとめ
OpenAPI を活用した API 開発には、次のようなメリットがあります。
-
ドキュメントの可視化
Swagger UI で常に最新のドキュメントを確認できる -
フロントエンド連携の効率化
型定義の自動生成など、フロント側とのすり合わせがスムーズになる -
API設計の標準化
チーム全体で一貫した API 設計を共有できる -
テストの効率化
Swagger UI の「Try it out」機能で手動テストもしやすい
参考リンク
お知らせ(採用情報)
最後にお知らせとなりますが、AppTime では一緒に働くメンバーを募集しております。
詳しくは採用情報ページをご確認ください。
みなさまからのご応募をお待ちしております。
最後までお読みいただきありがとうございました。
質問やフィードバックがあれば、ぜひコメントで教えてください