初めに
前回はシステム概要の紹介と、ArduinoとBluetoothの配線・プログラム作成まで行いました。今回は全体構成図の「Bluetoothの情報をスマホで受け取る」部分をやっていきます。
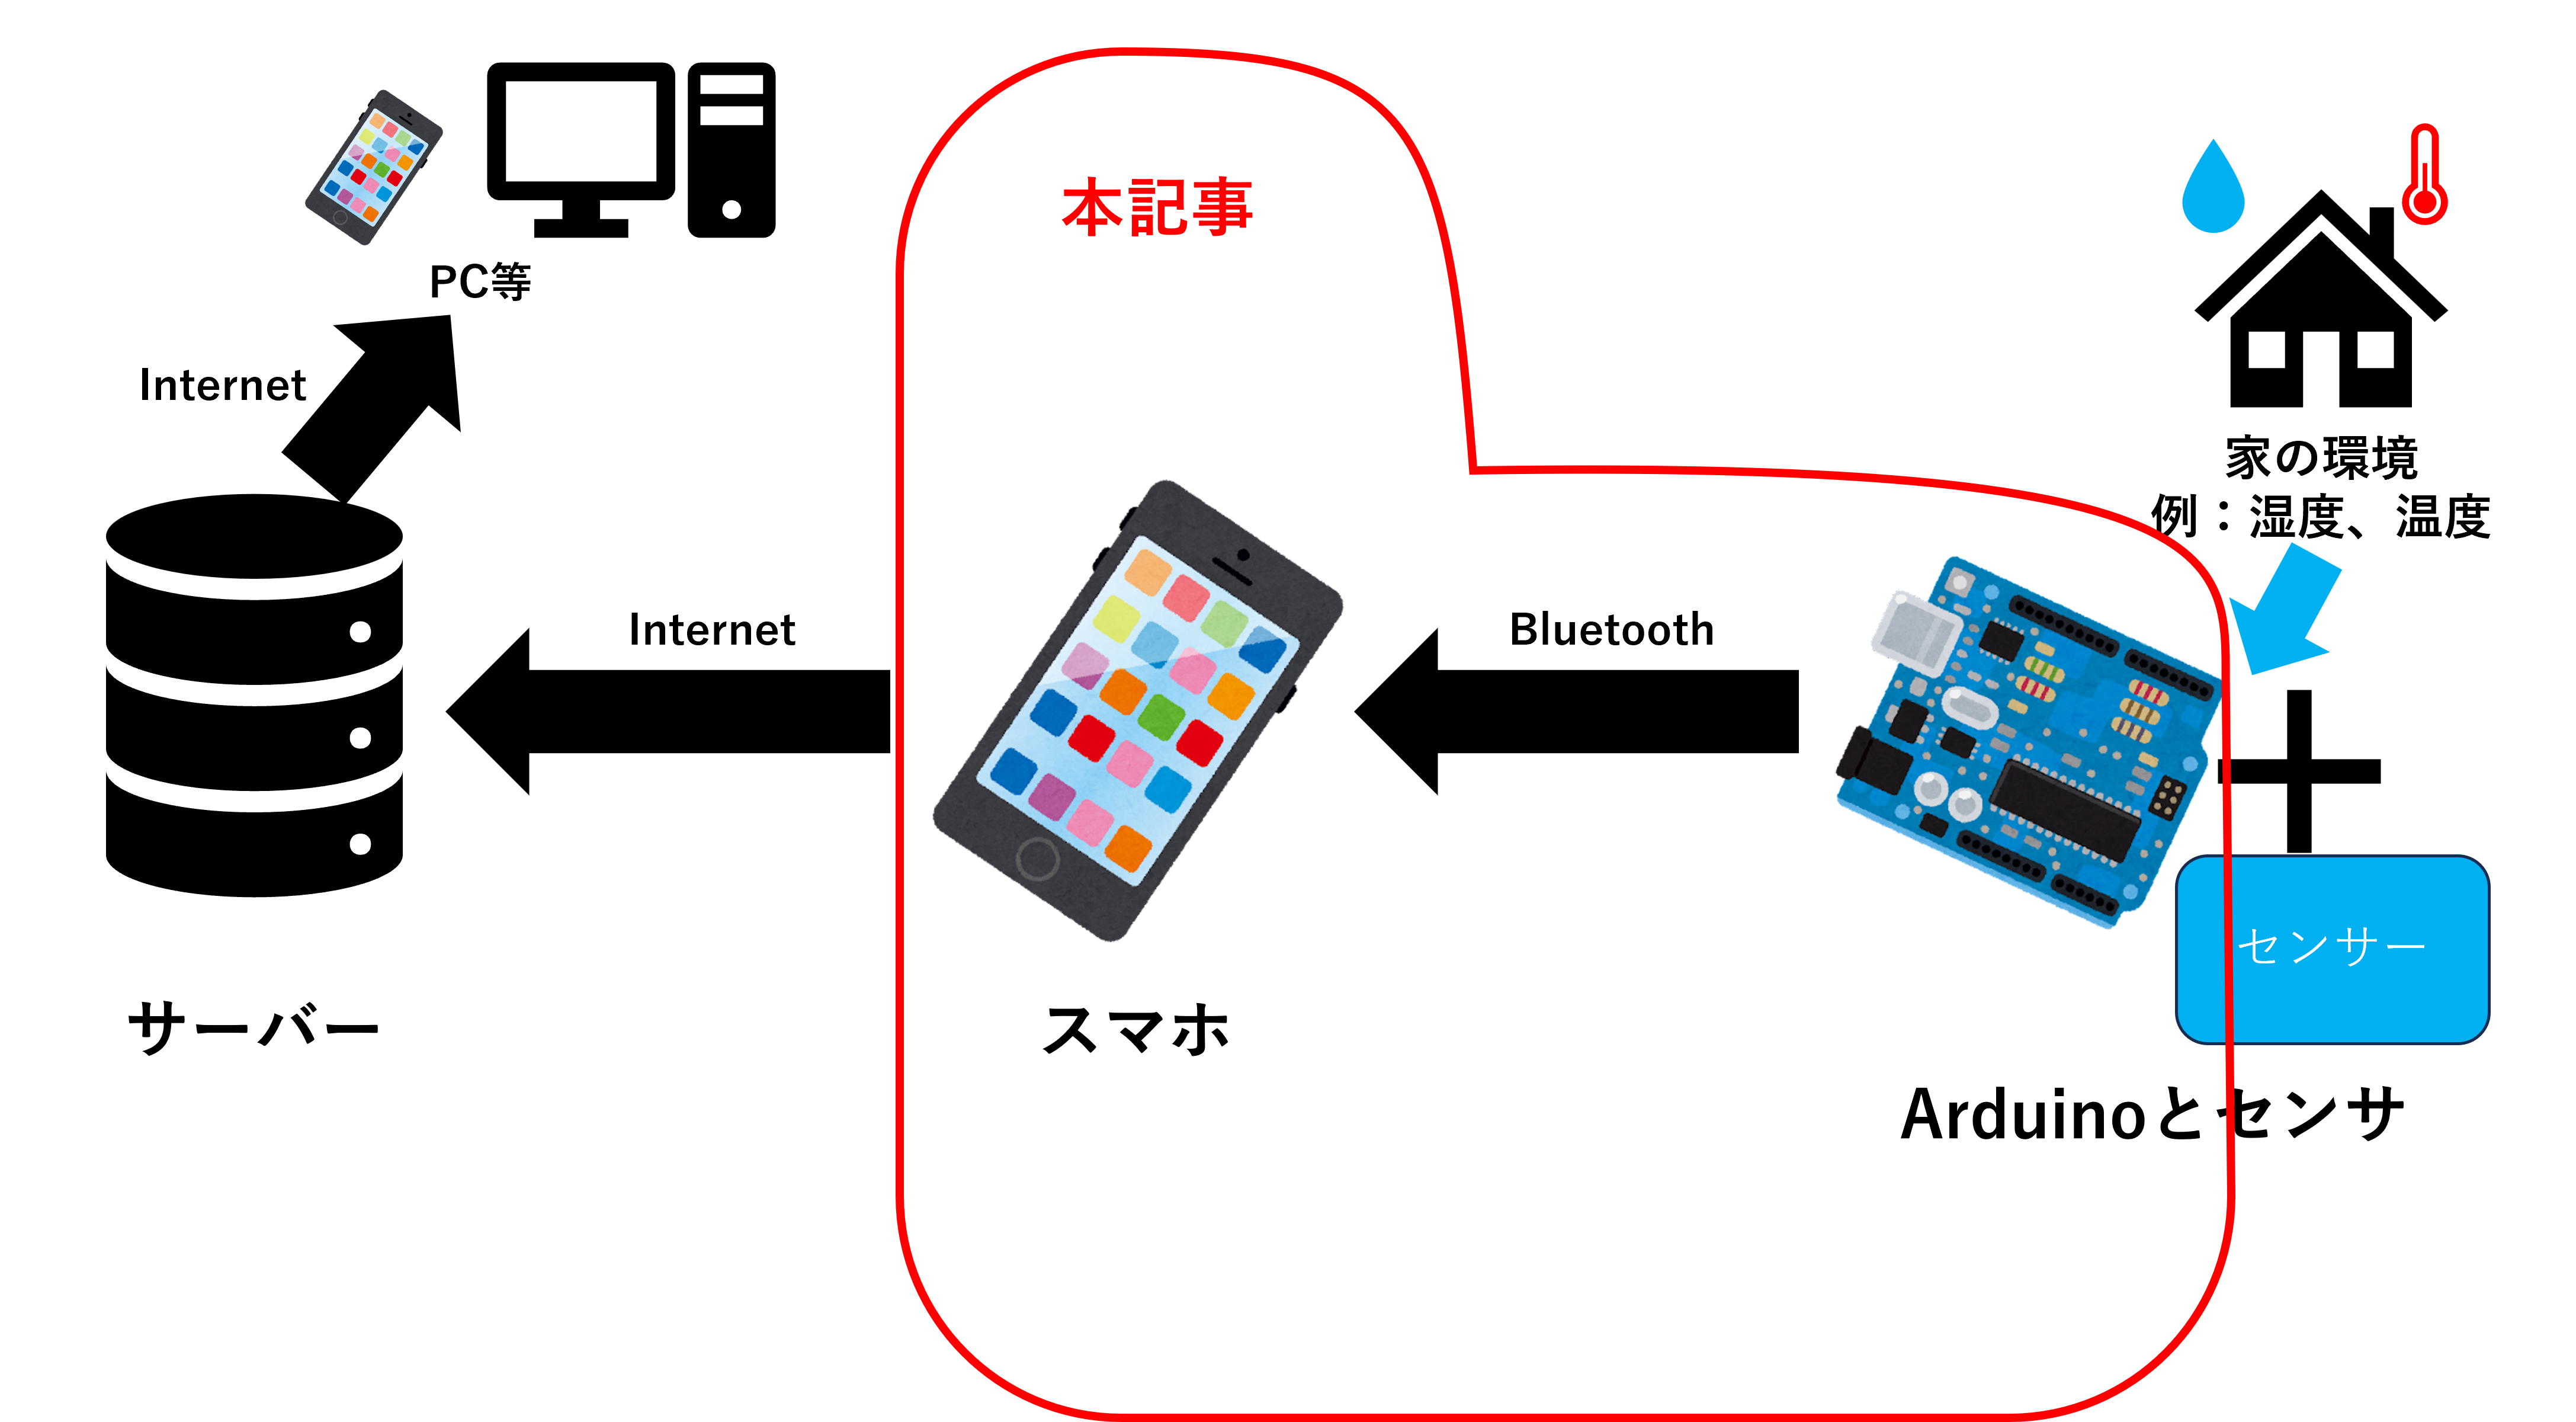
ここからが難しいですが楽しいところです!作者もわかっていない部分がありますので、できるだけ解説しながらやっていきますが、わからない・その説明間違っているって場合にはコメントください!
概要
本記事で紹介するシステムは以下の通りです。前回のBluetooth送信機(RN-42)で送信したデータはBluetooth SPP(Serial Port Profile)プロトコルを使用しています。このプロトコルはシリアル通信がBluetoothで使用できるもので、ArduinoとPCを有線で接続しているような挙動を取ることができます。
詳しくは→Bluetooth SPPを活用したデータ転送方法と実用例

これを使ってBluetooth経由で情報のやり取りを行います。
環境説明
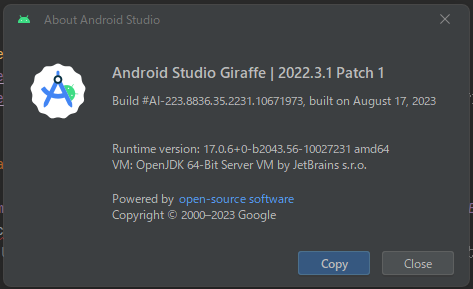
本題に入る前に、今回使用する環境を載せておきます。環境が違うと説明と違うところが出てきますのでお気をつけてください。
- Android studioバージョン:
- スマホ:Rakuten Hand 5G P780
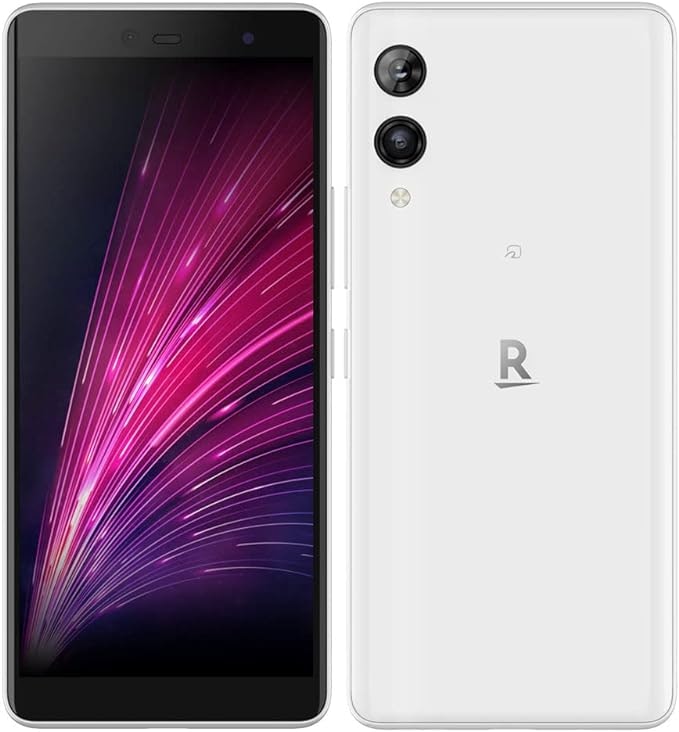
購入先リンク
Bluetoothが使えて、とても古くなければ大体使えると思います。 - 使用言語:kotlin
Bluetooth受信プログラム作成
では、プログラムを作っていきましょう!
プロジェクト作成
File > New > New Projectを開きます。
開いたウインドウのPhone and TabletタブのEmpty Views Activityをクリックします。
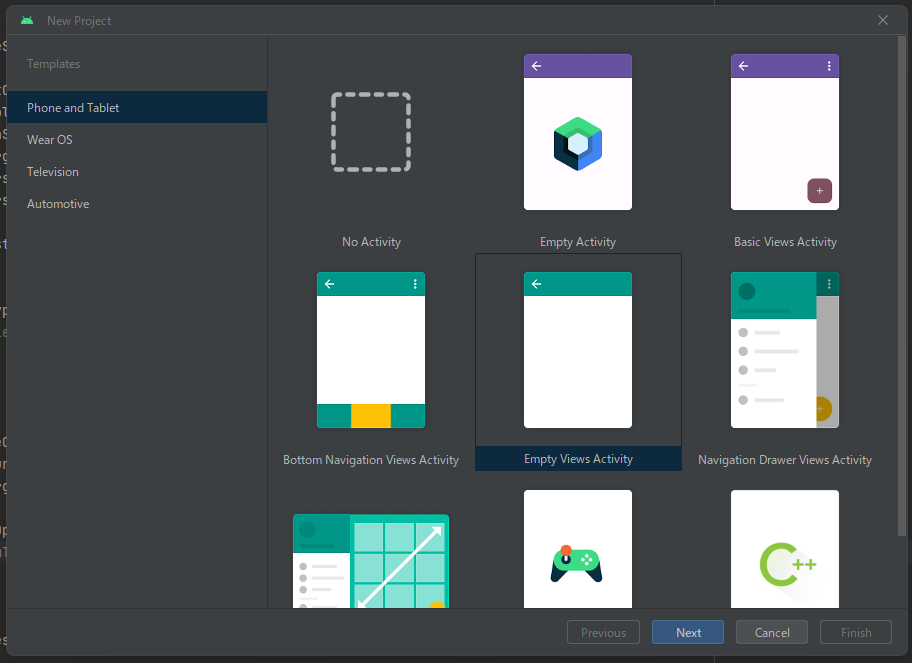
次にアプリ名、保存先、SDKバージョンを選択します。
アプリ名は特に指定はないので好きなものを選んでいただいて構いませんが、説明通りにやりたい方は下画像の「housemonitor」と設定しておきましょう。
保存先は特にプログラムに依存関係はないので好きなところで構いません。
ミニマムSDKバージョンも基本デフォルトで構いませんが、最低でもAPI26以上にしていただけると良いと思います!
言語はkotlinを選択してください。
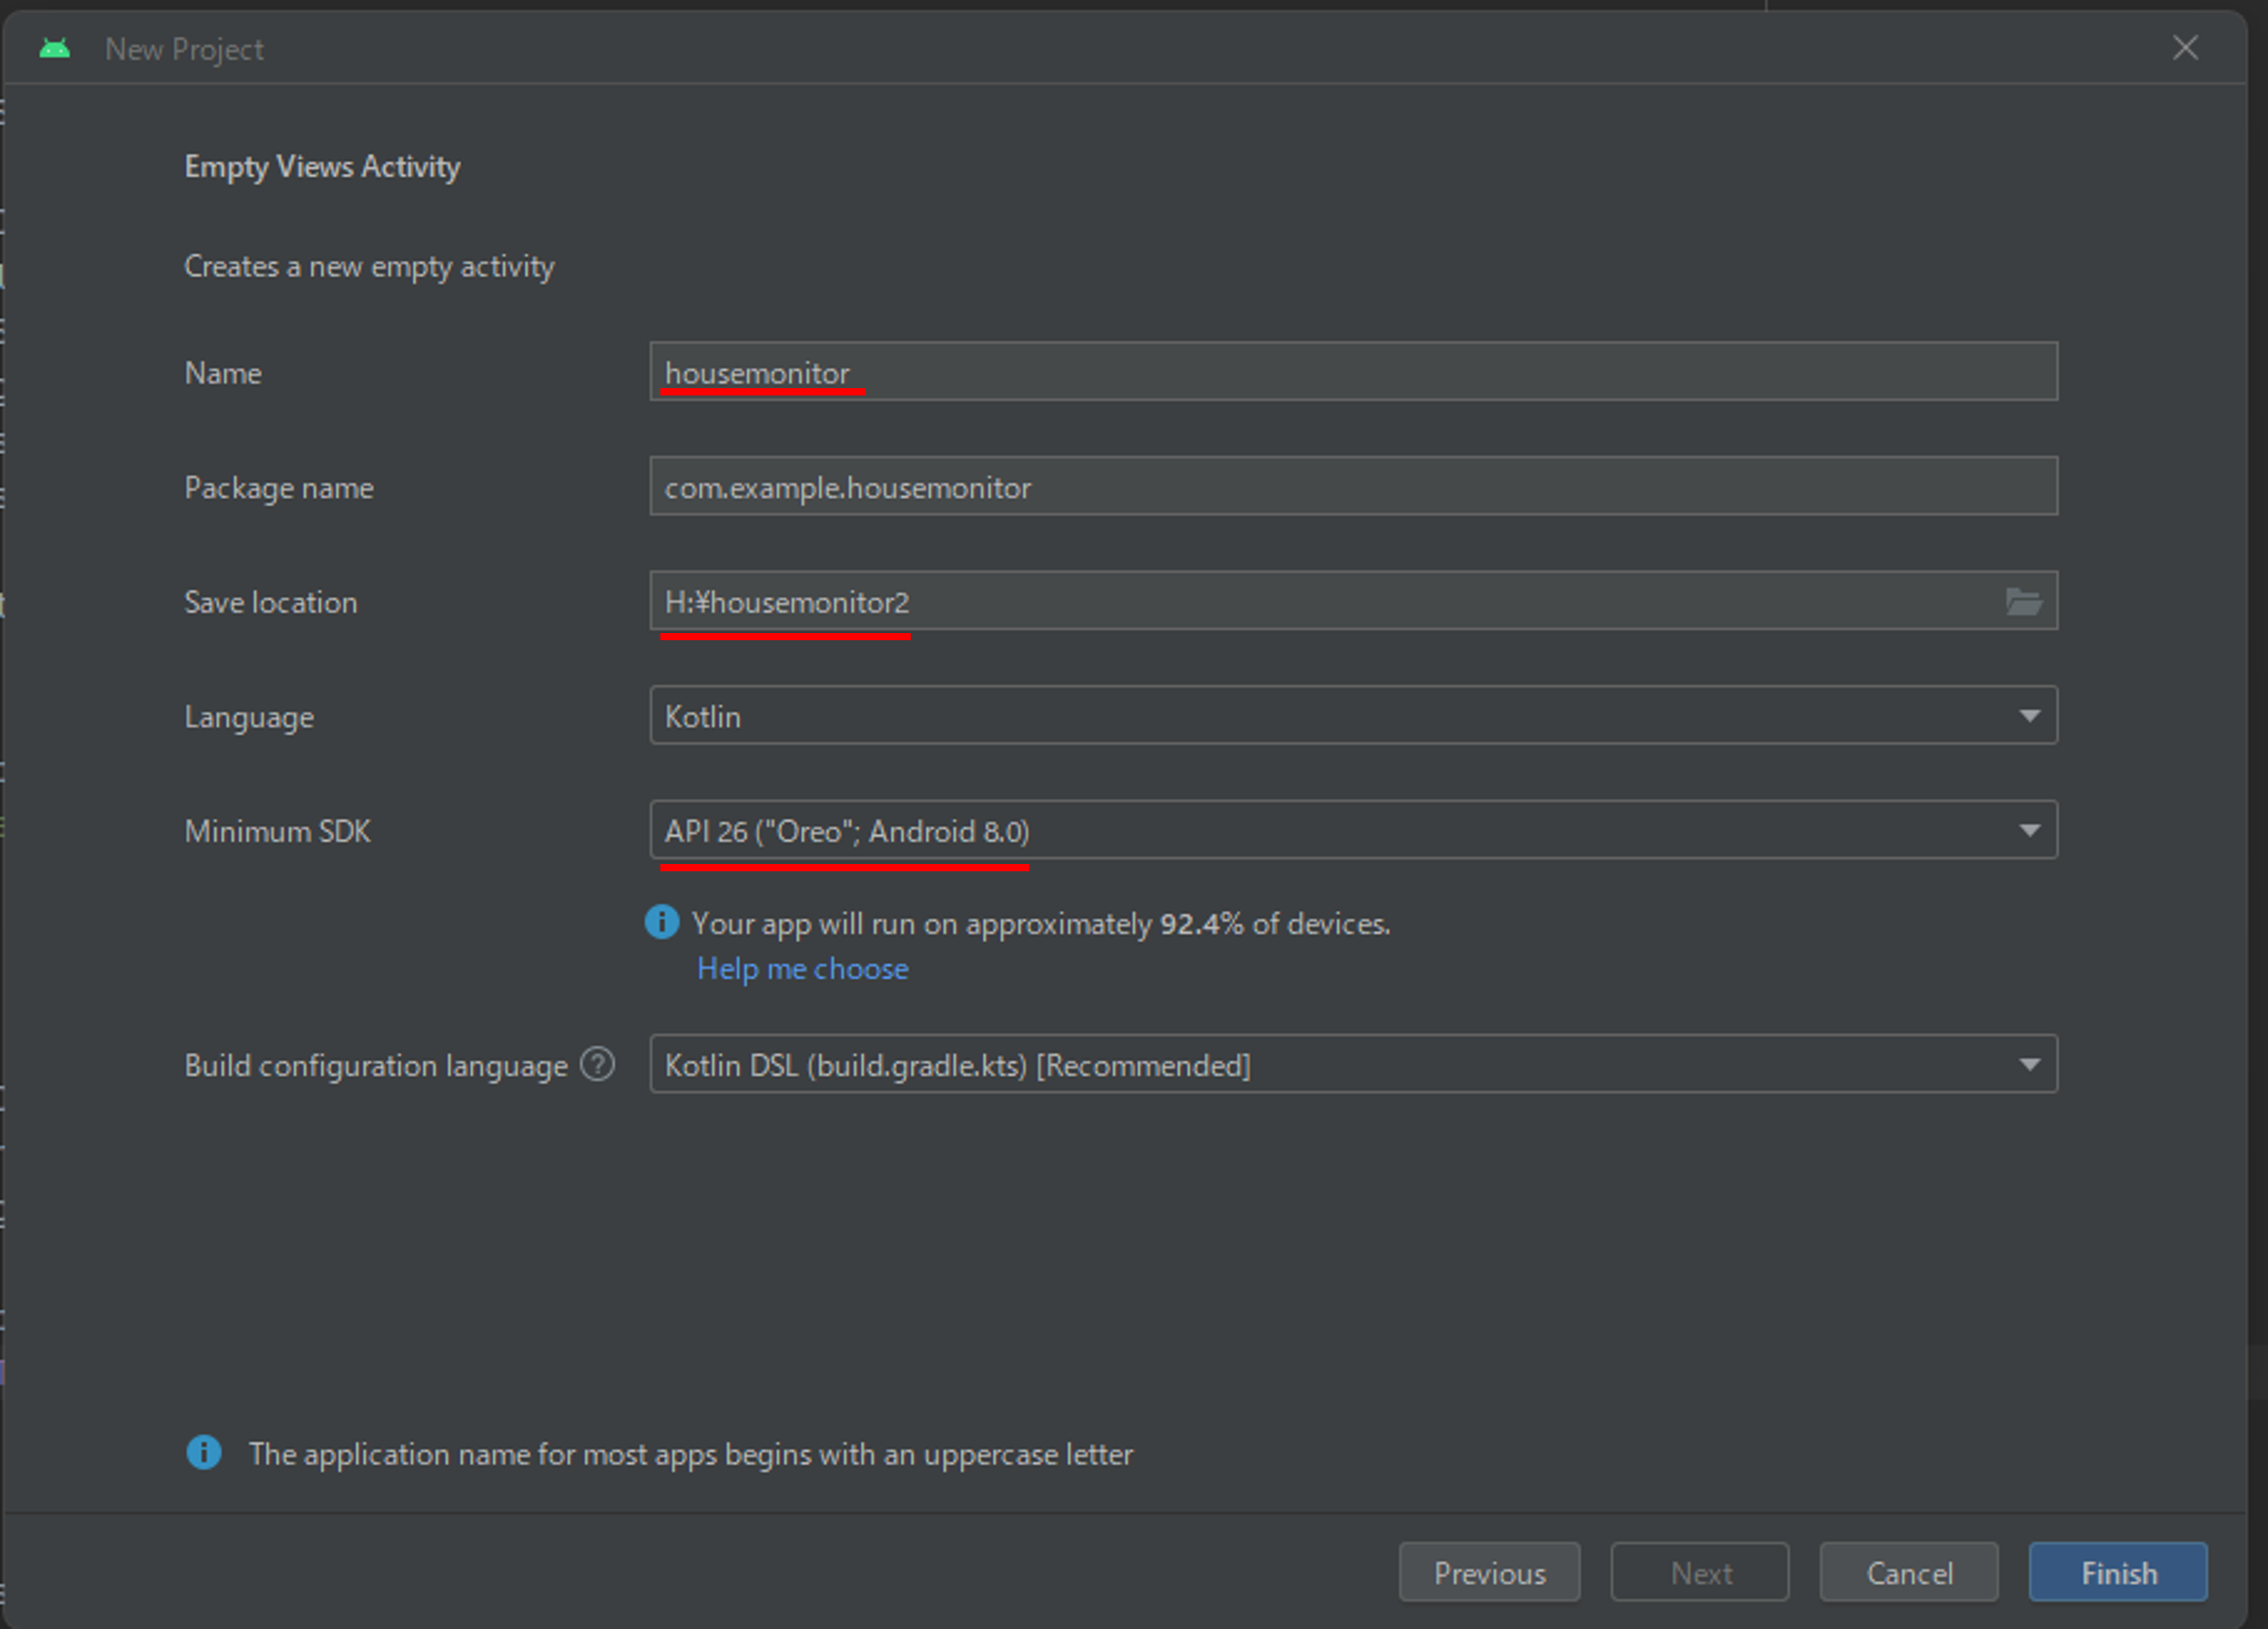
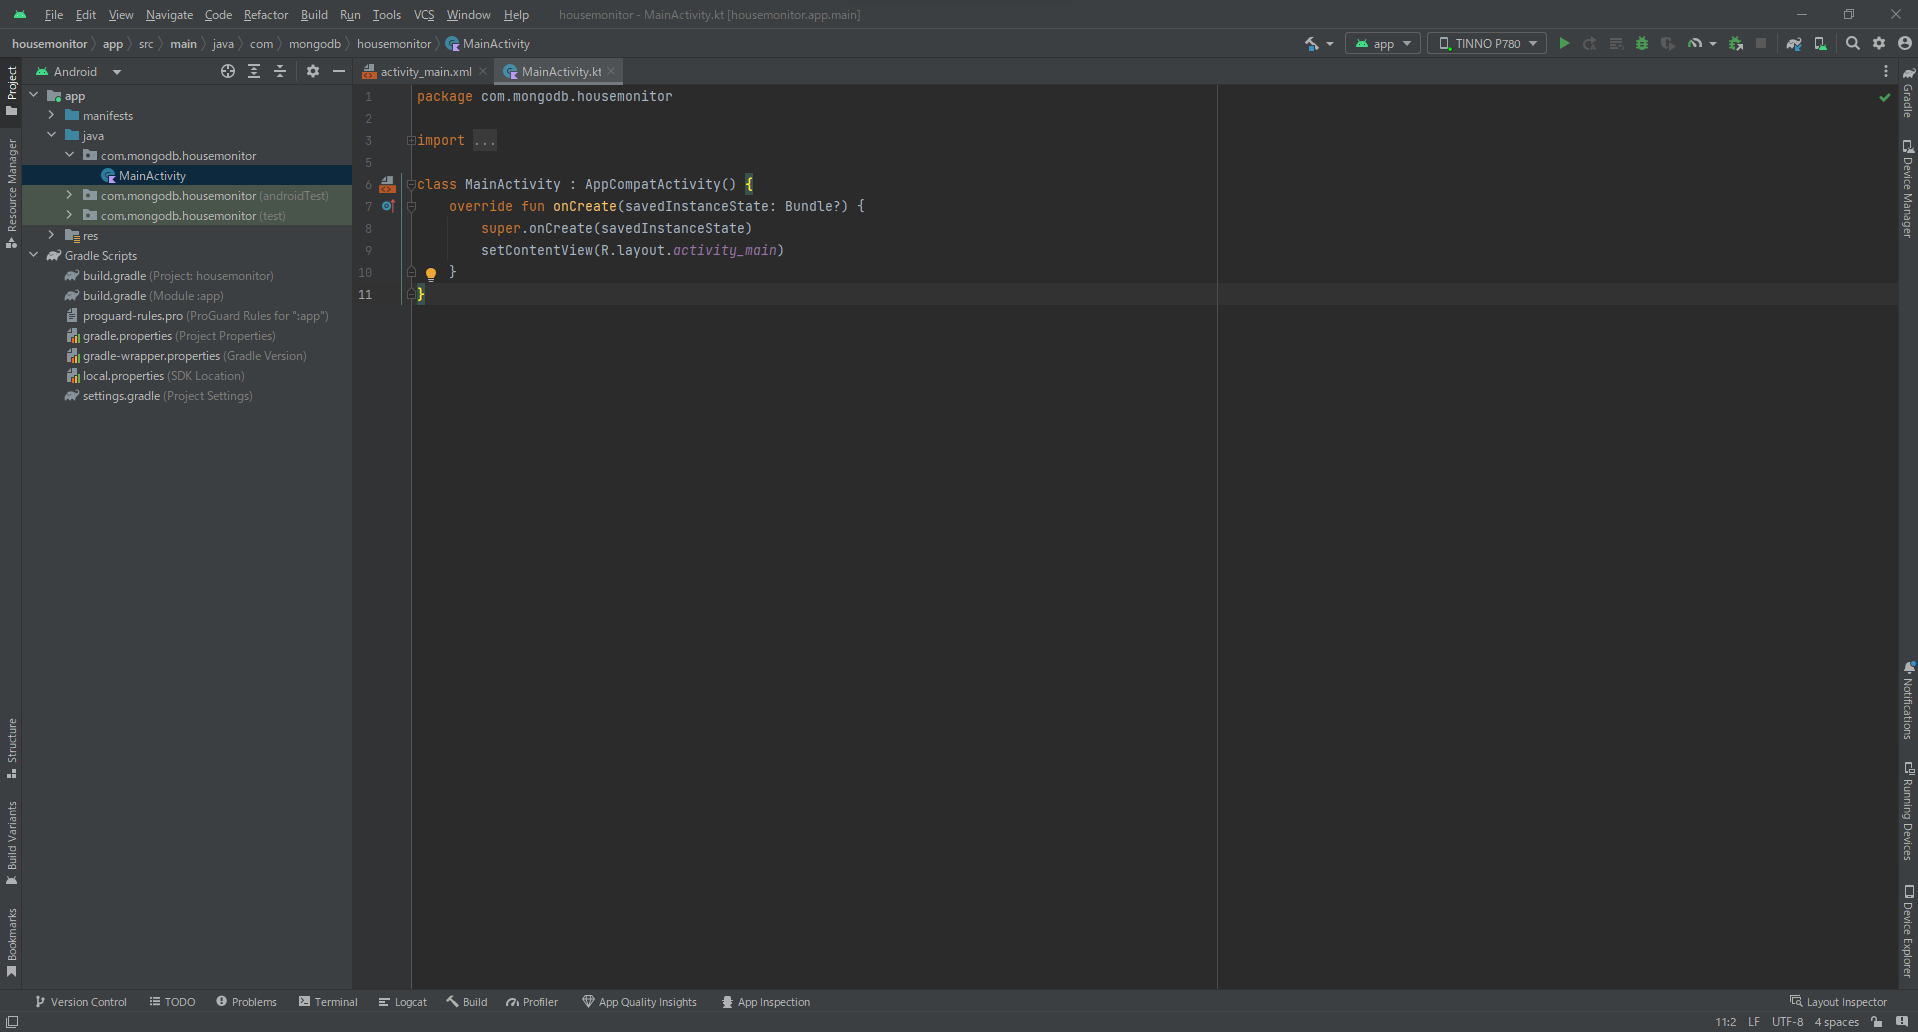
Finishを押して読み込みが全て完了し、下画像のように書き込める状態になれば作成完了です!
Bluetooth許可設定
次にアプリでBluetoothが使えるようにしておきます。
プロジェクトディレクトリのApp>manifestsをクリックします。
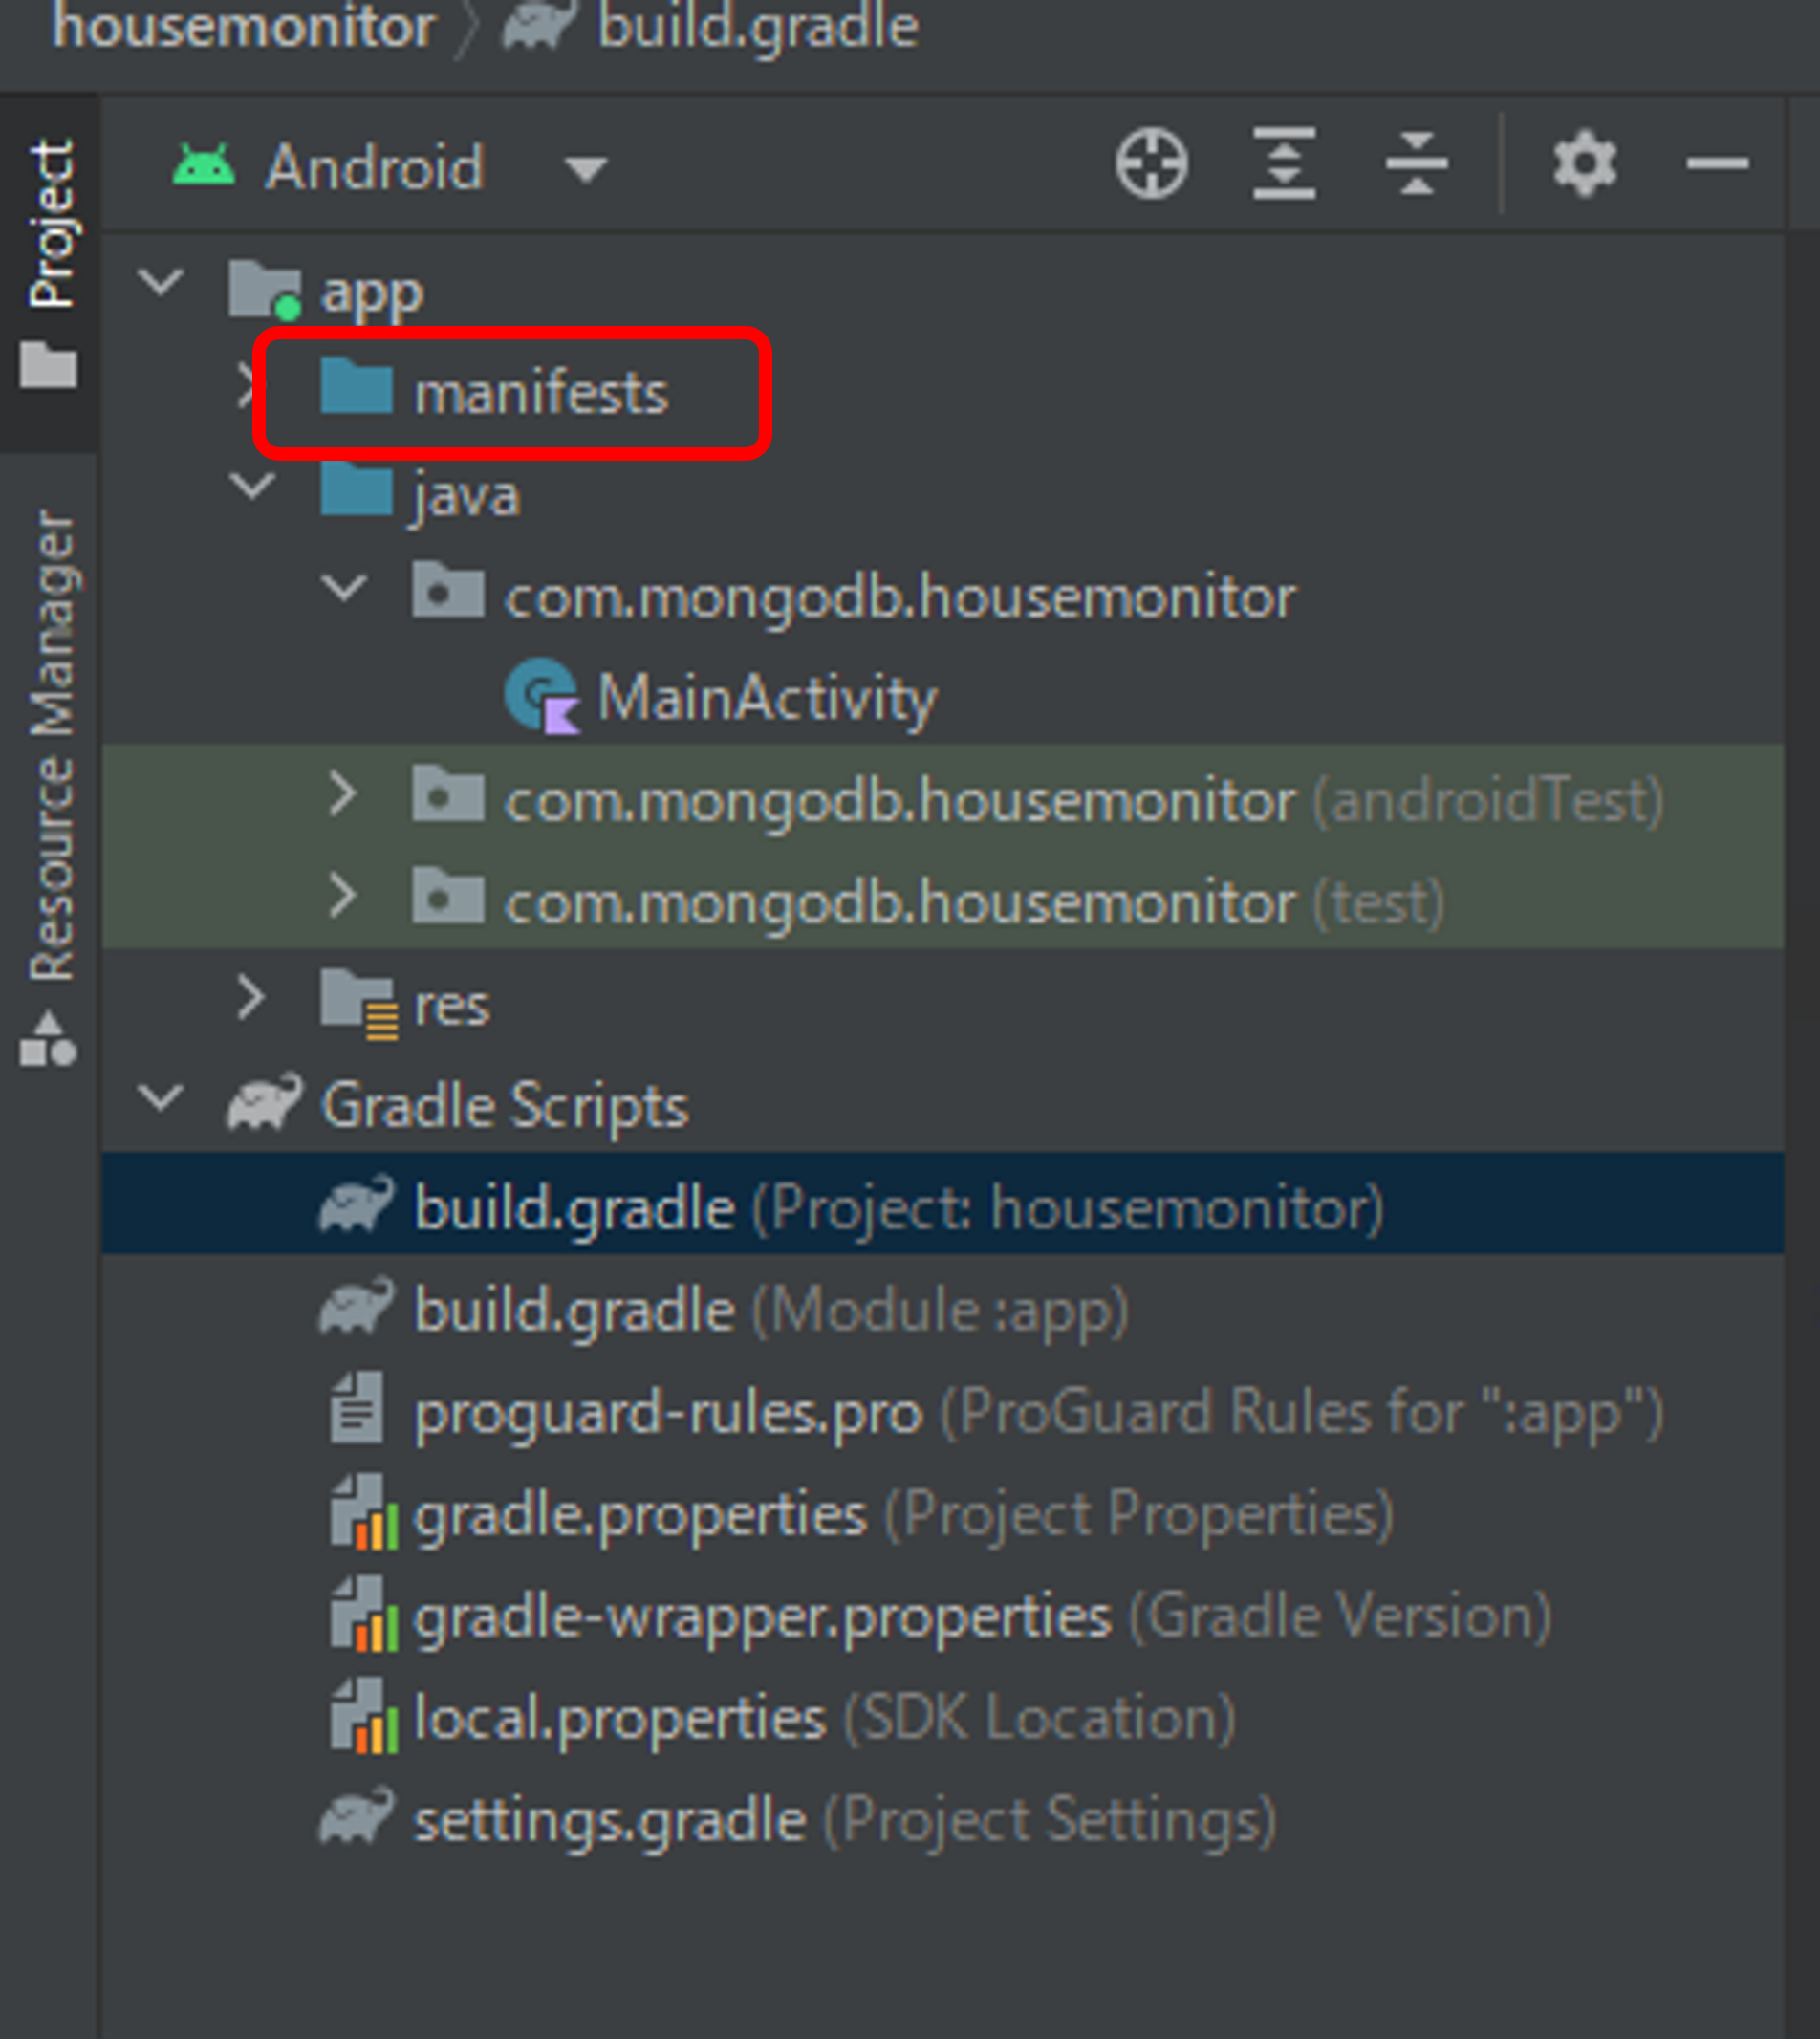
manifest...行の下に次の文を追記します。
    <uses-permission android:name="android.permission.BLUETOOTH"/>
    <uses-permission android:name="android.permission.BLUETOOTH_ADMIN"/>
    <uses-permission android:name="android.permission.BLUETOOTH_CONNECT"/>
    <uses-permission android:name="android.permission.BLUETOOTH_SCAN"/>
追記するとこんな感じです。
<?xml version="1.0" encoding="utf-8"?>
<manifest xmlns:android="http://schemas.android.com/apk/res/android"
    package="com.mongodb.housemonitor">
    <!--追記部分↓-->
    <uses-permission android:name="android.permission.BLUETOOTH"/>
    <uses-permission android:name="android.permission.BLUETOOTH_ADMIN"/>
    <uses-permission android:name="android.permission.BLUETOOTH_CONNECT"/>
    <uses-permission android:name="android.permission.BLUETOOTH_SCAN"/>
    <!--追記部分↑-->

    <application
        android:allowBackup="true"
        android:icon="@mipmap/ic_launcher"
        android:label="@string/app_name"
        android:roundIcon="@mipmap/ic_launcher_round"
        android:supportsRtl="true"
        android:theme="@style/Theme.Housemonitor">
        <activity
            android:name=".MainActivity"
            android:exported="true">
            <intent-filter>
                <action android:name="android.intent.action.MAIN" />

                <category android:name="android.intent.category.LAUNCHER" />
            </intent-filter>
        </activity>
    </application>
</manifest>
これでプログラムが書ける状態になりました。
受信プログラムの作成
では、書いていくのですが今回はandroid Developers公式が出しているガイドに沿って書いていくことにします。Bluetoothの概要を見ていくと下のようなコードが見つかります。
しかし、コードをコピペしてそのまま使うことはできませんでした。いろいろと調べていくと問題を見つけました。
1.通信強制切断
「ESP32とAndroid(Kotlin)でBluetoothSPPを使って通信する」こちらの記事にその問題が詳しく書かれていましたので引用させていただきます。
ここのソースコードを全部コピーしただけでは動かなかったのですが、動かないポイントとしてはクライアント側の接続にありました。
connectしたsocketを使って通信をするのですが、useという関数が最後まで行くとsocket.closeが呼ばれてしまい、通信が終わってしまいます。これがなんかうまくいかない原因だったようです。
また、公式においても次のような記述があります。
アプリ固有の manageMyConnectedSocket() メソッドは、データ転送用のスレッドを開始します。
BluetoothSocket の処理が完了したら、必ず close() を呼び出してください。これにより接続済みソケットがすぐにクローズされ、関連する内部のリソースがすべて解放されます。
use関数が終了すると自動的にclose()が実行されてしまい、リッスン(受信待機状態)をやめてしまうということです。
つまり、このコードでは接続した瞬間に接続を切る動作になってしまいます。
private inner class ConnectThread(device: BluetoothDevice) : Thread() {

    private val mmSocket: BluetoothSocket? by lazy(LazyThreadSafetyMode.NONE) {
        device.createRfcommSocketToServiceRecord(MY_UUID)
    }

    public override fun run() {
        // Cancel discovery because it otherwise slows down the connection.
        bluetoothAdapter?.cancelDiscovery()

        mmSocket?.use { socket ->
            // Connect to the remote device through the socket. This call blocks
            // until it succeeds or throws an exception.
            socket.connect()

            // The connection attempt succeeded. Perform work associated with
            // the connection in a separate thread.
            manageMyConnectedSocket(socket)
            //use関数が終わり自動的にclose()を実行させてしまう
        }
    }

    // Closes the client socket and causes the thread to finish.
    fun cancel() {
        try {
            mmSocket?.close()
        } catch (e: IOException) {
            Log.e(TAG, "Could not close the client socket", e)
        }
    }
}
先ほどの記事を参照すると、公式が出しているコードのuse関数に原因があるとわかります。そこでuse関数を入れずにsocket.connect()を実行します。これで待機状態を維持できます。
public override fun run() {
        // Cancel discovery because it otherwise slows down the connection.
        bluetoothAdapter?.cancelDiscovery()
        if (mmSocket == null) {
                return
            }
            val socket = mmSocket
            socket ?: return
            socket.connect()
            // The connection attempt succeeded. Perform work associated with
            // the connection in a separate thread.
            //直接manageMyConnectedSocketを起動する
            manageMyConnectedSocket(socket)
            //下のmmSocket?.useは実行しない
            //mmSocket?.use { socket ->
            // Connect to the remote device through the socket. This call blocks
            // until it succeeds or throws an exception.
            // socket.connect()

            // The connection attempt succeeded. Perform work associated with
            // the connection in a separate thread.
            //manageMyConnectedSocket(socket)
            //manageMyConnectedSocket()が自動的にclose()を実行させてしまう
        //}
    }
2.UUIDの設定「補足」
公式のコードではUUIDが指定されていませんでした。また、BluetoothのSPPで使用するUUIDは決まりがあるようで「[Android]BluetoothのSPPで使用するUUID」では次のようなIDを入力することが求められていました。
00001101-0000-1000-8000-00805F9B34FB
但し、今回の場合UUIDは書かなくても動きます。下のコードには書いていません。
受信プログラム
以上をまとめると以下のコードになります(完全版ではありません)。
一点注意が必要です!!
16行目のTARGET_DEVICE_NAMEは前回ペアリングしたRN-42のデバイス名(RNBT-○○○○)を記述してください。
package com.mongodb.housemonitor

import androidx.appcompat.app.AppCompatActivity
import android.os.Bundle
import android.bluetooth.BluetoothAdapter
import android.bluetooth.BluetoothDevice
import android.bluetooth.BluetoothSocket
import android.util.Log
import android.content.Intent
import java.io.IOException
import java.io.InputStream
import java.io.OutputStream

const val TAG = "MainActivity"
//前回ペアリングしたRN-42のデバイス名をRNBT-○○○○で記述してください。
const val TARGET_DEVICE_NAME = "RNBT-####"
const val REQUEST_ENABLE_BLUETOOTH = 1

class MainActivity : AppCompatActivity() {
    private val bluetoothAdapter: BluetoothAdapter? = BluetoothAdapter.getDefaultAdapter()
    private var connectedThread: ConnectedThread? = null
    private var connectThread: ConnectThread? = null
    override fun onCreate(savedInstanceState: Bundle?) {
        super.onCreate(savedInstanceState)
        setContentView(R.layout.activity_main)

        if (bluetoothAdapter == null) {
            Log.d(TAG, "bluetooth is not supported.")
            return
        }

        if (!bluetoothAdapter.isEnabled) {
            val enableBluetoothIntent = Intent(BluetoothAdapter.ACTION_REQUEST_ENABLE)
            startActivityForResult(enableBluetoothIntent, REQUEST_ENABLE_BLUETOOTH)
        }

        val pairedDevices: Set<BluetoothDevice>? = bluetoothAdapter.bondedDevices
        pairedDevices?.forEach { device ->
            val deviceName = device.name
            val deviceHardwareAddress = device.address // MAC address
            if (device.name == TARGET_DEVICE_NAME) {
                Log.d(TAG, "name = %s, MAC <%s>".format(deviceName, deviceHardwareAddress))
                device.uuids.forEach { uuid ->
                    Log.d(TAG, "uuid is %s".format(uuid.uuid))
                }
                connectThread = ConnectThread(device)
                connectThread?.start()
                return
            }
        }
    }

    fun manageMyConnectedSocket(socket: BluetoothSocket) {
        connectedThread = ConnectedThread(socket)
        connectedThread?.start()
    }

    private inner class ConnectThread(device: BluetoothDevice) : Thread() {
        private val mmSocket: BluetoothSocket? by lazy(LazyThreadSafetyMode.NONE) {
            device.createInsecureRfcommSocketToServiceRecord(device.uuids[0].uuid)

        }

        public override fun run() {
            // Cancel discovery because it otherwise slows down the connection.
            bluetoothAdapter?.cancelDiscovery()
            if (mmSocket == null) {
                return
            }
            val socket = mmSocket
            socket ?: return
            socket.connect()
            // The connection attempt succeeded. Perform work associated with
            // the connection in a separate thread.
            manageMyConnectedSocket(socket)
        }

        // Closes the client socket and causes the thread to finish.
        fun cancel() {
            try {
                mmSocket?.close()
            } catch (e: IOException) {
                Log.e(TAG, "Could not close the client socket", e)
            }
        }
    }

    private inner class ConnectedThread(private val mmSocket: BluetoothSocket) : Thread() {

        private val mmInStream: InputStream = mmSocket.inputStream
        private val mmOutStream: OutputStream = mmSocket.outputStream
        private val mmBuffer: ByteArray = ByteArray(1024) // mmBuffer store for the stream

        override fun run() {
            var numBytes: Int // bytes returned from read()
            Log.d(TAG, "connect start!")
            // Keep listening to the InputStream until an exception occurs.
            while (true) {
                // Read from the InputStream.
                numBytes = try {
                    mmInStream.read(mmBuffer)
                } catch (e: IOException) {
                    Log.d(TAG, "Input stream was disconnected", e)
                    break
                }
                Log.d(TAG, mmBuffer[0].toString())
            }
        }


        // Call this method from the main activity to shut down the connection.
        fun cancel() {
            try {
                mmSocket.close()
            } catch (e: IOException) {
                Log.e(TAG, "Could not close the connect socket", e)
            }
        }
    }
}
Andorid端末準備
プログラムが書けたら書き込む前にAndorid端末の設定を終わらせましょう。端末の設定を開いて、Bluetoothのペア設定を開きます。それと同時に前回のArduinoを起動させましょう!
その状態でスマホの新しいデバイスとペア設定のところを押すと、RNBT-○○○○が出てきますのでそのデバイスとペアリングしましょう。
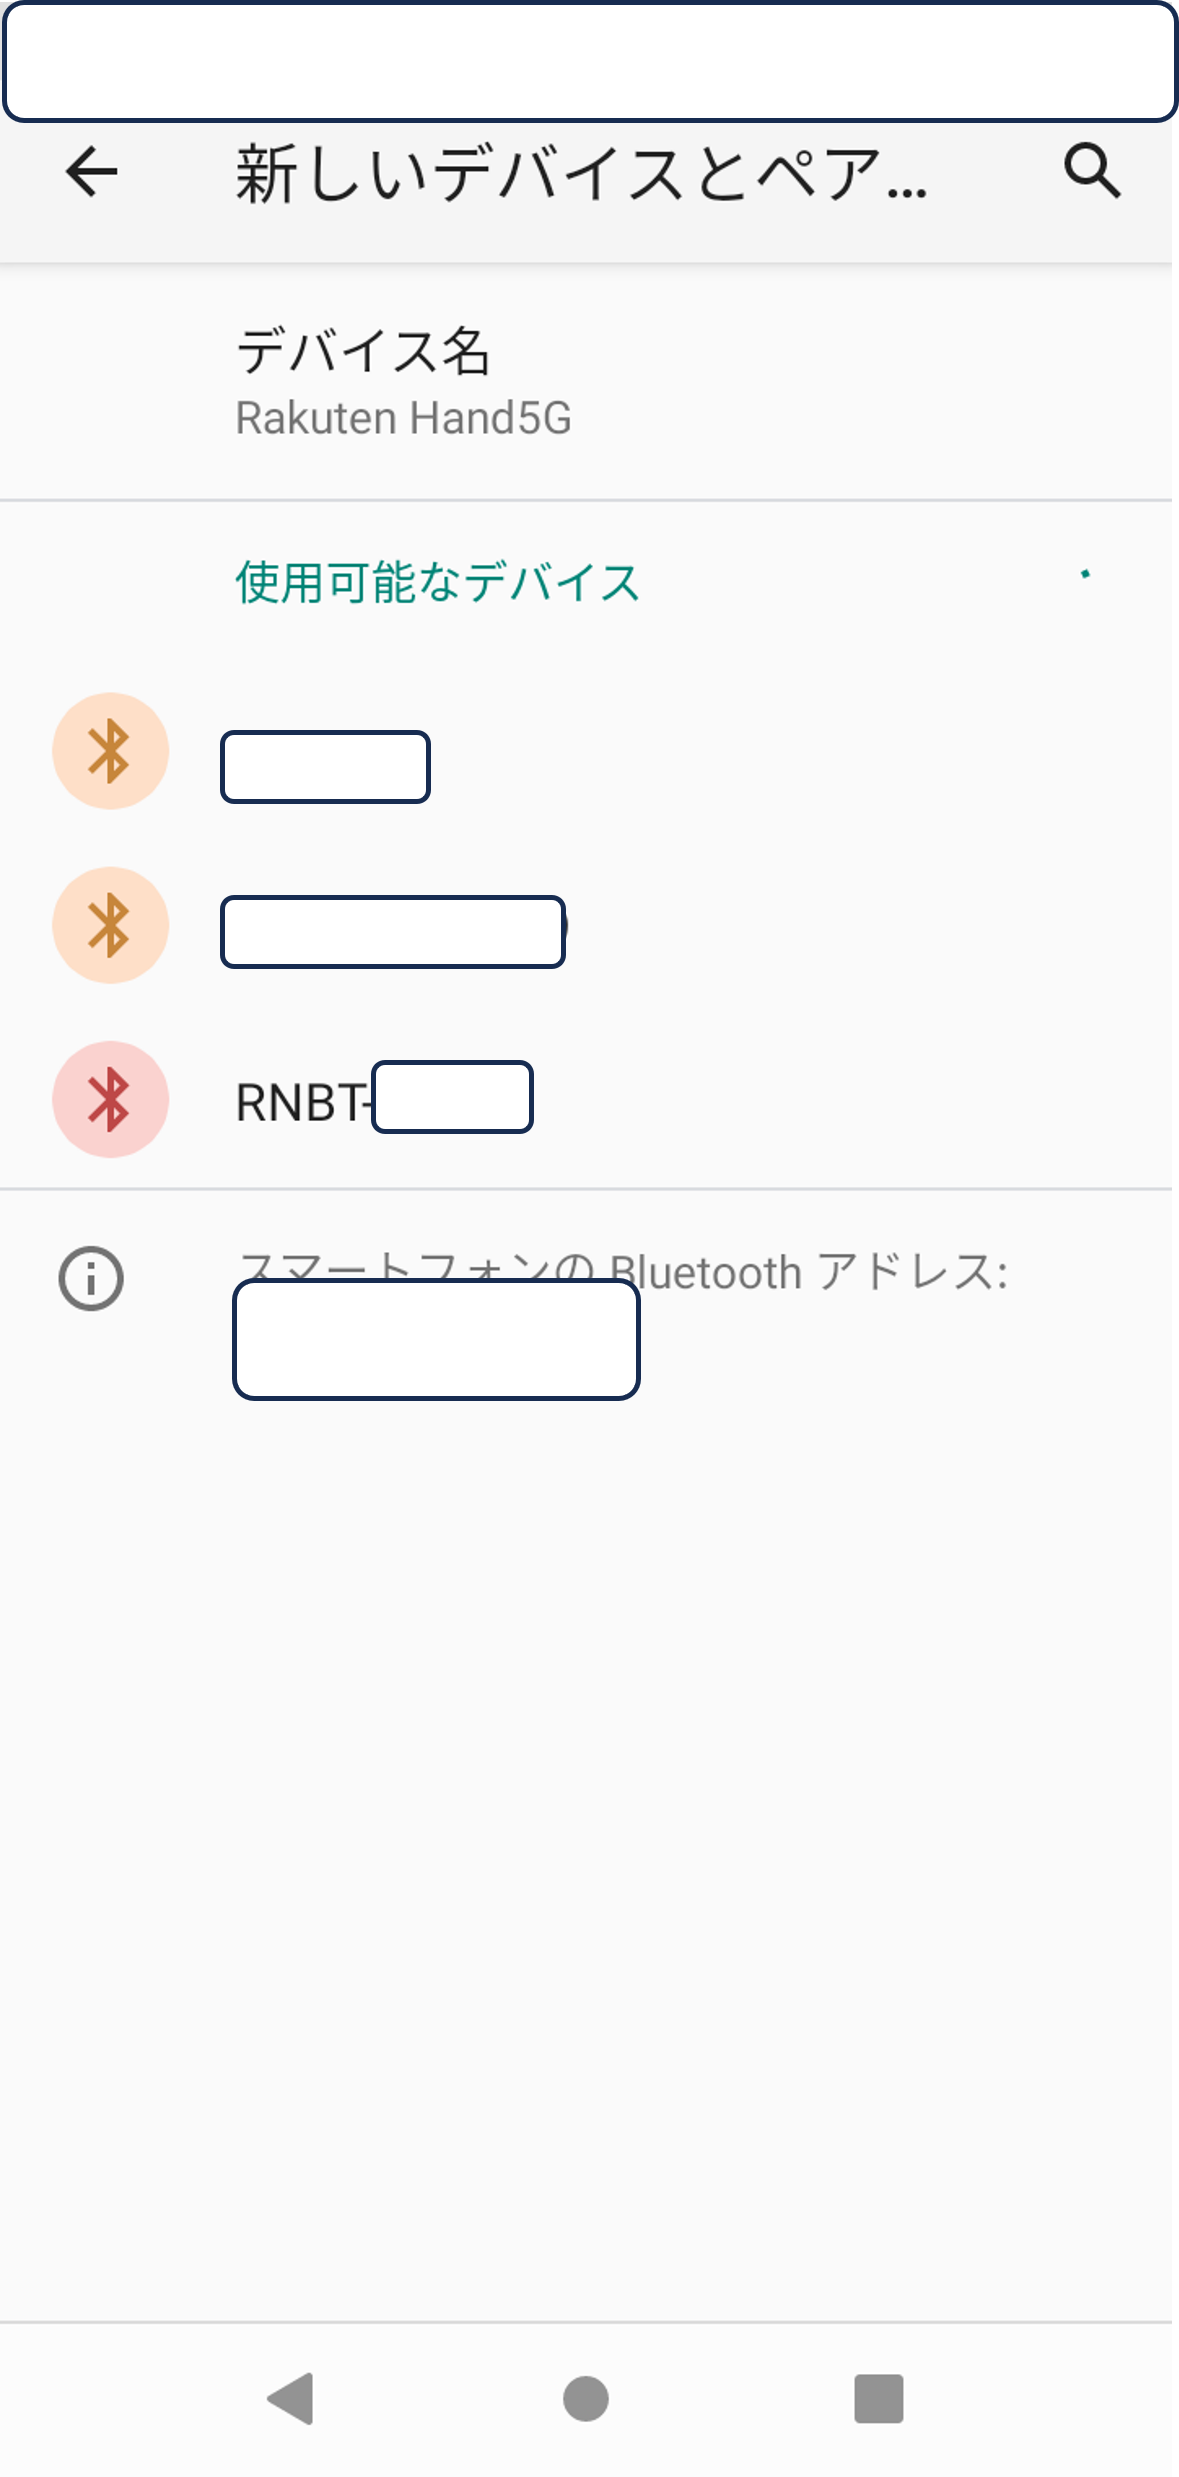
コード認証でOKを押したら完了です!
動作確認
Android端末が準備できたので、端末をPCに接続してAndroid studioで書き込みましょう。
MainActivityのコードが書けている状態で、接続端末の確認(下図左)をしてからRun(下図右)を押しましょう。

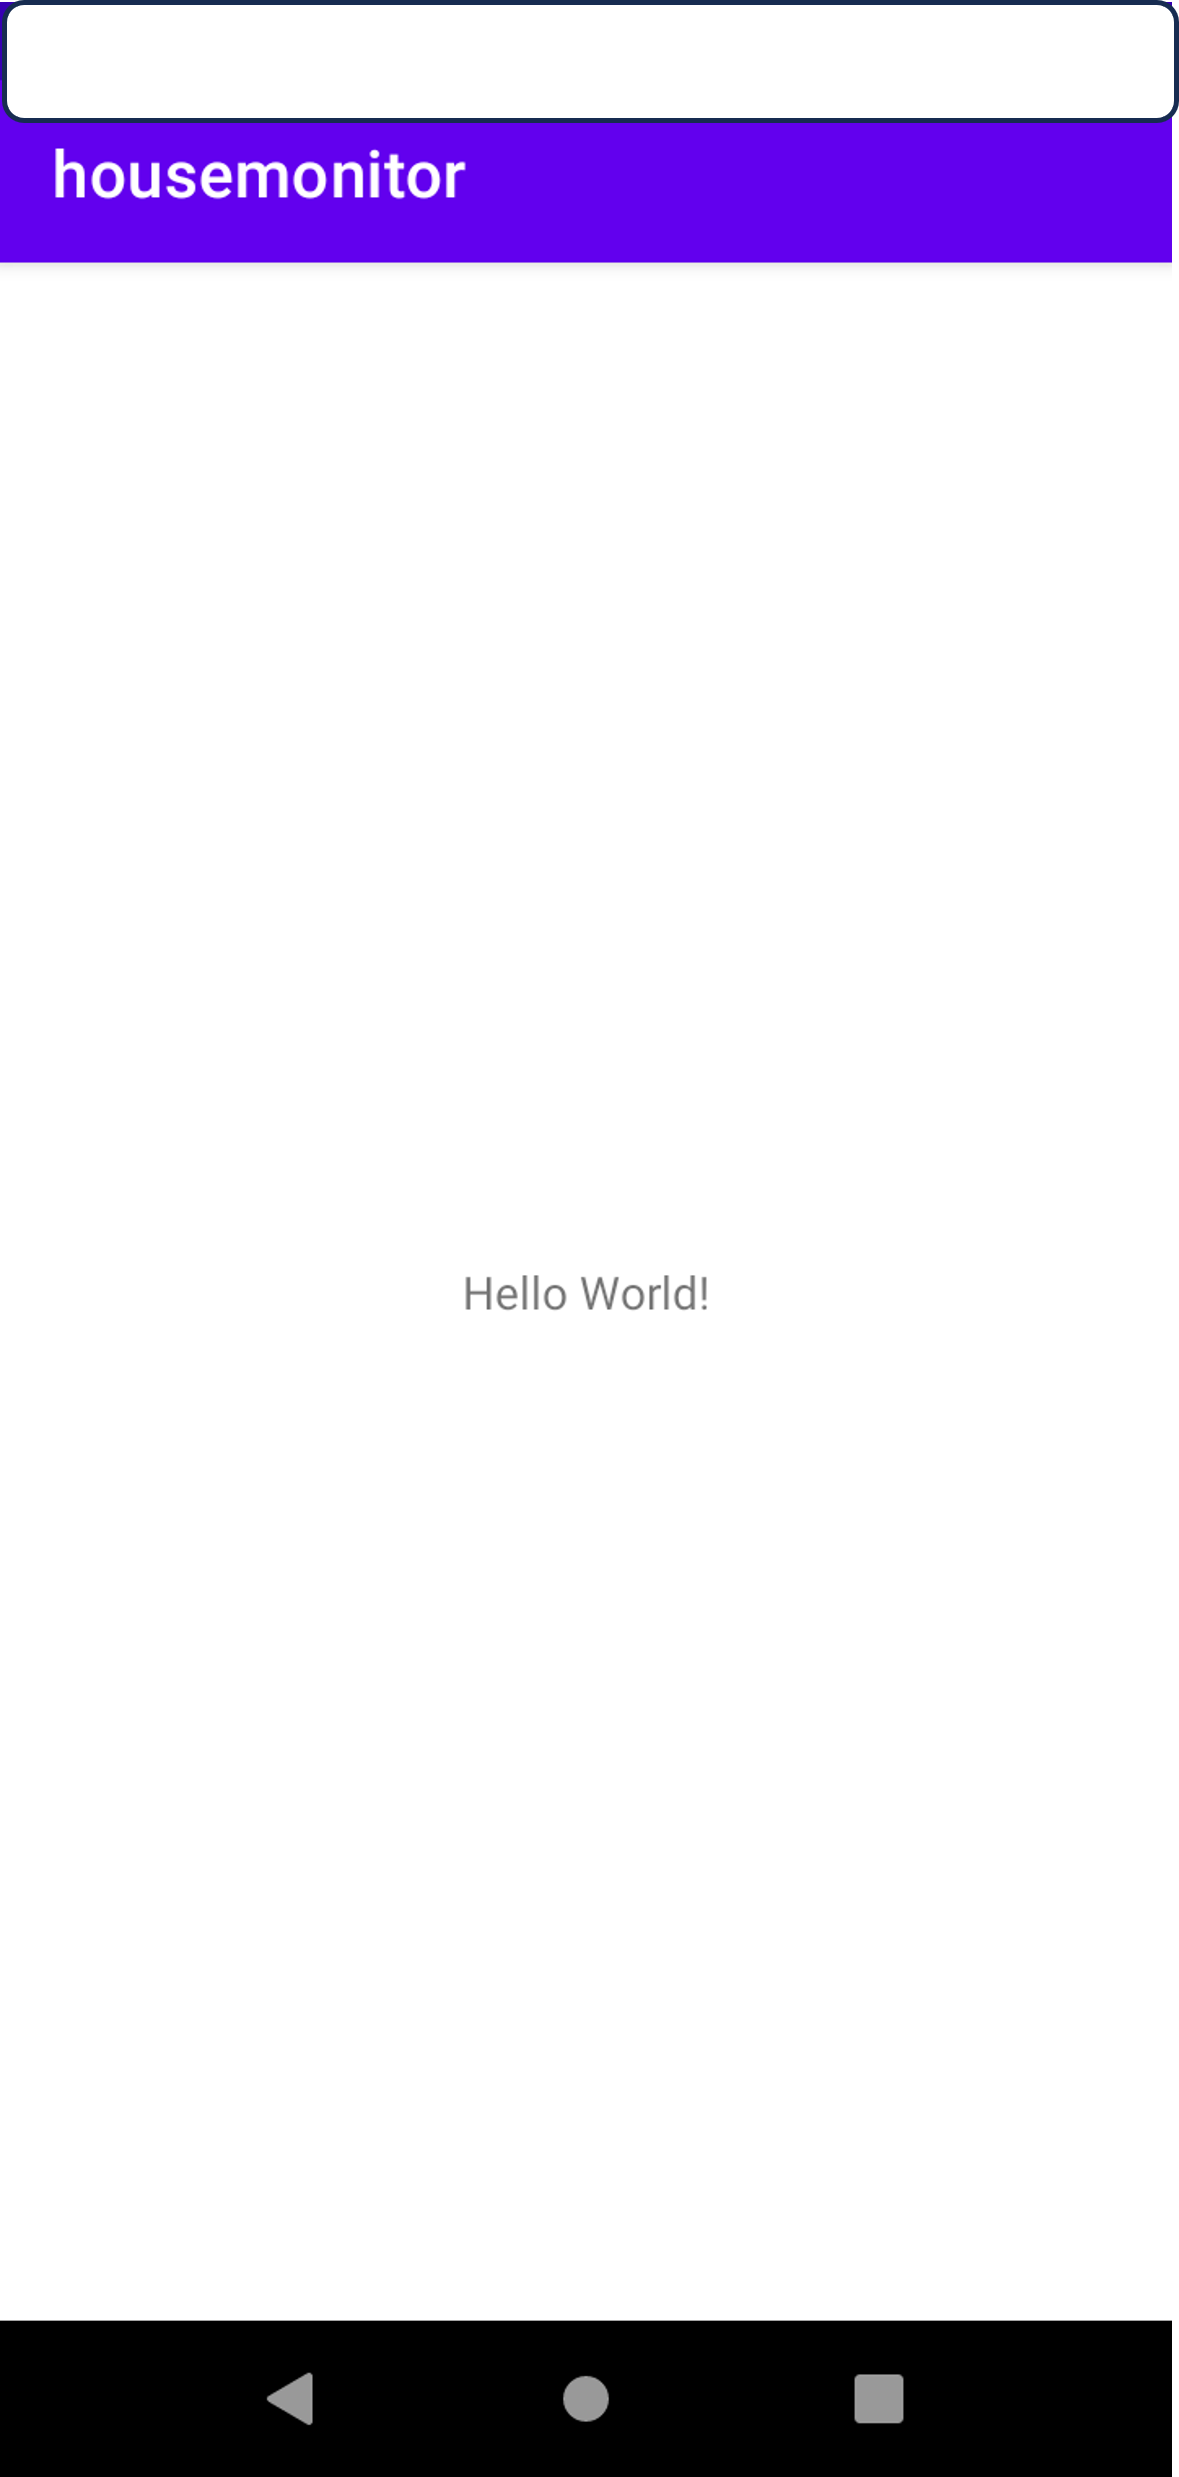
実行して、Grandle Build finishedとInstall sucessfully finishedの表記が出ればOKです。また、この時スマホが自動的にアプリを起動し、下のような状態になっていれば大丈夫です。
受信データの確認
あれ?何も映ってないじゃない!?と思われた方もいるかもしれません。ですが、スマホの画面が上図の状態であり、RN-42のLEDが赤く点滅していれば情報を取得できています。
その確認方法を説明します。
上の状態でAndorid studioのLogcatをクリックします。
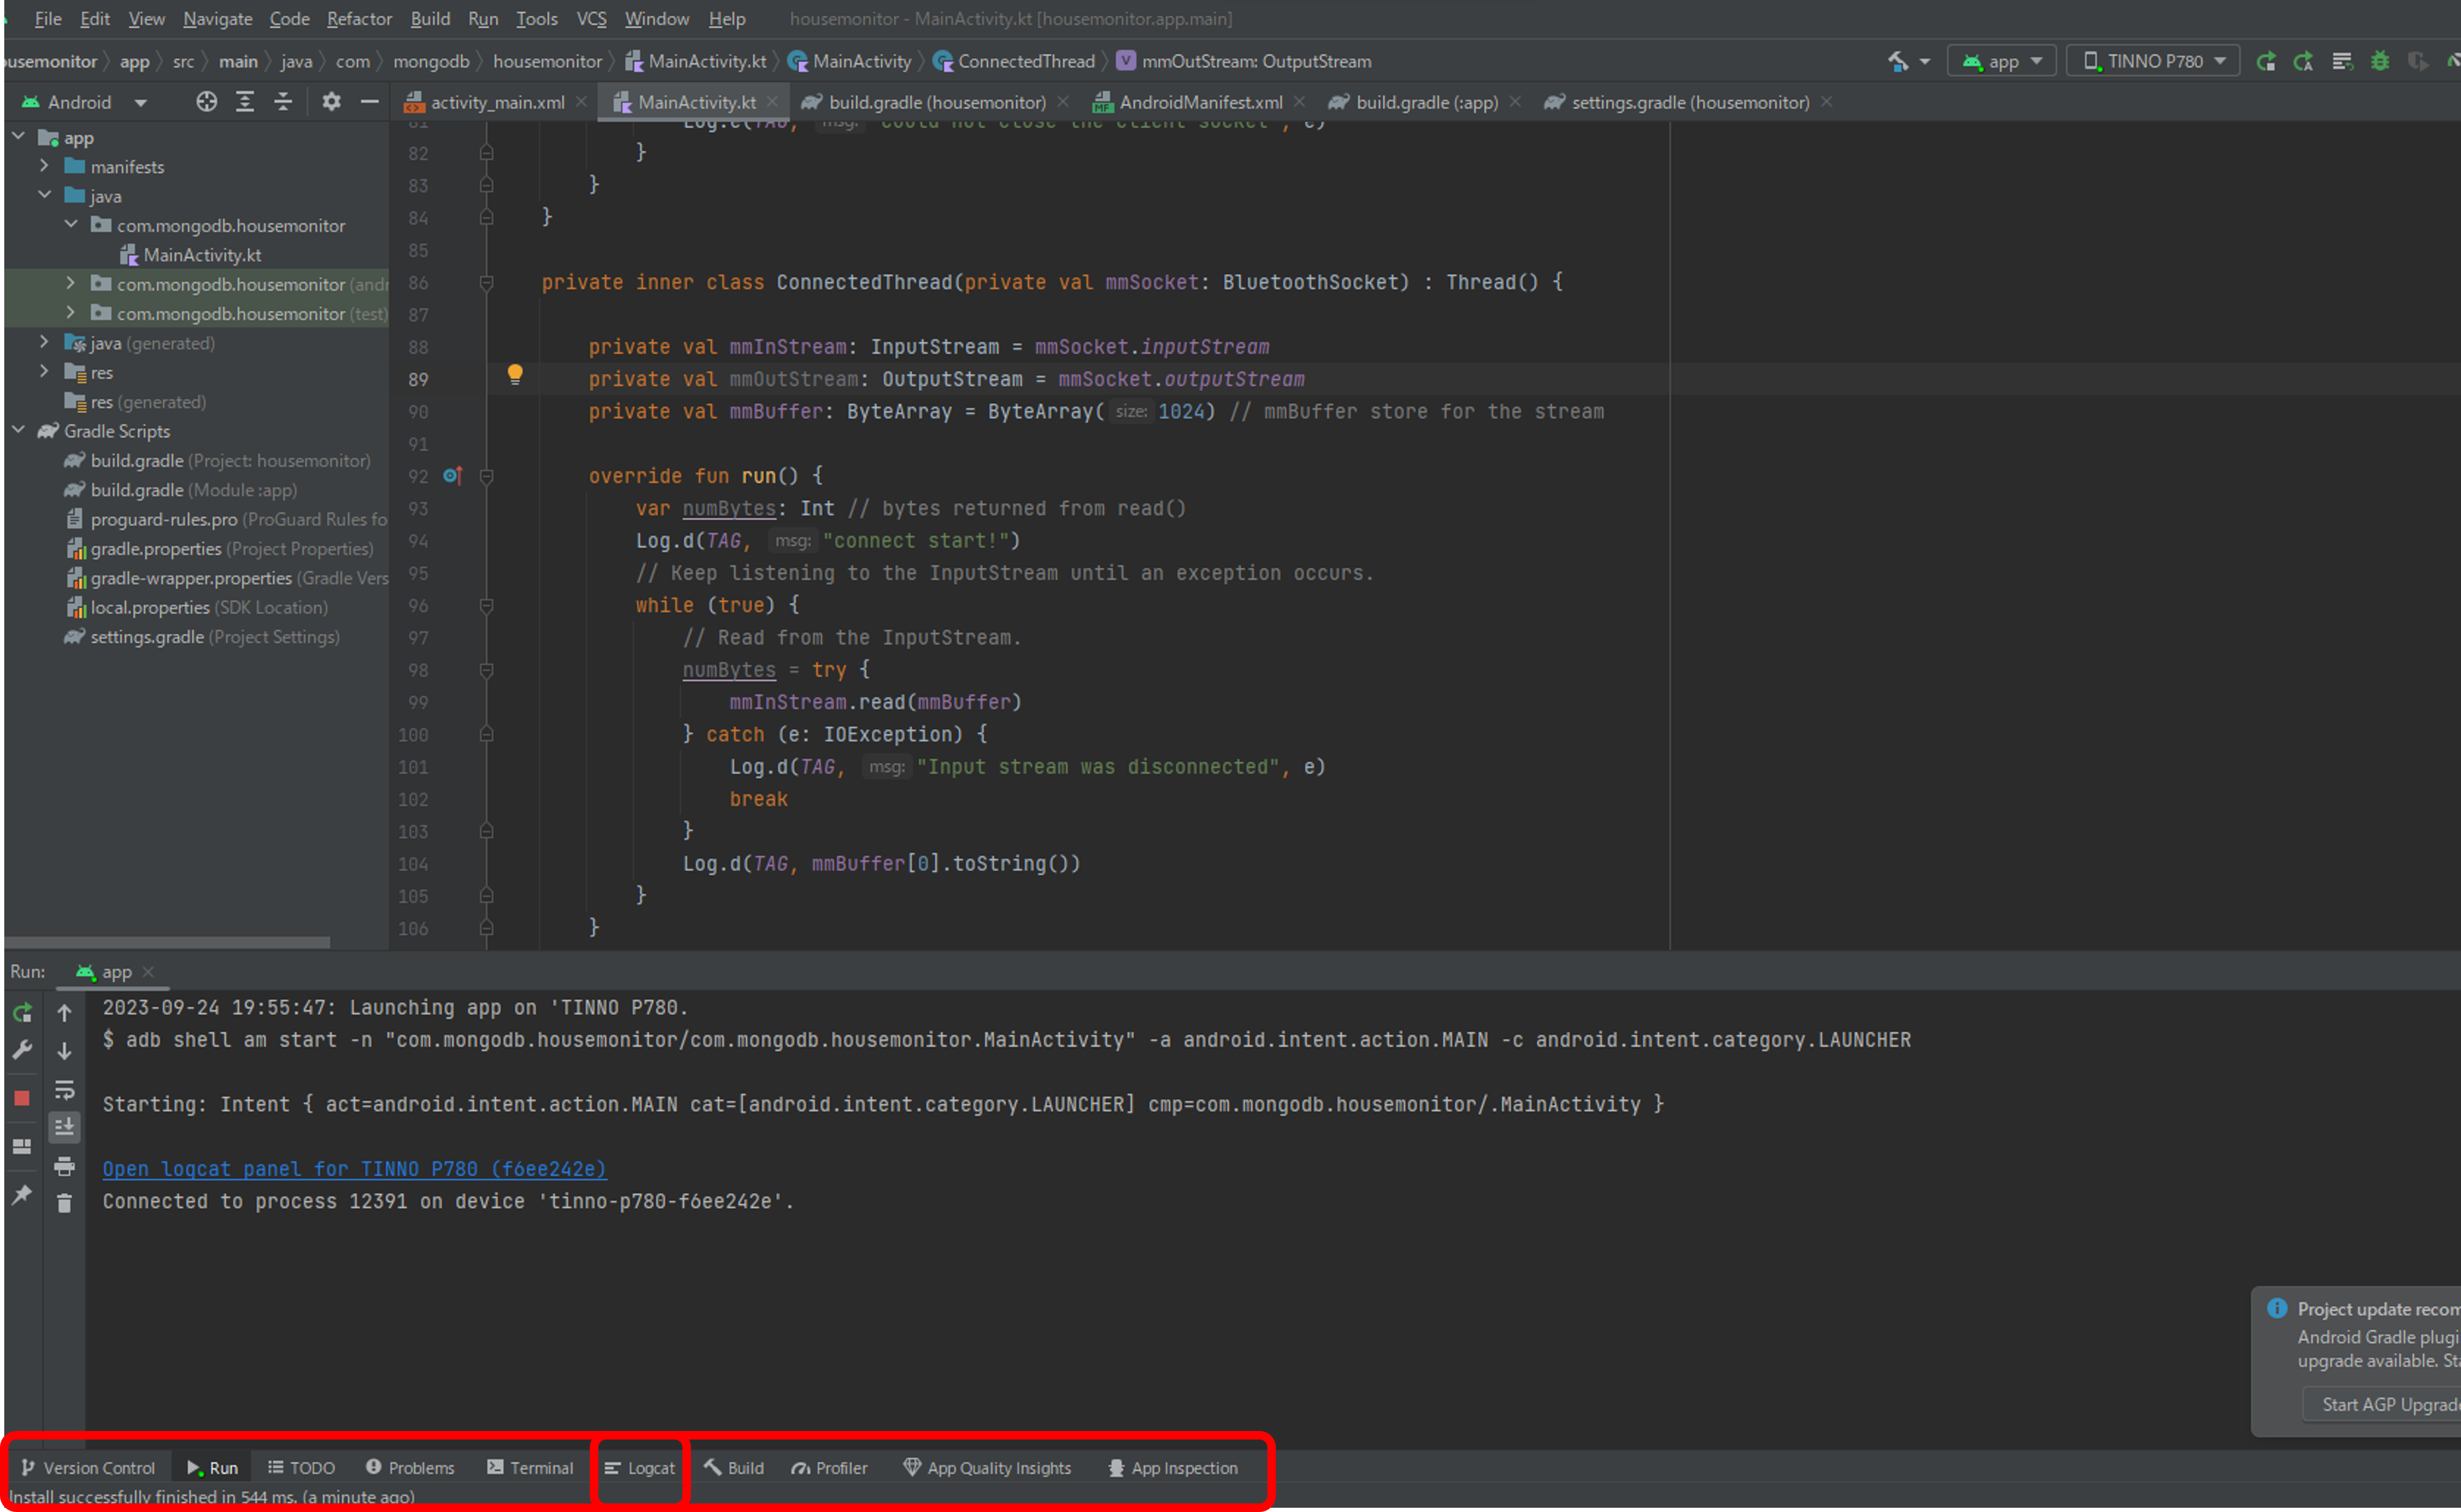
Logcatはこのように表示されていると思います。
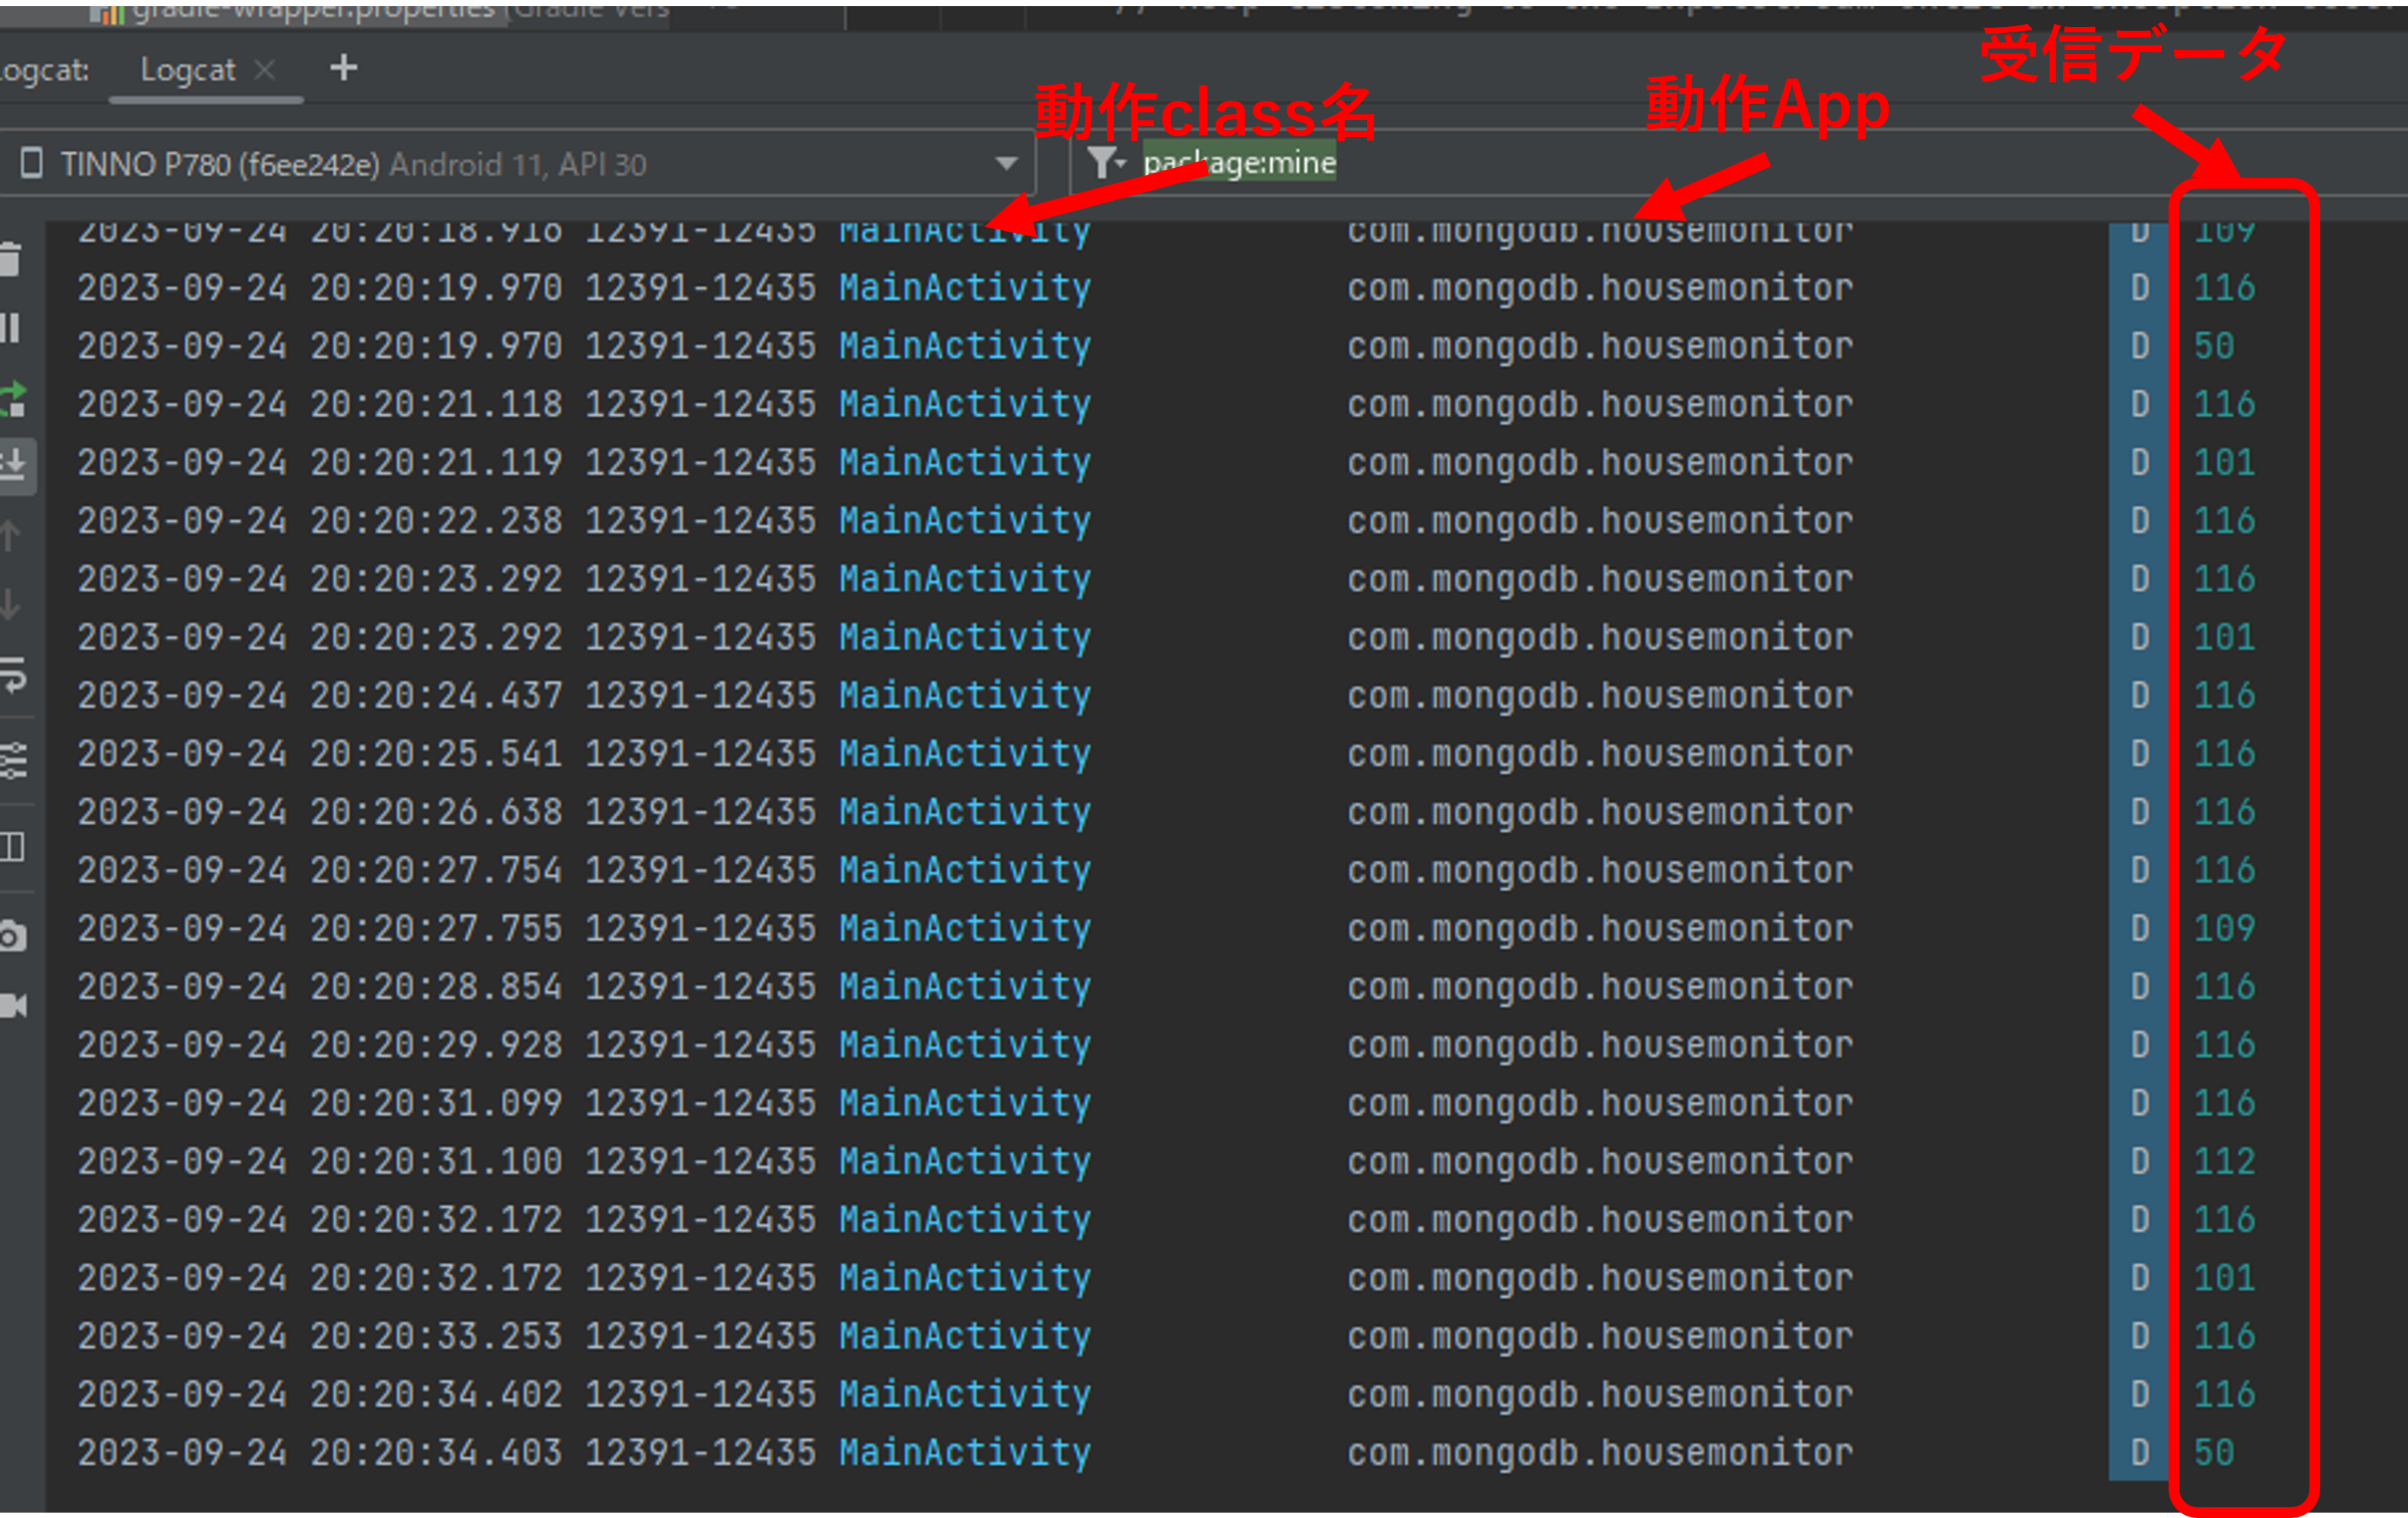
一番右側に表示されているのがRN-42から送られてきた情報を指しています。お気づきだと思いますが、温度・湿度の情報とは違う数値が表示されています。本来なら同じ情報が表示されるはずです。しかし、全く別の数値であり、さらに送信側では「temp」や「humid」といった文字も送信しているはずですが受信情報では数値しかありません。
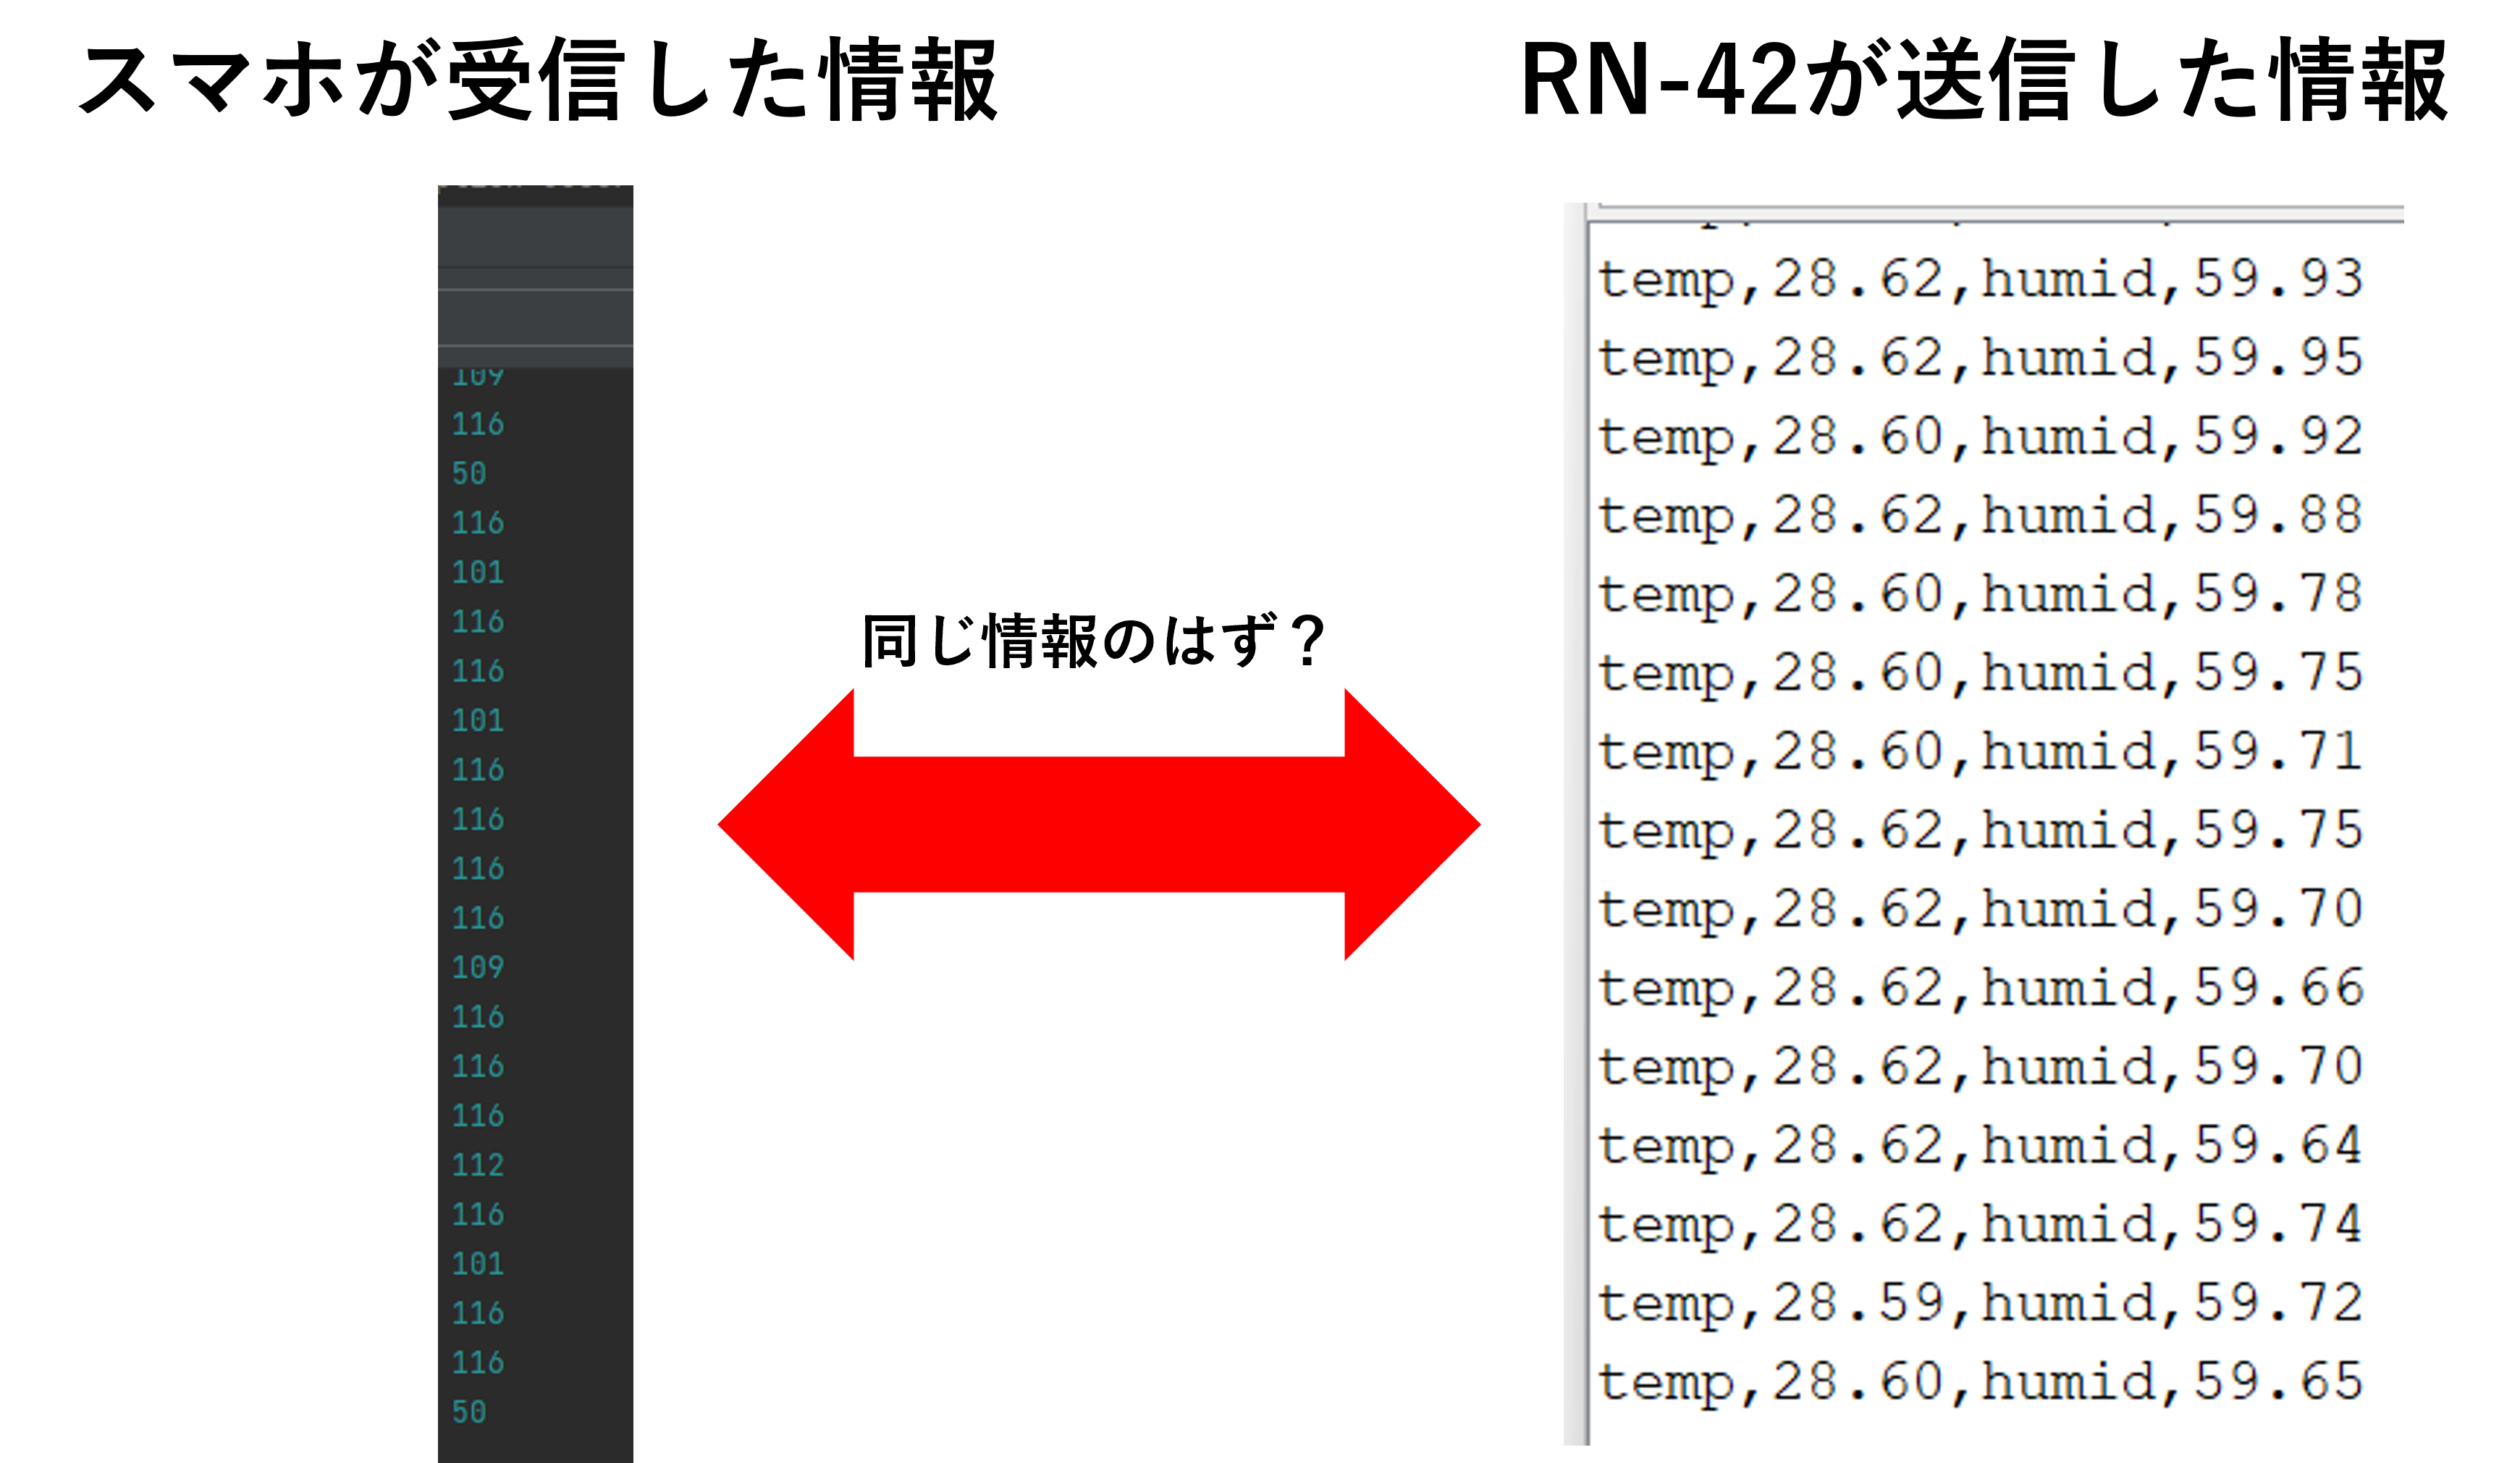
では全く別の情報なのかと言われるとそうではありません。理由としては、送信頻度と受信頻度が同じということです。Bluetoothを止めるとAndoridの受信情報の更新も止まりました。
受信情報を復元する
もうお気づきかもしれませんが、今回送られてきている情報は10進数の数値や文字ではありません。バイト列です。プログラム上でもByteArray関数が使われているので送られてくる情報がバイト列だとわかると思います。
では、元の情報に置き換えるためにバイト列をUTF-8の文字列に変換するプログラムを書きます。結論、インナークラスのConnectedThreadを以下のように書き変えます。
    private inner class ConnectedThread(private val mmSocket: BluetoothSocket) : Thread() {

        private val mmInStream: InputStream = mmSocket.inputStream
        private val mmOutStream: OutputStream = mmSocket.outputStream
        // 受け取る文字列のサイズを1にします。1バイトで受け取るためです。
        private val mmBuffer: ByteArray = ByteArray(1)
        //変換した文字列の格納変数
        var str2 = ""

        override fun run() {
            var numBytes: Int // bytes returned from read()
            Log.d(TAG, "connect start!")
            // Keep listening to the InputStream until an exception occurs.
            while (true) {
                while(true){
                    numBytes = try {
                        mmInStream.read(mmBuffer)
                    } catch (e: IOException) {
                        Log.d(TAG, "Input stream was disconnected", e)
                        break
                    }
                    //改行した時
                    if(mmBuffer[0].toString()=="13") {
                        break
                    }
                    //,(カンマ)が送られた時
                    else if (mmBuffer[0].toString() == "44") {
                        break
                    }
                    //それ以外(数値や文字が送られてきたとき)
                    else {
                        //デコードに必要なキャラセットを作成
                        val charset = Charsets.UTF_8
                        //1バイトの情報を今まで受信してきた文字と組み合わせる(加算する)
                        //受信した1バイトの情報をUTF-8に変換 デコード操作
                        str2 += String(mmBuffer, charset)
                    }
                }
                // Logcatで表示
                Log.d(TAG,str2)
                // 表示した後に文字列変数を初期化
                str2=""
            }
        }


        // Call this method from the main activity to shut down the connection.
        fun cancel() {
            try {
                mmSocket.close()
            } catch (e: IOException) {
                Log.e(TAG, "Could not close the connect socket", e)
            }
        }
    }
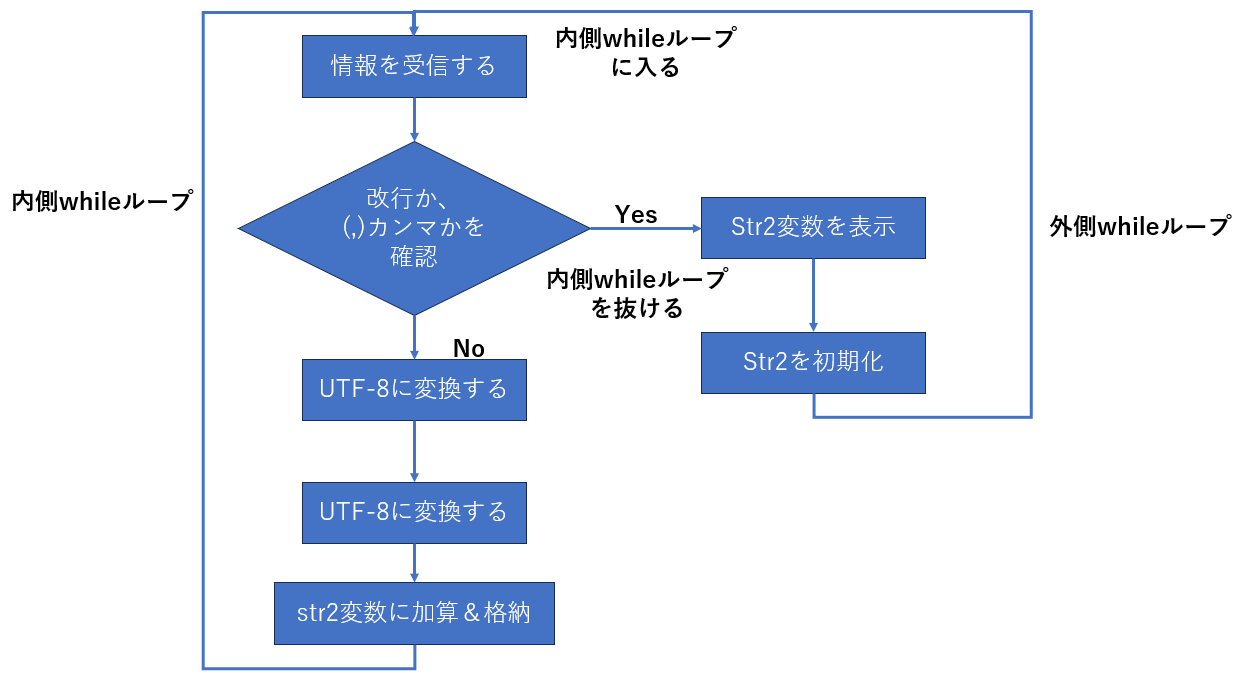
プログラムの流れ
ではプログラム動作を次に解説していきます。
受信バイト要素数
コードの主要な変更点を解説していきます。
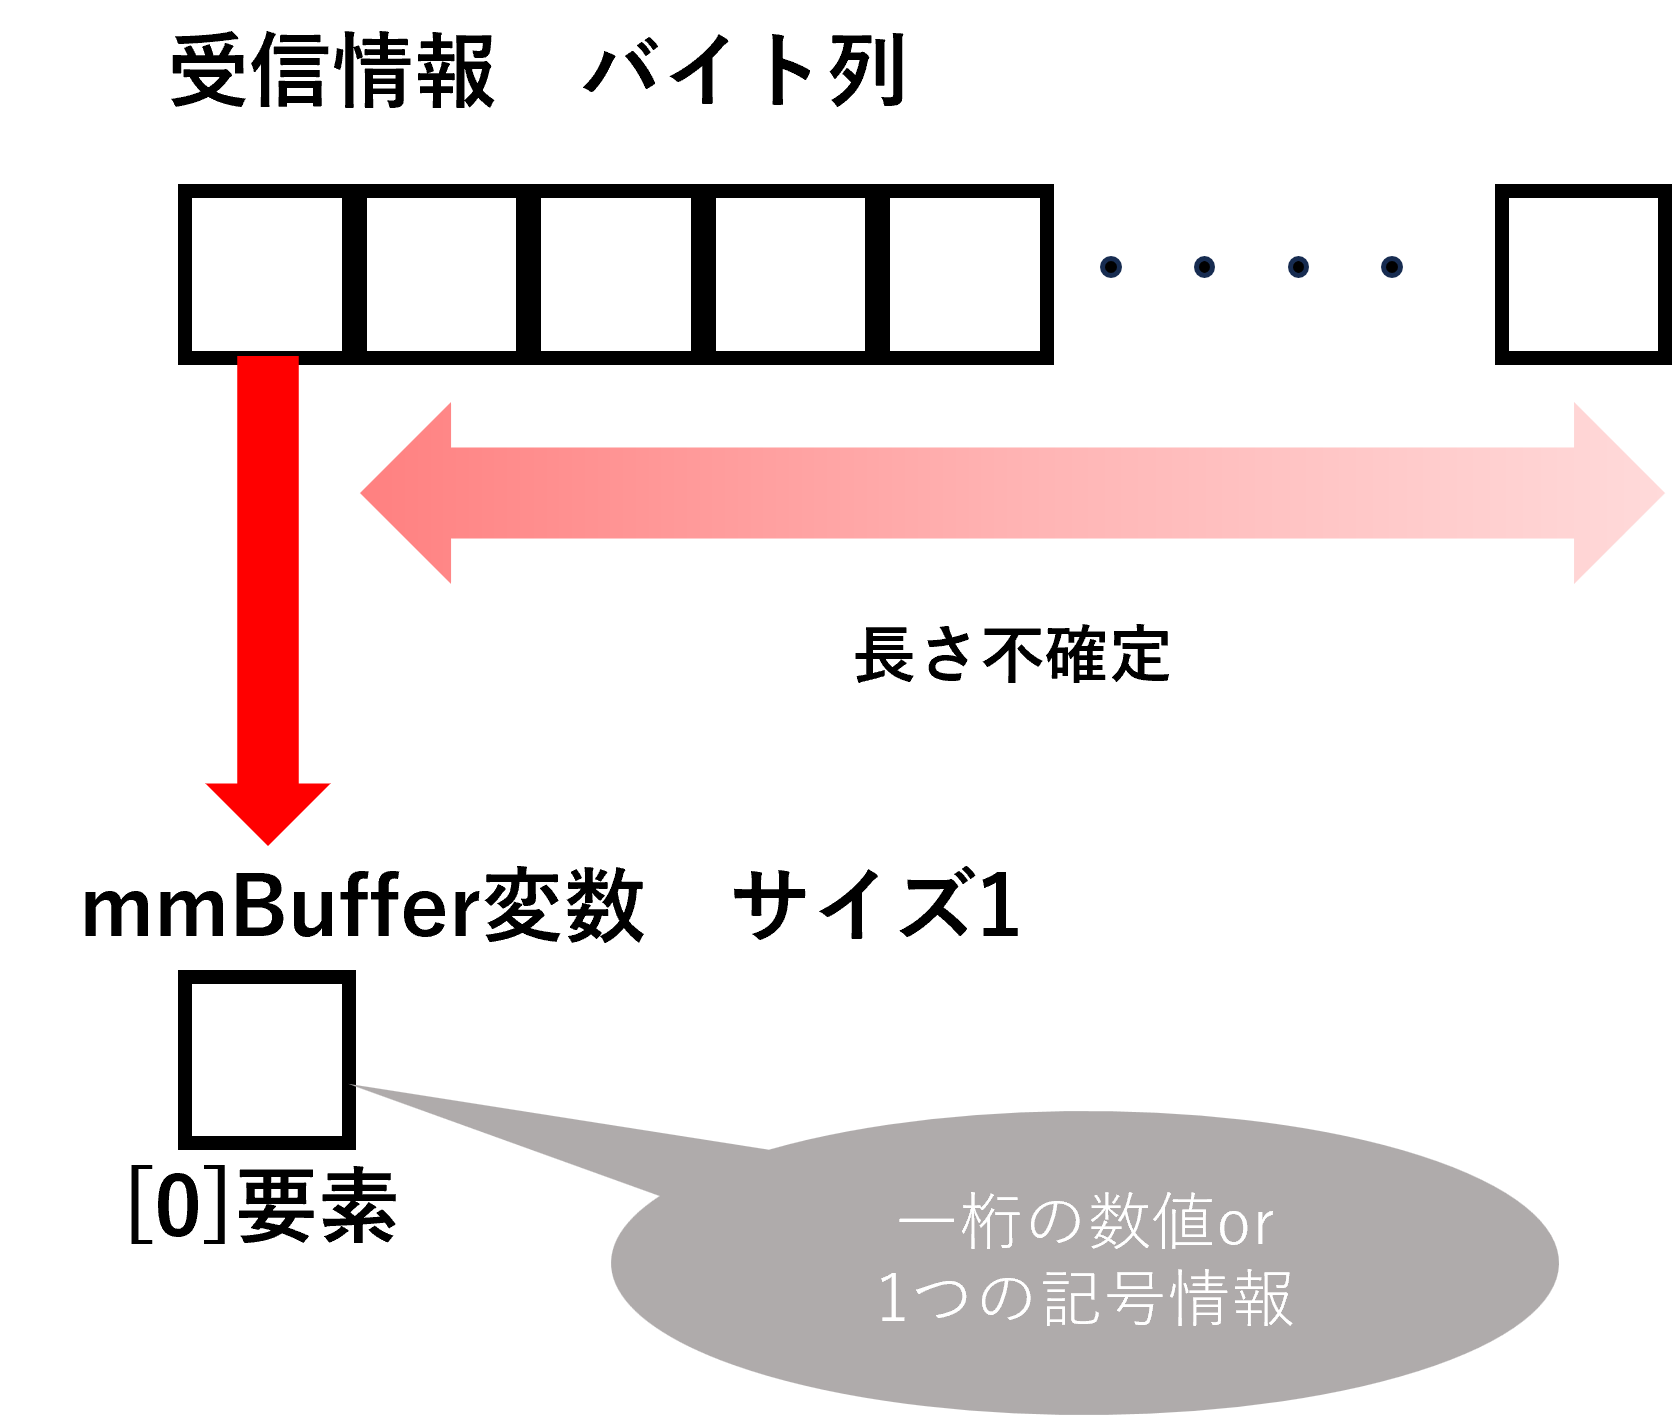
上記6行目のprivate val mmBuffer: ByteArray = ByteArray(1)は、送られてくるバイト列の最初の1要素のみ(1バイトのみ)受け取っています。送られてくるデータ量が不確定なため、複数の要素を持っていると受信データが送られてこなかったときにその要素がNullになってしまい、NullPointerException()が発生する可能性があるためです。
そのため、ここでは1としました。後々のコードでmmbuffer変数が最初の要素のみ使っていますので最低1つあればプログラムとしては動作します。
下の詳細記事にも書かれていますが英数字+記号であれば1バイトの情報であるためこの操作で問題ありません。
詳細記事>UTF-8(ユーティーエフエイト)とは?文字コードの仕組みを知れば文字化けでも慌てない
受け取れる情報の制限について
上記プログラムは1バイトの情報のみを受信しており、受け取れる文字には制限があります。
今回使用している文字は英数字+記号(一部)のみのASCII文字コードで規定されるものであるため、この範囲であれば1バイトで表現できます。
一方で、日本語を使用する場合は2~6バイトで表現するため、今回のような1バイトのみの受信だと復号できません。
詳細>UTF-8(ユーティーエフエイト)とは?文字コードの仕組みを知れば文字化けでも慌てない
改行した時、(,)カンマが送られた時
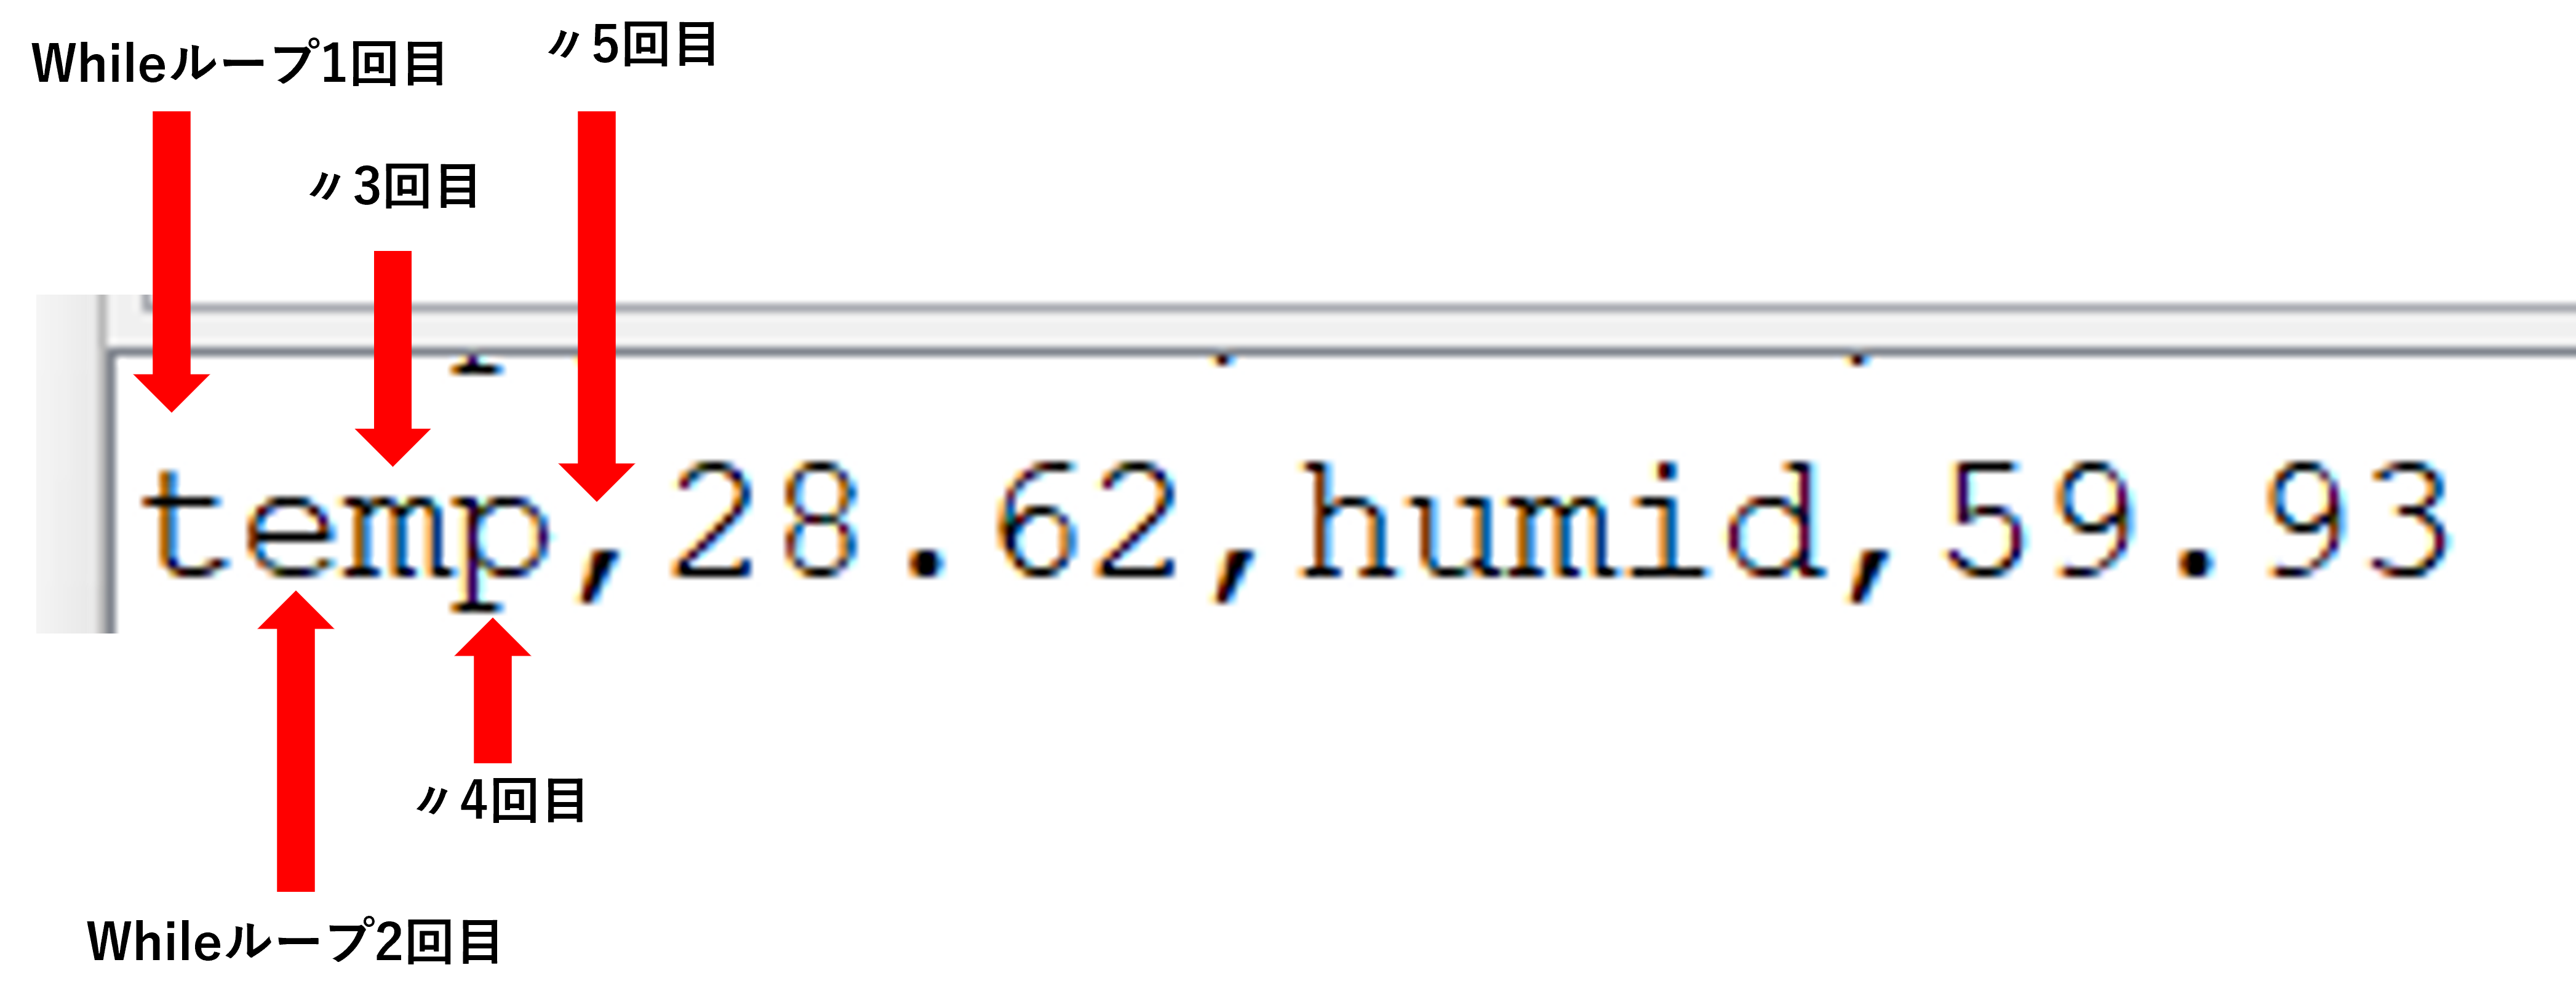
今送られてきている情報というのは1バイトずつであり、1文字(桁)ずつ送られてきていることになります。つまり、情報をまとめる処理が必要になってきます。例を考えてみましょう。
今Andorid端末が下のように内側のWhileループの1回目に「t」を受け取ったとすると、次のループでは「e」、3回目のループでは「m」というように一文字ずつ情報を受け取ることになります。
この時、tempという情報を複合するためには「p」を受信した時点で情報を受け取るのをやめて、それまでに受け取った文字(情報)をまとめる作業をする必要があります。そうしなければプログラムとしてはどこまでが一つの情報かが分からず、tempの情報の後の,28.62...の情報も続けて受信してしまいます。
そこで「改行」と「(,)カンマ」が送られてきたときにそれまで受け取っていた情報が一つの塊であると認識し、情報をまとめる処理を行います。

プログラム上でその作業をしているのが以下の部分です。
    //改行した時
    if(mmBuffer[0].toString()=="13") {
        break
    }
    //,(カンマ)が送られた時
    else if (mmBuffer[0].toString() == "44") {
        break
    }
    //それ以外(数値や文字が送られてきたとき)
    else {
        //デコードに必要なキャラセットを作成
        val charset = Charsets.UTF_8
        //1バイトの情報を今まで受信してきた文字と組み合わせる(加算する)
        //受信した1バイトの情報をUTF-8に変換 デコード操作
        str2 += String(mmBuffer, charset)
    }
最後のelse内の処理はバイトをUTF_8でデコードする作業です。str2という変数にバイトを文字に変換したものを格納しています。
改行と(,)カンマの10進数表現
上記コードで改行と(,)カンマの時は情報をまとめる処理をすると説明しましたが、その中のif文の条件式に「改行」の時は"13"、「カンマ」の時は"44"となっています。これは10進数表現のバイトをUTF-8に変換したときにそれぞれ13は改行(CR)、44はカンマ(,)になるためです。1
情報をまとめて表示
上記処理でカンマ(,)もしくは改行の情報を受信すると、内側のwhileループを抜けて外側のwhileループに入ります。そこで実行されるのが次のコードです。
    // Logcatで表示
    Log.d(TAG,str2)
    // 表示した後に文字列変数を初期化
    str2=""
}
Log.dでLogcatに情報を映しだしています。表示後はstr2=""で表示した文字列を初期化しています。
この処理が終わるとまた内側のwhileループに入り、情報を受け取る状態に戻ります。
動作確認
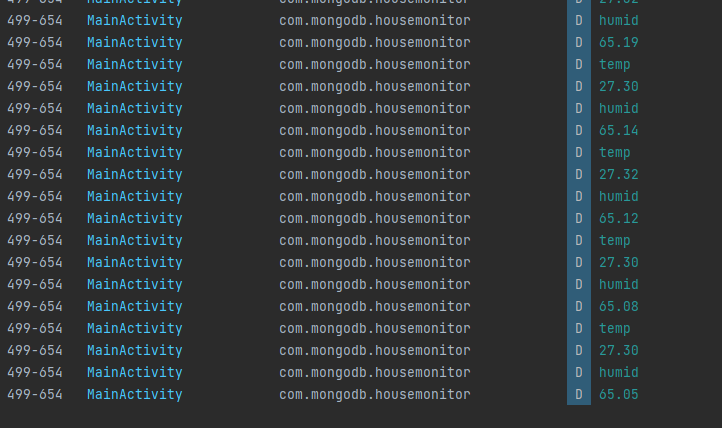
プログラムの書き変えしたら、先ほどと同様にBuildとインストールを行い動作させてみるとLogcatでは次のように表示できました。
それぞれの数値・文字毎に区切られ、また送信している時と同様の情報を得ていることが分かります。
プログラム全文
MainActivityだけ全文を載せておきます。
package com.mongodb.housemonitor

import androidx.appcompat.app.AppCompatActivity
import android.os.Bundle
import android.bluetooth.BluetoothAdapter
import android.bluetooth.BluetoothDevice
import android.bluetooth.BluetoothSocket
import android.util.Log
import android.content.Intent
import java.io.IOException
import java.io.InputStream
import java.io.OutputStream

const val TAG = "MainActivity"
//前回ペアリングしたRN-42のデバイス名をRNBT-○○○○で記述してください。
const val TARGET_DEVICE_NAME = "RNBT-####"
const val REQUEST_ENABLE_BLUETOOTH = 1

class MainActivity : AppCompatActivity() {
    private val bluetoothAdapter: BluetoothAdapter? = BluetoothAdapter.getDefaultAdapter()
    private var connectedThread: ConnectedThread? = null
    private var connectThread: ConnectThread? = null
    override fun onCreate(savedInstanceState: Bundle?) {
        super.onCreate(savedInstanceState)
        setContentView(R.layout.activity_main)

        if (bluetoothAdapter == null) {
            Log.d(TAG, "bluetooth is not supported.")
            return
        }

        if (!bluetoothAdapter.isEnabled) {
            val enableBluetoothIntent = Intent(BluetoothAdapter.ACTION_REQUEST_ENABLE)
            startActivityForResult(enableBluetoothIntent, REQUEST_ENABLE_BLUETOOTH)
        }

        val pairedDevices: Set<BluetoothDevice>? = bluetoothAdapter.bondedDevices
        pairedDevices?.forEach { device ->
            val deviceName = device.name
            val deviceHardwareAddress = device.address // MAC address
            if (device.name == TARGET_DEVICE_NAME) {
                Log.d(TAG, "name = %s, MAC <%s>".format(deviceName, deviceHardwareAddress))
                device.uuids.forEach { uuid ->
                    Log.d(TAG, "uuid is %s".format(uuid.uuid))
                }
                connectThread = ConnectThread(device)
                connectThread?.start()
                return
            }
        }
    }

    fun manageMyConnectedSocket(socket: BluetoothSocket) {
        connectedThread = ConnectedThread(socket)
        connectedThread?.start()
    }

    private inner class ConnectThread(device: BluetoothDevice) : Thread() {
        private val mmSocket: BluetoothSocket? by lazy(LazyThreadSafetyMode.NONE) {
            device.createInsecureRfcommSocketToServiceRecord(device.uuids[0].uuid)
        }

        public override fun run() {
            // Cancel discovery because it otherwise slows down the connection.
            bluetoothAdapter?.cancelDiscovery()
            if (mmSocket == null) {
                return
            }
            val socket = mmSocket
            socket ?: return
            socket.connect()
            // The connection attempt succeeded. Perform work associated with
            // the connection in a separate thread.
            manageMyConnectedSocket(socket)
        }

        // Closes the client socket and causes the thread to finish.
        fun cancel() {
            try {
                mmSocket?.close()
            } catch (e: IOException) {
                Log.e(TAG, "Could not close the client socket", e)
            }
        }
    }

    private inner class ConnectedThread(private val mmSocket: BluetoothSocket) : Thread() {

        private val mmInStream: InputStream = mmSocket.inputStream
        private val mmOutStream: OutputStream = mmSocket.outputStream
        // 受け取る文字列のサイズを1にします。1バイトで受け取るためです。
        private val mmBuffer: ByteArray = ByteArray(1)
        //変換した文字列の格納変数
        var str2 = ""

        override fun run() {
            var numBytes: Int // bytes returned from read()
            Log.d(TAG, "connect start!")
            // Keep listening to the InputStream until an exception occurs.
            while (true) {
                while(true){
                    numBytes = try {
                        mmInStream.read(mmBuffer)
                    } catch (e: IOException) {
                        Log.d(TAG, "Input stream was disconnected", e)
                        break
                    }
                    //改行した時
                    if(mmBuffer[0].toString()=="13") {
                        break
                    }
                    //,(カンマ)が送られた時
                    else if (mmBuffer[0].toString() == "44") {
                        break
                    }
                    //それ以外(数値や文字が送られてきたとき)
                    else {
                        //デコードに必要なキャラセットを作成
                        val charset = Charsets.UTF_8
                        //1バイトの情報を今まで受信してきた文字と組み合わせる(加算する)
                        //受信した1バイトの情報をUTF-8に変換 デコード操作
                        str2 += String(mmBuffer, charset)
                    }
                }
                // Logcatで表示
                Log.d(TAG,str2)
                // 表示した後に文字列変数を初期化
                str2=""
            }
        }


        // Call this method from the main activity to shut down the connection.
        fun cancel() {
            try {
                mmSocket.close()
            } catch (e: IOException) {
                Log.e(TAG, "Could not close the connect socket", e)
            }
        }
    }
}
まとめ&課題
以上でAndoridスマホでArduinoの情報を受け取る処理は終わりです。ただ情報を受け取るだけの操作でこれだけ考えてやらないといけないので大変だと思います。ただ内部処理はまだまだ必要です。例えば現状、Bluetoothの相手はプログラム上で設定(const val TARGET_DEVICE_NAME = "RNBT-####")していますが、これだと受信相手が変わった時にプログラムを変えなければならず面倒です。スマホ上で変更できるようにする必要があります。
次回は上述した追加の内部処理と、受け取った情報を元に可視化するプログラムを書いていこうと思います。
ここまで読んで頂きありがとうございました。ちょっと急ぎで書いてしまったため、正確に説明できていない所があると思います。もし不明点などありましたらコメントください!
お疲れ様でした!
-
13は改行と説明しましたが、CR(Carriage Return:行頭復帰)です。実際の改行情報としてはこのCRに加えてLF(Line Feed)も存在します。ここでは、改行動作を行う際に初めに送信されるCRを受信したときに改行したと認識して、情報をまとめる動作をしています。 ↩
