こんにちは。ソーイ株式会社の髙﨑です。
本記事では、業務で導入した Laravel Fortify を用いた
2要素認証(2FA)の実装について、実際の実装手順をもとに整理します。
目次
- はじめに
- Fortifyの導入
- 2FA有効化の実装(シークレット生成)
- ログイン時2FA(チャレンジ画面)の実装
- バッグエンド実装
- まとめ
はじめに
本記事では、Laravel Fortify を利用して
TOTPを用いた2要素認証(2FA)を実装する方法を段階的に解説します。
TOTP(Time-based One-Time Password)とは、現在時刻とシークレットキーをもとに、一定時間(一般的には30秒)ごとに変化するワンタイムパスワードを生成し、認証に利用する方式です。
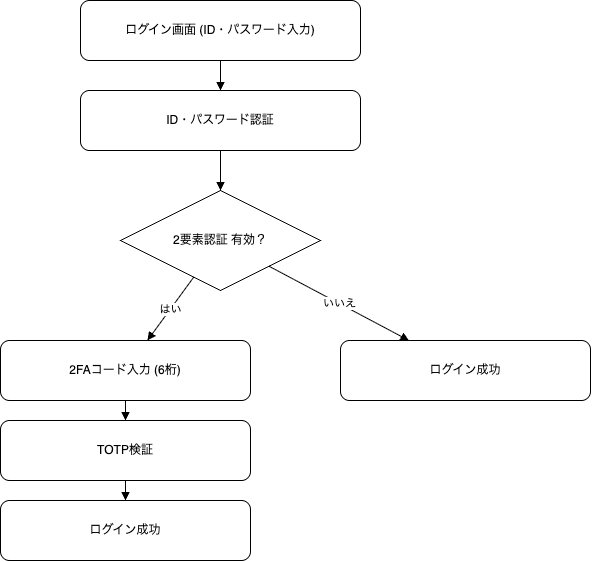
全体的な認証フローは下記のようになります。
なお、本記事の実装例は以下の環境を前提としています。
PHP:8.4
MySQL:8.4
Laravel:12
Laravel Fortify:1.32.1
Vue.js: 2.7.16(フロントエンド実装にて使用)
Fortifyの導入
まずは、Fortify のインストールを行います。
composer require laravel/fortify
インストール後、以下のコマンドを実行することで
Fortify に関する設定ファイルやマイグレーションが生成されます。
php artisan vendor:publish --provider="Laravel\Fortify\FortifyServiceProvider"
このコマンドにより、主に以下のファイルが生成されます。
- config/fortify.php(Fortify機能の設定用ファイル)
- app/Providers/FortifyServiceProvider.php(ログイン処理等のカスタム登録用ファイル)
- 2FA用のマイグレーションファイル
マイグレーションを実行すると、users テーブルに2要素認証で使用する以下のカラムが追加されます。
- two_factor_secret
- two_factor_recovery_codes
- two_factor_confirmed_at
次にconfig/forify.phpにて2要素認証の有効化を行います。
featuresにてtwoFactorAuthenticationを追加します。
'features' => [
    Features::registration(),
    Features::resetPasswords(),
    // Features::emailVerification(),
    Features::updateProfileInformation(),
    Features::updatePasswords(),
    Features::twoFactorAuthentication([
        'confirm' => true,
        'confirmPassword' => true,
        // 'window' => 0,
    ]),
],
以上でFortifyの導入、2要素認証実装の準備は完了です。
2FA有効化の実装(シークレット生成)
Fortify では、2FA 有効化用のエンドポイントがあらかじめ用意されているため、
フロントエンド側からそれを呼び出すだけでシークレットが生成されます。
使用するエンドポイント
POST /user/two-factor-authentication
このエンドポイントを呼び出すと、以下が行われます。
- two_factor_secret が生成される
- two_factor_recovery_codes が生成される
以下のコードでは、「有効化する」ボタンを押下することで
2FA を有効化し、QR コードを表示する実装例を示しています。
<template>
  <div>
    <h5>二要素認証 (TOTP)</h5>

    <!-- まだ有効化していない -->
    <div v-if="!enabled">
      <button :disabled="loading" @click="enable">
        有効化する
      </button>
    </div>

    <!-- 有効化済み(未確認含む) -->
    <div v-else>
      <!-- Fortifyが返すSVG形式のQRコードを表示 -->
      <div v-if="qrSvg" v-html="qrSvg" />

      <!-- 未確認ならコード入力 -->
      <div v-if="!confirmed">
        <input v-model="code" placeholder="123456" />
        <button :disabled="loading" @click="confirm">
          確認する
        </button>
      </div>

      <p v-else>✅ 2FA 有効(確認済)</p>
    </div>
  </div>
</template>

<script>
export default {
  props: {
    // APIで取得したユーザー情報を想定(two_factor_secret/confirmed_at が入っている)
    user: { type: Object, required: true },
  },

  data() {
    return {
      loading: false,
      enabled: !!this.user.two_factor_secret,
      confirmed: !!this.user.two_factor_confirmed_at,
      qrSvg: '',
      code: '',
    }
  },

  async mounted() {
    if (this.enabled && !this.confirmed) {
      await this.fetchQr()
    }
  },

  methods: {
    async enable() {
      this.loading = true
      await axios.post('/user/two-factor-authentication') // シークレット生成
      this.enabled = true
      await this.fetchQr()
      this.loading = false
    },

    async fetchQr() {
      const { data } = await axios.get('/user/two-factor-qr-code') // { svg: "<svg...>" }
      this.qrSvg = data.svg
    },

    async confirm() {
      this.loading = true
      await axios.post('/user/confirmed-two-factor-authentication', { code: this.code })
      this.confirmed = true
      this.code = ''
      this.loading = false
    },
  },
}
</script>
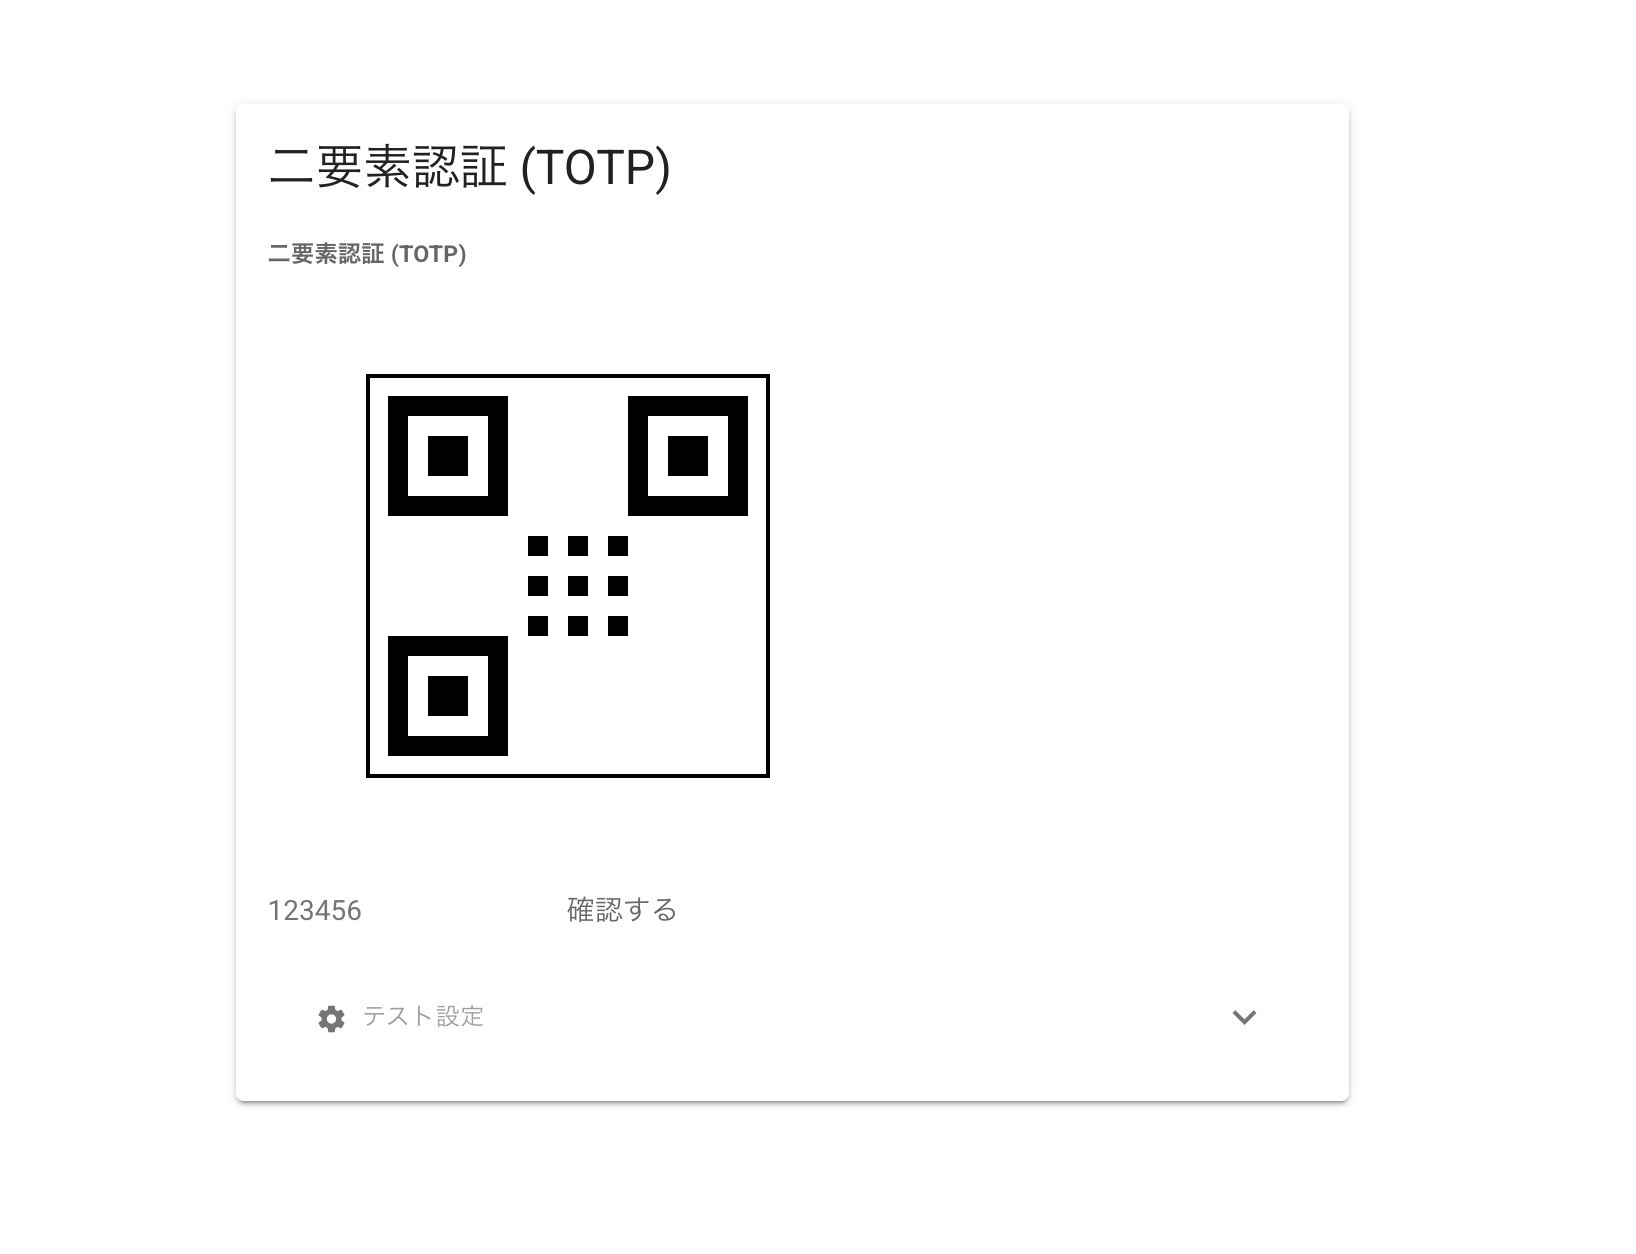
※画像のQRコードはサンプルです
ログイン時2FA(チャレンジ画面)の実装
次に、ログイン時に表示される
2FA チャレンジ画面(認証コード入力) を実装します。
以下は、Fortify が用意している
two-factor.login ルートを利用した Blade テンプレートの例です。
<form method="POST" action="{{ route('two-factor.login') }}">
    @csrf

    <label for="code">認証コード</label>
    <input
        id="code"
        name="code"
        type="text"
        inputmode="numeric"
        pattern="[0-9]*"
        autocomplete="one-time-code"
        autofocus
    >

    @error('code')
        <div style="color: red;">{{ $message }}</div>
    @enderror

    <button type="submit">
        認証する
    </button>
</form>
バックエンド実装
最後に、Fortify の設定を行うFortifyServiceProviderの実装例です。
<?php

namespace App\Providers;

use App\Actions\Fortify\CreateNewUser;
use App\Actions\Fortify\ResetUserPassword;
use App\Actions\Fortify\UpdateUserPassword;
use App\Actions\Fortify\UpdateUserProfileInformation;
use App\Http\Responses\TwoFactorLoginResponse;
use Illuminate\Cache\RateLimiting\Limit;
use Illuminate\Http\Request;
use Illuminate\Support\Facades\RateLimiter;
use Illuminate\Support\ServiceProvider;
use Illuminate\Support\Str;
use Laravel\Fortify\Contracts\TwoFactorLoginResponse;
use Laravel\Fortify\Fortify;

class FortifyServiceProvider extends ServiceProvider
{
    public function boot(): void
    {
        /**
         * 2FA チャレンジを通過した後のレスポンス(遷移先など)をカスタマイズしたい場合は
         * TwoFactorLoginResponse を差し替える。
         */
        $this->app->singleton(TwoFactorLoginResponse::class, TwoFactorLoginResponse::class);

        /**
         * 認証画面(Blade)を指定
         * - ログイン画面
         * - 2FA チャレンジ画面(6桁コード入力)
         */
        Fortify::loginView(fn () => view('auth.login'));
        Fortify::twoFactorChallengeView(fn () => view('auth.two-factor-auth'));

        /**
         * 各種アクション(必要に応じて)
         */
        Fortify::createUsersUsing(CreateNewUser::class);
        Fortify::updateUserProfileInformationUsing(UpdateUserProfileInformation::class);
        Fortify::updateUserPasswordsUsing(UpdateUserPassword::class);
        Fortify::resetUserPasswordsUsing(ResetUserPassword::class);

        /**
         * レート制限(ブルートフォース対策)
         */
        RateLimiter::for('login', function (Request $request) {
            $throttleKey = Str::transliterate(
                Str::lower($request->input(Fortify::username())) . '|' . $request->ip()
            );

            return Limit::perMinute(5)->by($throttleKey);
        });

        RateLimiter::for('two-factor', function (Request $request) {
            return Limit::perMinute(5)->by($request->session()->get('login.id'));
        });
    }
}
まとめ
以上でLaravel Fortifyを用いた2要素認証の実装が完了しました。
Fortify を利用することで、2FAに必要な認証処理やマイグレーションを自動で用意でき、比較的少ない実装量で導入できます。
注意点としては、Fortifyは認証用のバッグエンド処理を提供するパッケージのため、フロントエンドの実装は利用者側で行う必要がある点です。
フロントエンド実装まで含めたい場合は、Laravel Jetstream や Laravel Breeze を利用するのが良いでしょう。
お知らせ
技術ブログを週1〜2本更新中、ソーイをフォローして最新記事をチェック!
https://qiita.com/organizations/sewii