こんにちは。ミーティングテクノロジーという会社で会議ツールを開発している伊勢川です。

仕事で位置情報サービスを軽く調べる機会があって、せっかくなので調べた内容を記事にしたいと思います。
位置情報(地図)サービスといえば、Google Mapを思い浮かべる人も多いのではないでしょうか。私もGoogle Mapのヘビーユーザー&ファンで、カーナビの代わりとして使ったり、街で見つけた史跡の写真等を2000件以上投稿したりしています。
B2Cのサービスの中ではGoogle Mapが圧倒的な存在感を放っていますが、B2B向けのサービスとなると様相が異なるようです。今回は、ある調査でB2B向けサービスの中ではGoogle Mapより高い評価がついていた「HERE」というサービスについて書きます。
Google Mapよりすごいと言われる所以はなにか
Omdiaのレポートによると、B2B市場の位置情報サービスにおいて、総合力では「HERE」が1位と評価されており、その評点はGoogle Mapを上回っていました。
Google Mapのファンとしては、総合力で負けていると言われても納得がいかないので、どういう評価をしているのか、レポートをもう少し読み進めてみましょう。
同調査では、Reach(浸透度)とCompleteness(網羅性)の2軸で評価を行っており、Reachは主にB2B市場のユーザー数やエコシステムを評価、Completenessは主にデータ・プラットフォーム・付加価値サービス・収益化を評価していました。ReachがB2B市場を対象としているため、圧倒的な差がつかなかったようです。Completenessのところは、実際にサービスを使ってみないとよく分からないので、後半で試します。
HERE Technologiesという会社について調べてみると、世界に50拠点以上あるグローバルな会社で、35年以上地図や位置情報技術を扱ってきた会社だそうです。恥ずかしながら存じ上げなかったです。Googleさんより先輩なんですね。
三菱やNTTがHERE先輩の株式の30%を取得しているとのことで、日本やアジアにおけるサービスの拡充も今後期待できるかもしれません。
Maps API for Javascriptを試してみた
それでは実際の機能を試してみましょう。見た目でわかりやすいのでMaps API for Javascriptを使ってみます。
Developer登録
まずは、下記のページからDeveloper登録を行います。
https://www.here.com/jp/platform/developer
アプリの作成とAPIキーの発行
Developer登録後、プラットフォームのトップページから、「JavaScript 用の Maps API で始める」をクリックし、そこからアクセスマネージャーに移動します。

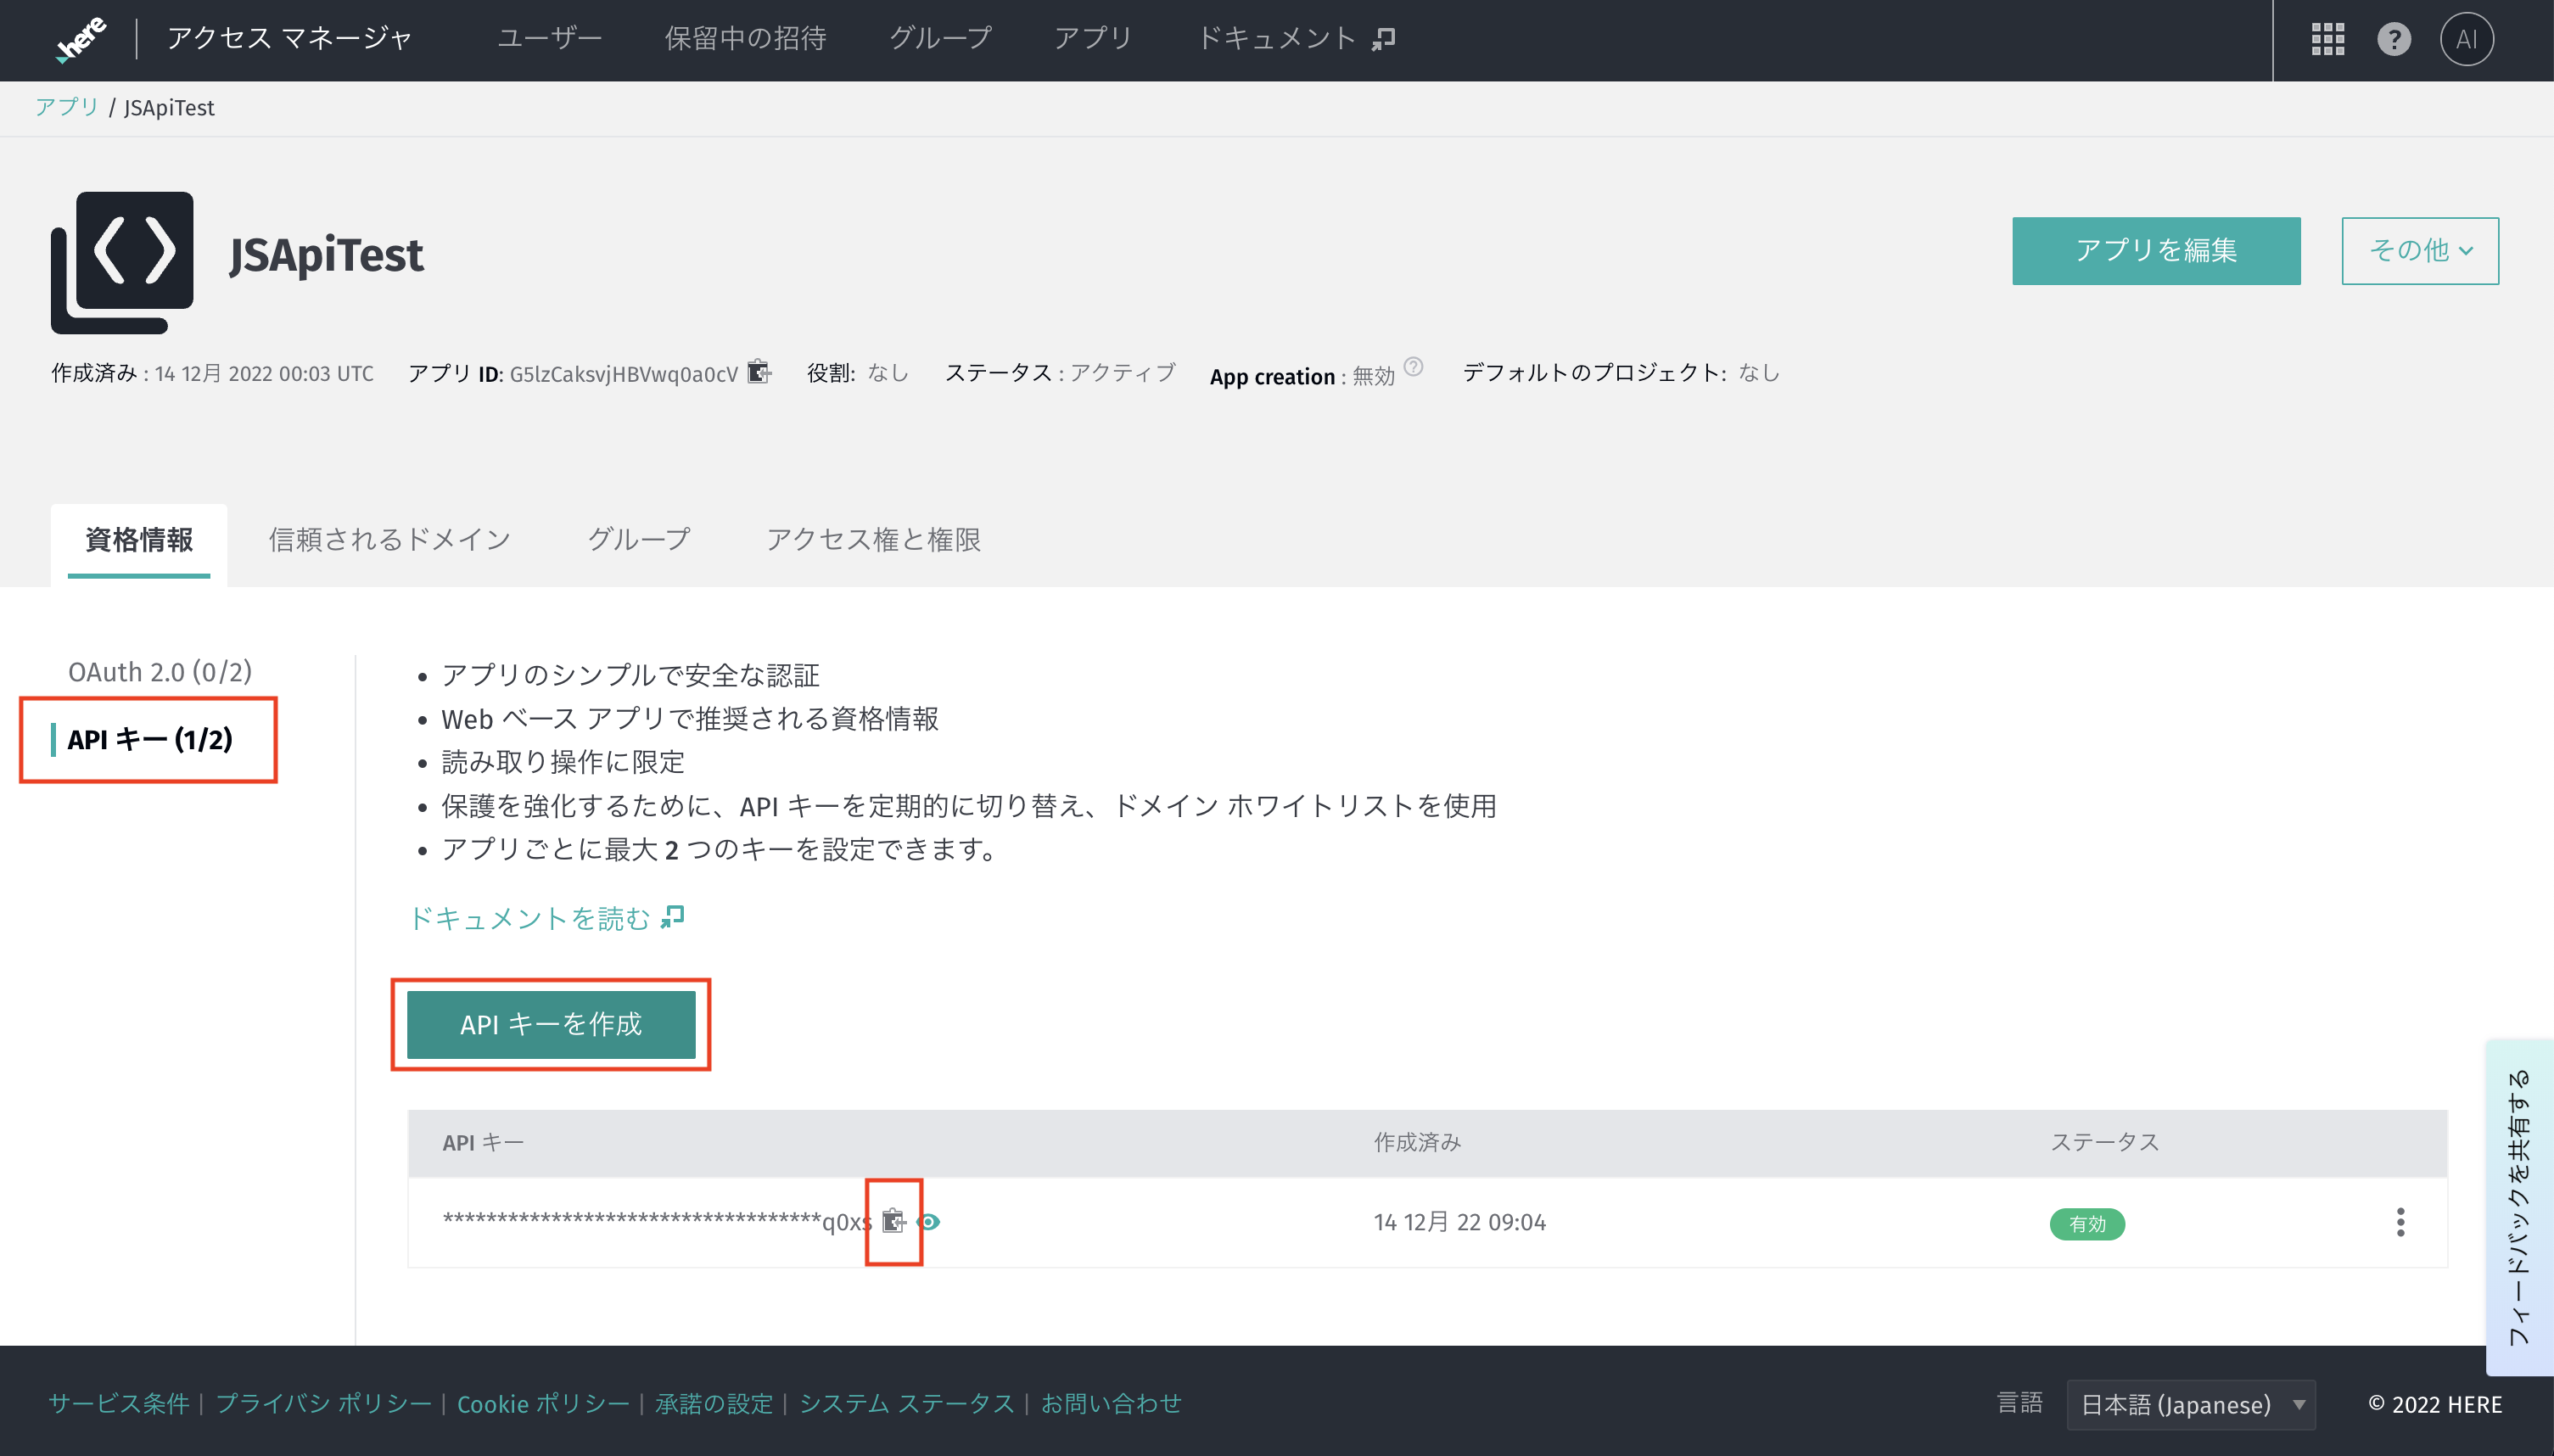
アクセスマネージャーから、新しいアプリを登録します。ここでは、試すだけなのでアプリ名を適当に入れて、プロジェクトの紐付けも行わず登録します。

アプリを登録したら、「APIキー>APIキーを作成」をクリックすると、APIキーが発行され、これを用いるとHEREのAPIが使えるようになります。
日本の詳細地図を使えるようにする
サンプルコードを実行すると、ベルリンやニューヨークの地図が出てきて、自分にはあまり土地勘がなくてピンと来ません。そのままでも、日本地図を表示することはできますが、国道など大きな道しか載っていない荒い地図なので、日本には対応していないのだろうかと不安になります。
ただ、これはフェイントで、ググると日本用の詳細な地図を表示する方法が出てきました。
上記の公式ガイドを参考に、下記のような構成でファイルを作ります。
HERE_jp_map
    |--index.html
    |--js
        |--app.js
公式ガイドの地図のサイズが小さかったので、下記のように画面一杯に表示します。
また、地図をインタラクティブに動かしたいので、mapeventsなどのjsも読み込むように修正しています。
<!DOCTYPE html>
<html>
  <head>
    <meta name="viewport" content="initial-scale=1.0,width=device-width" />
    <!-- Style -->
    <link rel="stylesheet" type="text/css" href="https://js.api.here.com/v3/3.1/mapsjs-ui.css" />
    <!-- JS API -->
    <script type="text/javascript" src="https://js.api.here.com/v3/3.1/mapsjs-core.js" charset="utf-8"></script>
    <script type="text/javascript" src="https://js.api.here.com/v3/3.1/mapsjs-service.js" charset="utf-8"></script>
    <script type="text/javascript" src="https://js.api.here.com/v3/3.1/mapsjs-ui.js"></script>
    <script type="text/javascript" src="https://js.api.here.com/v3/3.1/mapsjs-mapevents.js"></script>
  </head>
  <body>
    <div style="width: 100vw; height: 100vh" id="mapContainer"></div>
    <script type="module" src="js/app.js"></script>
  </body>
</html>
公式ガイドのコードをコピペして、地図をインタラクティブに動かすためのイベントリスナーを追加します。
var platform = new H.service.Platform({
  'apikey': '{YOUR_API_KEY}'
});

// configure an OMV service to use the `core` enpoint
var omvService = platform.getOMVService({path:  'v2/vectortiles/core/mc'});
var baseUrl = 'https://js.api.here.com/v3/3.1/styles/omv/oslo/japan/';

// create a Japan specific style
var style = new H.map.Style(`${baseUrl}normal.day.yaml`, baseUrl);

// instantiate provider and layer for the basemap
var omvProvider = new H.service.omv.Provider(omvService, style);
var omvlayer = new H.map.layer.TileLayer(omvProvider);

// instantiate (and display) a map:
var map = new H.Map(
    document.getElementById('mapContainer'),
    omvlayer,
    {
      zoom: 17,
      center: {lat: 35.68026, lng: 139.76744}
    });

// make map interactive
window.addEventListener('resize', () => map.getViewPort().resize());
var behavior = new H.mapevents.Behavior(new H.mapevents.MapEvents(map));
python3が入っている場合は、下記のコマンドでhttpのサーバーで静的ファイルをホスティングをします。
python -m http.server 8888
npmが入っている場合は、下記のコマンドで同じことができます。
npx http-server -p 8888
ブラウザで、下記のURLにアクセスすると、東京駅近辺の詳細な地図が表示されます。
http://localhost:8888/
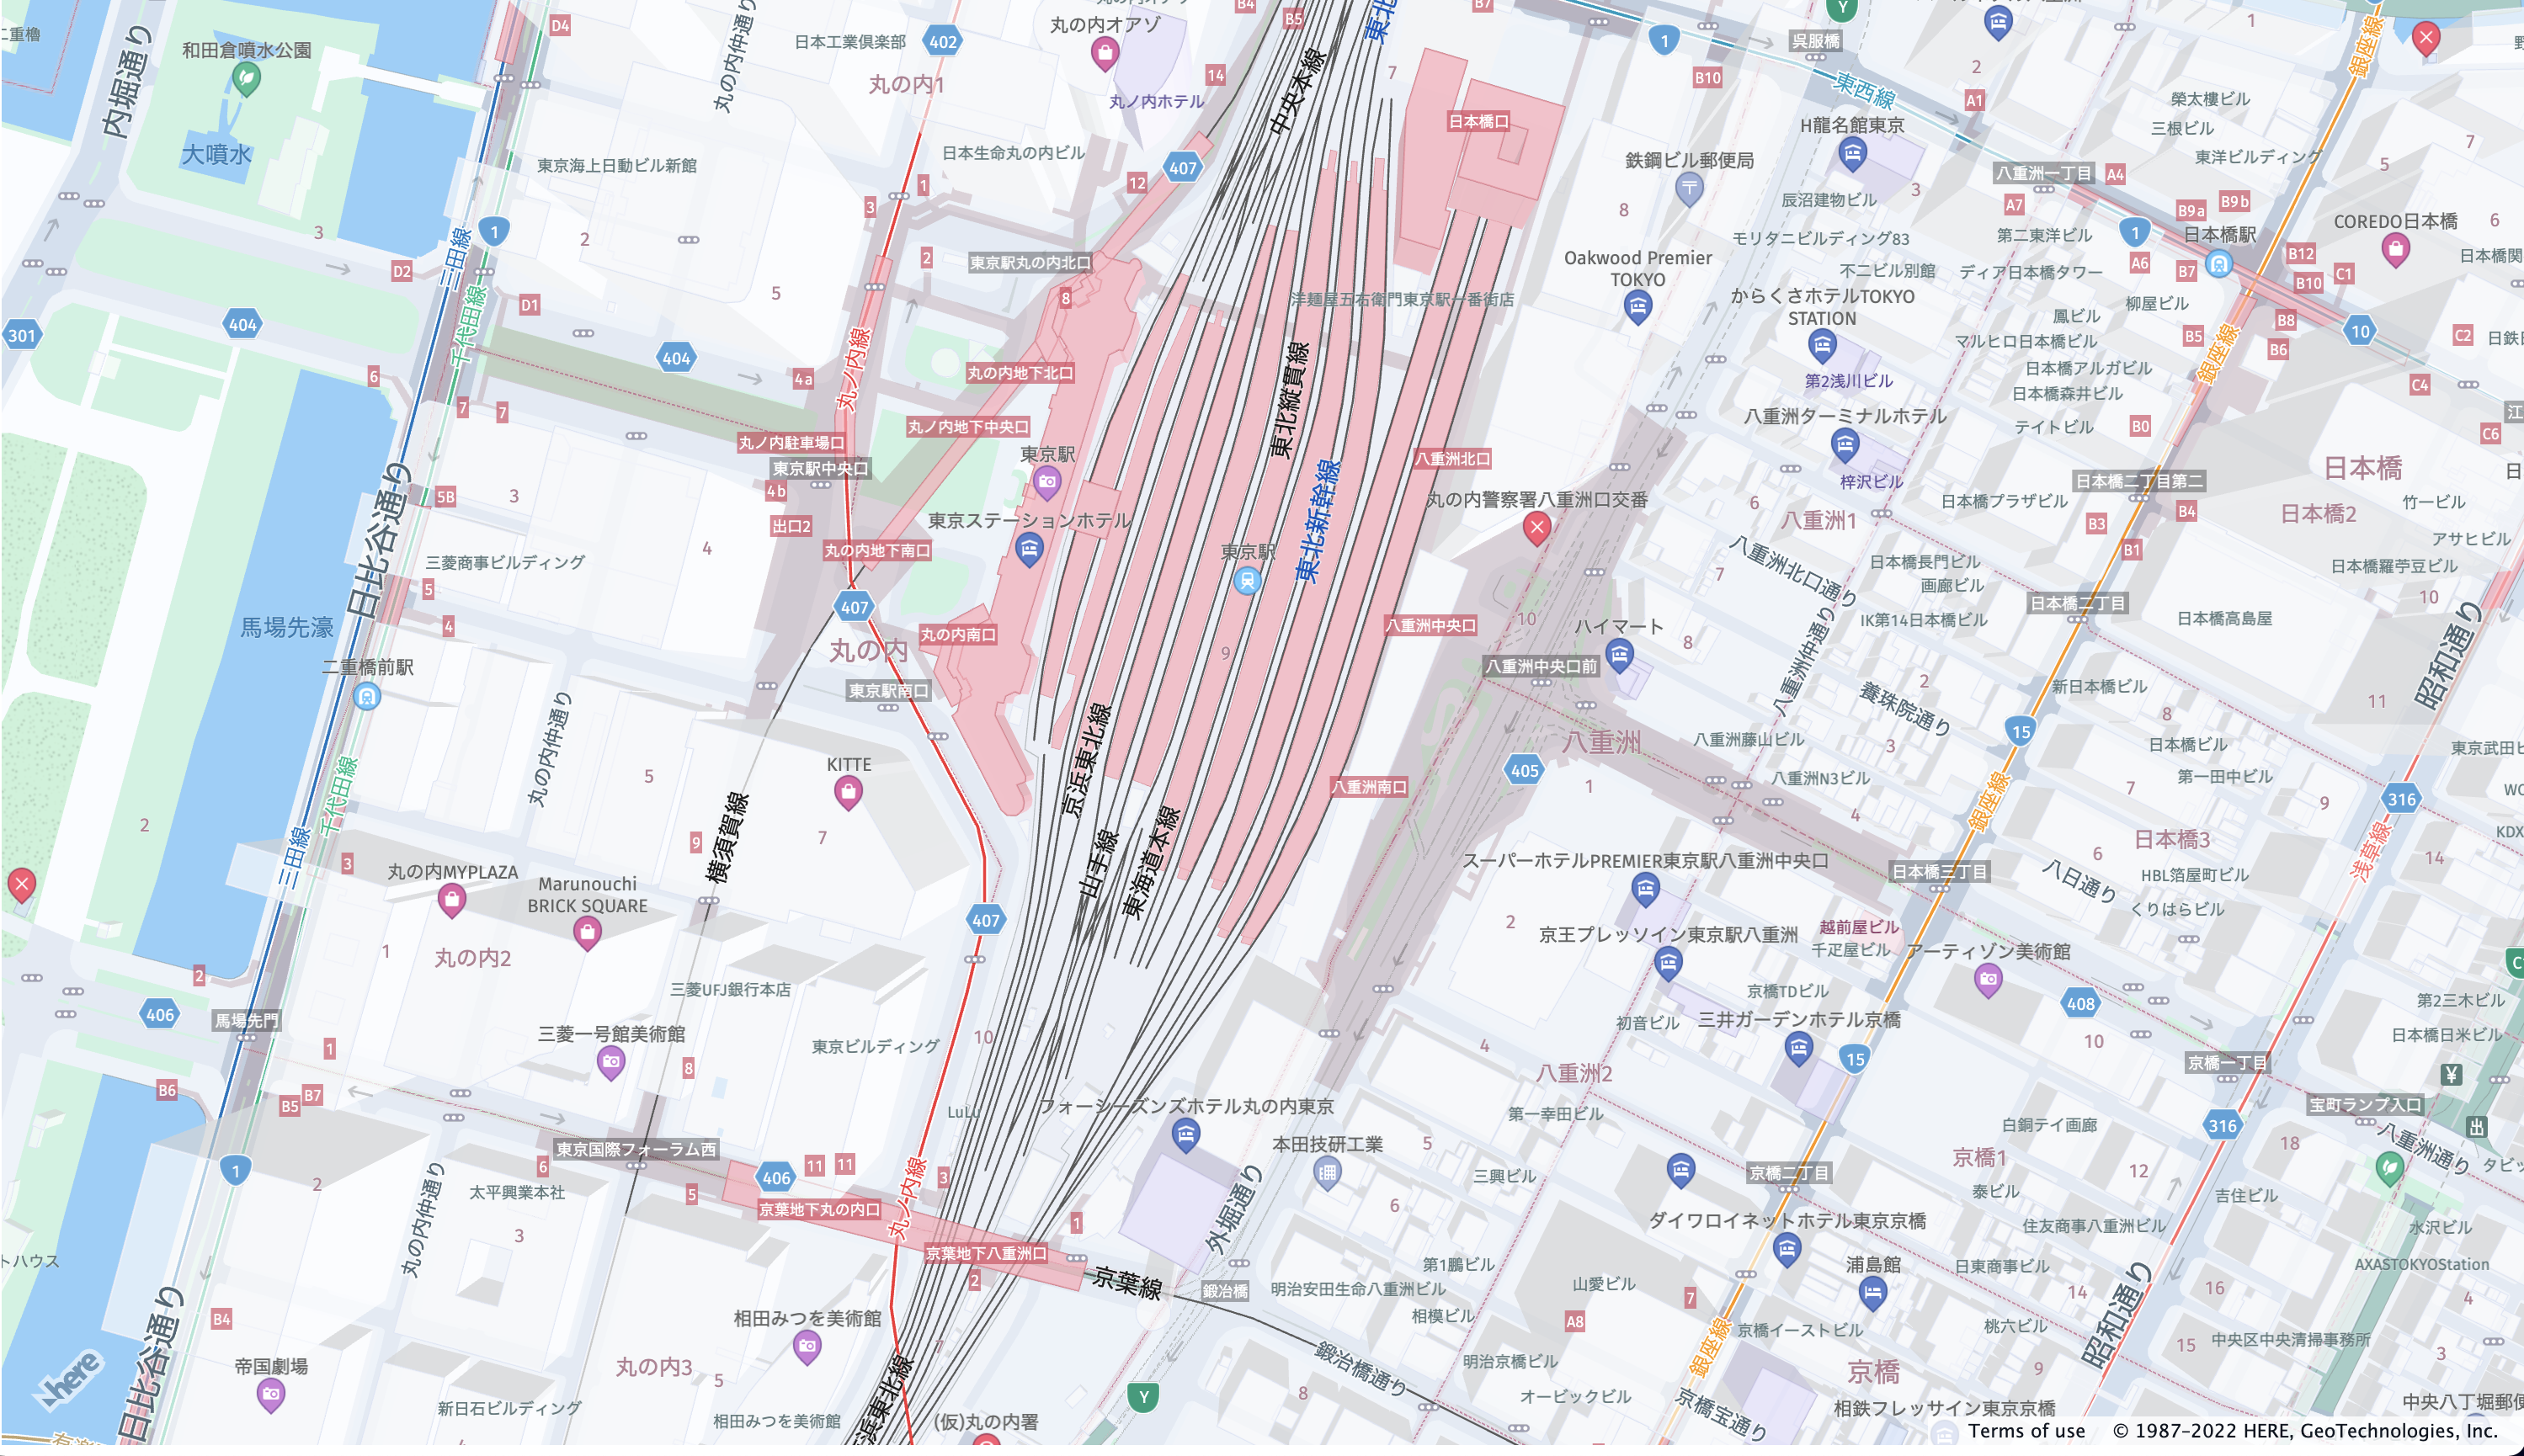
これで、日本の詳細地図を使って、サンプルを試せるようになりました。
特徴
それでは、サンプルを試してみましょう。ドキュメントをざっと見るだけでも膨大な機能があるので、全て試した訳ではないですが、Google Mapの機能と比較して、「お!いいな」と思った部分を抜粋して紹介します。
ルート案内はトラックや積載物などの詳細な条件指定ができる
Google Mapをカーナビで使っていると、たまに恐ろしく狭い道を案内されることがあります。軽自動車ならギリギリ通れるんだろうけど、普通車だと厳しいような道を案内されて困ることがたまにあって、最近は怪しいなと思ったらナビに頼らないようにしています。
サンプルコードを探していると、そんな問題を解決してくれる機能がありました。
ルート検索をするときに、トラック用の経路を指定したり、積載物の種類の指定したりすることができます。トンネルや舗装されていない道を避けるといったオプションの指定も可能なようです。
公式ガイドは下記で、ニューヨークで、普通の車は最短経路で案内がされるけど、可燃物を積んだトラックの場合は迂回路が案内されるという例が紹介されています。
https://developer.here.com/documentation/examples/maps-js/services/truck-routing-road-restrictions
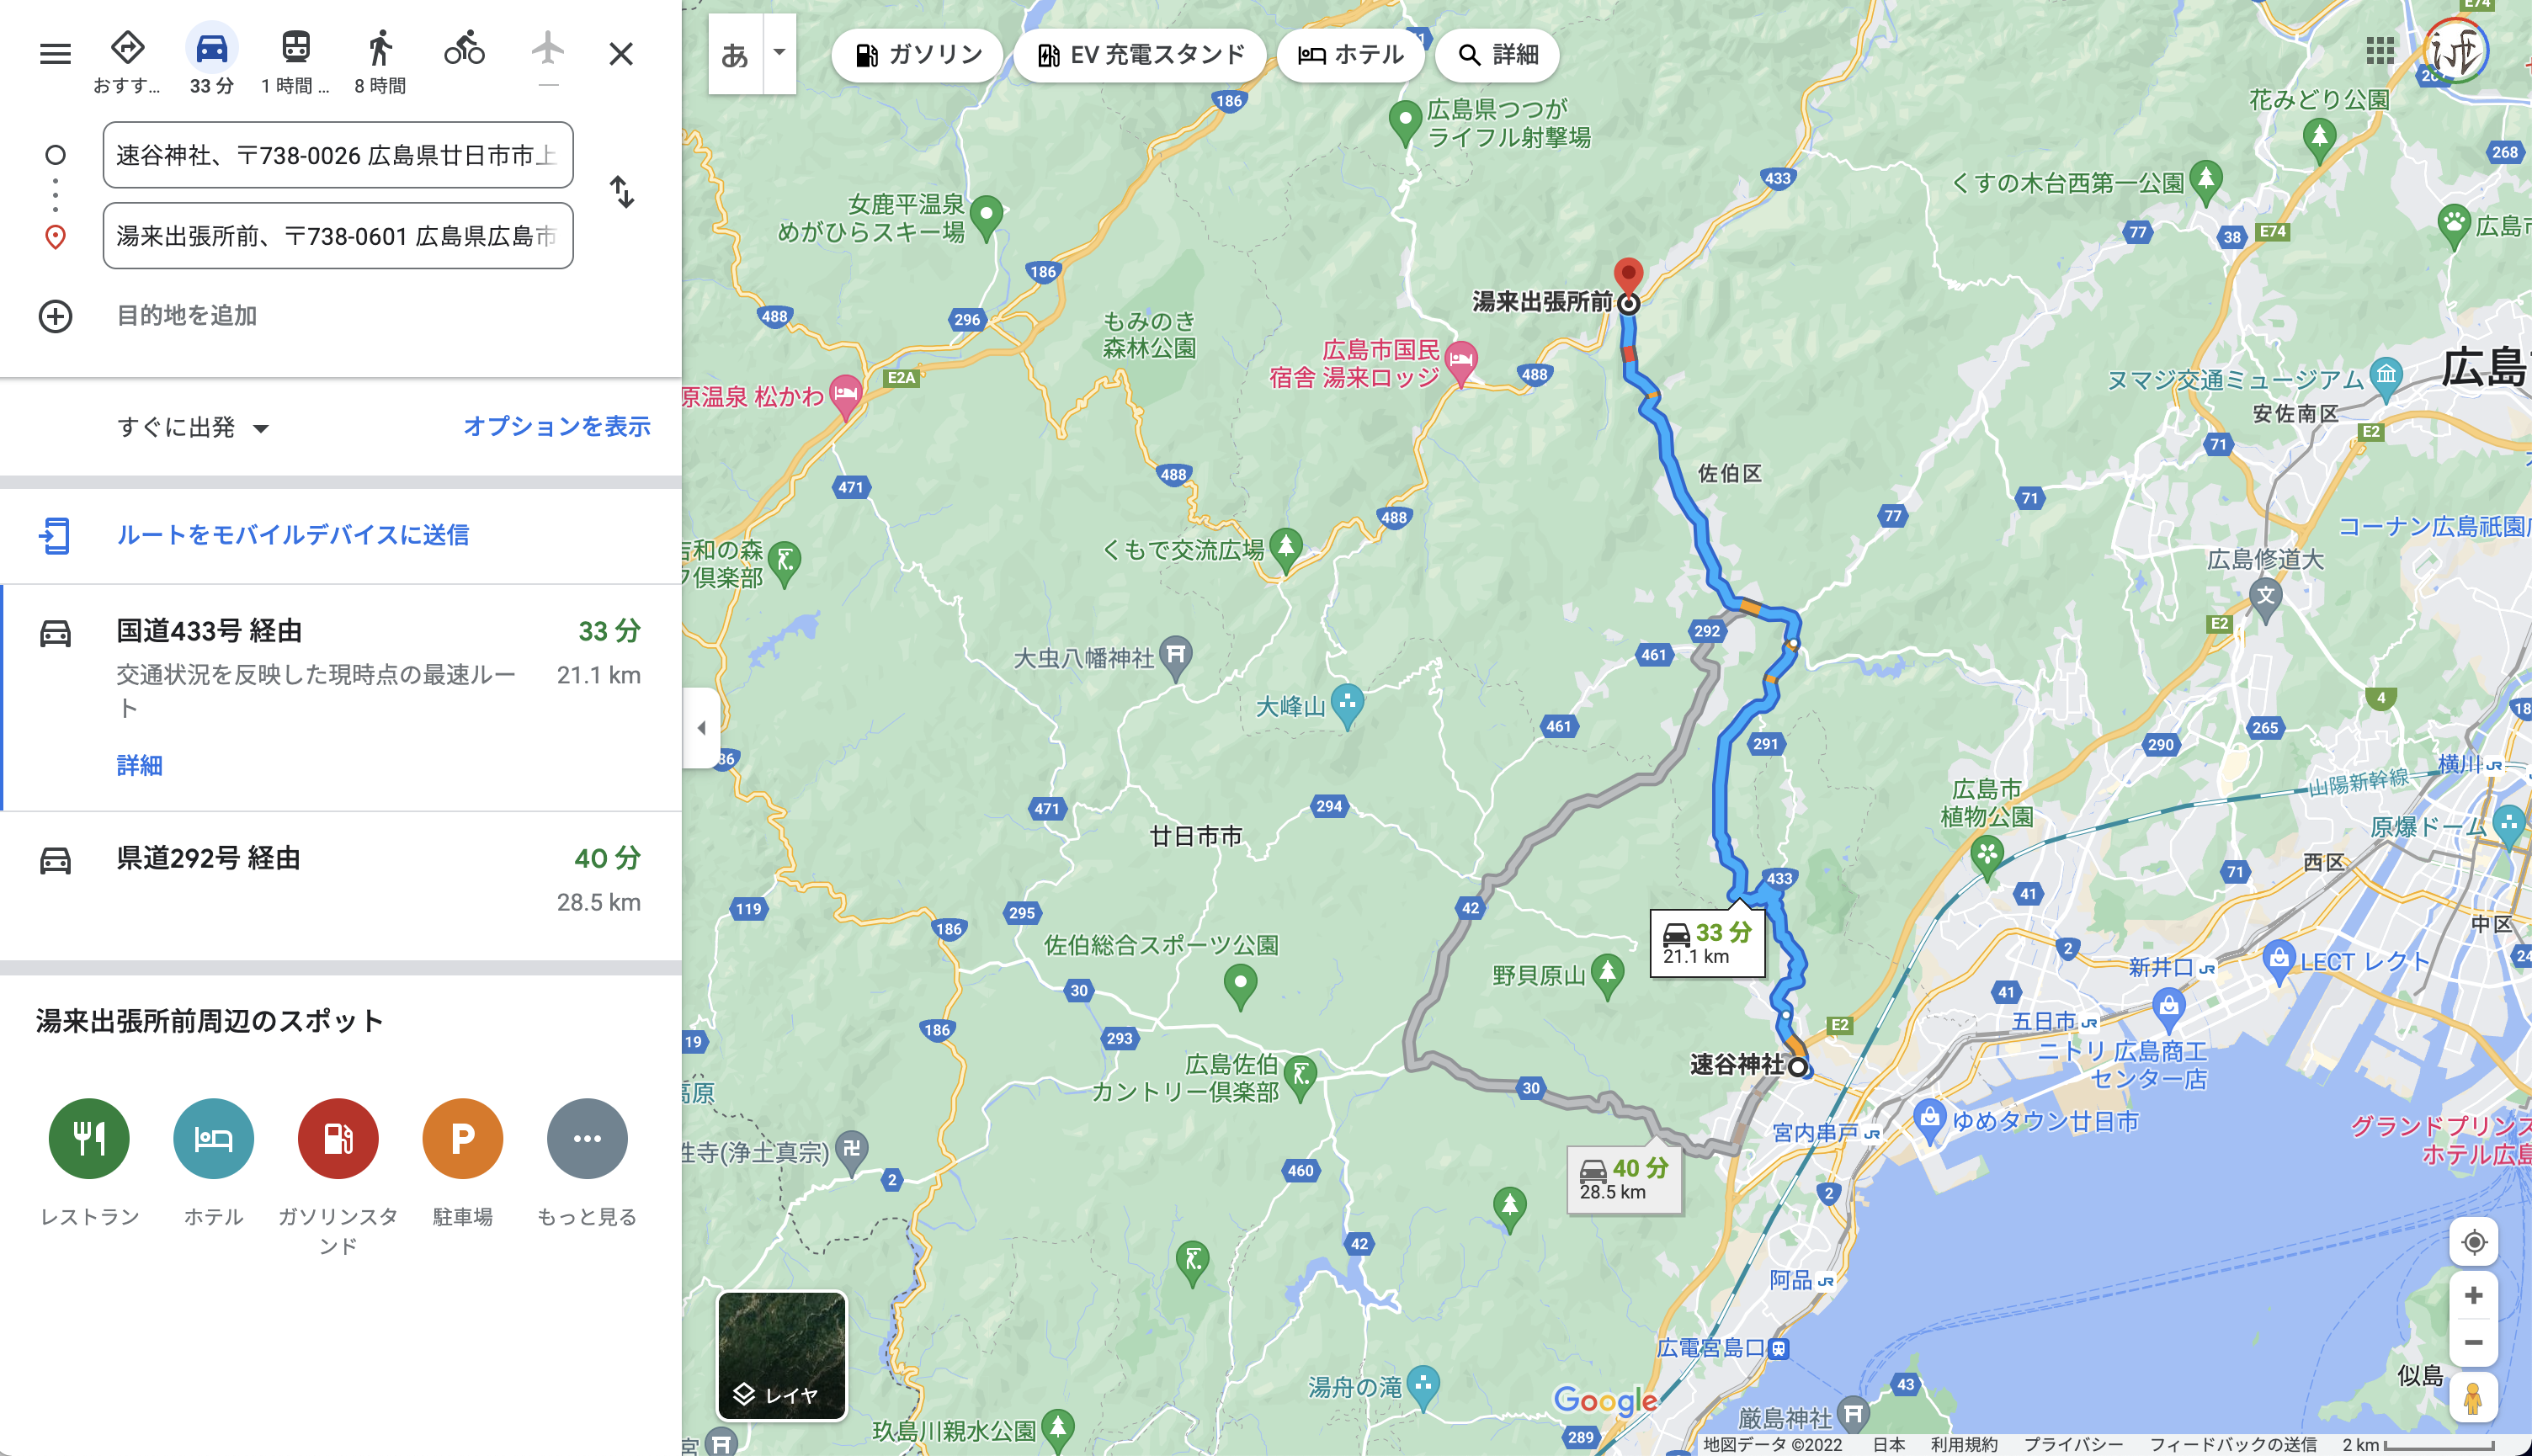
ニューヨークだと実感がないので、地元広島で試してみることにします。広島といえば厳島神社ですが、本州には厳島神社より古くから祀られている速谷神社があります。今回はその速谷神社から湯来温泉に行くルートを検索してみます。なかなか県外の人にはあまり知られていない渋いコースですね。
速谷神社から湯来温泉に行くときは、国道433号線から291号が最短ルートなのですが、この道は途中が恐ろしく狭いところがあって、ポツンと一軒家に行くときみたいなスリルが味わうことができます。田舎の道にはまだこういう場所が残っているので注意が必要です。
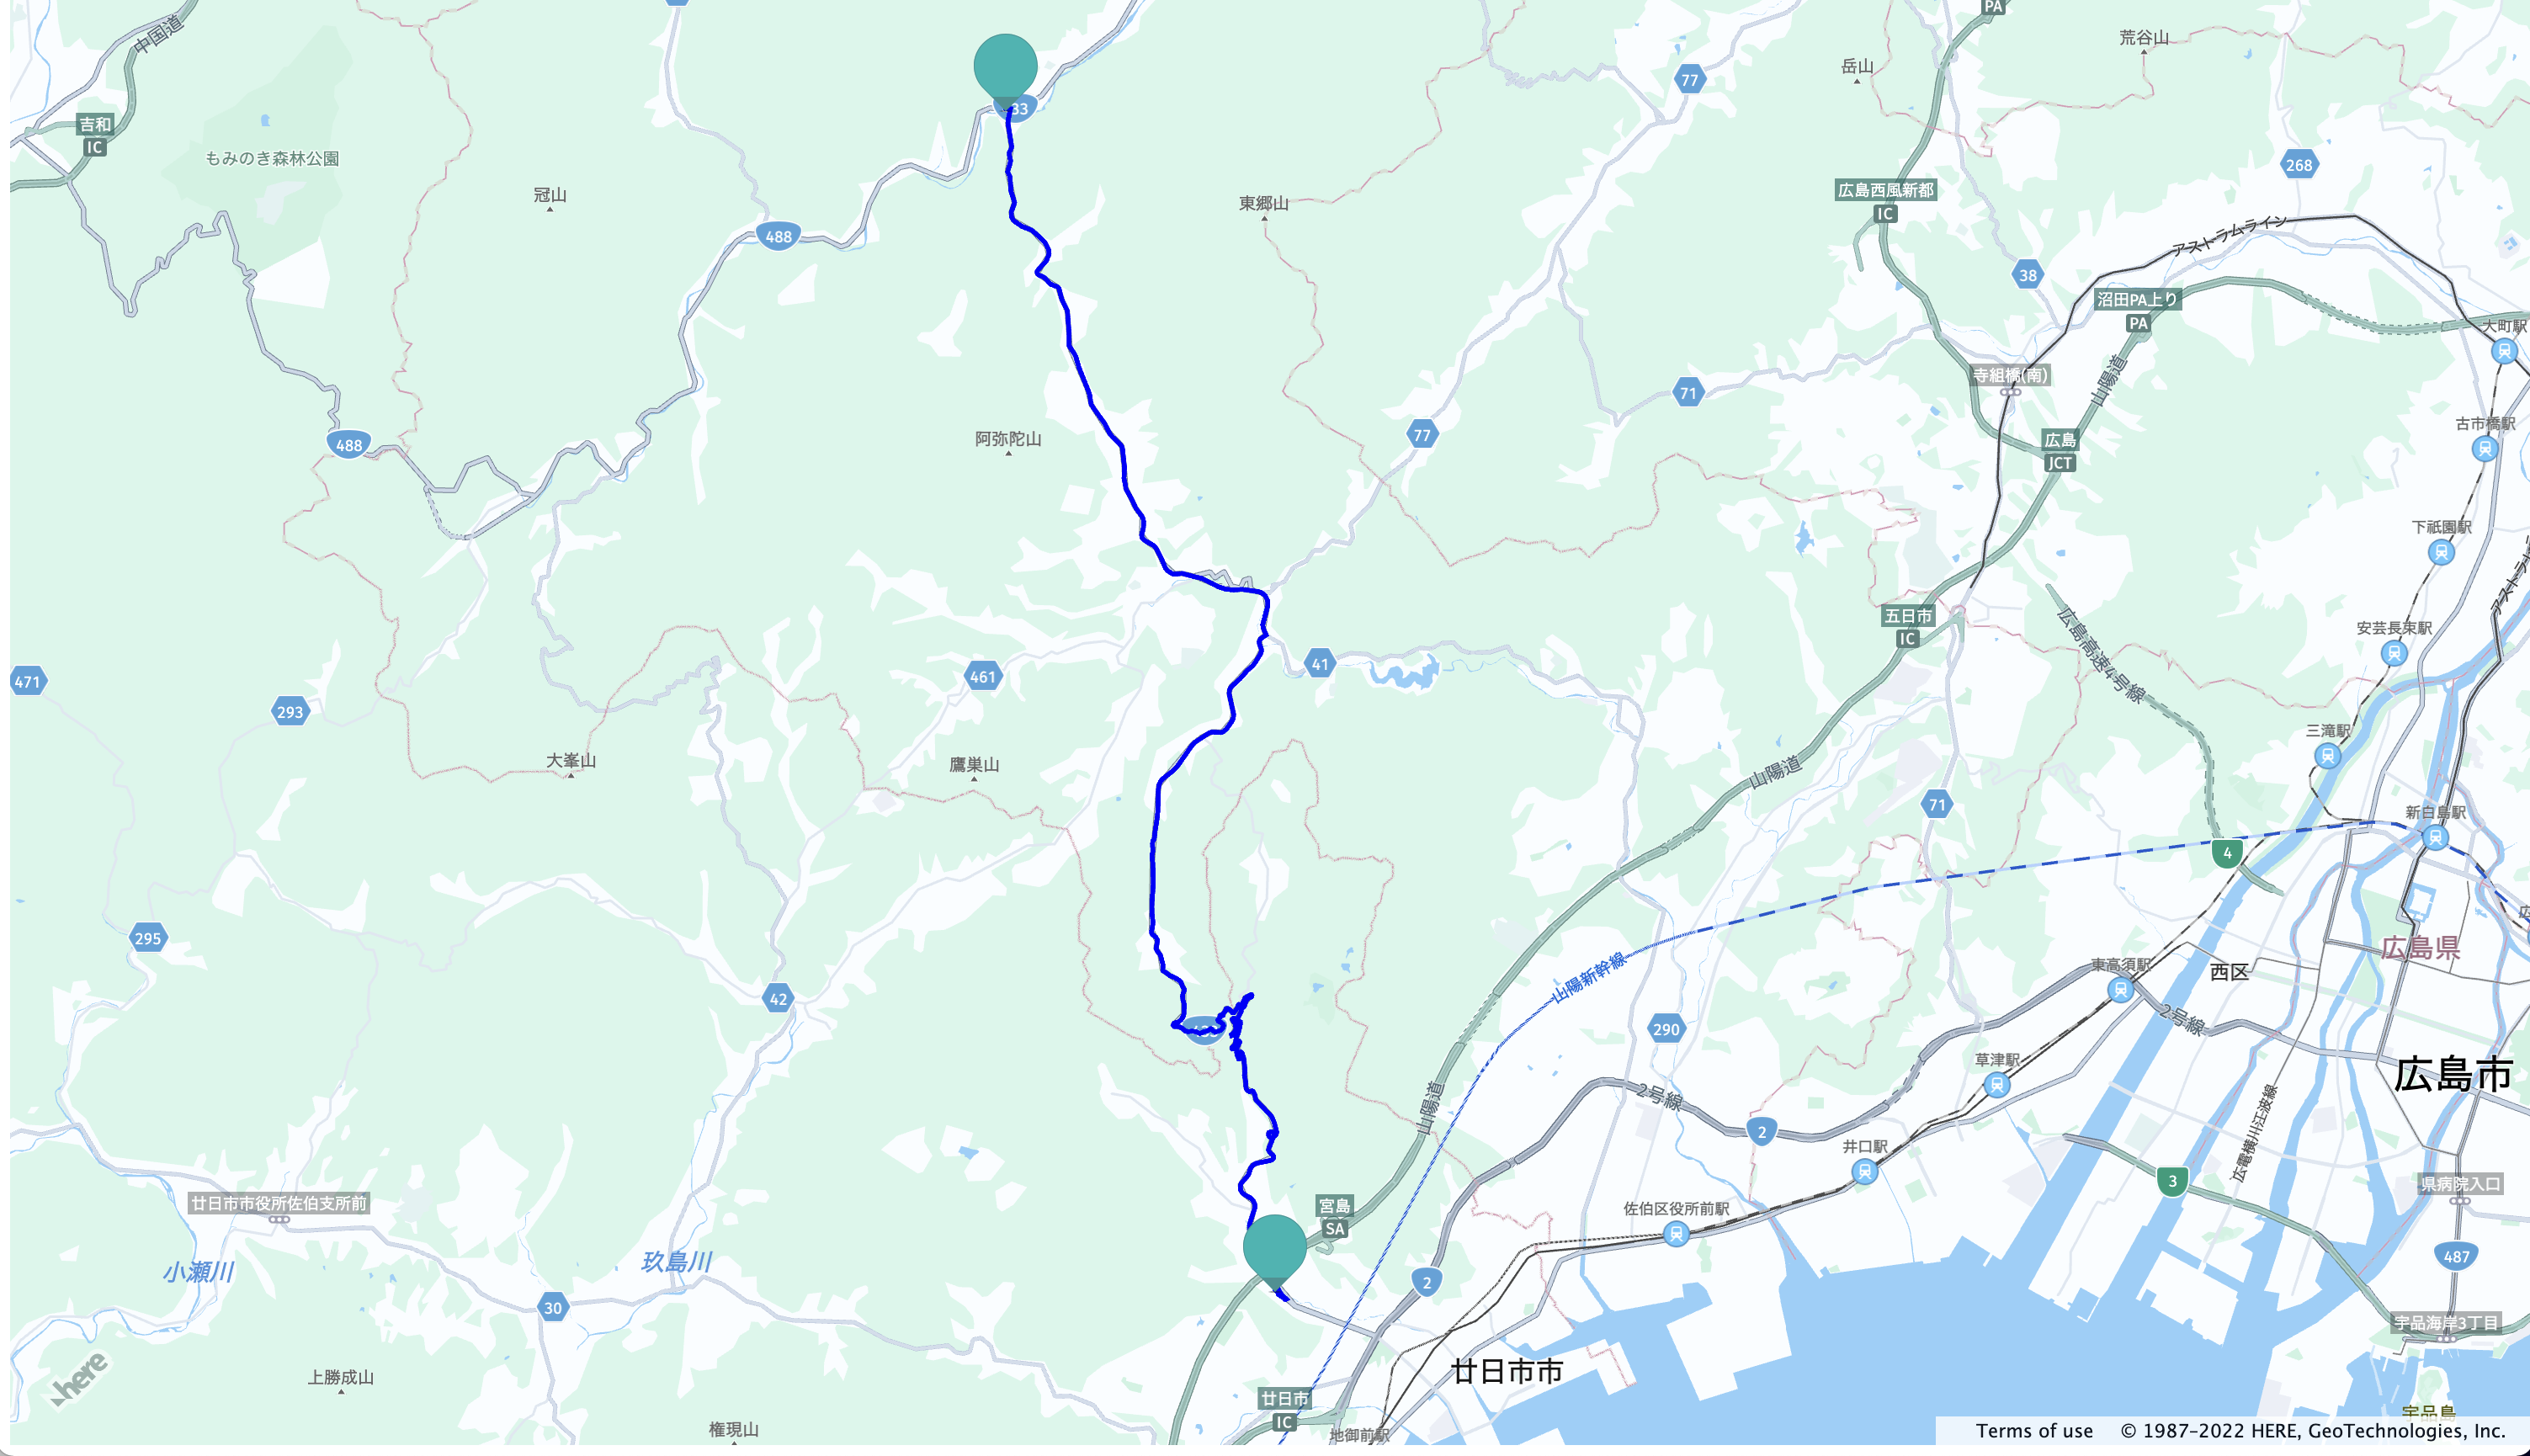
試しにGoogle Mapでルート検索をしてみると、案の定狭い道を案内してきます(恐ろしく狭い291号はたぶん通行止めのためそこは案内されなかった)。迂回路も候補に出していますが、ここも初っ端に狭いところがあります。
次にHEREで「transportMode: car」にしてルート検索をすると、Google Mapと同じ経路が案内されました。まあ、すれ違えないけど普通車でも通れるのでこれが正しいのかもしれません。
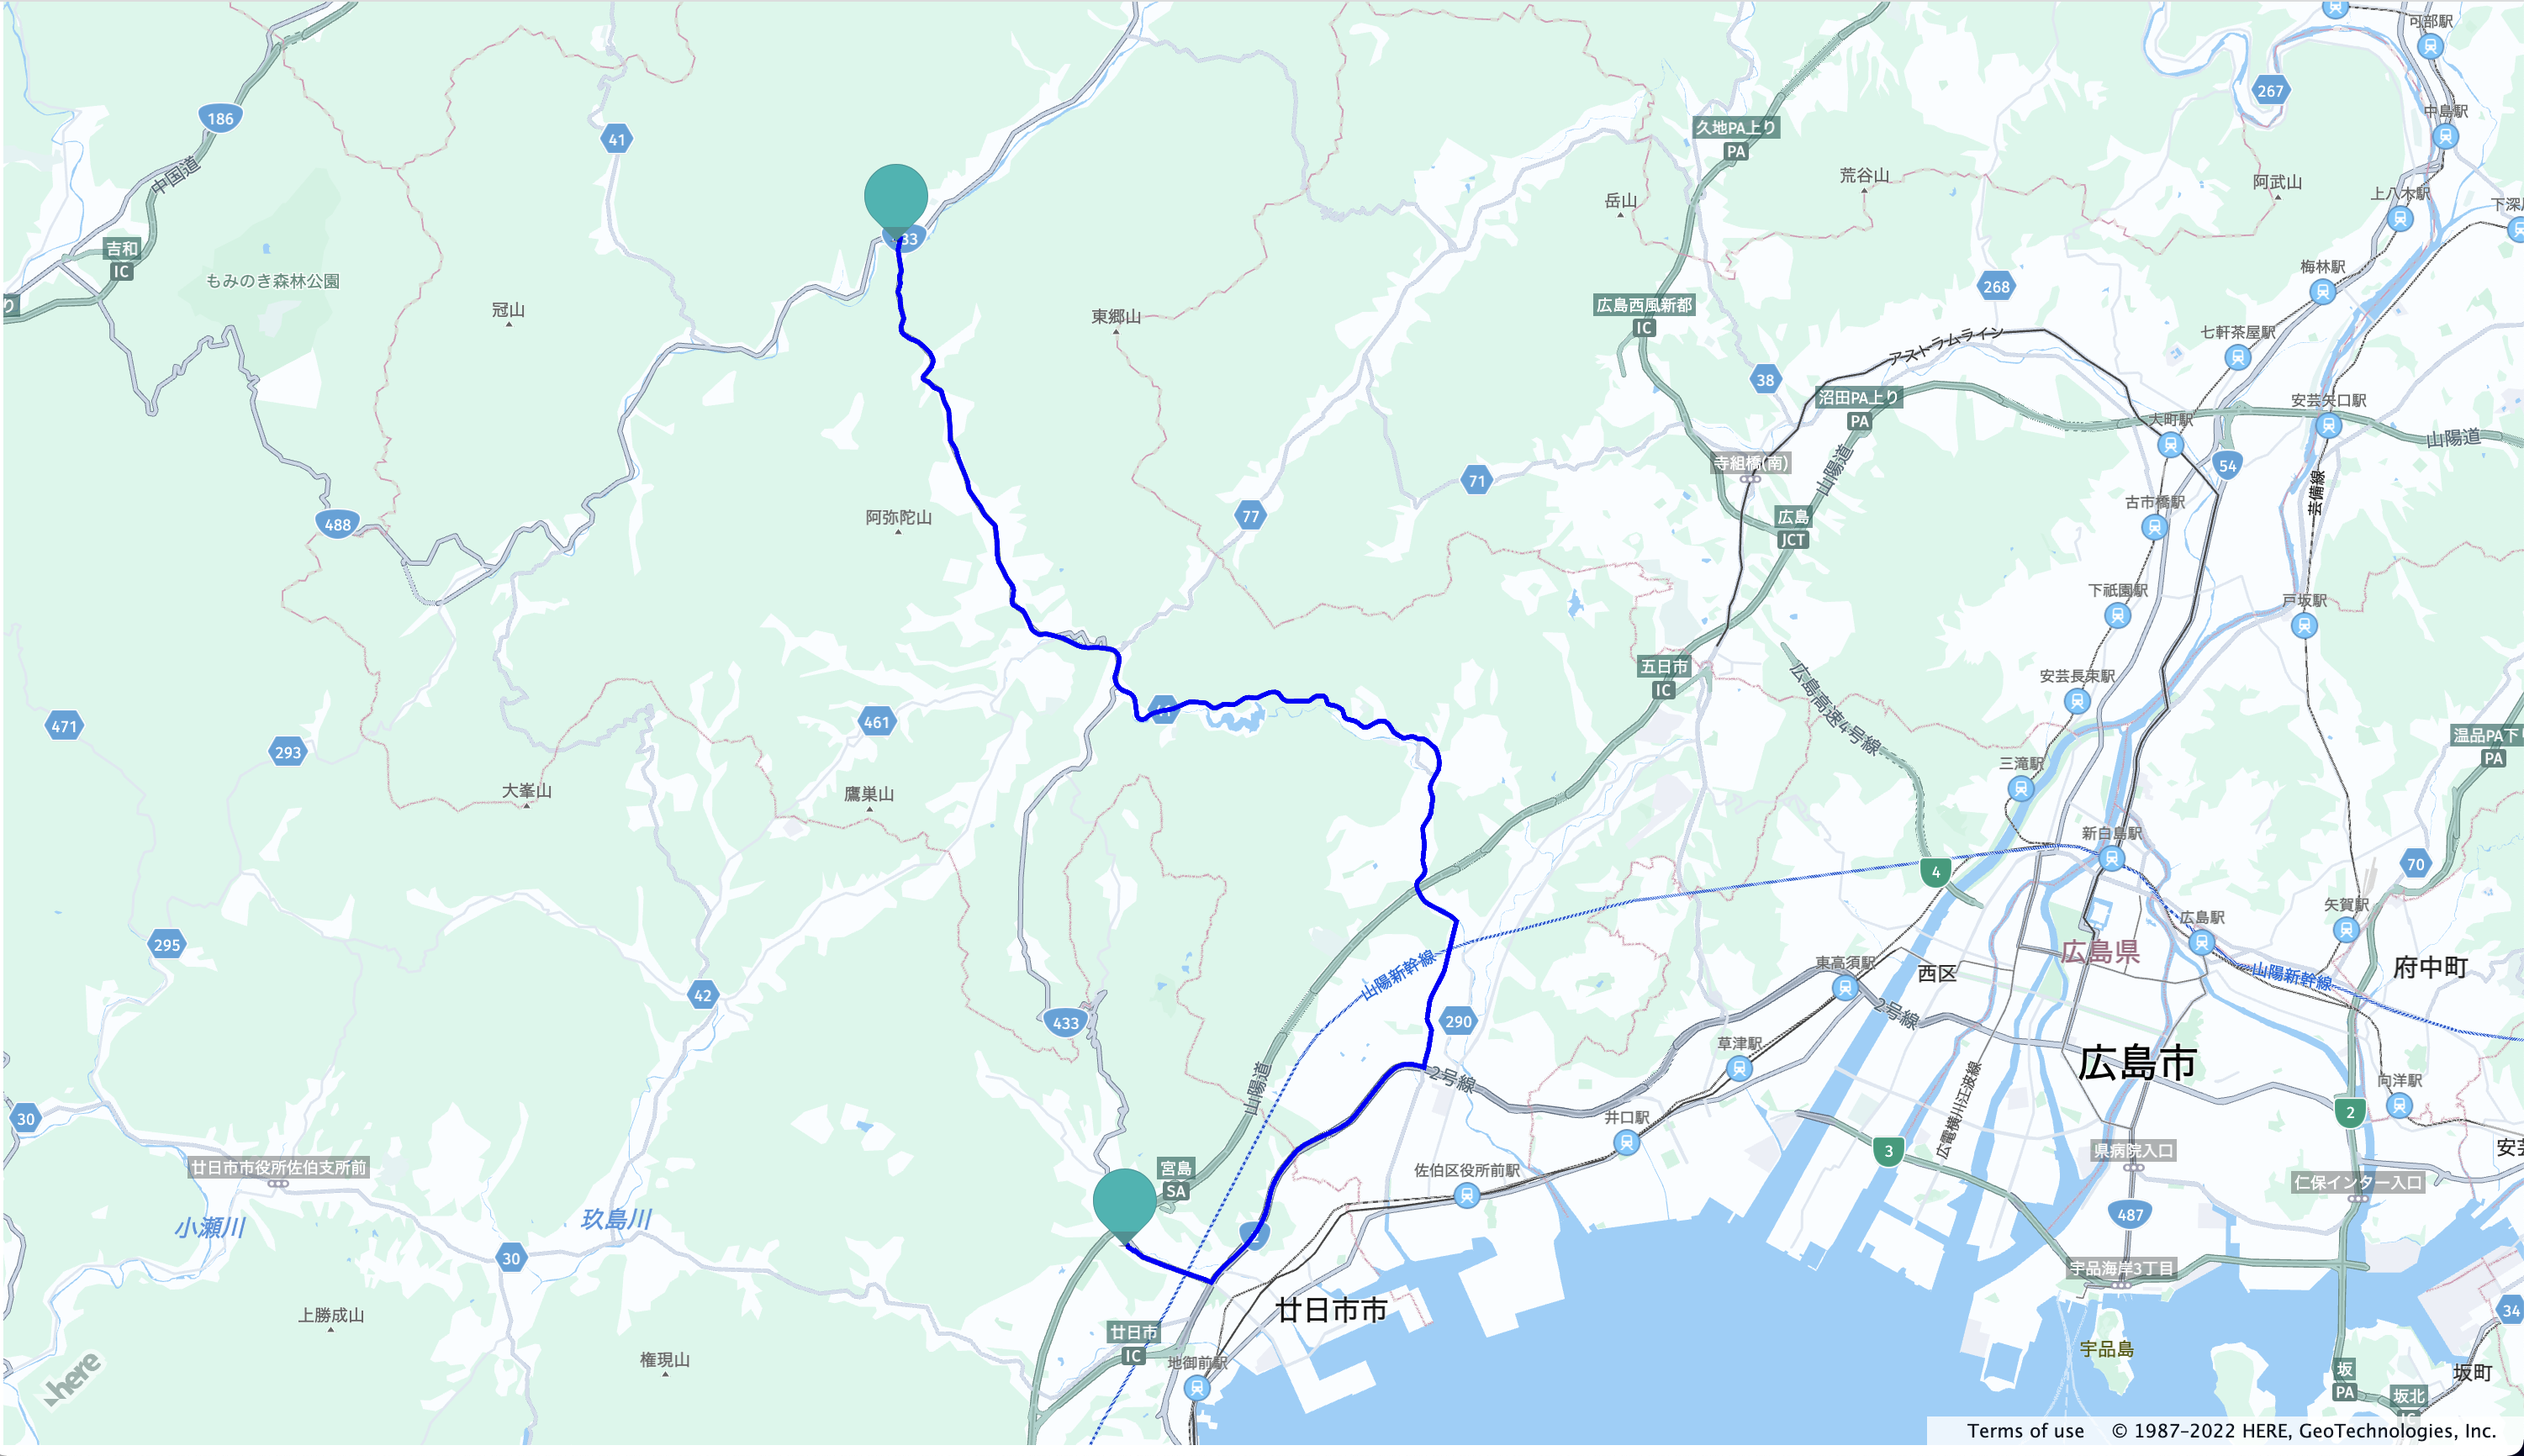
今度は「transportMode: truck」でルート検索をしてみると、今度はトラックでも通りやすい大きな道を案内してくれました。トラックで温泉に行く人は稀でしょうけど、納得の結果です。
コードは下記の通りです。先程の日本地図を表示したコードに下記を追加すると、上記の結果が表示されます。
// try routing api
let origin;
let destination;

let onError = (error) => {
  alert(error.message);
}

// create an instance of the routing service and make a request
let router = platform.getRoutingService(null, 8);

// Define a callback function to process the routing response:
let onResult = function(result) {
  // ensure that at least one route was found
  if (result.routes.length) {
    result.routes[0].sections.forEach((section) => {
         // Create a linestring to use as a point source for the route line
        let linestring = H.geo.LineString.fromFlexiblePolyline(section.polyline);

        // Create a polyline to display the route:
        let routeLine = new H.map.Polyline(linestring, {
          style: { strokeColor: 'blue', lineWidth: 3 }
        });

        // Create a marker for the start point:
        let startMarker = new H.map.Marker(section.departure.place.location);

        // Create a marker for the end point:
        let endMarker = new H.map.Marker(section.arrival.place.location);

        // Add the route polyline and the two markers to the map:
        map.addObjects([routeLine, startMarker, endMarker]);

        // Set the map's viewport to make the whole route visible:
        map.getViewModel().setLookAtData({bounds: routeLine.getBoundingBox()});
    });
  }
};

let routingParameters = {
  'transportMode': 'truck',
  // Include the route shape in the response
  'return': 'polyline'
};

// Define a callback that calculates the route
let calculateRoute = () => {
  // Make sure that both destination and origin are present
  if (!origin || !destination) return;

  // Add origin and destination to the routing parameters
  routingParameters.origin = origin;
  routingParameters.destination = destination;

  router.calculateRoute(routingParameters, onResult, onError);
}

// get the instance of the Search service
var service = platform.getSearchService();

// geocode origin point
service.geocode({
  q: '広島県廿日市市上平良308−1'
}, (result) => {
  origin = result.items[0].position.lat + ',' + result.items[0].position.lng;
  calculateRoute();
}, onError);

// geocode a destination point
service.geocode({
  q: '広島県広島市佐伯区湯来町大字和田166'
}, (result) => {
  destination = result.items[0].position.lat + ',' + result.items[0].position.lng;
  calculateRoute();
}, onError)
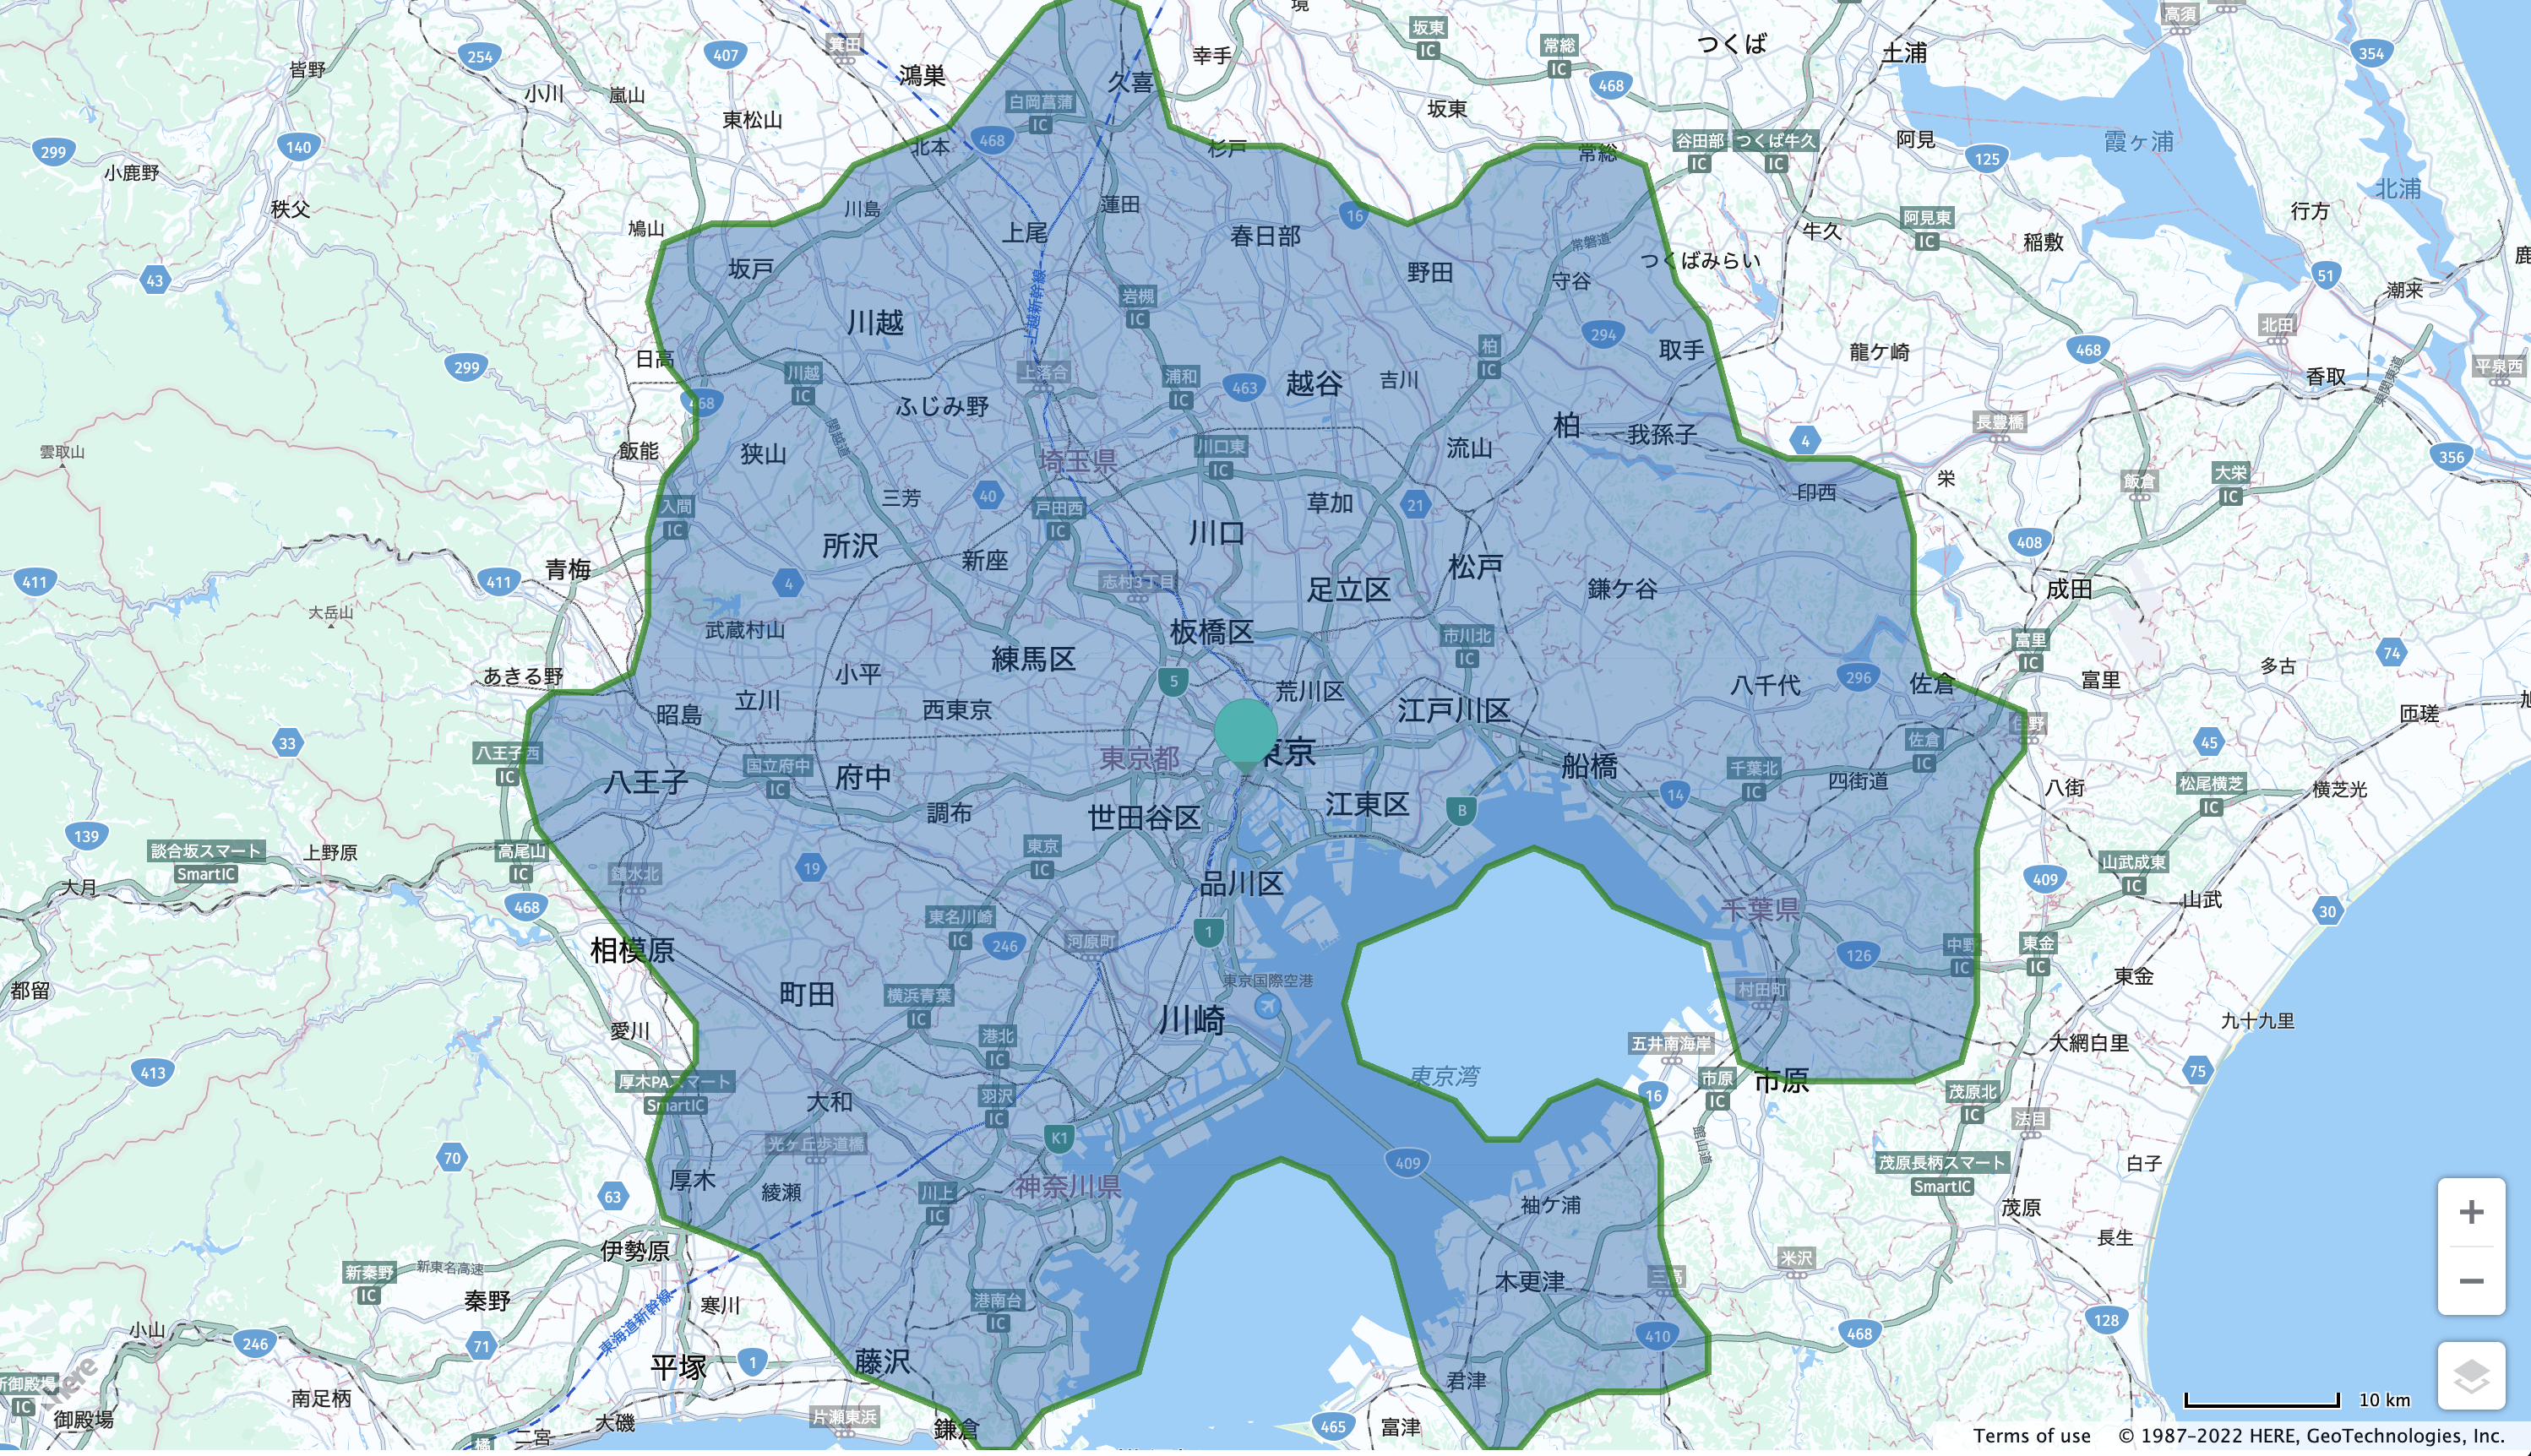
一定時間・距離内で行ける範囲を一気に探せる
次にいいなと思ったのは、一定時間・距離内で行ける範囲を一気に探せる機能です。私は、不動産を探すのが趣味ですが、対象の不動産の徒歩圏内にどんな施設があるかを探すときは、Google Mapで一つ一つ経路検索をして調べていました。この機能を使えば、一発で調べることができます。また、観光地で、徒歩で行ける範囲を調べたりするのにも便利そうです。
公式ガイドでは、ブランデンブルグ門からEV(電気自動車)で行ける範囲を調べる例が紹介されています。
https://developer.here.com/documentation/examples/maps-js/services/map-with-isoline-route
これもあまり実感がわかないので、日本地図に変更して、東京駅からEVで行ける範囲を調べてみましょう。道がいいところは遠くまで行けることがわかり、これも納得の行く結果でした。
コードは下記の通りです。最初に日本地図を表示したコードに下記を追加すると、上記の結果が表示されます。
/**
 * Calculates and displays an area reachable for the given parameters of the EV vehicle
 *
 * A full list of available request parameters can be found in the Routing API documentation.
 * see: https://developer.here.com/documentation/isoline-routing-api/dev_guide/topics/use-cases/consumption_based-isoline.html
 *
 * @param {H.service.Platform} platform A stub class to access HERE services
 */
 function calculateIsolineRoute(platform) {
  var router = platform.getRoutingService(null, 8),
      routeRequestParams = {
        'origin': '35.681750,139.765899',
        'range[type]': 'consumption',
        'range[values]': 20000,
        'transportMode': 'car',
        'ev[ascent]': 9,
        'ev[descent]': 4.3,
        'ev[auxiliaryConsumption]': 1.8
      };

  // add a marker to display a starting point of the vehicle
  map.addObject(new H.map.Marker({
    lat: 35.681750,
    lng: 139.765899
  }));

  router.calculateIsoline(
    routeRequestParams,
    onSuccess,
    onError
  );
}

/**
 * This function will be called once the Routing REST API provides a response
 * @param {Object} result A JSON object representing the calculated range
 */
function onSuccess(result) {
  var route = result.isolines[0];

  /*
   * The styling of the route response on the map is entirely under the developer's control.
   * A representative styling can be found the full JS + HTML code of this example
   * in the functions below:
   */
  addRouteShapeToMap(route);
}

/**
 * This function will be called if a communication error occurs during the JSON-P request
 * @param {Object} error The error message received.
 */
function onError(error) {
  alert('Can\'t reach the remote server');
}

// Create the default UI components
var ui = H.ui.UI.createDefault(map, omvlayer);

/**
 * Creates a H.map.Polyline from the shape of the route and adds it to the map.
 * @param {Object} route A route as received from the H.service.RoutingService
 */
function addRouteShapeToMap(route) {
  route.polygons.forEach((section) => {
    // decode LineString from the flexible polyline
    let linestring = H.geo.LineString.fromFlexiblePolyline(section.outer);

    // Create a polygon to display the area
    let polygon = new H.map.Polygon(linestring, {
      style: {
        lineWidth: 4,
        strokeColor: 'rgba(0, 128, 0, 0.7)'
      }
    });

    // Add the polygon to the map
    map.addObject(polygon);
    // And zoom to its bounding rectangle
    map.getViewModel().setLookAtData({
      bounds: polygon.getBoundingBox()
    });
  });
}

// Now use the map as required...
calculateIsolineRoute(platform);
まとめ
調査を始めたときは、Google Mapよりすごいというのは本当かなと半信半疑でしたが、実際の機能を調べて使ってみると、たしかに法人向けに優れた特徴があることがわかりました。
ガイドやサンプルコードも充実していて、簡単に試すことができました。
値段は使い方によりますが、無料の枠もそれなりにあって、ビジネスアプリケーションに位置情報関連の機能を組み込む際には有力な候補となることは間違いないでしょう。