事前準備
Python
pythonインストール
AWS SAMで、python3.7を使用するので、3.7としています。
3.8でもOKですが、後続のsam init のruntime選択で3.8を選択し、versionを合わせるようにしてください。
AWS
AWS CLIのインストール
AWS CLIの設定
# 1. 以下より情報を取得
#   AWSコンソール - IAM Management - ユーザー - (任意ユーザー選択) - 認証情報タブ - アクセスキーの作成
# 2. aws configureコマンドで設定

PS C:\> aws configure

AWS Access Key ID [None]    : ********************
AWS Secret Access Key [None]: ********************
Default region name [None]  : ap-northeast-1
Default output format [None]: json

# 3. 設定値確認

PS C:\> aws configure list

      Name                    Value             Type    Location
      ----                    -----             ----    --------
   profile                <not set>             None    None
access_key     ******************** shared-credentials-file
secret_key     ******************** shared-credentials-file
    region           ap-northeast-1      config-file    ~/.aws/config
AWS SAM CLIのインストール
AWS SAMチュートリアル
AWS SAMのチュートリアルを実施し、問題ないことを確認しておくとベスト。
チュートリアル 入力サンプル
プロジェクト作成
PS C:\> sam init
Which template source would you like to use?
        1 - AWS Quick Start Templates
        2 - Custom Template Location
Choice: 1
What package type would you like to use?
        1 - Zip (artifact is a zip uploaded to S3)
        2 - Image (artifact is an image uploaded to an ECR image repository)
Package type: 1

Which runtime would you like to use?
        1 - nodejs14.x
        2 - python3.8
        3 - ruby2.7
        4 - go1.x
        5 - java11
        6 - dotnetcore3.1
        7 - nodejs12.x
        8 - nodejs10.x
        9 - python3.7
        10 - python3.6
        11 - python2.7
        12 - ruby2.5
        13 - java8.al2
        14 - java8
        15 - dotnetcore2.1
Runtime: 9
############
# 注意点
############
# python 3.8インストールの場合は、2の3.8を選ぶようにしてください。
############

Project name [sam-app]: sam-app

Cloning app templates from https://github.com/aws/aws-sam-cli-app-templates

AWS quick start application templates:
        1 - Hello World Example
        2 - EventBridge Hello World
        3 - EventBridge App from scratch (100+ Event Schemas)
        4 - Step Functions Sample App (Stock Trader)
Template selection: 1

    -----------------------
    Generating application:
    -----------------------
    Name: sam-app
    Runtime: python3.7
    Dependency Manager: pip
    Application Template: hello-world
    Output Directory: .

    Next steps can be found in the README file at ./sam-app/README.md
build
# プロジェクトに移動
PS C:\> cd sam-app

# build (エラーとならないこと)
PS C:\> sam build

Building codeuri: C:\sam-app\hello_world runtime: python3.7 metadata: {} functions: ['HelloWorldFunction']
Running PythonPipBuilder:ResolveDependencies
Running PythonPipBuilder:CopySource

Build Succeeded

Built Artifacts  : .aws-sam\build
Built Template   : .aws-sam\build\template.yaml

Commands you can use next
=========================
[*] Invoke Function: sam local invoke
[*] Deploy: sam deploy --guided
デプロイ
PS C:\> sam deploy --guided
Configuring SAM deploy
======================

        Looking for config file [samconfig.toml] :  Not found

        Setting default arguments for 'sam deploy'
        =========================================
        Stack Name [sam-app]:(任意のアプリ名を入力)
        AWS Region [ap-northeast-1]:(Enter)
        #Shows you resources changes to be deployed and require a 'Y' to initiate deploy
        Confirm changes before deploy [y/N]:(Enter)
        #SAM needs permission to be able to create roles to connect to the resources in your template
        Allow SAM CLI IAM role creation [Y/n]:(Enter)
        HelloWorldFunction may not have authorization defined, Is this okay? [y/N]: y
        Save arguments to configuration file [Y/n]:(Enter)
        SAM configuration file [samconfig.toml]:(Enter)
        SAM configuration environment [default]:(Enter)

(しばらく続く)

------------------------------------------------------------------------------------------------------------------------------------------------------
Outputs
------------------------------------------------------------------------------------------------------------------------------------------------------
Key                 HelloWorldFunctionIamRole
Description         Implicit IAM Role created for Hello World function
Value               arn:aws:iam::999999999999:role/sam-app-HelloWorldFunctionRole-********

Key                 HelloWorldApi
Description         API Gateway endpoint URL for Prod stage for Hello World function
Value               https://sample*****.execute-api.ap-northeast-1.amazonaws.com/Prod/hello/

Key                 HelloWorldFunction
Description         Hello World Lambda Function ARN
Value               arn:aws:lambda:ap-northeast-1:999999999999:function:sam-app-HelloWorldFunction-FMNf8mNO8CM5
------------------------------------------------------------------------------------------------------------------------------------------------------

Successfully created/updated stack - sam-app in ap-northeast-1
Successfully を確認したら、Outputs欄のAPI URLをCallして、以下の出力結果が表示されることを確認
{
"message": "hello world"
}
APIをローカルでホストする
APIをローカルのDockerにて稼働させる
PS C:\> sam local start-api

Mounting HelloWorldFunction at http://127.0.0.1:3000/hello [GET]
You can now browse to the above endpoints to invoke your functions. You do not need to restart/reload SAM CLI while working on your functions, changes will be reflected instantly/automatically. You only need to restart SAM CLI if you update your AWS SAM template
2021-05-24 16:35:04  * Running on http://127.0.0.1:3000/ (Press CTRL+C to quit)
※start-api コマンドは、REST API エンドポイントをレプリケートするローカルエンドポイントを起動します。
関数をローカルで実行できる実行コンテナをダウンロードします。
最終的な結果は、AWS クラウドで関数を呼び出したときと同じ出力になります。
Lambda 関数を直接呼び出す
PS C:\> sam local invoke "HelloWorldFunction" -e events/event.json

Invoking app.lambda_handler (python3.7)
Skip pulling image and use local one: amazon/aws-sam-cli-emulation-image-python3.7:rapid-1.23.0.

Mounting C:\sam-app\.aws-sam\build\HelloWorldFunction as /var/task:ro,delegated inside runtime container
START RequestId: ******-1f00-4ba0-822c-269e51c2a1f0 Version: $LATEST
END RequestId: ******-1f00-4ba0-822c-269e51c2a1f0
REPORT RequestId: ******-1f00-4ba0-822c-269e51c2a1f0  Init Duration: 0.08 ms  Duration: 59.41 ms      Billed Duration: 100 ms Memory Size: 128 MB     Max Memory Used: 128 MB
{"statusCode": 200, "body": "{\"message\": \"hello world\"}"}
チュートリアルで作成したものを削除する場合
aws cloudformation delete-stack --stack-name (stack名_apigateway) --region (region)
PS C:\> aws cloudformation delete-stack --stack-name sam-app --region ap-northeast-1
GCP Cloud vision APIの利用設定
プロジェクト作成
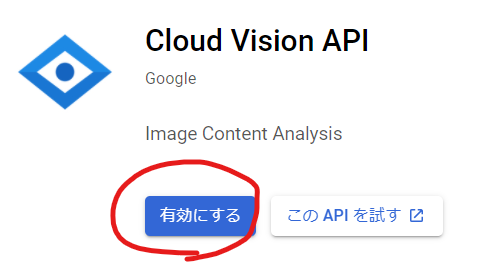
Cloud Vision API の有効化
- 作成したプロジェクトが選択されていることを確認
- 検索Windowより「Cloud vision API」と入力
- 検索結果より、Cloud vision APIを選択
- 有効にするボタンを押下
サービスアカウントを作成する
ナビゲーションより「IAMと管理」-「サービスアカウント」を選択し、サービスアカウントを作成を押下
必要な情報を入力して、完了ボタンを押下します。
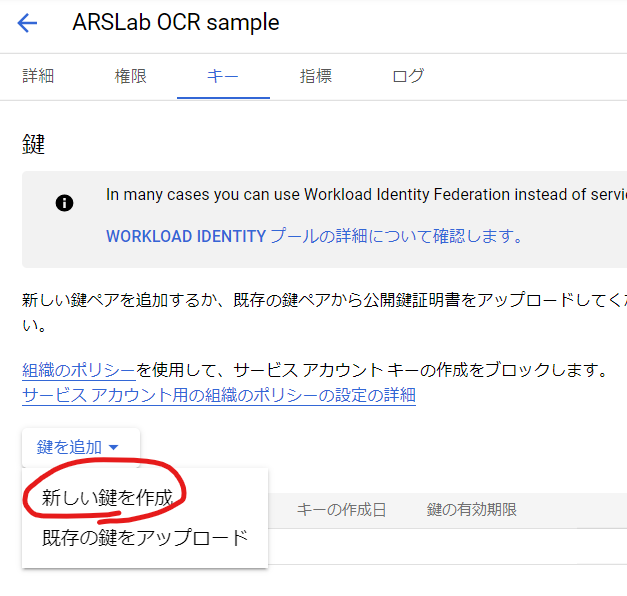
サービスアカウントのキーを作成
サービスアカウントの一覧より、作成したサービスアカウントを選択し、「キー」タブを選択。
その後、鍵を追加にて、「新しい鍵を作成」を選択。
作成後、jsonファイルがローカルにダウンロードされます。
jsonファイルは、のちほど使用します。
サーバレスアプリの作成(AWS SAM)
init
プロジェクト名以外は、チュートリアルと同様に進めます。
sam init
PS C:\> sam init
Which template source would you like to use?
        1 - AWS Quick Start Templates
        2 - Custom Template Location
Choice: 1
What package type would you like to use?
        1 - Zip (artifact is a zip uploaded to S3)
        2 - Image (artifact is an image uploaded to an ECR image repository)
Package type: 1

Which runtime would you like to use?
        1 - nodejs14.x
        2 - python3.8
        3 - ruby2.7
        4 - go1.x
        5 - java11
        6 - dotnetcore3.1
        7 - nodejs12.x
        8 - nodejs10.x
        9 - python3.7
        10 - python3.6
        11 - python2.7
        12 - ruby2.5
        13 - java8.al2
        14 - java8
        15 - dotnetcore2.1
Runtime: 9
############
# 注意点
############
# python 3.8インストールの場合は、2の3.8を選ぶようにしてください。
############

Project name [sam-app]: gcp-ocr-sample

Cloning app templates from https://github.com/aws/aws-sam-cli-app-templates

AWS quick start application templates:
        1 - Hello World Example
        2 - EventBridge Hello World
        3 - EventBridge App from scratch (100+ Event Schemas)
        4 - Step Functions Sample App (Stock Trader)
Template selection: 1

    -----------------------
    Generating application:
    -----------------------
    Name: gcp-ocr-sample
    Runtime: python3.7
    Dependency Manager: pip
    Application Template: hello-world
    Output Directory: .

    Next steps can be found in the README file at ./gcp-ocr-sample/README.md

# 完了後、次の作業のためにフォルダ内に移動しておく
PS C:\> cd gcp-ocr-sample
sam init 後のフォルダ構成
gcp-ocr-sample
│  .gitignore
│  README.md
│  template.yaml
│  tree.txt
│  __init__.py
│
├─events
│      event.json
│
├─hello_world
│      app.py
│      requirements.txt
│      __init__.py
│
└─tests
    │  __init__.py
    │
    └─unit
            test_handler.py
            __init__.py
Cloud vision APIを使用するための設定
requirements.txtの修正
GCPのVisionクライアントライブラリを使うために、requirements.txtに以下を追記します。
google-cloud-vision
gcp 認証情報のjsonを格納
以下の場所に認証情報を格納します。
gcp-ocr-sample
├─hello_world
│      app.py
│      requirements.txt
│      arslab-ocr-sample.json  ← ここに格納
│      __init__.py
SAMテンプレートファイル(template.yaml)の修正
AWSTemplateFormatVersion: '2010-09-09'
Transform: AWS::Serverless-2016-10-31
# プロジェクト名
Description: gcp-ocr-sample

# Globalsについて設定: https://github.com/awslabs/serverless-application-model/blob/master/docs/globals.rst
Globals:
  Function:
    Timeout: 30

# Resorces
Resources:
  # 画像格納先のS3 Bucket情報
  ImageBucket:
    DeletionPolicy: Retain
    Type: AWS::S3::Bucket
    Properties:
      BucketName: arslab-ocr-sample-bucket  <= 自分用のbucketnameに修正してください
      NotificationConfiguration:
        TopicConfigurations:
          - Event: s3:ObjectCreated:*
            Topic: !Ref OcrNotifyTopic

  OcrNotifyTopic:
    Type: AWS::SNS::Topic

  OcrNotifyTopicPolicy:
    Type: AWS::SNS::TopicPolicy
    Properties:
      Topics:
        - !Ref OcrNotifyTopic
      PolicyDocument:
        Id: !Ref OcrNotifyTopic
        Version: 2012-10-17
        Statement:
          - Effect: Allow
            Principal:
              Service: s3.amazonaws.com
            Action: SNS:Publish
            Resource: !Ref OcrNotifyTopic
            Condition:
              ArnLike:
                aws:SourceArn: arn:aws:s3:::arslab-ocr-sample-bucket <= 自分用のbucketnameに修正してください

  OcrSampleFunction:
    Type: AWS::Serverless::Function
    Properties:
      CodeUri: hello_world/
      Handler: app.lambda_handler
      Runtime: python3.7 <= 使用しているpythonのバージョンに合わせて修正してください
      Timeout: 30
      Policies:
        - arn:aws:iam::aws:policy/AmazonS3ReadOnlyAccess
      # GCP用の認証情報のjson
      Environment:
        Variables:
          GOOGLE_APPLICATION_CREDENTIALS: arslab-ocr-sample.json
      Events:
        S3Event:
          Type: SNS
          Properties:
            Topic: !Ref OcrNotifyTopic

  OcrSampleFunctionLogGroup:
    Type: AWS::Logs::LogGroup
    Properties:
      LogGroupName: !Sub /aws/lambda/${OcrSampleFunction}
lambdaコード
import json

import boto3

s3 = boto3.client('s3')

def lambda_handler(event, context):
    message = json.loads(event['Records'][0]['Sns']['Message'])
    s3_event = message['Records'][0]['s3']

    bucket_name = s3_event['bucket']['name']
    key_name = s3_event['object']['key']

    print(f'target: {bucket_name}, {key_name}')

    body = s3.get_object(Bucket=bucket_name, Key=key_name)['Body'].read()

    detect_document(body)

def detect_document(body):
    # https://cloud.google.com/vision/docs/handwriting
    from google.cloud import vision
    client = vision.ImageAnnotatorClient()
    image = vision.Image(content=body)

    response = client.document_text_detection(
        image=image,
        image_context={'language_hints': ['ja']}
    )

    for page in response.full_text_annotation.pages:
        for block in page.blocks:
            print('+ Block confidence: {}\n'.format(block.confidence))

            for paragraph in block.paragraphs:
                print('-- Paragraph confidence: {}'.format(
                    paragraph.confidence))

                for word in paragraph.words:
                    word_text = ''.join([
                        symbol.text for symbol in word.symbols
                    ])
                    print('**** Word text: {} (confidence: {})'.format(
                        word_text, word.confidence))

                    for symbol in word.symbols:
                        print('>>>>>> Symbol: {} (confidence: {})'.format(
                            symbol.text, symbol.confidence))

    if response.error.message:
        raise Exception(
            '{}\nFor more info on error messages, check: '
            'https://cloud.google.com/apis/design/errors'.format(
                response.error.message))
build
Build Succeeded が表示されればOKです。
sam build
PS C:\> sam build
Building codeuri: C:\Proj\Z4.ARSLab\aws\sam\gcp-ocr-sample\hello_world runtime: python3.7 metadata: {} functions: ['OcrSampleFunction']
Running PythonPipBuilder:ResolveDependencies
Running PythonPipBuilder:CopySource

Build Succeeded

Built Artifacts  : .aws-sam\build
Built Template   : .aws-sam\build\template.yaml

Commands you can use next
=========================
[*] Invoke Function: sam local invoke
[*] Deploy: sam deploy --guided
Build Failed となってしまう場合
「sam build --debug」で実施すると、詳細原因が確認できるケースがあります。
Error: PythonPipBuilder:ResolveDependencies - {protobuf==3.17.1(wheel)} (バージョン、リビジョンは異なるかも)が発生する場合は
sam init 後に修正した「requirements.txt」に「protobuf==3.15.0」を追加すると解消されます。
protobuf==3.15.0
google-cloud-vision
deploy
Successfully を確認してください。
sam deploy
PS C:\> sam deploy --guided

Configuring SAM deploy
======================

        Looking for config file [samconfig.toml] :  Not found

        Setting default arguments for 'sam deploy'
        =========================================
        Stack Name [sam-app]: gcp-ocr-sample-(各々の名称)
        AWS Region [ap-northeast-1]:
        #Shows you resources changes to be deployed and require a 'Y' to initiate deploy
        Confirm changes before deploy [y/N]:
        #SAM needs permission to be able to create roles to connect to the resources in your template
        Allow SAM CLI IAM role creation [Y/n]:
        Save arguments to configuration file [Y/n]:
        SAM configuration file [samconfig.toml]:
        SAM configuration environment [default]:

        Looking for resources needed for deployment: Found!


(省略)


Successfully created/updated stack - gcp-ocr-sample in ap-northeast-1
動作確認
S3 Bucketに画像ファイルを格納
template.yamlで指定した、Bucket内に画像ファイルを格納します。
(省略)
    Type: AWS::S3::Bucket
    Properties:
      BucketName: arslab-ocr-sample-bucket
(省略)
格納後、自動的にLambdaがCallされます。
CloudWatch Logsにて、結果を確認
AWSコンソールより、CloudWatchサービスを表示
ログ - ロググループを選択し、今回作成されたロググループ「/aws/lambda/gcp-ocr-sample-OcrSampleFunctionXXXXXXXXX」を選択。
ログストリームを選択し、ログイベントを確認
※GCPで請求アカウントが存在しない or 課金が有効化されていない場合は、API Callでエラーとなりますので
その際は設定してください。
参考


