##Amazon textractとは
画像内の文字列を検出する事ができるサービス。検出した文字列はテキストファイルに変換も可能。
##画像内の文字列を検出してみる
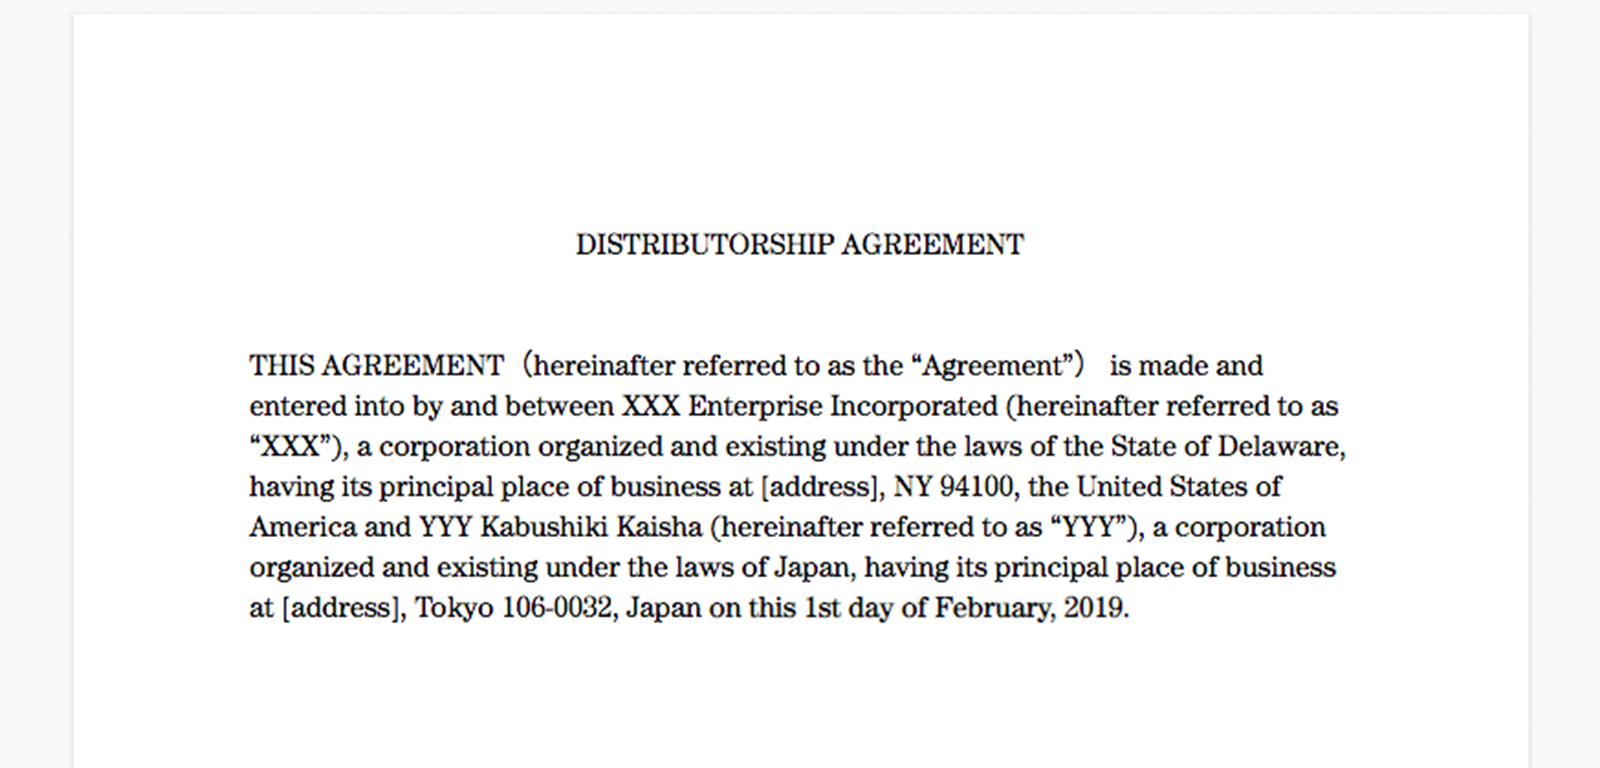
画像内の文字列を検出していきます。ただしtextractはまだ日本語には対応していないため英語の画像ファイルを検出していきます。
それでは、そっさく検出を行って行きましょう!
検証するpythonファイルの動作
①boto3,json,sysのインポート
②Textract作成,画像ファイルの読み込み,出力画像の作成
③画像内の文字列を順番に処理
④出力画像の保存と表示
#①boto3,json,sysのインポート
import boto3
import json
import sys
#画像の読み書きのためPillowのImageをインポート
from PIL import Image


#②textract作成
textract = boto3.client('textract', 'us-east-2')

#画像ファイルを開く
with open(sys.argv[1], 'rb') as file:
  #文字列を検出
 result = textract.detect_document_text(
    Document={'Bytes': file.read()})
  #結果をjsonで表示
  print(json.dumps(result, indent=4))

#入力画像ファイルを読み込む
image_in = Image.open(sys.srgv[1])
#画像のサイズを取得
w, h = image_in.size
#出力画像を作成
image_out = Image.new('RGB', (w, h), (200, 200, 200))

#③画像内の文字列を順番に処理
for block in result['Blocks']:
  #ブロックタイプがLINE(行)かどうかを調べる
  if block['BlockType'] == 'LINE':
    #バウンディングボックスを取得
    box = block['Geometry']['BoundingBox']
    #文字列の左,上,右,下の座標を計算
    left = int(box['Left']*w)
    top = int(box['Top']*h)
    right = int(box['Width']*w)
    bottom = int(box['Height']*h)
    #入力画像から出力画像に文字列の部分を貼り付け
    image_out.paste(
        image_in.crop((left, top, right, bottom)), (left, top))
    #内容を表示
    print(block['Text']),

④出力ファイルに保存と表示
image_out.save('detect_'+sys.argv[1])
image_out.show()
それでは
textract_derect.pyの実行です。
python textract_detect.py 画像ファイル.jpg
####実行結果
一行一行英文を検出してます。
{
    "DocumentMetadata": {
        "Pages": 1
    },
    "Blocks": [

    途中省略

   {
            "BlockType": "LINE",
            "Confidence": 99.50028991699219,
       #タイトルを検出している
            "Text": "DISTRIBUTORSHIP AGREEMENT",
            "Geometry": {
                "BoundingBox": {
                    "Width": 0.2813566327095032,
                    "Height": 0.03232826665043831,
                    "Left": 0.35955098271369934,
                    "Top": 0.30113476514816284
                },
                "Polygon": [
    途中省略
  #本文全て検出
   DISTRIBUTORSHIP AGREEMENT
   THIS AGREEMENT (hereinafter referred to as the "Agreement") is made and
   entered into by and between XXX Enterprise Incorporated (hereinafter referred to as
   "XXX"), a corporation organized and existing under the laws of the State of Delaware,
   having its principal place of business at [address], NY 94100, the United States of
   America and YYY Kabushiki Kaisha (hereinafter referred to as "YYY"), a corporation
   organized and existing under the laws of Japan, having its principal place of business
   at [address], Tokyo 106-0032, Japan on this 1st day of February, 2019.
しっかりと画像内の文章を出力画像へ変換して、ターミナル上にもテキストの出力が出来てますね。
文章として文字を検出出来ているところが素晴らしいです。
次は画像内の表から値を取得していきましょう。
##画像内の文字列を検出してみる
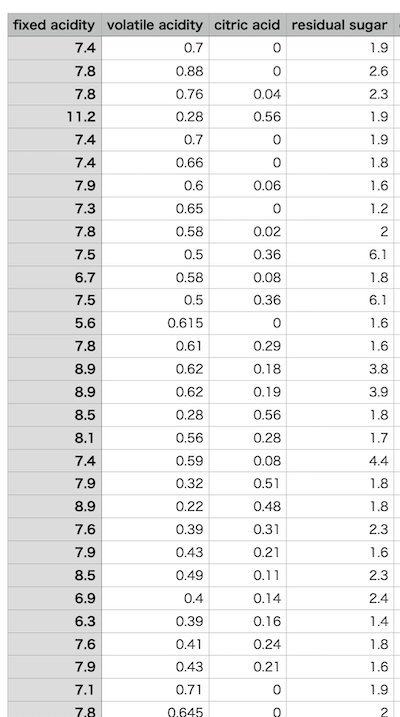
値を取得する表の画像としてこちらの画像を利用します。こちは機械学習でよく用いられるワインのデータを切り取って用いています。
表の値を検出してみましょう
pythonファイルの動作
①boto3,json,csv,sysのインポート
②Textract作成,画像ファイルの表,フォームを検出
③画像内の表のブロックを順番に処理
④行と列の処理
#①boto3,json,sysのインポート
import boto3
import csv
import json
import sys

#②Textract作成
textract = boto3.client('textract', 'us-east-2')

#画像ファイルを開く
with open(sys.argv[1], 'rb') as file:
  #表やフォームを検出
 result = textract.analyze_document(
    Document={'Bytes': file.read()},
    FeatureTypes=['TABLES', 'FORMS'])
  #結果表示
  print(json.dumps(result, indent=4))

#検出された文字列の格納用に空の辞書を作成
text = {}

#③画像内の表のブロックを順番に処理
for block in result['Blocks']:
    #ブロックに文字列が含まれていたら辞書に追加
    if 'Text' in block:
        text[block['Id']] = block['Text']

#検出されたセルを格納するために空の辞書を作成
cell = {}
#検出されたブロックを順番に処理
for block in result['Blocks']:
  #ブロックタイプがセルかどうか調べる
  if block['BlockType'] == 'CELL':
     #行番号と列番号を取得
     row = int(block['RowIndex'])-1
     column = int(block['ColumnIndex'])-1
     #辞書にセルを追加
     cell[(row, column)] = ''

     #ブロック内の他のブロックを順番に処理
     if 'Relationships' in block:
       for relationship in block['Relationships']:
         #他のブロックのIDを順番に処理
         if relationship['Type'] == 'CHILD':
           for id in relationship['Ids']:
             #セル内の文字列を辞書に登録
             if id in text:
                 cell[(row, column)] += text[id]+''

#行の処理(8行分)
for row in range(8):
  #列の処理(4列分)
  for column in range(4):
    #セル内の文字列を出力
    if (row, column) in cell:
        print('{:20}'.format(cell[(row, column)]), end='')
#改行を出力
print()
(実は間違えて初め日本語のexcelファイルの画像で検証してましたが、textractが日本語に対応していないた検出結果がズレまくり)
####実行結果
#途中省略
fixedacidity        volatileacidity     citricacid          residualsugar
7.4                 0.7                 0                   1.9
7.8                 0.88                0                   2.6
7.8                 0.76                0.04                2.3
11.2                0.28                0.56                1.9
7.4                 0.7                 0                   1.9
7.4                 0.66                0                   1.8
7.9                 0.6                 0.06                1.6
##まとめ
textractを用いて画像内の文字列や表のデータを検出してみました。
引き続き、AWSのAIサービスを紹介していきます。
##引用 参考文献
この記事は以下の情報を参考にして執筆しました
AWSでつくるAIプログラミング入門

