動作環境
Raspberry Pi 2 Model B (以下RPi)
Raspbian Jessie
gcc (Raspbian 4.9.2-10) 4.9.2
とあるI2Cセンサー
Raspberry Pi > C > RPi_i2c_comm_180227: v0.4 > GPIOピンのレベル設定と、レベル読取まで
の続き。
とあるI2Cセンサーの読取まで実装できた。
GitHubリポジトリ
処理概要
- GPIO19: SDA
- GPIO26: SCL
上記のピンとVCC, GNDピンを使用し、ソフトウェアI2Cでセンサーからのデータを取得する。
RPi_i2c_comm_180227.c
...
int main(void)
{
    int slvAdr = 0x44; // Slave address
    char vals[10] = {0};
    int idx;

    //test_clockout_ioin();

    // 1. init
    i2c_Setup();

    // 2. start measurement
    // write header
    i2c_SendStartCondition(/* withInit=*/true);
    i2c_SendSlaveAddress(slvAdr, /*bfRead=*/false);
    if (i2c_IsACK()) {
        printf("ACK\n");
    };
    // send command
    i2c_SendData(0x2C); // 0x2C: arbitrary
    if (i2c_IsACK()) {
        printf("ACK\n");
    };
    i2c_SendData(0x06); // 0x06: arbitrary
    if (i2c_IsACK()) {
        printf("ACK\n");
    };
    i2c_SendStopCondition();

    // 3. wait for measurement
    Wait_millisecond(15); // 15: arbitrary

    // 4. obtain data
    // read header
    i2c_SendStartCondition(/* withInit=*/false);
    i2c_SendSlaveAddress(slvAdr, /*bfRead=*/true);
    if (i2c_IsACK()) {
        printf("ACK\n");
    };
    for(idx=0; idx<6; idx++) {
        vals[idx] = i2c_ReadData(/* isLast=*/(idx==5));
        printf("%d\n", vals[idx]);
    }
    i2c_SendStopCondition();

    // 5. finish
    i2c_Teardown();

    return 0;
}
ソース構成

RPi以外への移植
以下のようにすることで、RPi以外での実装が可能であった。
- i2c_gpio_180309以下を書替え
- wait_msec_nsec_180301以下を書替え
- RPi_i2c_comm_180227のmain()関数内の処理を実装する
- ファイル終端をCR+LFにする (Windowsの場合)
以下はRPi以外でのセンサーからの読込みの結果。
移植直後クロックの設定に失敗していたが、Analog Discovery 2で応答を確認しながらデバッグするとすぐに解決した。
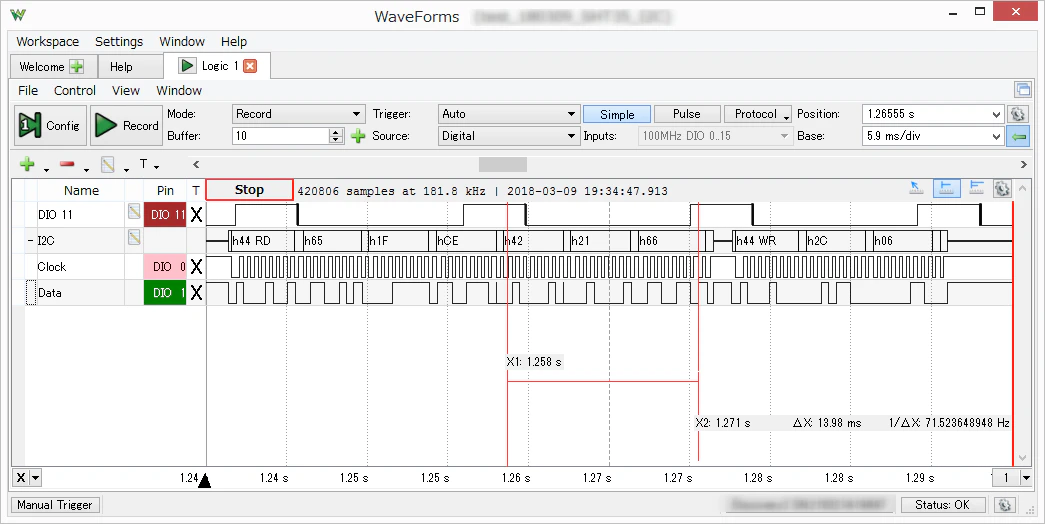
DIO 11は使用してないピン。Analog Discovery2の警告メッセージがI2Cのラインの描画に重なるための対処。
これで、[RPiで動作確認] > [組込みで実装]の流れができあがった。
備考
linux上で作ったソースをWindows上の組込み開発環境にて使おうとすると「終端コードが特殊です」のようなメッセージが表示される。
linuxではLFの終端で、WindowsではCR+LFの終端の違いに起因する。